
Cisco Webex Experience Management Widgets and Gadgets
Content Outline
Customer Experience Journey and Customer Experience Analytics can be added to Webex Contact Center as widgets, and Unified CCE or Unified CCX as gadgets. These can be easily exported from the Spaces section of Experience Management.
Overview
-
Customer Experience Journey (CEJ) - Displays all the past survey responses from a customer in a chronological list. A common widget/gadget for both agents and supervisor, it helps gain context about the customer’s past experiences with the business and engage appropriately with the customer. Customer Experience Journey is automatically activated when an agent engages with a customer through a call, chat, or email. An agent can view ratings and scores such as Net Promoter Score (NPS), Customer Satisfaction (CSAT), and Customer Effort Score (CES) along with all other feedback collected from a customer.
Responses section within Experience Management Spaces is exported as Customer Experience Journey widget/gadget. This section shows all the past survey responses from customers in Experience Management. But when exported as CEJ widget/gadget, responses are shown for a single customer at a time by applying filters for customer ID, phone number, or email ID, whichever is available.
- Customer Experience Analytics (CEA) - Displays the overall pulse of the customers or agents through industry-standard metrics such as NPS, CSAT, and CES or other KPIs being tracked within Experience Management. Customer Experience Analytics is available for agents and supervisors.
Custom dashboards within Experience Management are called Metric Groups. These Metric Groups can be exported as Customer Experience Analytics. Metric Groups can be customized using canned widgets, and widgets created within Experience Management.
Once added, these gadgets display the response data for CEJ and Metrics in CEA as they are setup in Webex Experience Management. Based on user’s role, CEA will display metrics relevant for the user.
- Agent Sign In - When an agent signs in to Webex Contact Center, Unified CCE, or Unified CCX, Customer Experience Journey display past customer responses and Customer Experience Analytics displays agent’s key metrics and KPIs as an aggregate across all their interactions with customers respectively. These include NPS, CES, and other KPIs such as agent friendliness, enthusiasm, and communication skills.
- Supervisor Sign In - When a supervisor signs in to Unified CCE, or Unified CCX, Customer Experience Analytics display the data that is derived through the overall NPS, CES, and trend of these metrics over time. A supervisor can view data split by teams and agents. Insights from ‘Like-Dislike’ and ‘Impact Analysis’ help supervisors identify areas for improvement and also help prioritize actions based on what actions will drive their key metric.
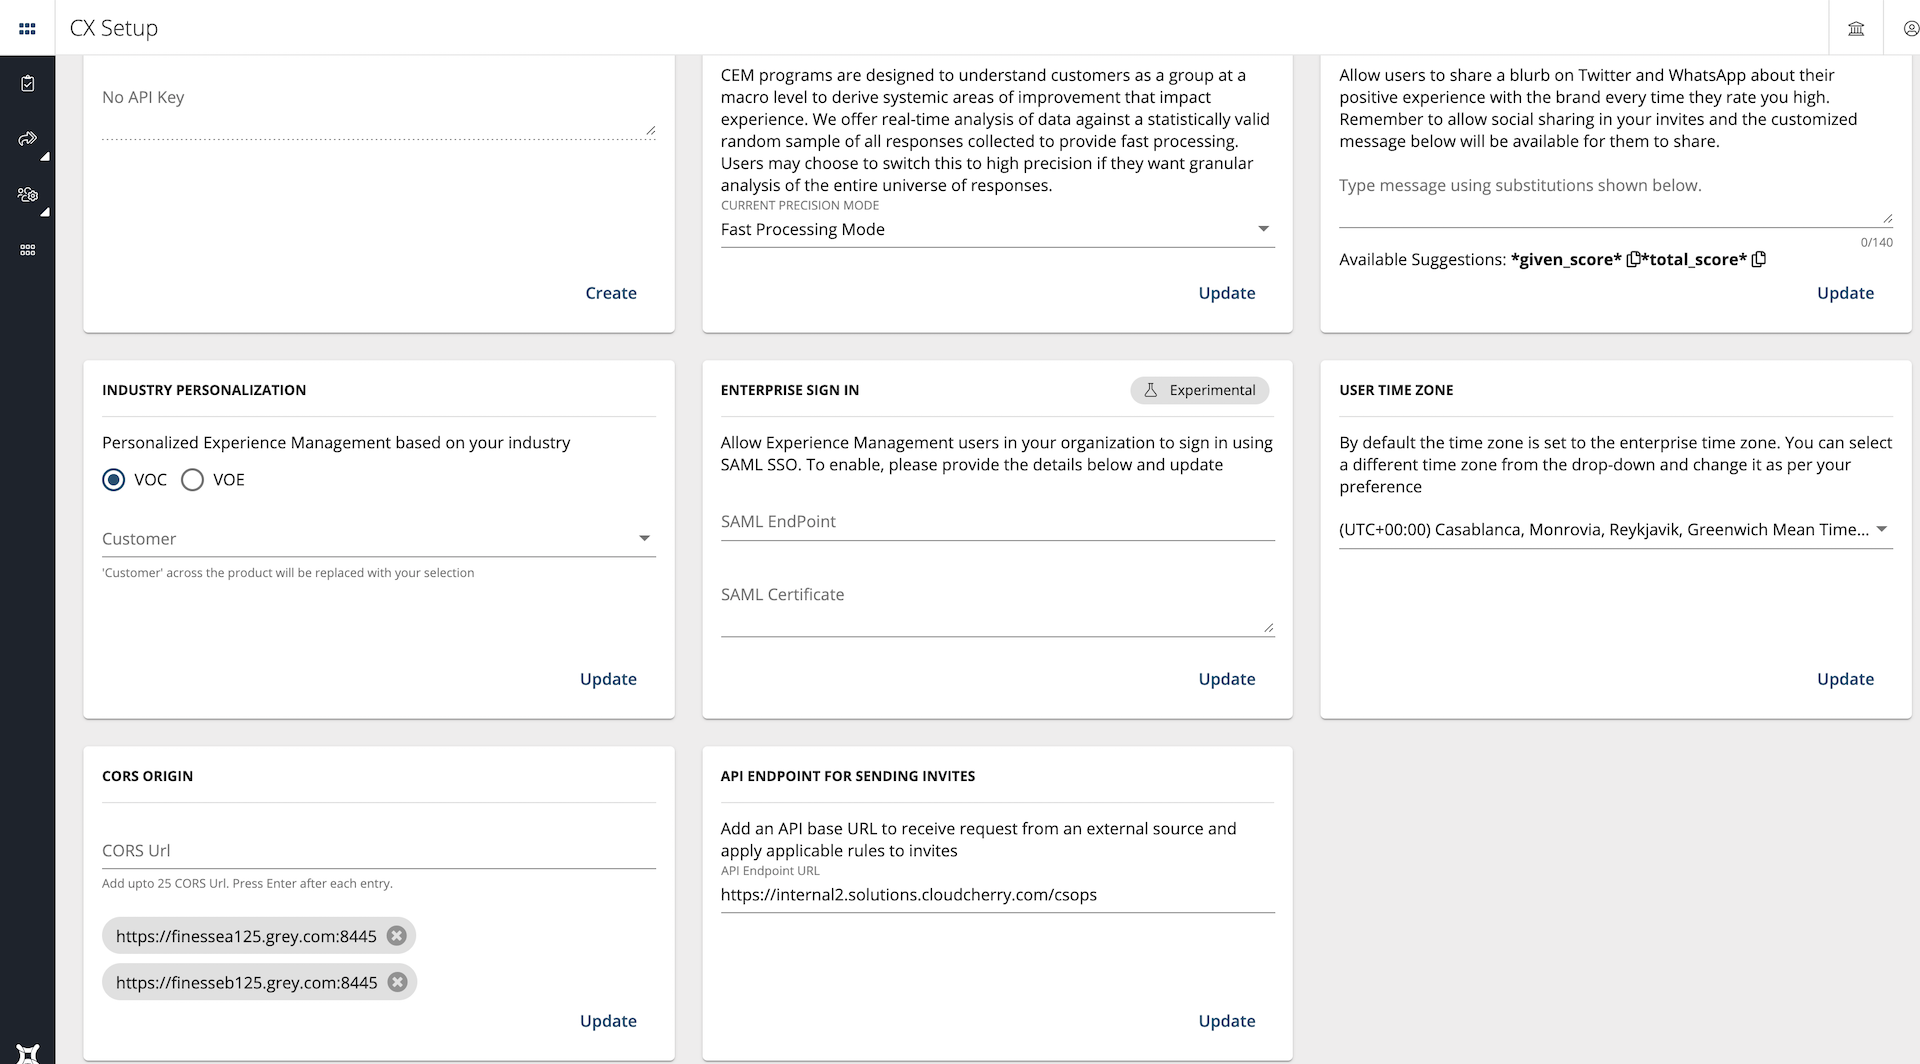
Before You Begin (CORS URL Setup)
To ensure that CEJ and CEA load up correctly in Webex Contact Center, Unified CCE, or Unified CCX, they need to be authenticated. You can allow up to 25 of your Webex Contact Center, Unified CCE, or Unified CCX URLs in Experience Management. This can also be used for solutions with multiple nodes.
The format for allowing is https://<finesse FQDN>:8445
Follow the steps below to allow CORS Origin:
Step 1: Please make a note of the hostname along with the port number of the IP you are using to connect to Experience Management from Webex Contact Center, Unified CCE, or Unified CCX.
Step 2: Have your contact center administrator login to the Experience Management dashboard via a web browser using the credentials sent during the handover of your account.
Step 3: Navigate to the Edit Profile page by clicking on the User Profile icon on the top right of the screen.
Step 4: Scroll down the Edit Profile page till you see a tab titled CORS Origin.
Step 5: Enter the host name with port number of your environment and press Enter. You can add up to 25 URLs.
Export CEJ and CEA for Webex Contact Center, Unified CCE, or Unified CCX
Follow the steps listed below to export CEJ and CEA from Experience Management.
Add CEJ and CEA to Webex Contact Center, Unified CCE, or Unified CCX
Follow the steps listed below to add CEJ and CEA to Webex Contact Center, Unified CCE, or Unified CCX. Before you begin, please ensure the code snippet has been copied to your clipboard from Experience Management. For more information, see the section above.
Add CEJ and CEA widgets to Webex Contact Center
To add the CEJ and CEA widgets to Webex Contact Center, they need to the configured in the Desktop Layout JSON, after enabling WXM Configuration
The default Desktop Layout JSON can be accessed in the Layout Section within the Admin Portal. Once downloaded the JSON should be edited to include the Space ID and Metric ID retrieved by following the steps in the previous section above and then re-uploaded to the Layout Section.
Below is an example of the configuration JSON:
Example for adding CEJ:
{
  "comp": "md-tab-panel",
  "attributes": {
    "slot": "panel",
    "class": "widget-pane"
  },
  "children": [
    {
      "comp": "agentx-wc-cloudcherry-widget",
      "properties": {
        "userModel": "$STORE.app.userModel",
        "spaceId": "SPACE_ID_COME_HERE",
        "metricsId": "METRIC_ID_COME_HERE",
        "teamId": "$STORE.agent.teamName",
        "ani": "$STORE.agentContact.taskSelected.ani",
        "isDarkMode": "$STORE.app.darkMode"
      },
      "wrapper": {
        "title": "Experience Journey",
        "maximizeAreaName": "app-maximize-area"
      }
    }
  ],
  "visibility": "WXM_JOURNEY"
}
Example for adding CEA:
  "page": {
    "id": "wxm-metrics",
    "widgets": {
      "comp1": {
        "comp": "agentx-wc-cloudcherry-widget",
        "attributes": {
          "metrics": true
        },
        "properties": {
          "userModel": "$STORE.app.userModel",
          "spaceId": "SPACE_ID_COME_HERE",
          "metricsId": "METRIC_ID_COME_HERE",
          "isDarkMode": "$STORE.app.darkMode",
          "agentId": "$STORE.agent.agentId"
        }
      }
    },
    "layout": {
      "areas": [
        [
          "comp1"
        ]
      ],
      "size": {
        "cols": [
          1
        ],
        "rows": [
          1
        ]
      }
    }
  }
CEA and CEJ widgets on the Webex CC Agent Desktop use CI to authenticate. For the widgets to function it is necessary to first link the WCC org to the Webex XM tenant.
Steps to link Webex Contact Center Org to Webex Experience Management Tenant
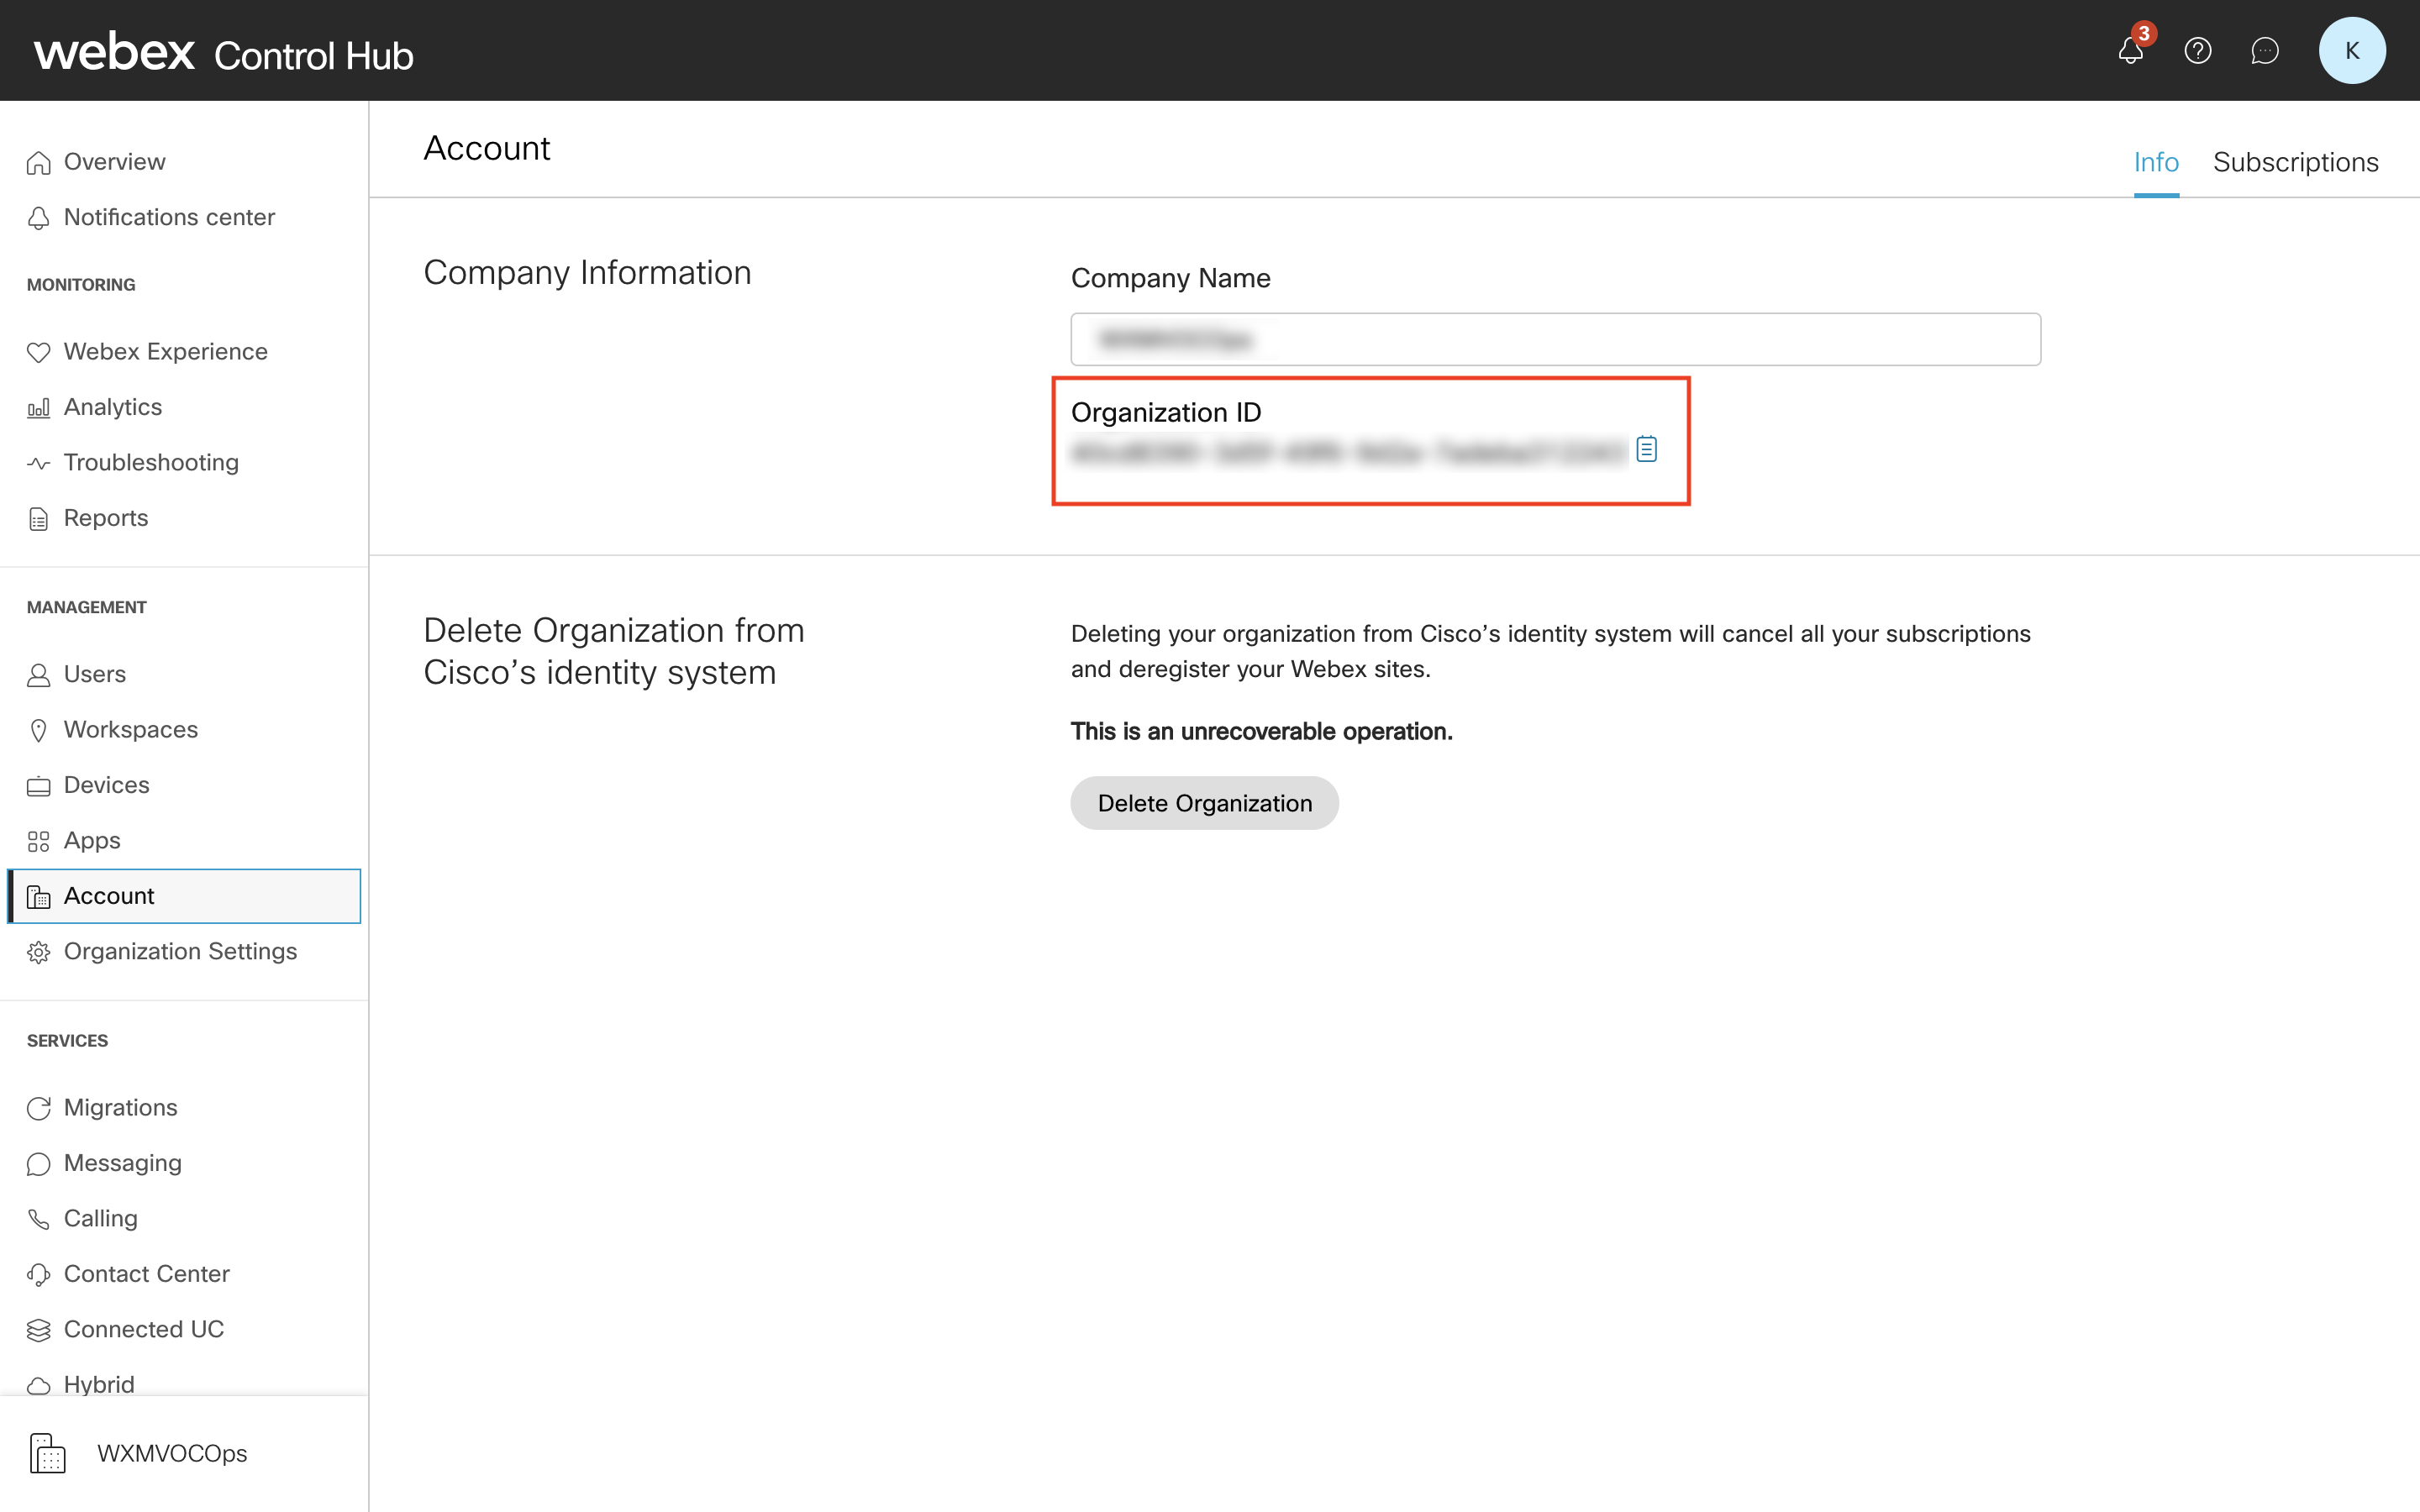
PREREQUISITE:
Obtain the Organization ID which needs to be mapped to the Webex Experience Management tenant. The Organization ID can be found in your Control Hub, in the Account section under the Management menu.
Step 1: Sign In to Webex Experience Management dashboard using the credentials setup during the account handover. Please contact your Webex Contact Center provisioning admin for the account details if required.
Step 2: Navigate to the Account Preferences page by clicking on the User Profile icon on the top right of the screen.
Step 3: Scroll down the Account Preferences page and locate a tile titled “COMMON IDENTITY ACCESS FOR WEBEX CONTACT CENTER”.
Step 4: Enter the Organization ID and select the Experience Management sub-user account that should be used to pull data to be displayed in the CEJ and CEA widgets from the drop-down.

Once setup, Webex CC Agent Desktop widgets (CEA and CEJ) will be able to display feedback data from the Webex XM platform using CI authentication to access the data in Webex XM via the selected sub-user account at the time of configuring.