
Loop Closure
Content Outline
Overview
Loop Closure is an immediate follow-up action on the customer feedback to improve their overall experience with the brand and effectively closing the feedback loop. It is like a remedial experience which can help prevent the loyal & existing customers from going away to the competitor brands.
When loop closure is set-up in the WXM platform, it helps create follow-up tickets automatically after the unhappy customers leave negative feedback. This provides an opportunity to resolve the complaints and keep them loyal to the brand. It is not just about stopping the unhappy customers from becoming detractors but it is equally important to follow-up with the passive customers and turn them into brand promoters.
It is imperative for every brand or organization to be able to handle the customer complaints right the first time.
Components of Loop Closure system
The main components required to set-up Loop Closure in the platform are:
-
Department: It is important to set-up departments for enabling the loop closure as this is where you provide access to the loop closure to the whole department who will be responsible for closing feedback loop with the customers.
-
Ticket turn-around-time (TAT): TAT is the time taken by the ticket to get escalated from one user to another user within the same department.
-
Ticket Status: There are different statuses that can be defined in the system as per the requirements. By default, when a ticket is created with ‘Open’ status but can be changed. to ‘Pending or In-Progress’ status, and finally ‘closed’ status.
-
Ticket Actions: Different ticket actions can be configured. E.g.: Assigned, Resolved, Unresolved, etc.). Ticket actions ensure that the ticket owners provide a valid root cause before updating the ticket action.
-
Ticket Notification: These are automated alert request conditions that can be set-up for tickets to trigger a ticket notification. E.g.: tickets should be created whenever a customer gives a negative score for something or Detractor rating i.e. NPS is less than 7 from a customer, it automatically creates a ticket requesting follow-up.
-
Escalation Matrix: Multiple levels of escalations can be defined in the user management module based on the organizations hierarchical structure where you can set who should get notified on management (hierarchical) level if the user responsible for closing the ticket has not acted on the ticket within the stipulated SLA (TAT).
-
Spaces: Enable Loop closure in Responses Tab to view the tickets on the dashboard
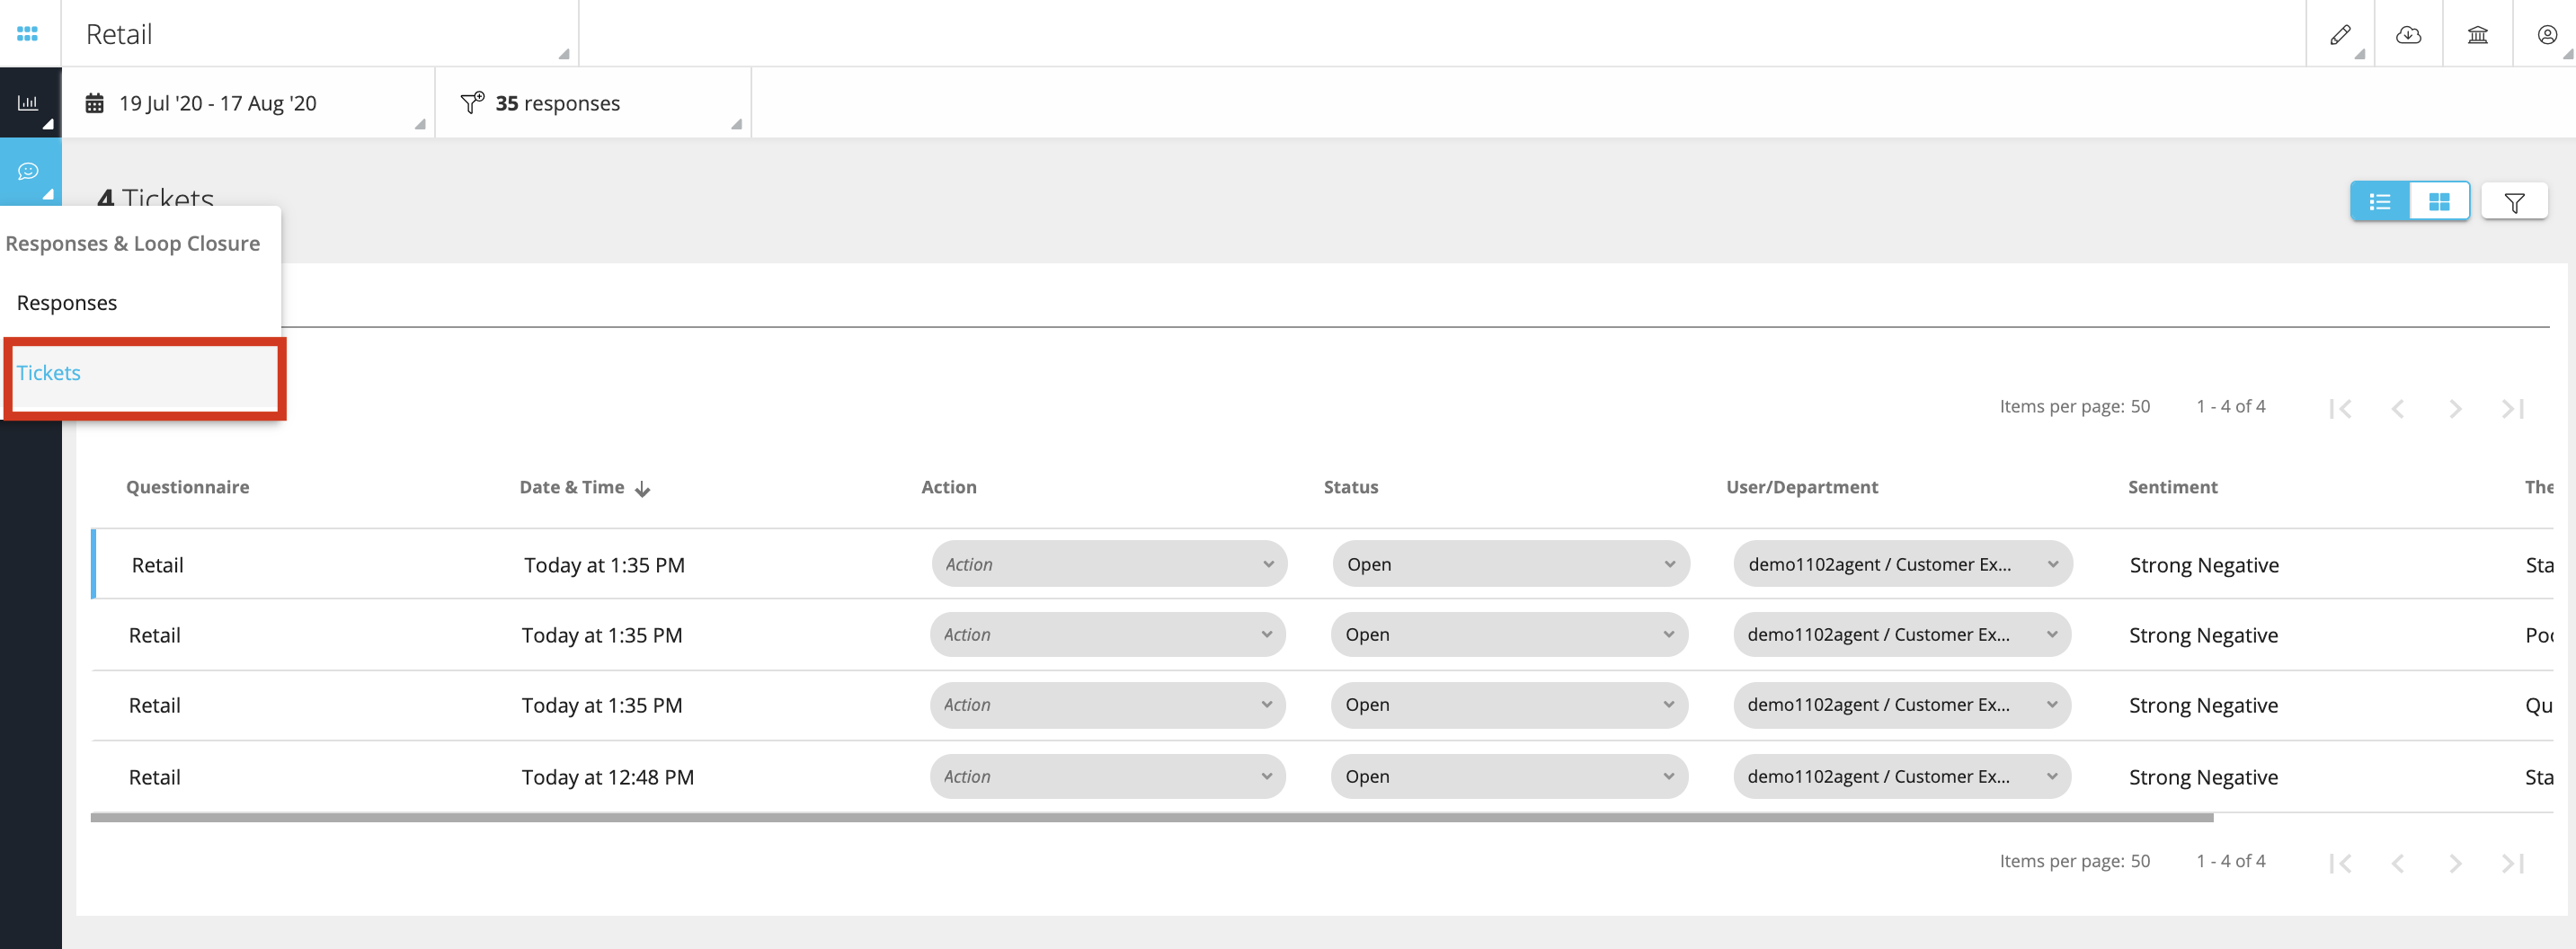
Tickets
To view the tickets, go to Spaces > Response & Loop Closure Tab > Tickets as shown below
Different Views & Filters
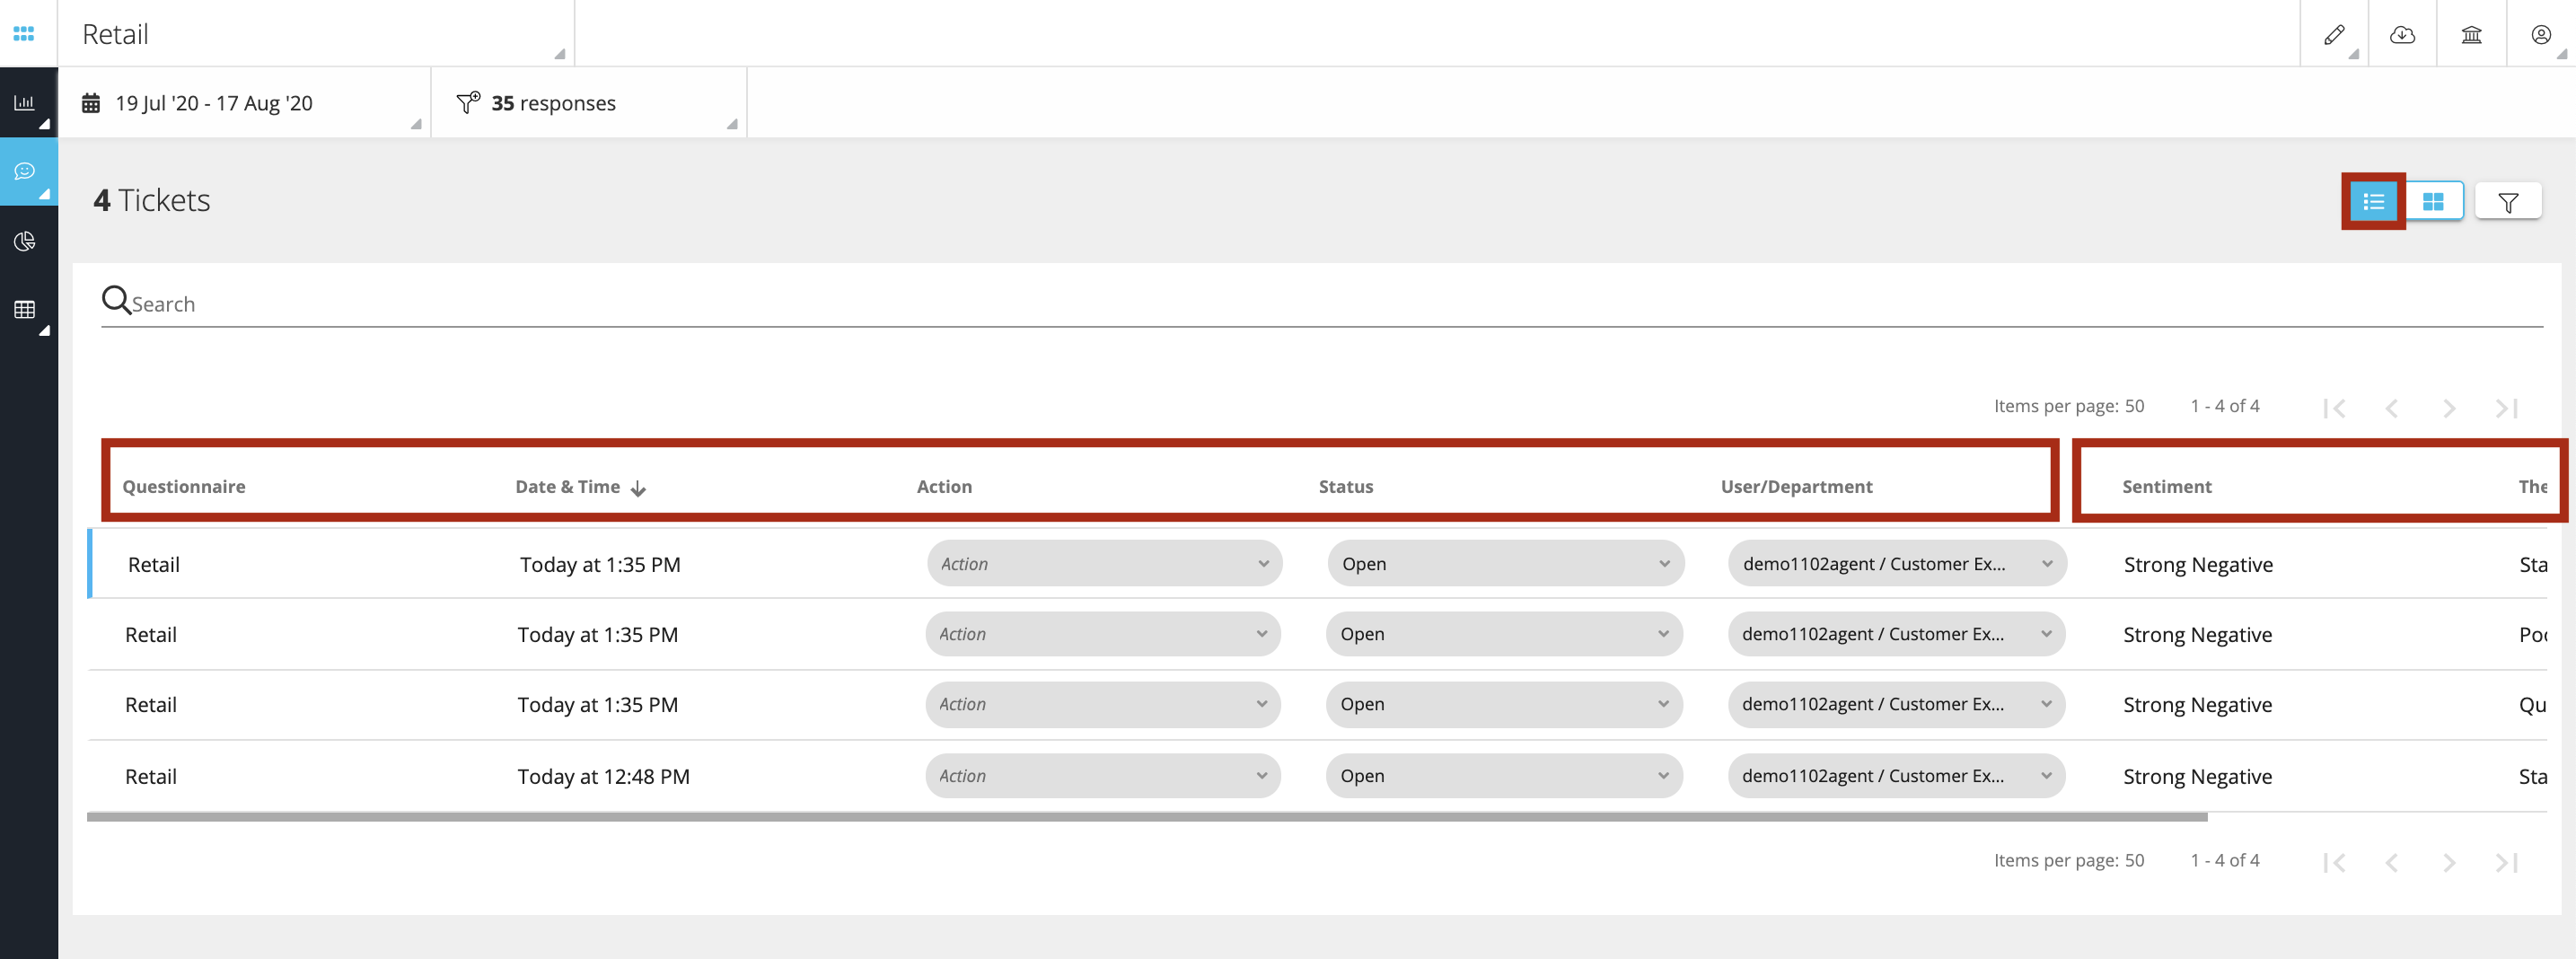
List/Tabular View: All the tickets can be seen in a compact view mode. The tickets and the related information are shown in a column-based format and is very useful to make quick updates to the tickets like changing action, assigning the ticket to another user or department or changing the status from open to pending etc. The details consist of two sections: Default fields: Standard details that cannot be configured
- Questionnaire Name
- Date and Time of the Response and ticket created
- Ticket Action
- Ticket Status
- User/Department Customized fields/Pinned details: Beyond the default fields listed above you can add additional fields to this tabular view that can be configured as per your requirements in the questionnaire by pinning the relevant questions. This helps you to scan through the important details quickly.
- Sentiment
- Customer Name or any other information that you would like to see
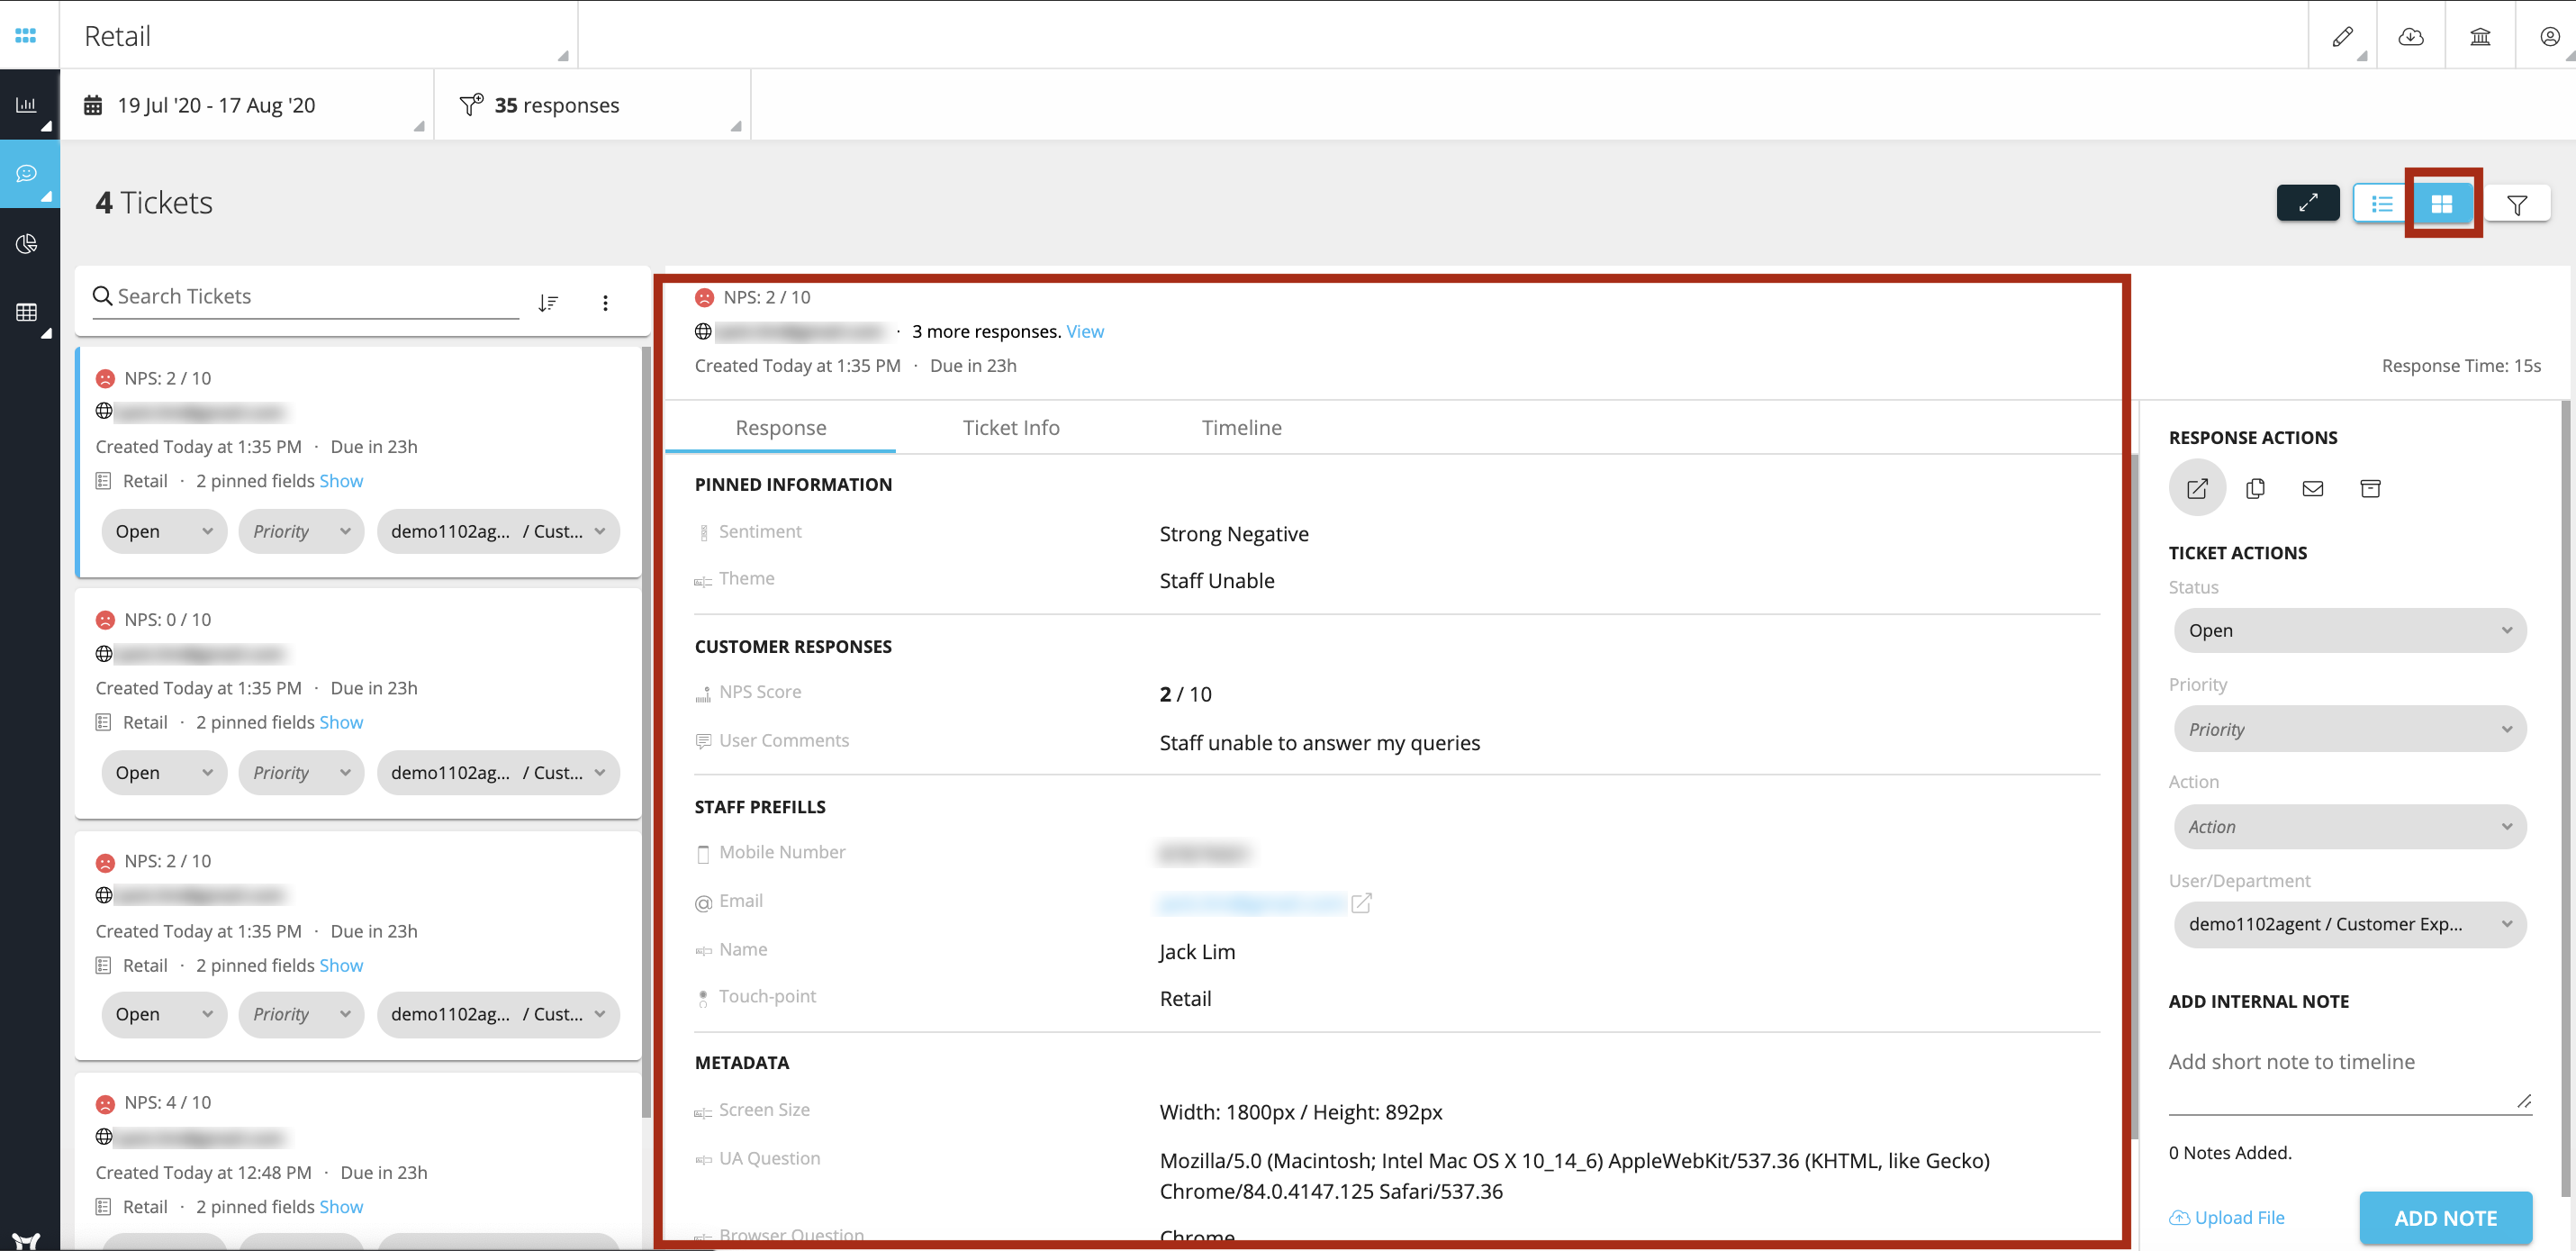
Card-based View: This is like Email inbox view where tickets are present in the left and details appear in the center. In the card-based view you can see the details segregated into different sections like:
- Anchor Metric scores – This shows the NPS, CSAT or CES scores given by the customer
- Customer details – This shows the customer details like Name, Mobile or Email) -More responses from same customer in the past – When you click on ‘View’ a pop-window opens that shows all the past responses from the same customer. This is a very critical piece of data as from here you can see if this customer has turned from being Promoter to a Detractor or Passive or vice versa and how has his experience been throughout the journey.
- Date and Time - This refers to the data and time of the customer response
- Pinned Information – These details or fields can be configured as per your requirements in the questionnaire by pinning the relevant questions. This helps you to scan through the important details quickly.
- Customer Responses – This section shows all the questions to which customer has responded
- Staff Prefills – This section shows all the staff prefills that you use while triggering the survey to the customers
- Metadata – This shows all the system prefill information that system collects by default like device type, screen size, browser type etc. when any customer responds to the survey.
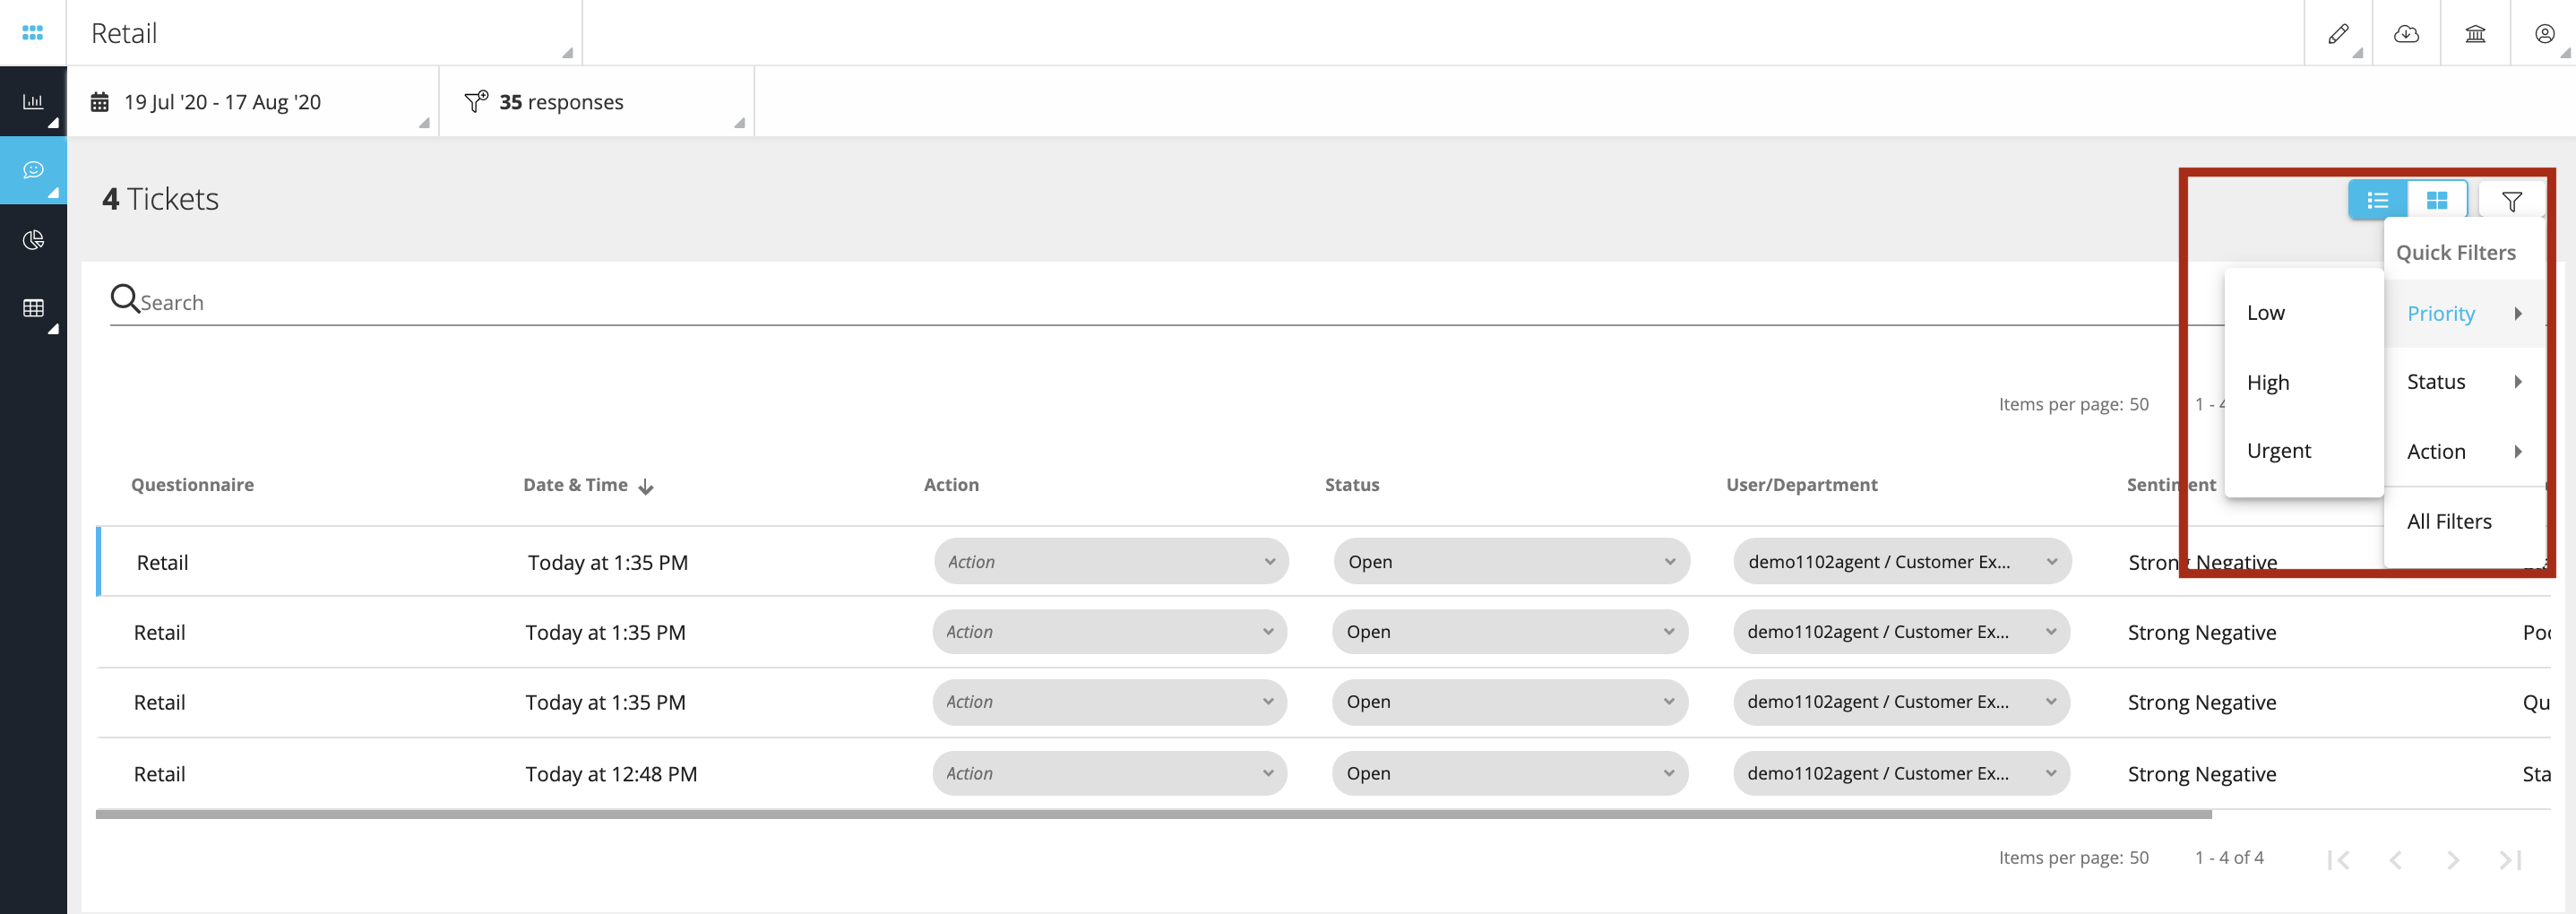
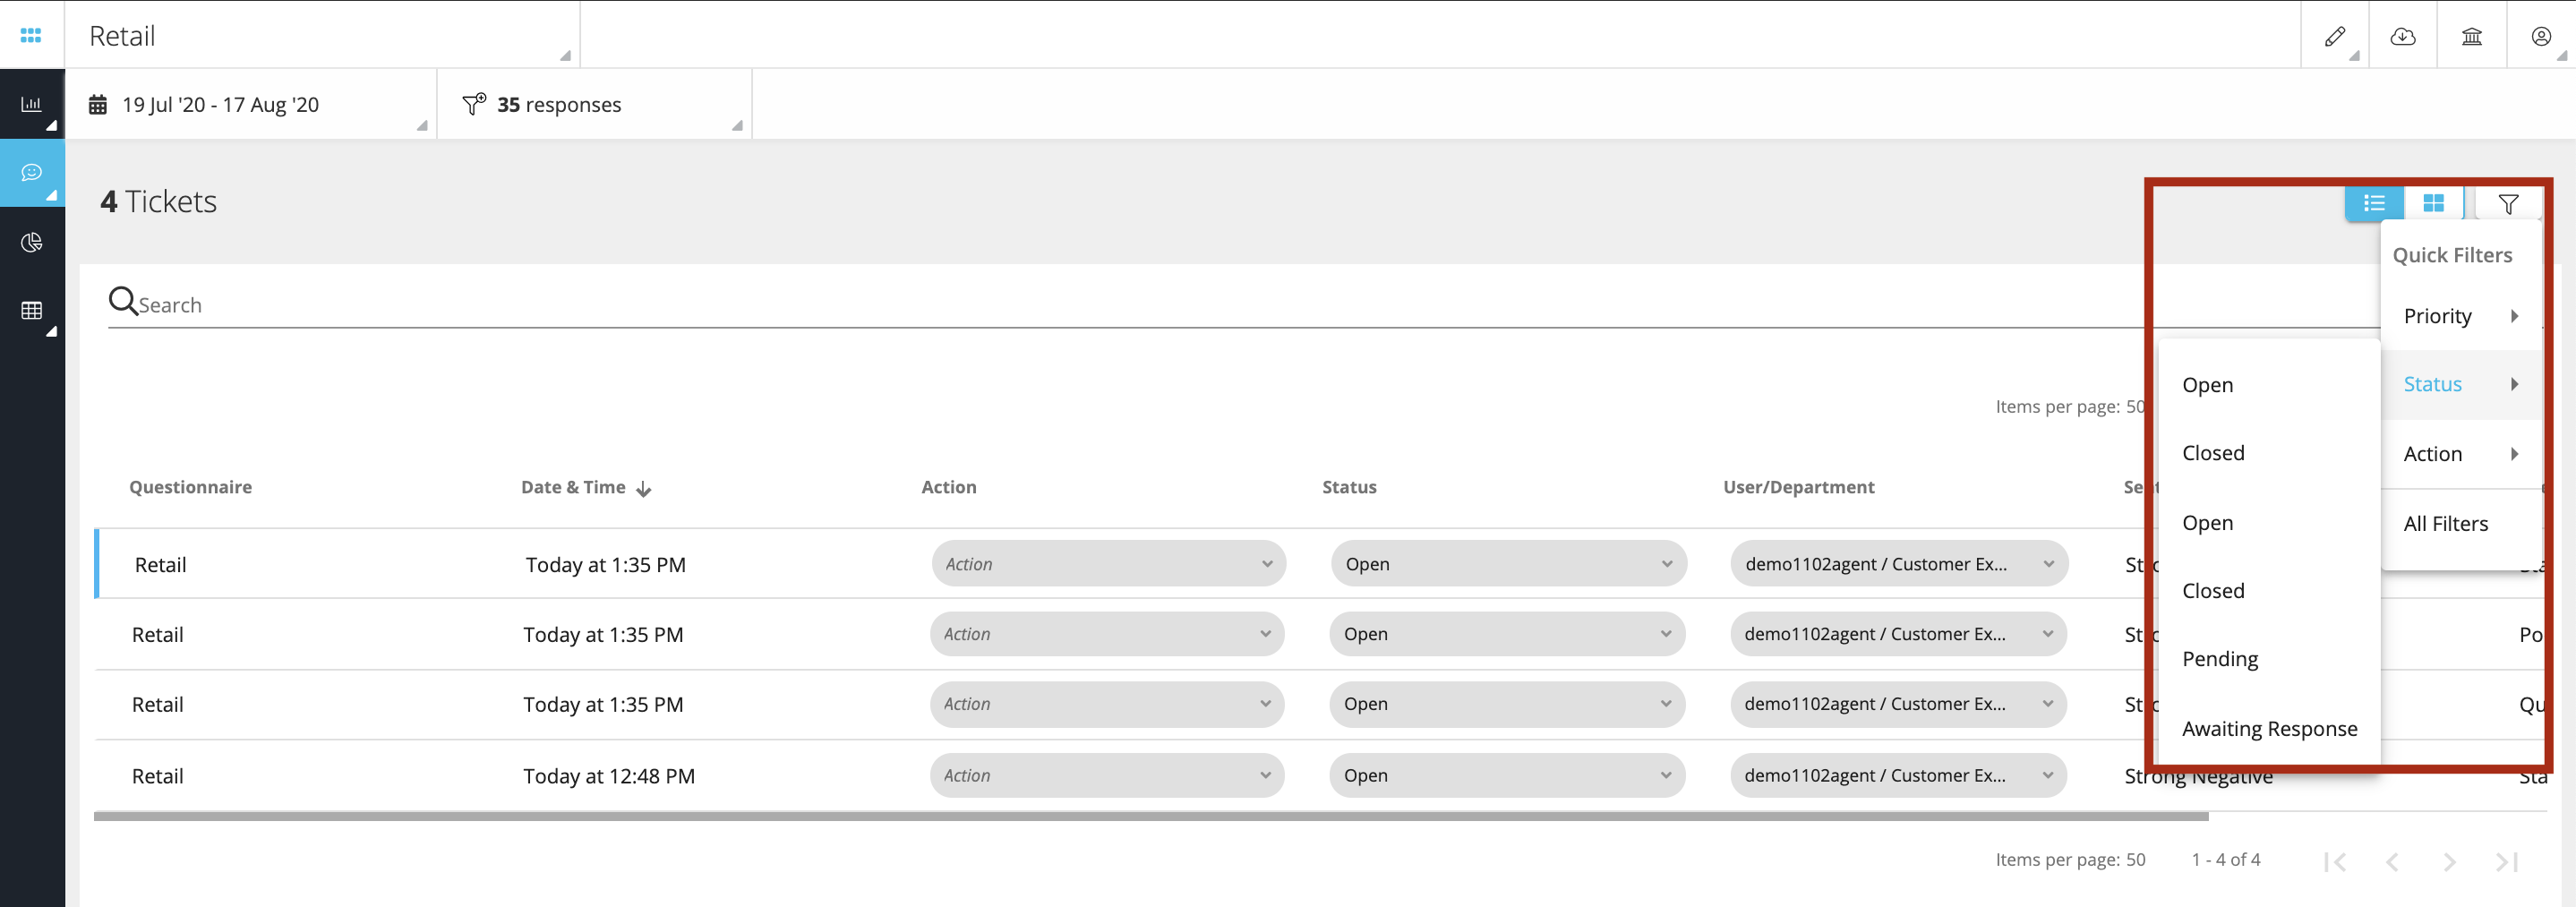
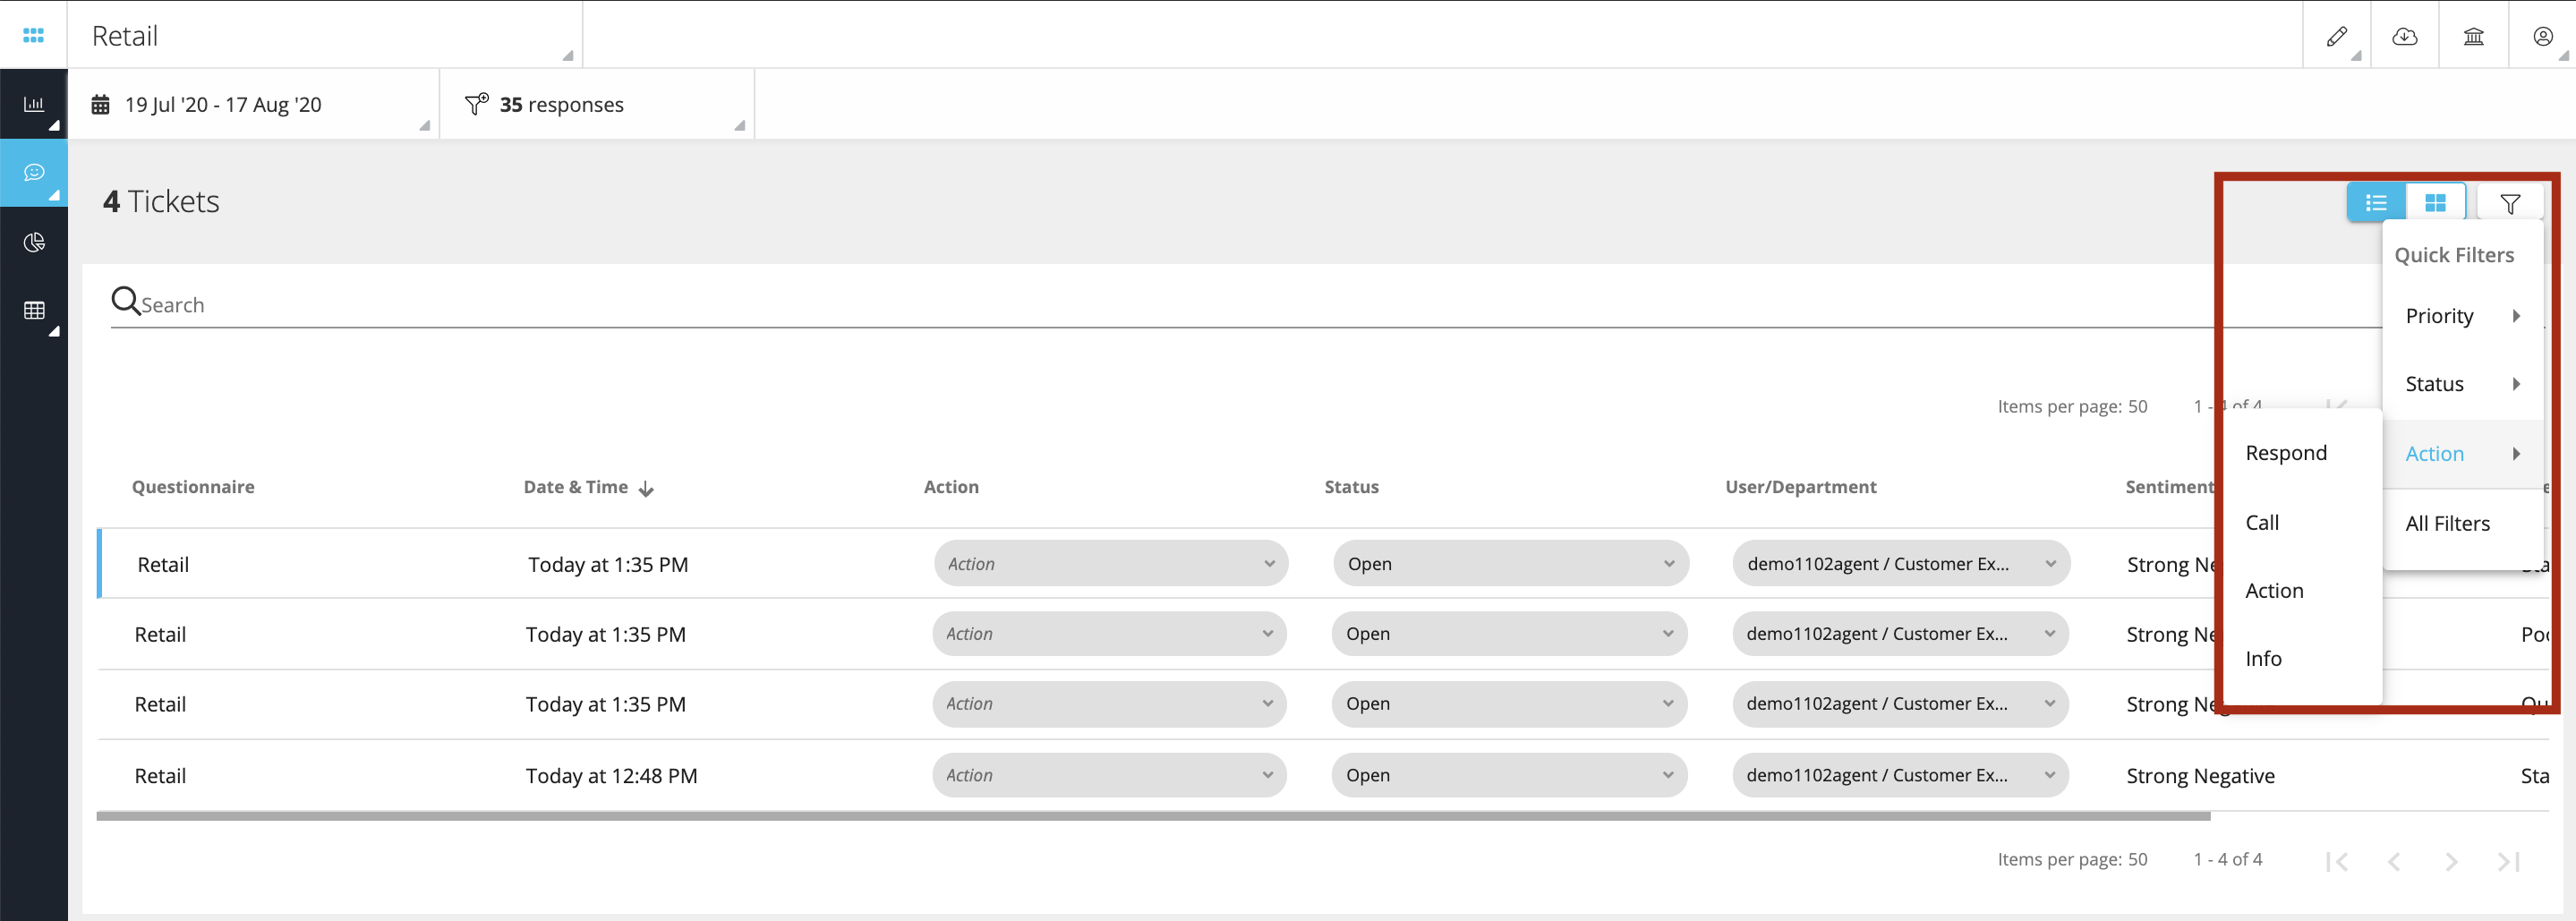
Quick Filters
To apply the ticket filters, click on the funnel icon on the right-hand side as shown below. Quick filters let you apply filters based on Priority (Low, Medium, High, Urgent, etc.), Status (Open, Pending & Closed, etc.), Action (Assign, Resolved, Respond, Call, etc.) & All Filters.
Ticket Quick filters work along with Data Filters which can be set across different questionnaires and other question attributes etc.

Priority
Ticket Priority is an attribute that establishes the degree of severity that should to be given to the ticket. Standard Priority levels that are configured in the system are:
- Low - For the tickets that can be prioritized to be addressed later.
- High – These tickets are High in importance, and needs to be addressed ASAP.
- Urgent – These tickets receive the highest focus and shows that the customer is extremely unhappy.
Status
The different stages show the lifecycle of a ticket that it travels through. The ticket’s status is important this explains that whether the customer’s complaint is addressed or not with proper reasons.
The ticket statuses can be configured based on the requirements which can be used by the loop closure team to filter the tickets at any point in time. Few commonly used tickets statues are:
- Open - This is the default status of a ticket when it is created.
- In Progress / Pending - A ticket can be moved to pending status when the loop closure team user has replied to a ticket and is waiting for more inputs from a customer or from other internal departments.
- Closed - A ticket is marked as closed when the customer acknowledges that his/her concern has been addressed / resolved by the loop closure team user. However, even if the ticket has been marked as closed, it can be reopened again if the customer concern is still outstanding or has happened again for same transaction.
Action
Ticket actions save time a lot of time for the loop closure team users as it ensures that all processes for the Ticket to close are completed accordingly. The ticket actions can be configured based on the requirements. Few of the actions that are commonly used are Assigned, Resolved, Unresolved, etc. Ticket actions ensure that the ticket owners provide a valid root cause before updating the ticket action. This is very helpful for keeping a track of unresolved issues.
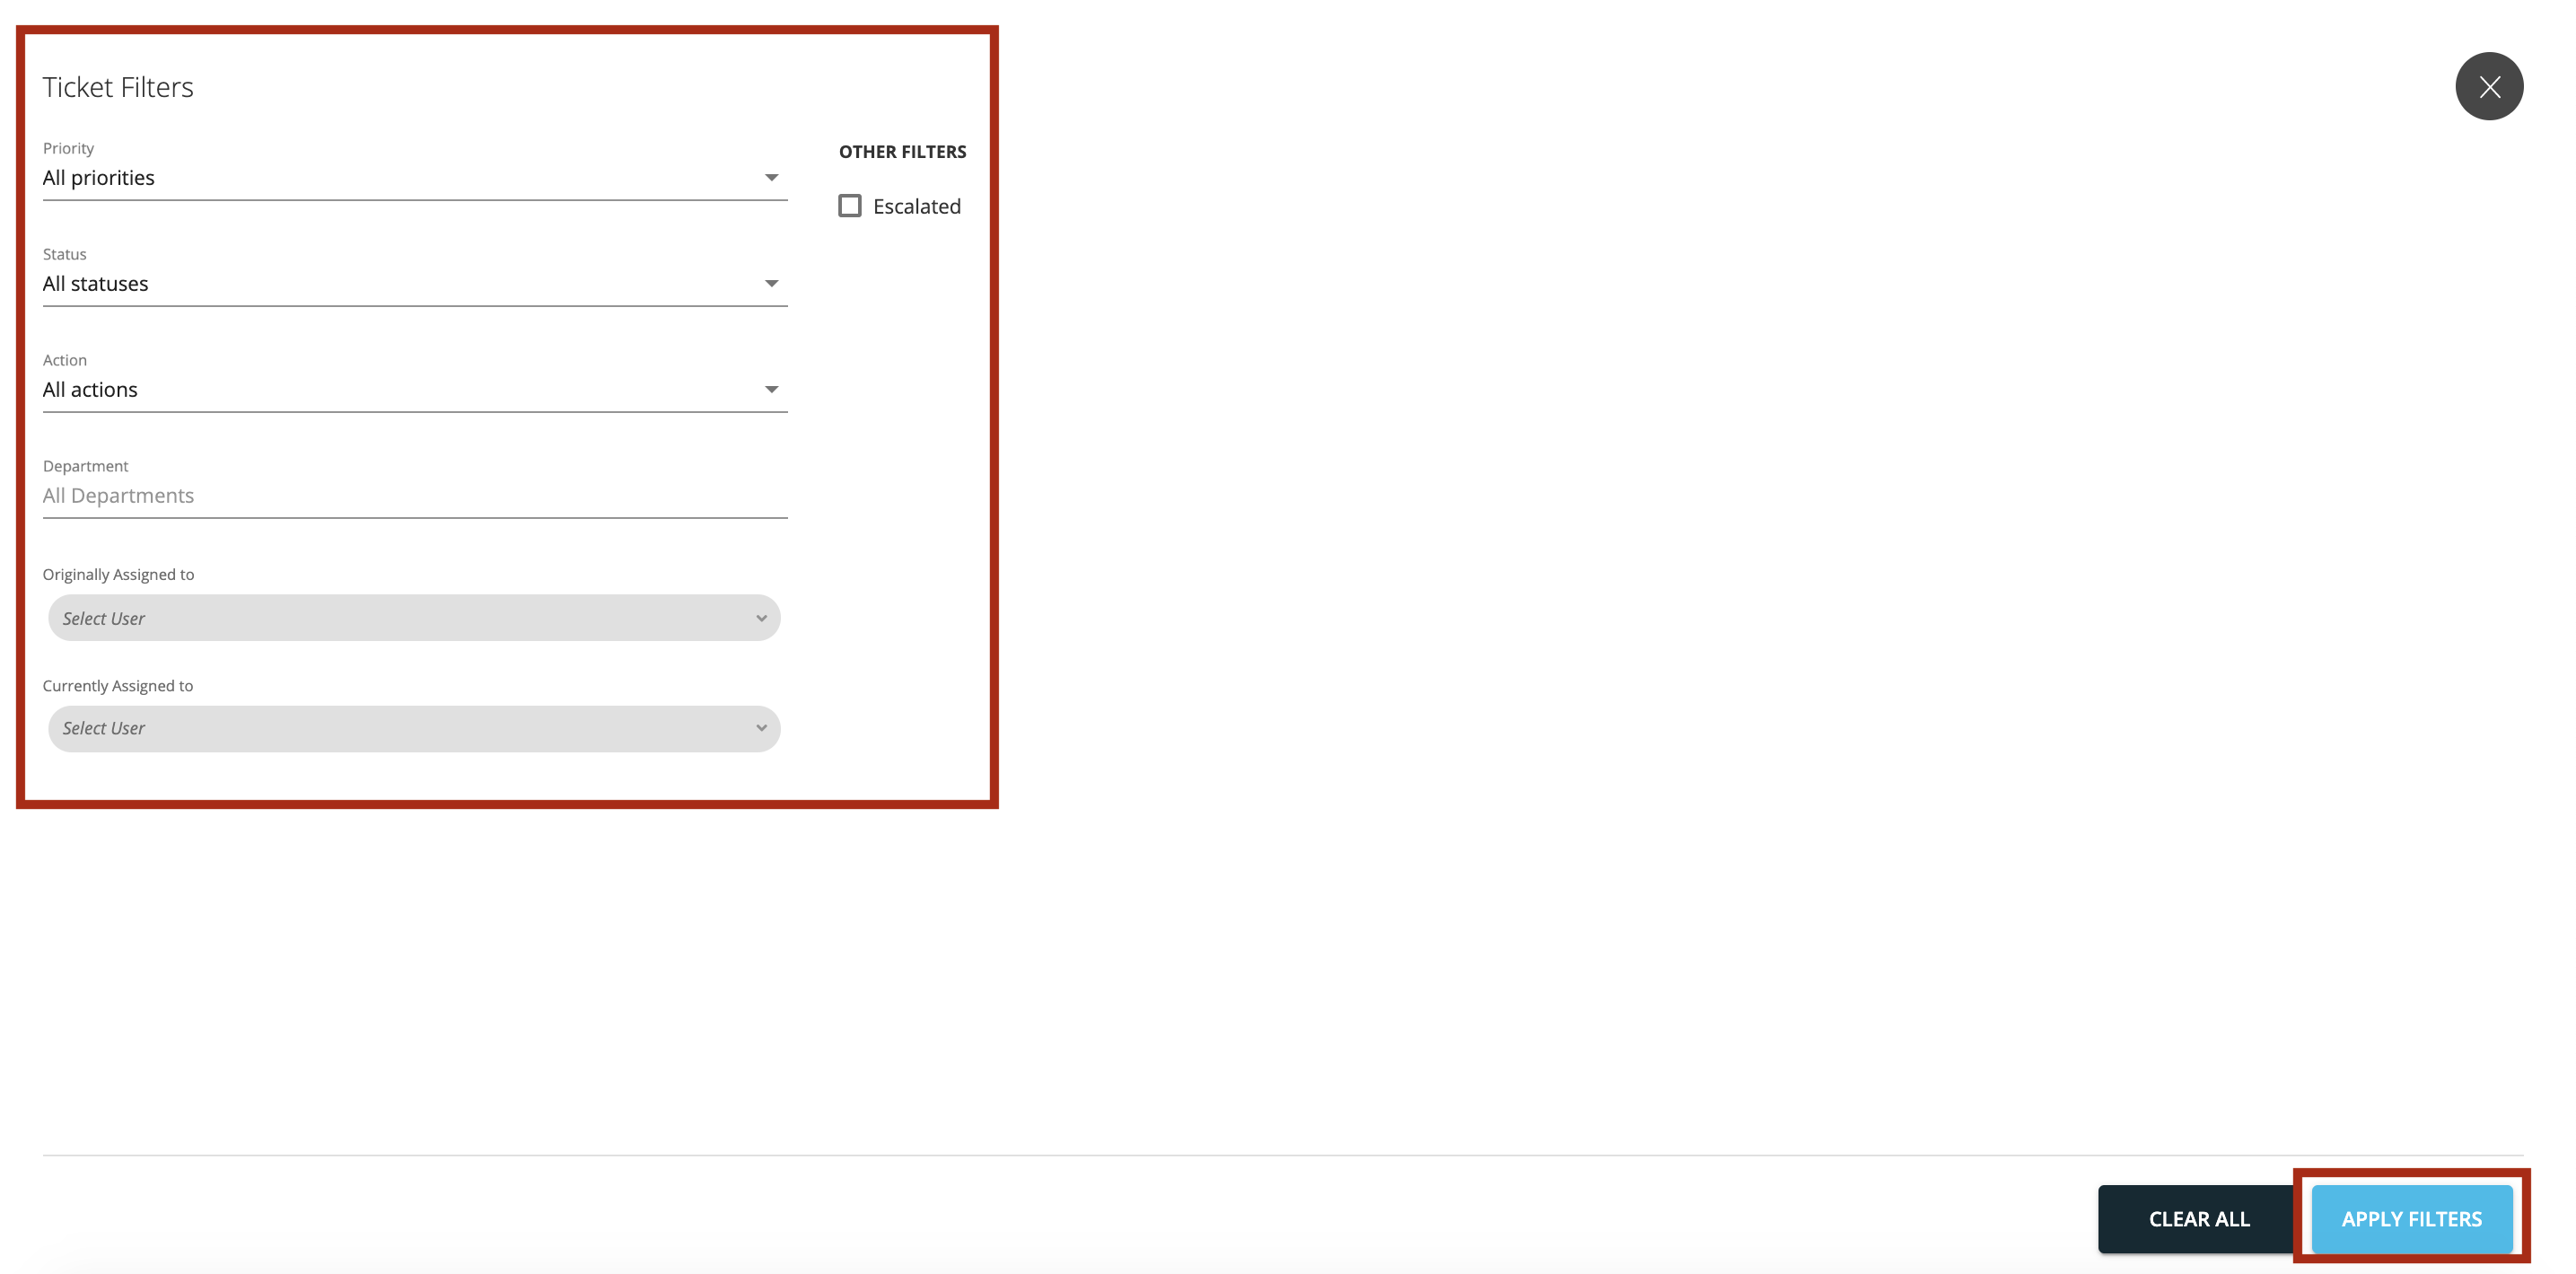
All filters
If you want to apply multiple filter combinations together then you can do so in ‘All Filters’ window. Once you have selected the desired filters press ‘Apply Filters’ button at the bottom right as shown below.
For instance, it can help to see all unresolved tickets with Urgent priority which have already been escalated and outside the SLA, assigned to User A. This will empowers the team leaders to focus on the tickets which are still unaddressed by the agents and need immediate attention.
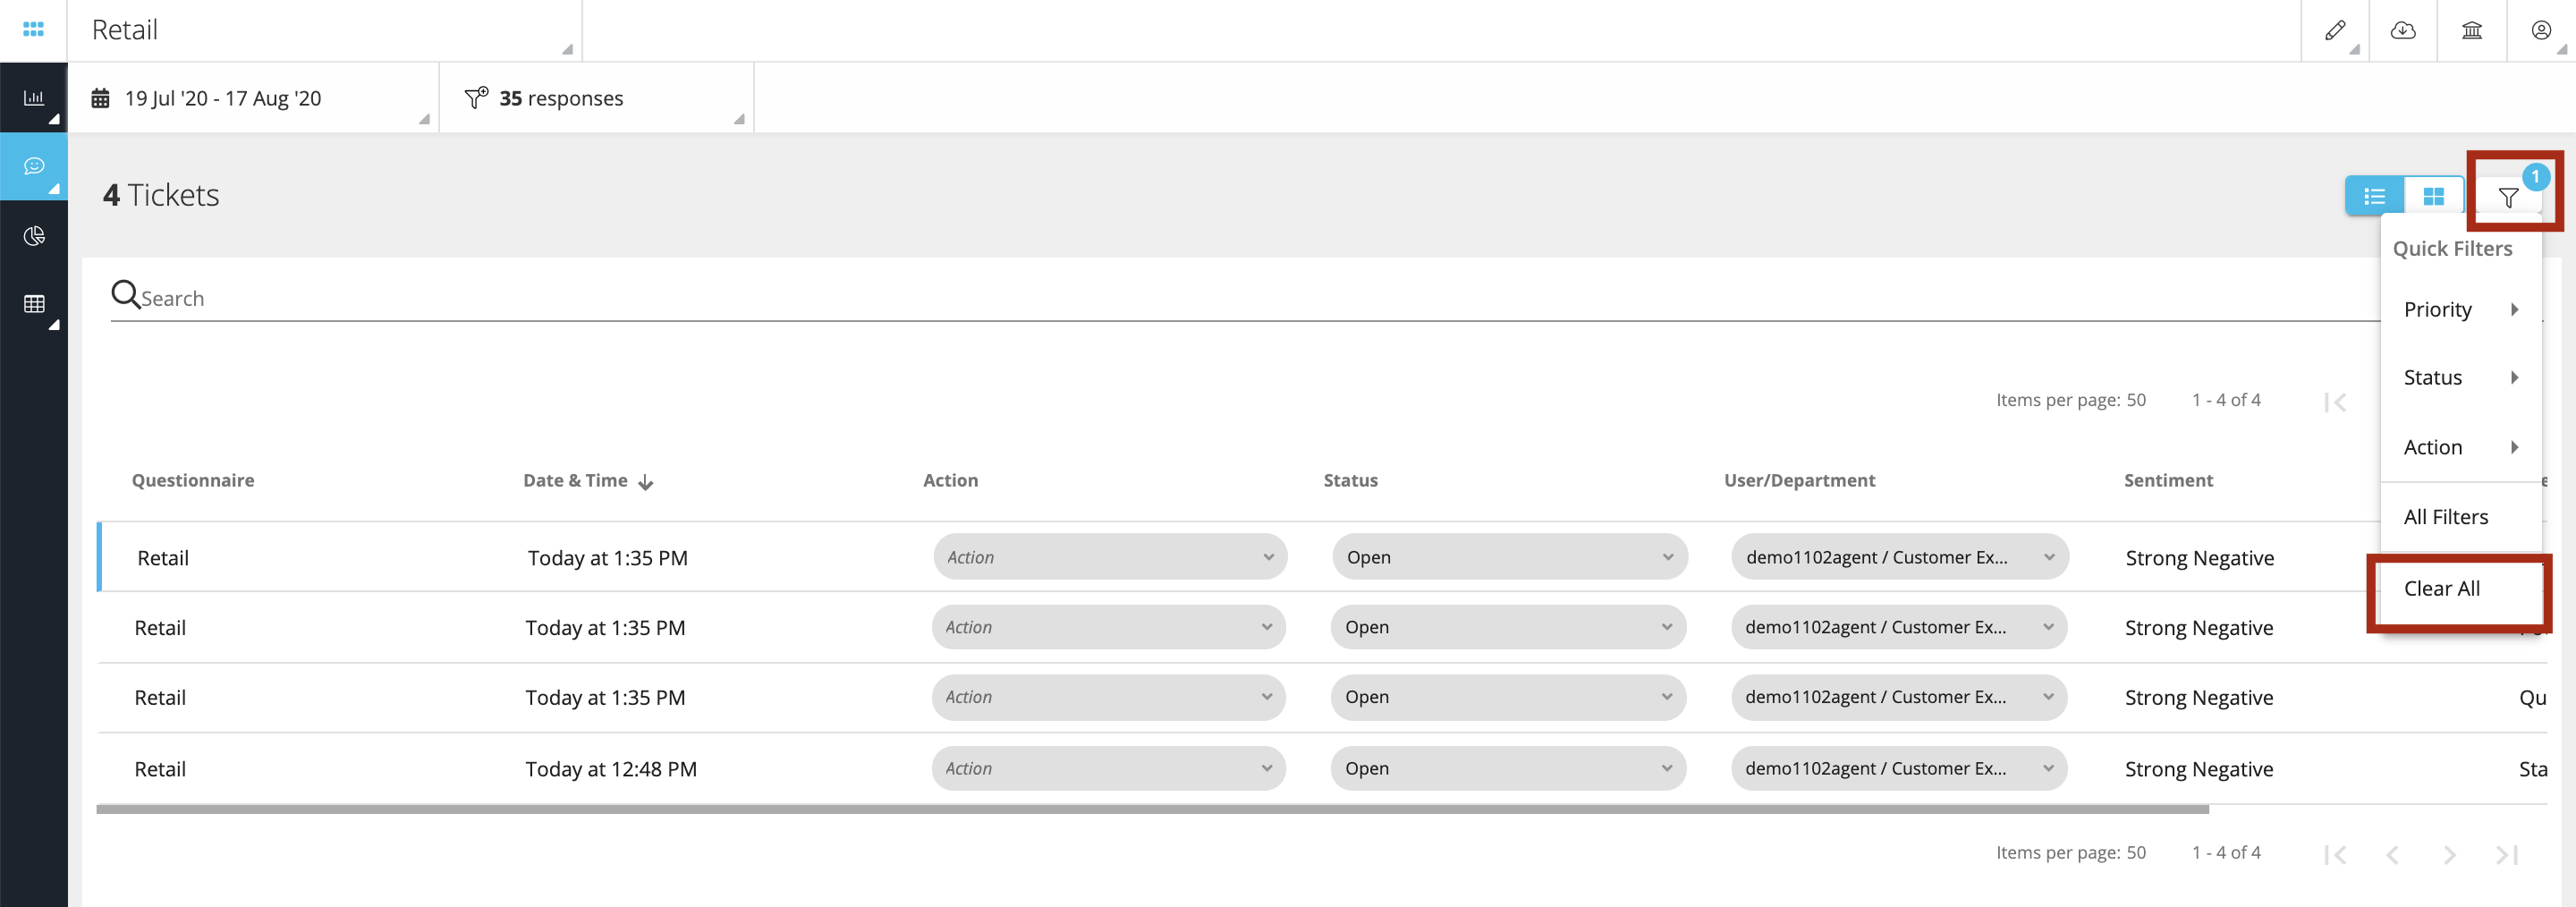
Clear Filters
To remove the filters, click on the funnel icon and press ‘Clear All’
Ticket Details & Assignment
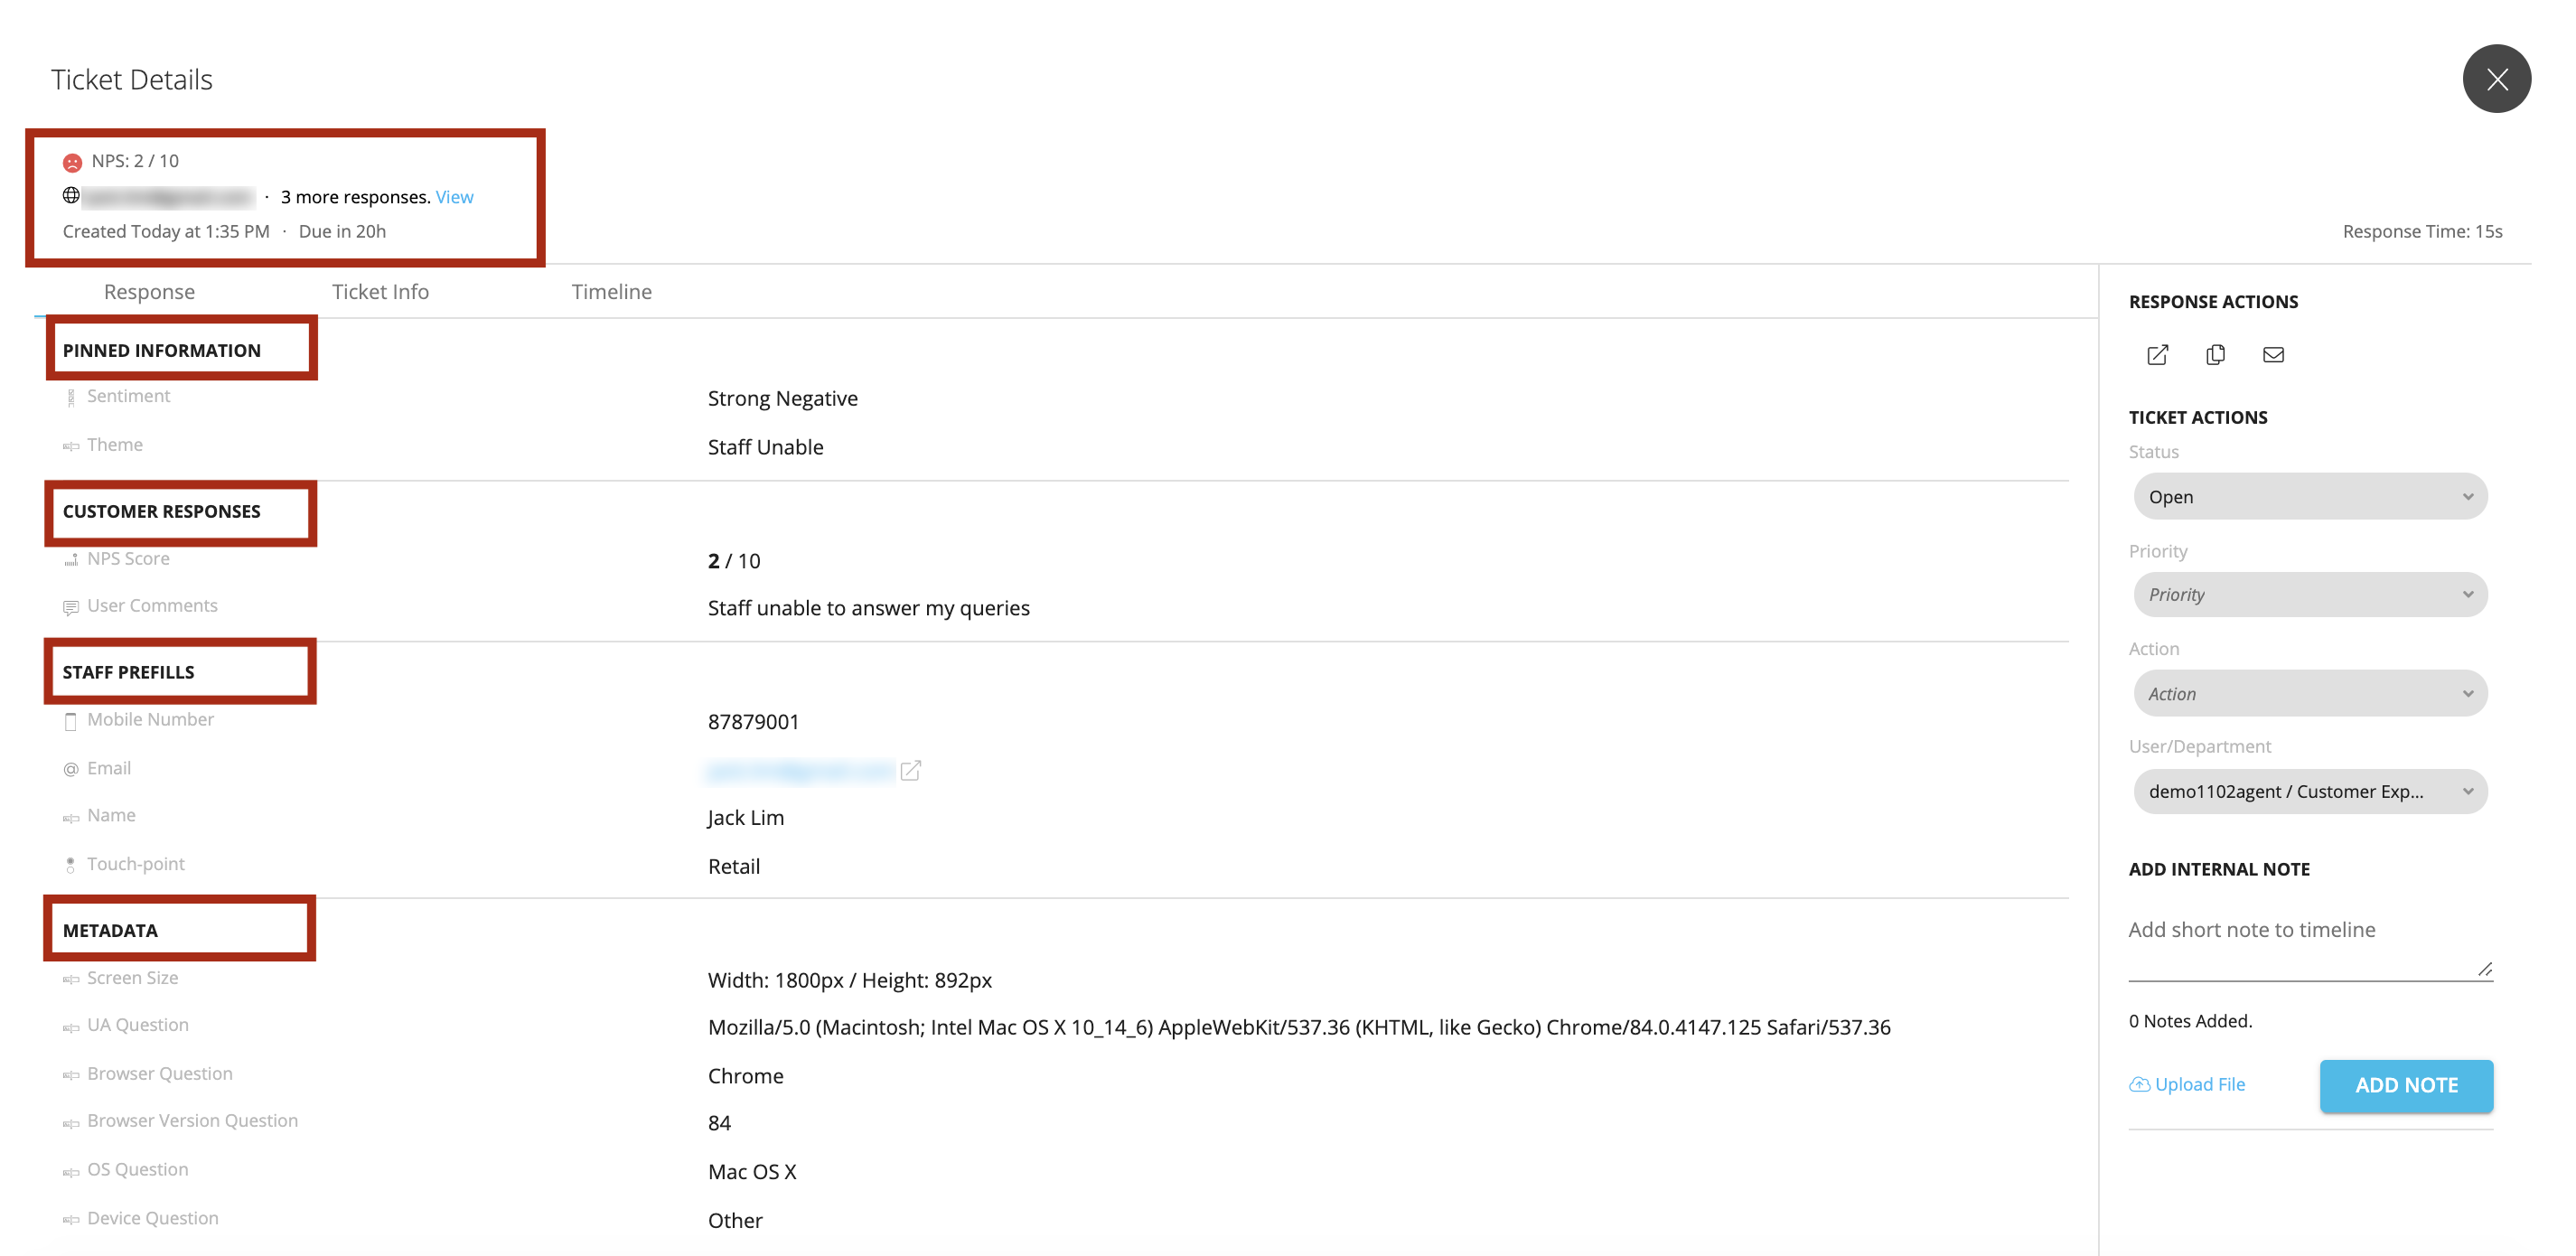
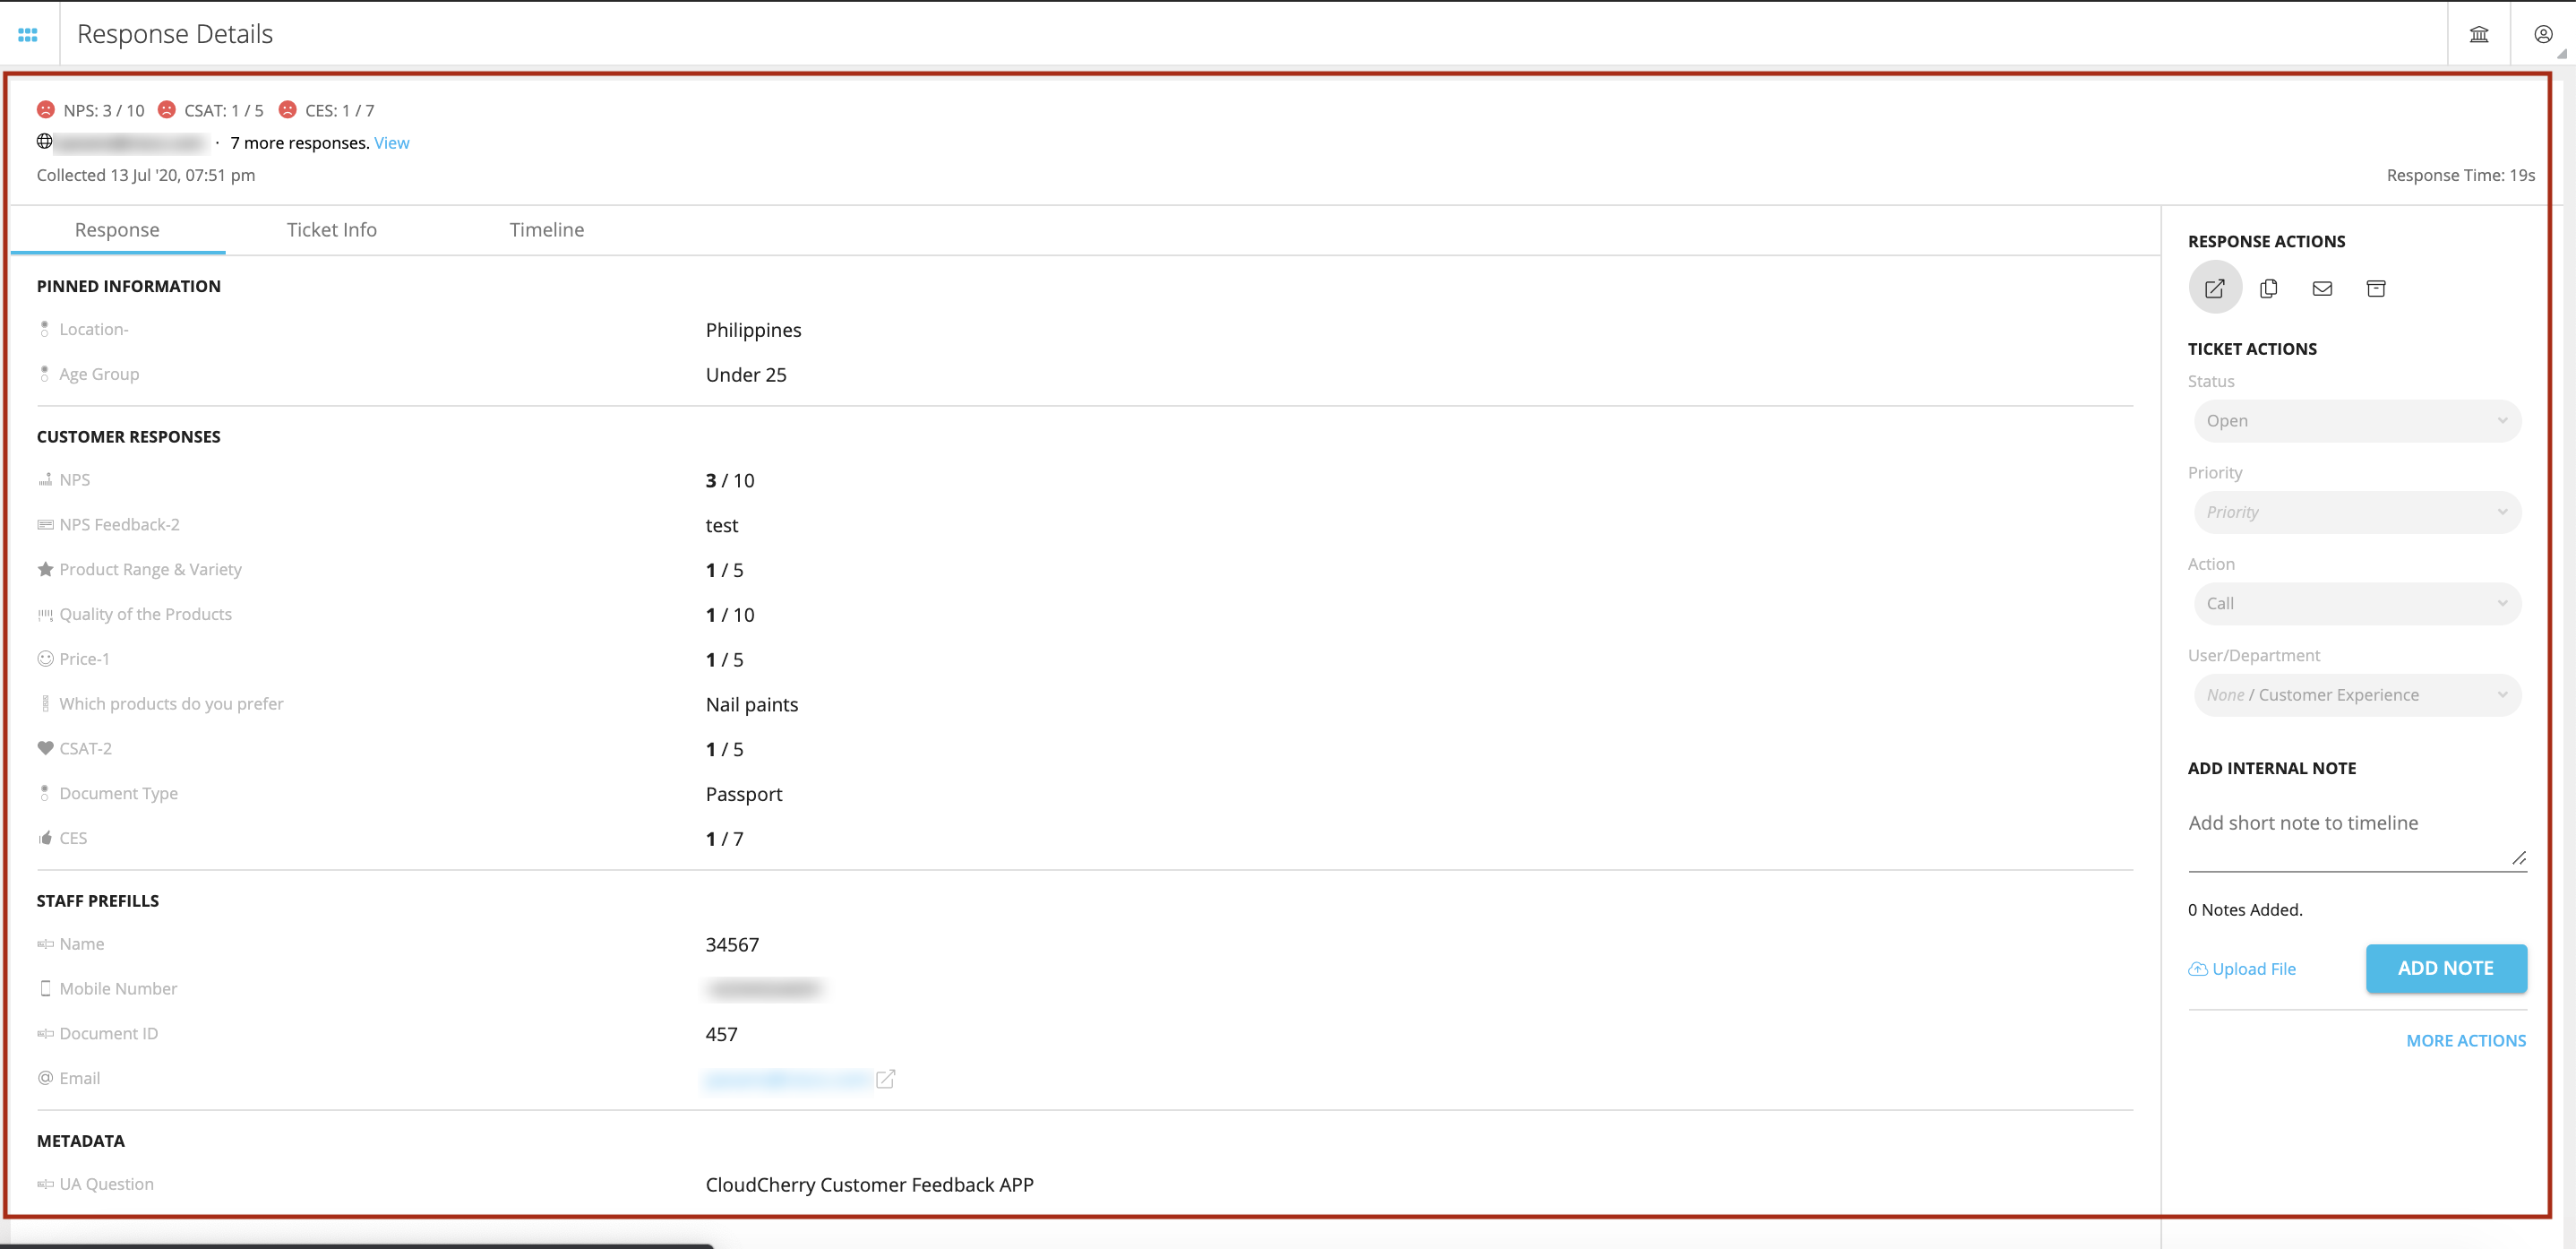
Additionally, each ticket is divided into 3 sections. They are:
- Response: This section shows the details like Pinned Information, Customer Response, Staff Prefills, Meta data, etc.
- Ticket Info: This section shows information related to that ticket like ID, assigned to user etc.
- Timelines: This section covers the audit history related to that ticket like e.g.: conversation history etc.
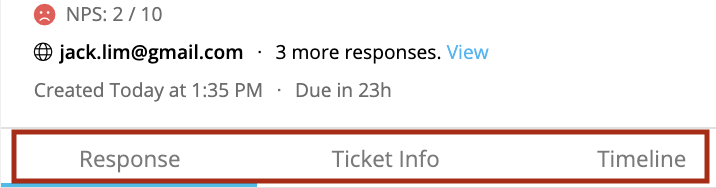
In the Response section, you will see the response details like Anchor Metric (NPS) scores along with the Customer Name and date/time of the response received.
Response section is further divided into 4 main parts, namely:
- Pinned Information: These are those attributes which are pinned in the questionnaire
- Customer Responses: These are responses from the customer
- Staff Prefills: These details are prefilled before the survey is triggered to the customer so that each link is a personalized link. For e.g.: Name, Mobile, Email, etc.
- Meta Data: These are those details which system captures when customer responds. For e.g.: Device, Screen size etc.
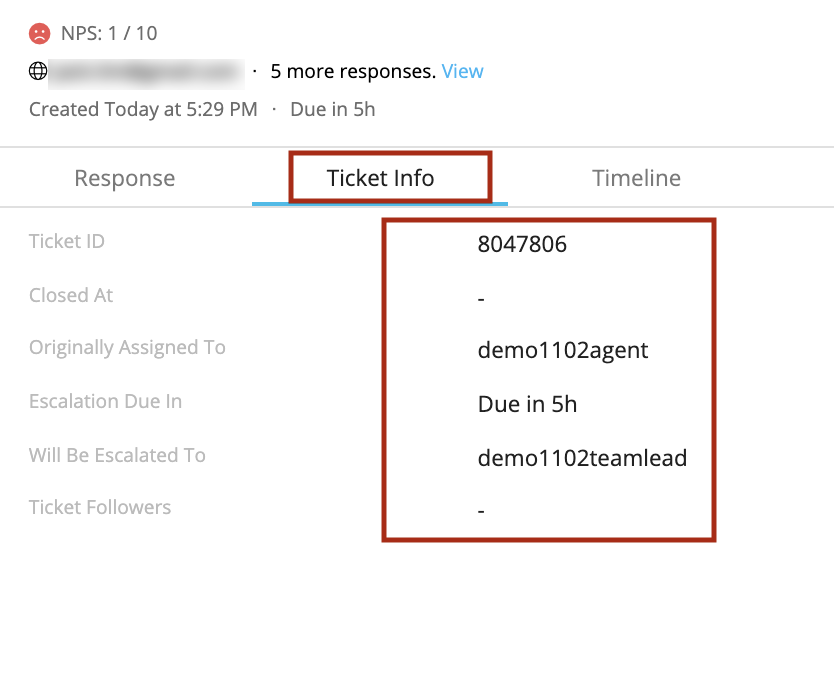
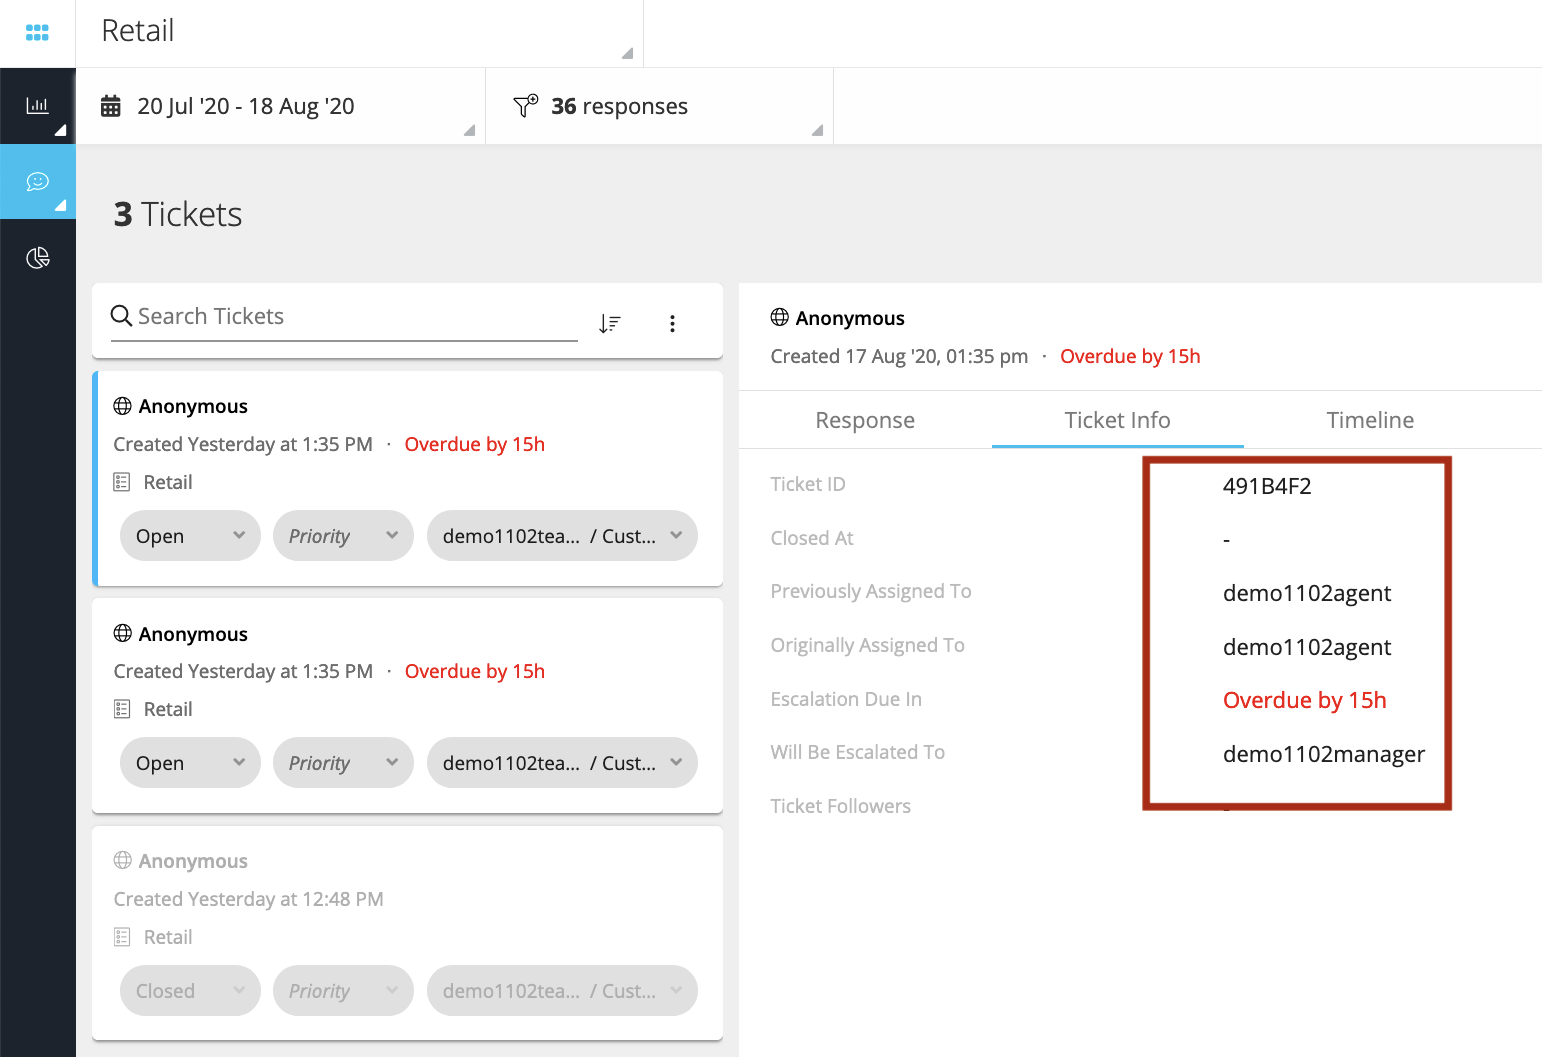
Ticket Info
This section provides information related to the ticket like:
- Ticket ID: Unique ID of the ticket
- Closed At: This shows the date time when the ticket was closed (e.g.: 18 Aug ‘20, 03:25 pm)
- Originally Assigned To: The first user whom the ticket was assigned
- Previously Assigned To: The user whom the ticket was previously assigned to before escalation or reassignment
- Escalation Due In: This is based on the TAT. This shows in how much time the escalation is due (e.g.: Due in 12 hours). Once the ticket the overdue, the overdue time starts showing in Red
- Will Be Escalated To: User whom the ticket will be escalated to
- Ticket Followers: These users are ticket observers
Ticket Timeline
This shows the complete audit trail/history of the communication done. Any supporting notes which user writes to close the ticket or track the progress of the ticket is recorded here with date and timestamp.

Updating Tickets
To update the tickets, open the respective ticket in detail view as shown below. Updating Ticket Actions Under the Ticket Actions section on the right-hand side you can change the Priority, Status and Action of the ticket.
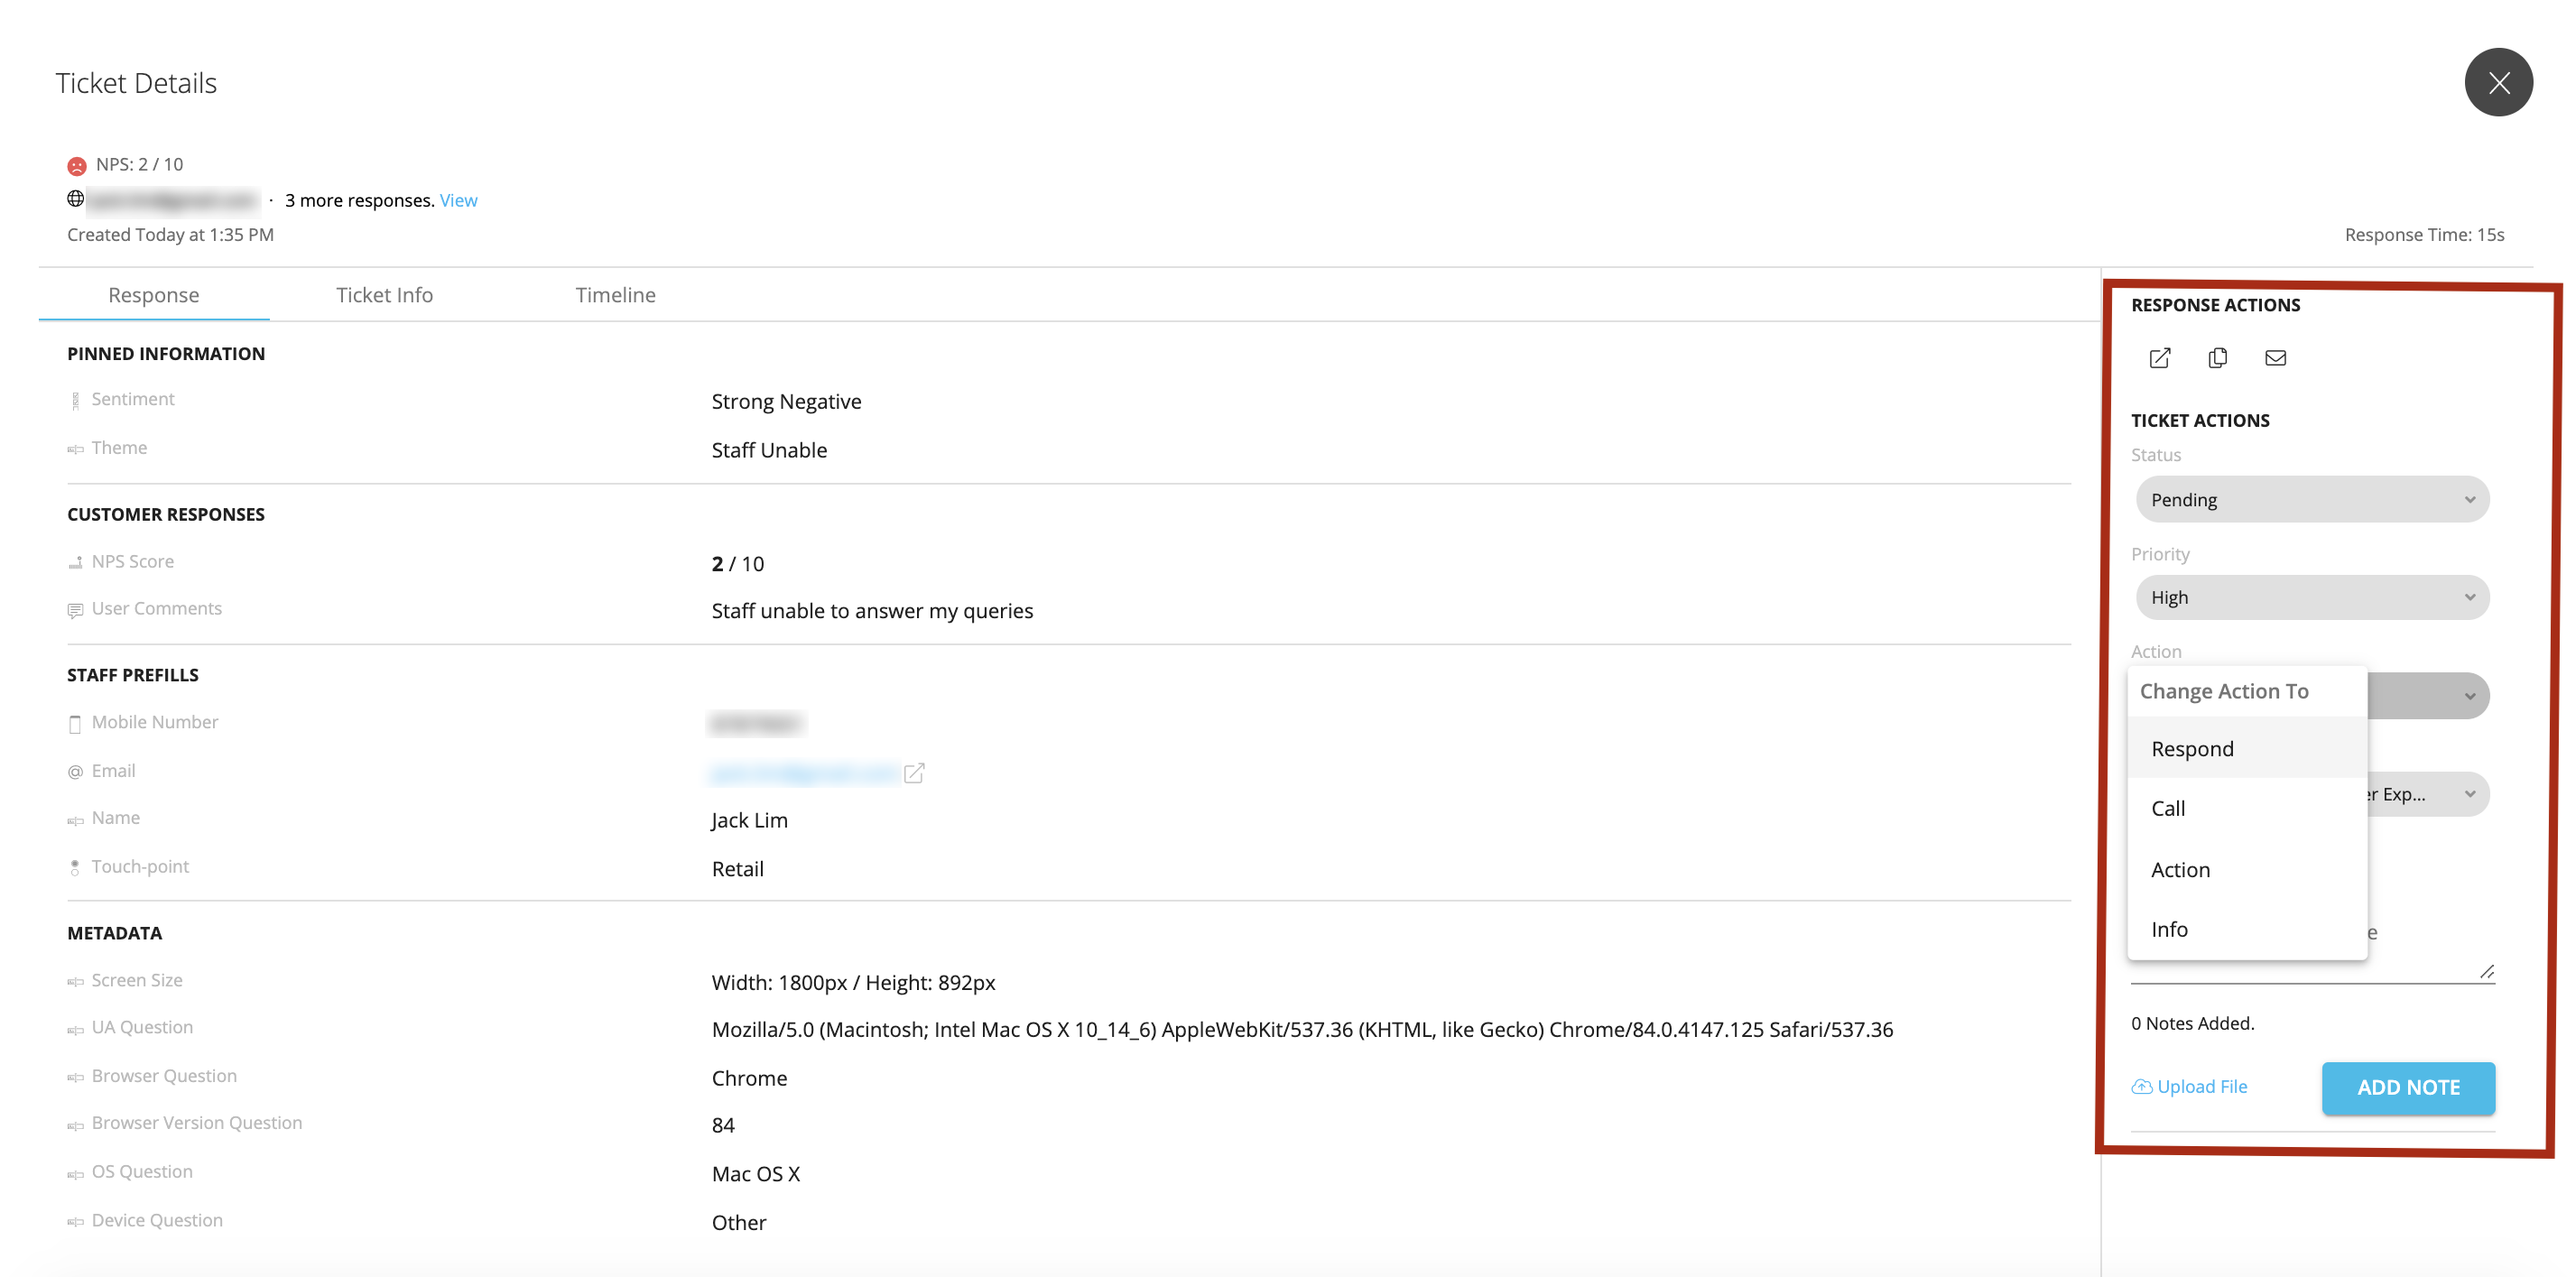
Once you change anything in the ticket, the system shows a success prompt of the updated change

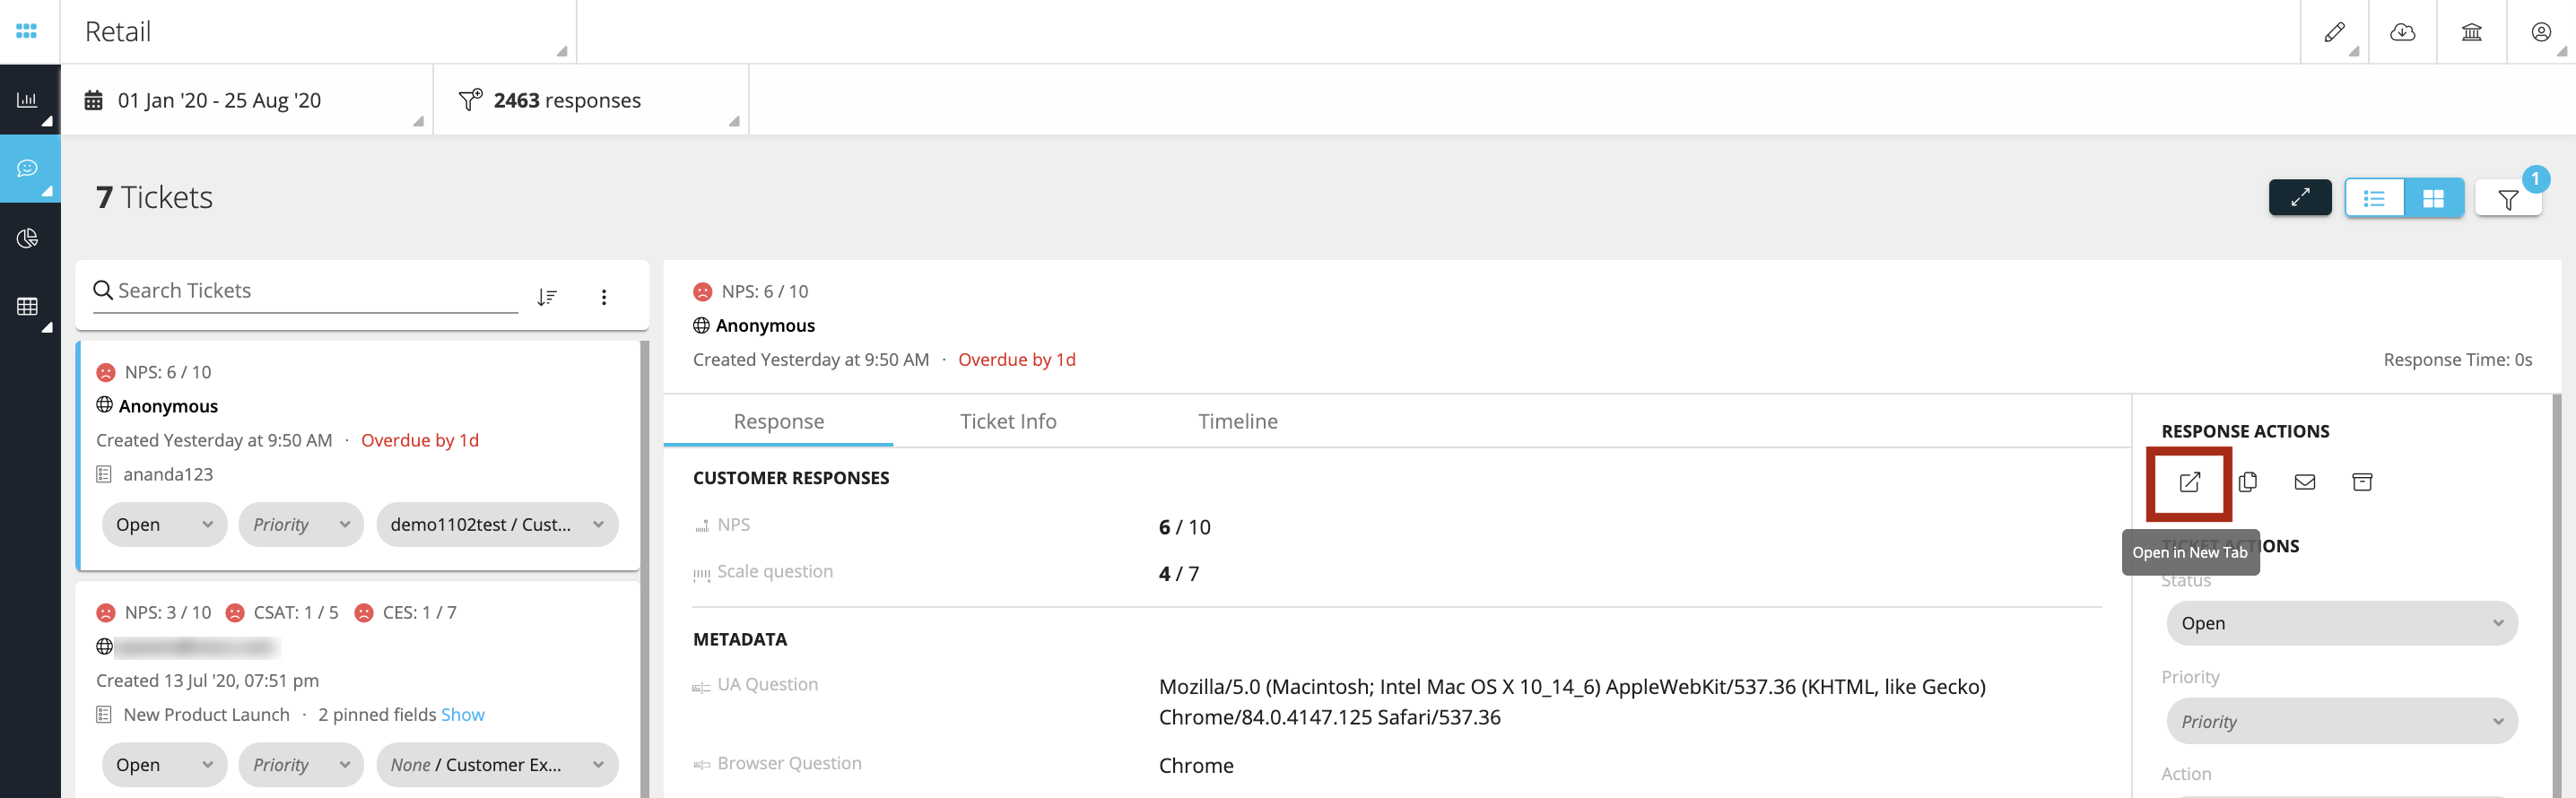
Additional Response Actions
There are few additional actions which are placed on the top of the response action panel as shown below.
- Open in New Tab
- Copy URL to Clipboard
- Share via Email

Open in New tab
Clicking on Open in New tab icon helps open the selected ticket in a separate window and as below. This helps to focus on that one ticket and see all the details only pertaining to that ticket.
Ticket URL
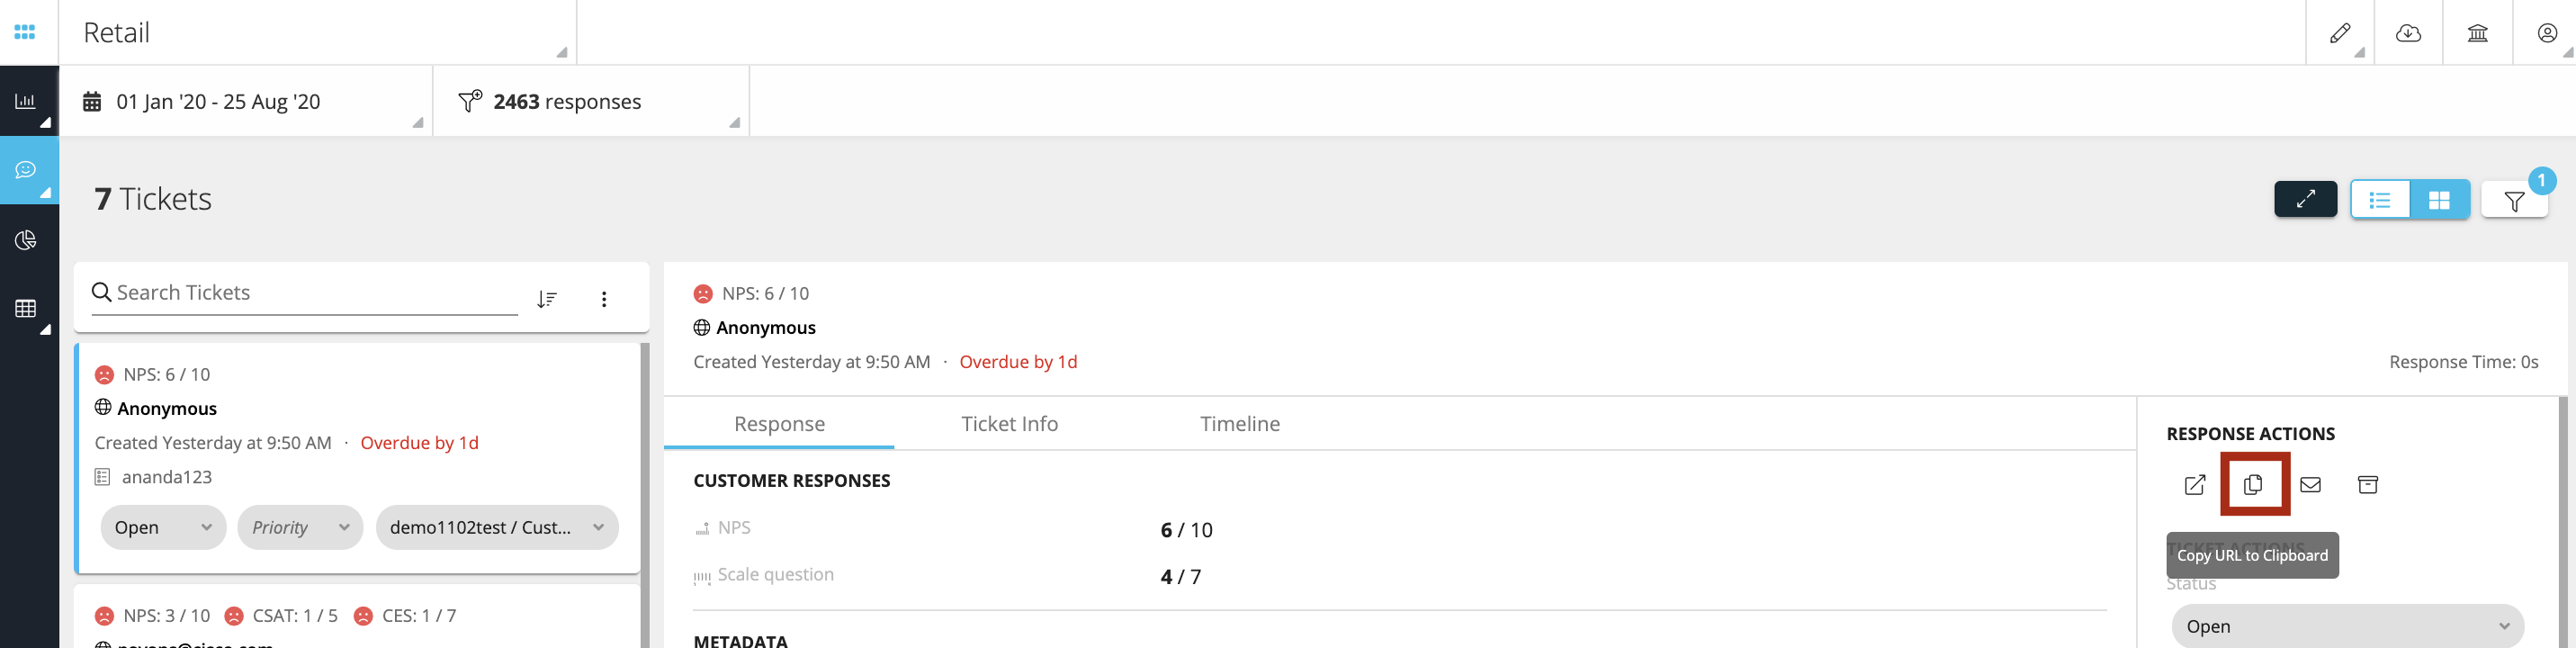
There are two ways by which you can share the ticket details with other users.
- Copy URL to Clipboard
- Share via Email
Copy URL to Clipboard
By clicking on this icon, a loop closure team user can copy the ticket URL and share it with the relevant team members from whom they are seeking support to address the customer concerns. Example URL: https://cx.cloudcherry.com/preview/#/response/5f431cf3056ec317fcc1c2a3
The benefit of sharing this ticket URL is that the user with whom this URL shared that user can simply click on this link and it will automatically direct to the relevant ticket and open the ticket details. This avoids wasting time searching for the ticket.
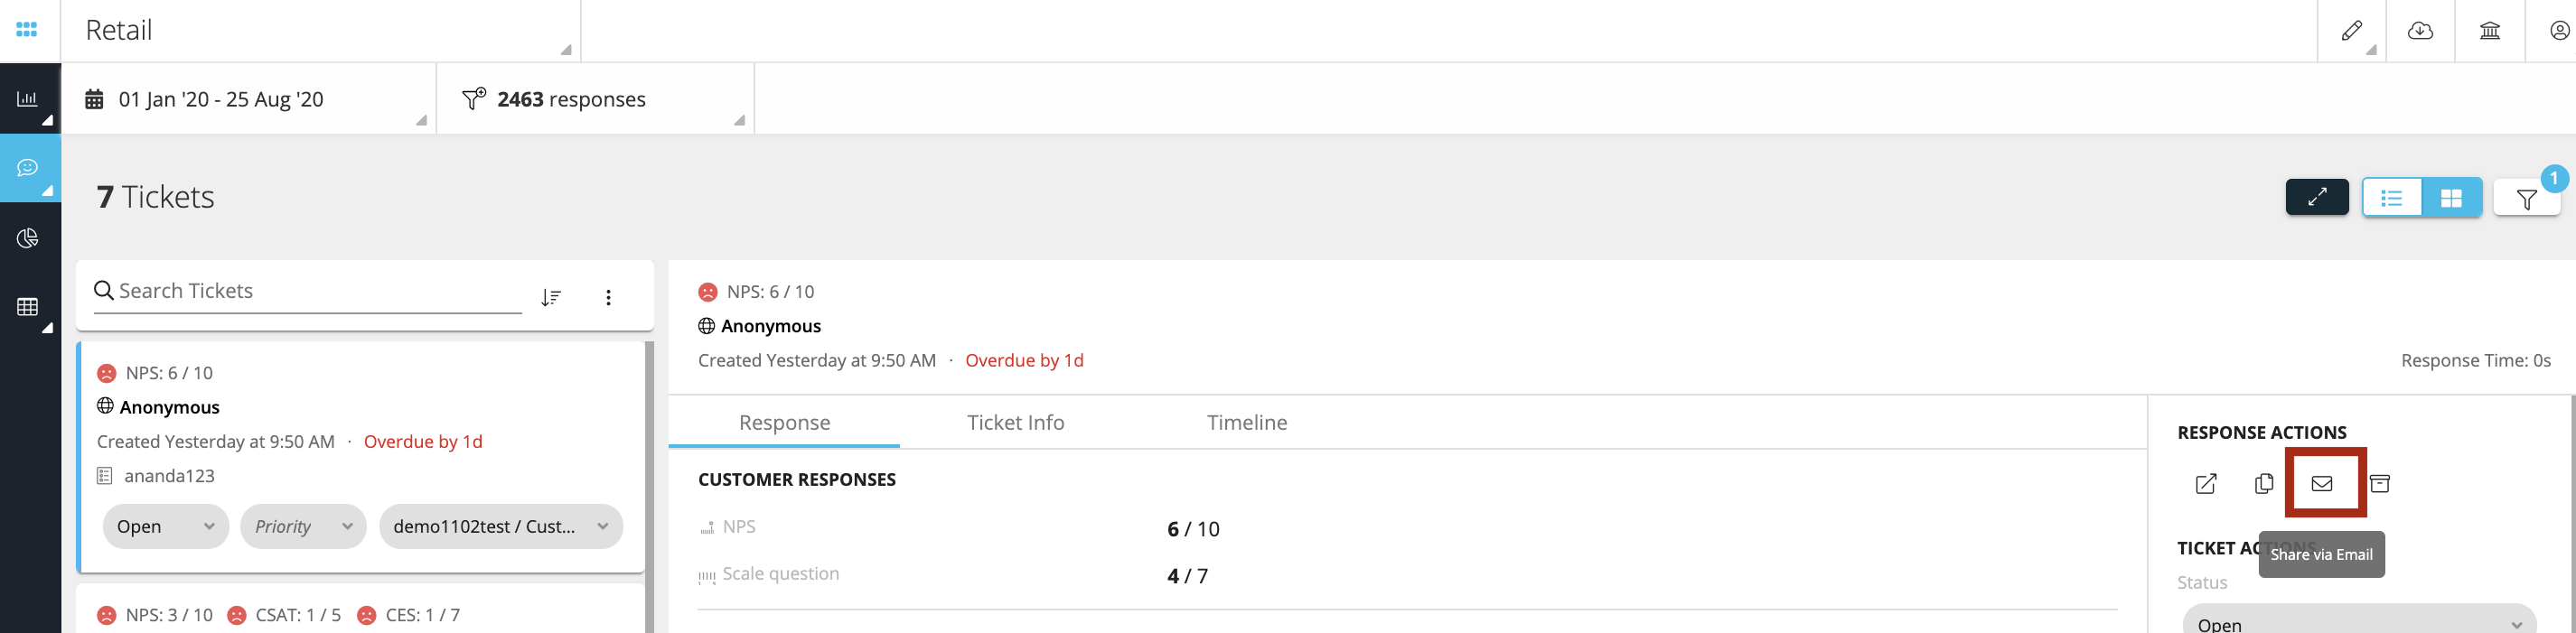
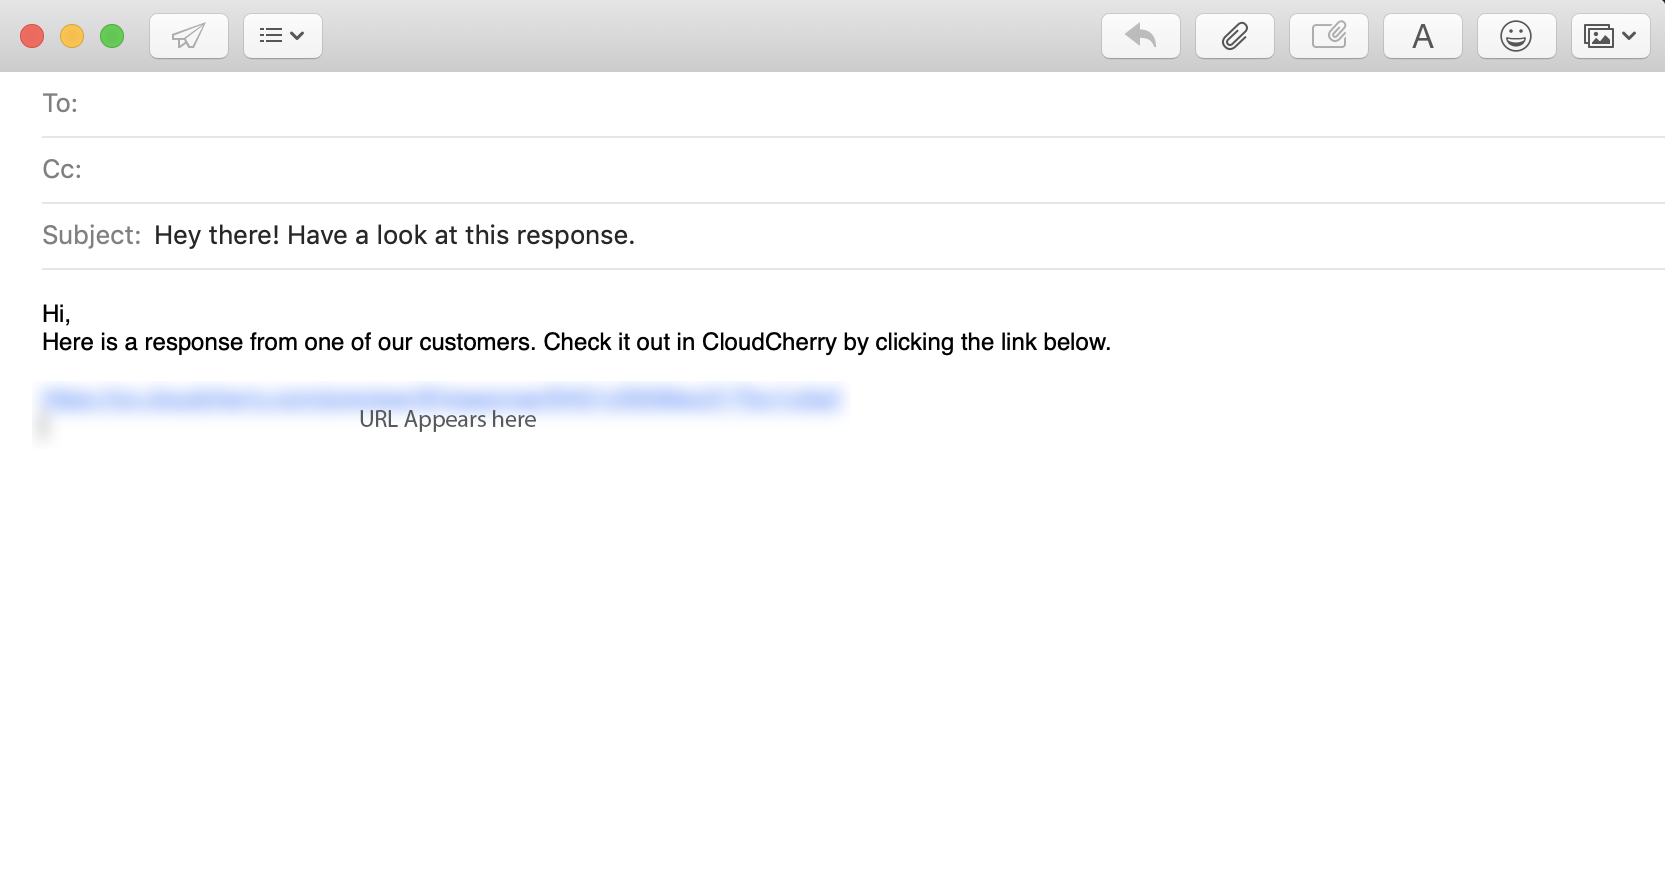
Share via Email
When you click on Share via Email icon, it opens in your email platform (Outlook etc.) in draft mode as shown below. When the recipient user/users receive this email, clicking on this link and it will automatically direct and open the relevant ticket details.
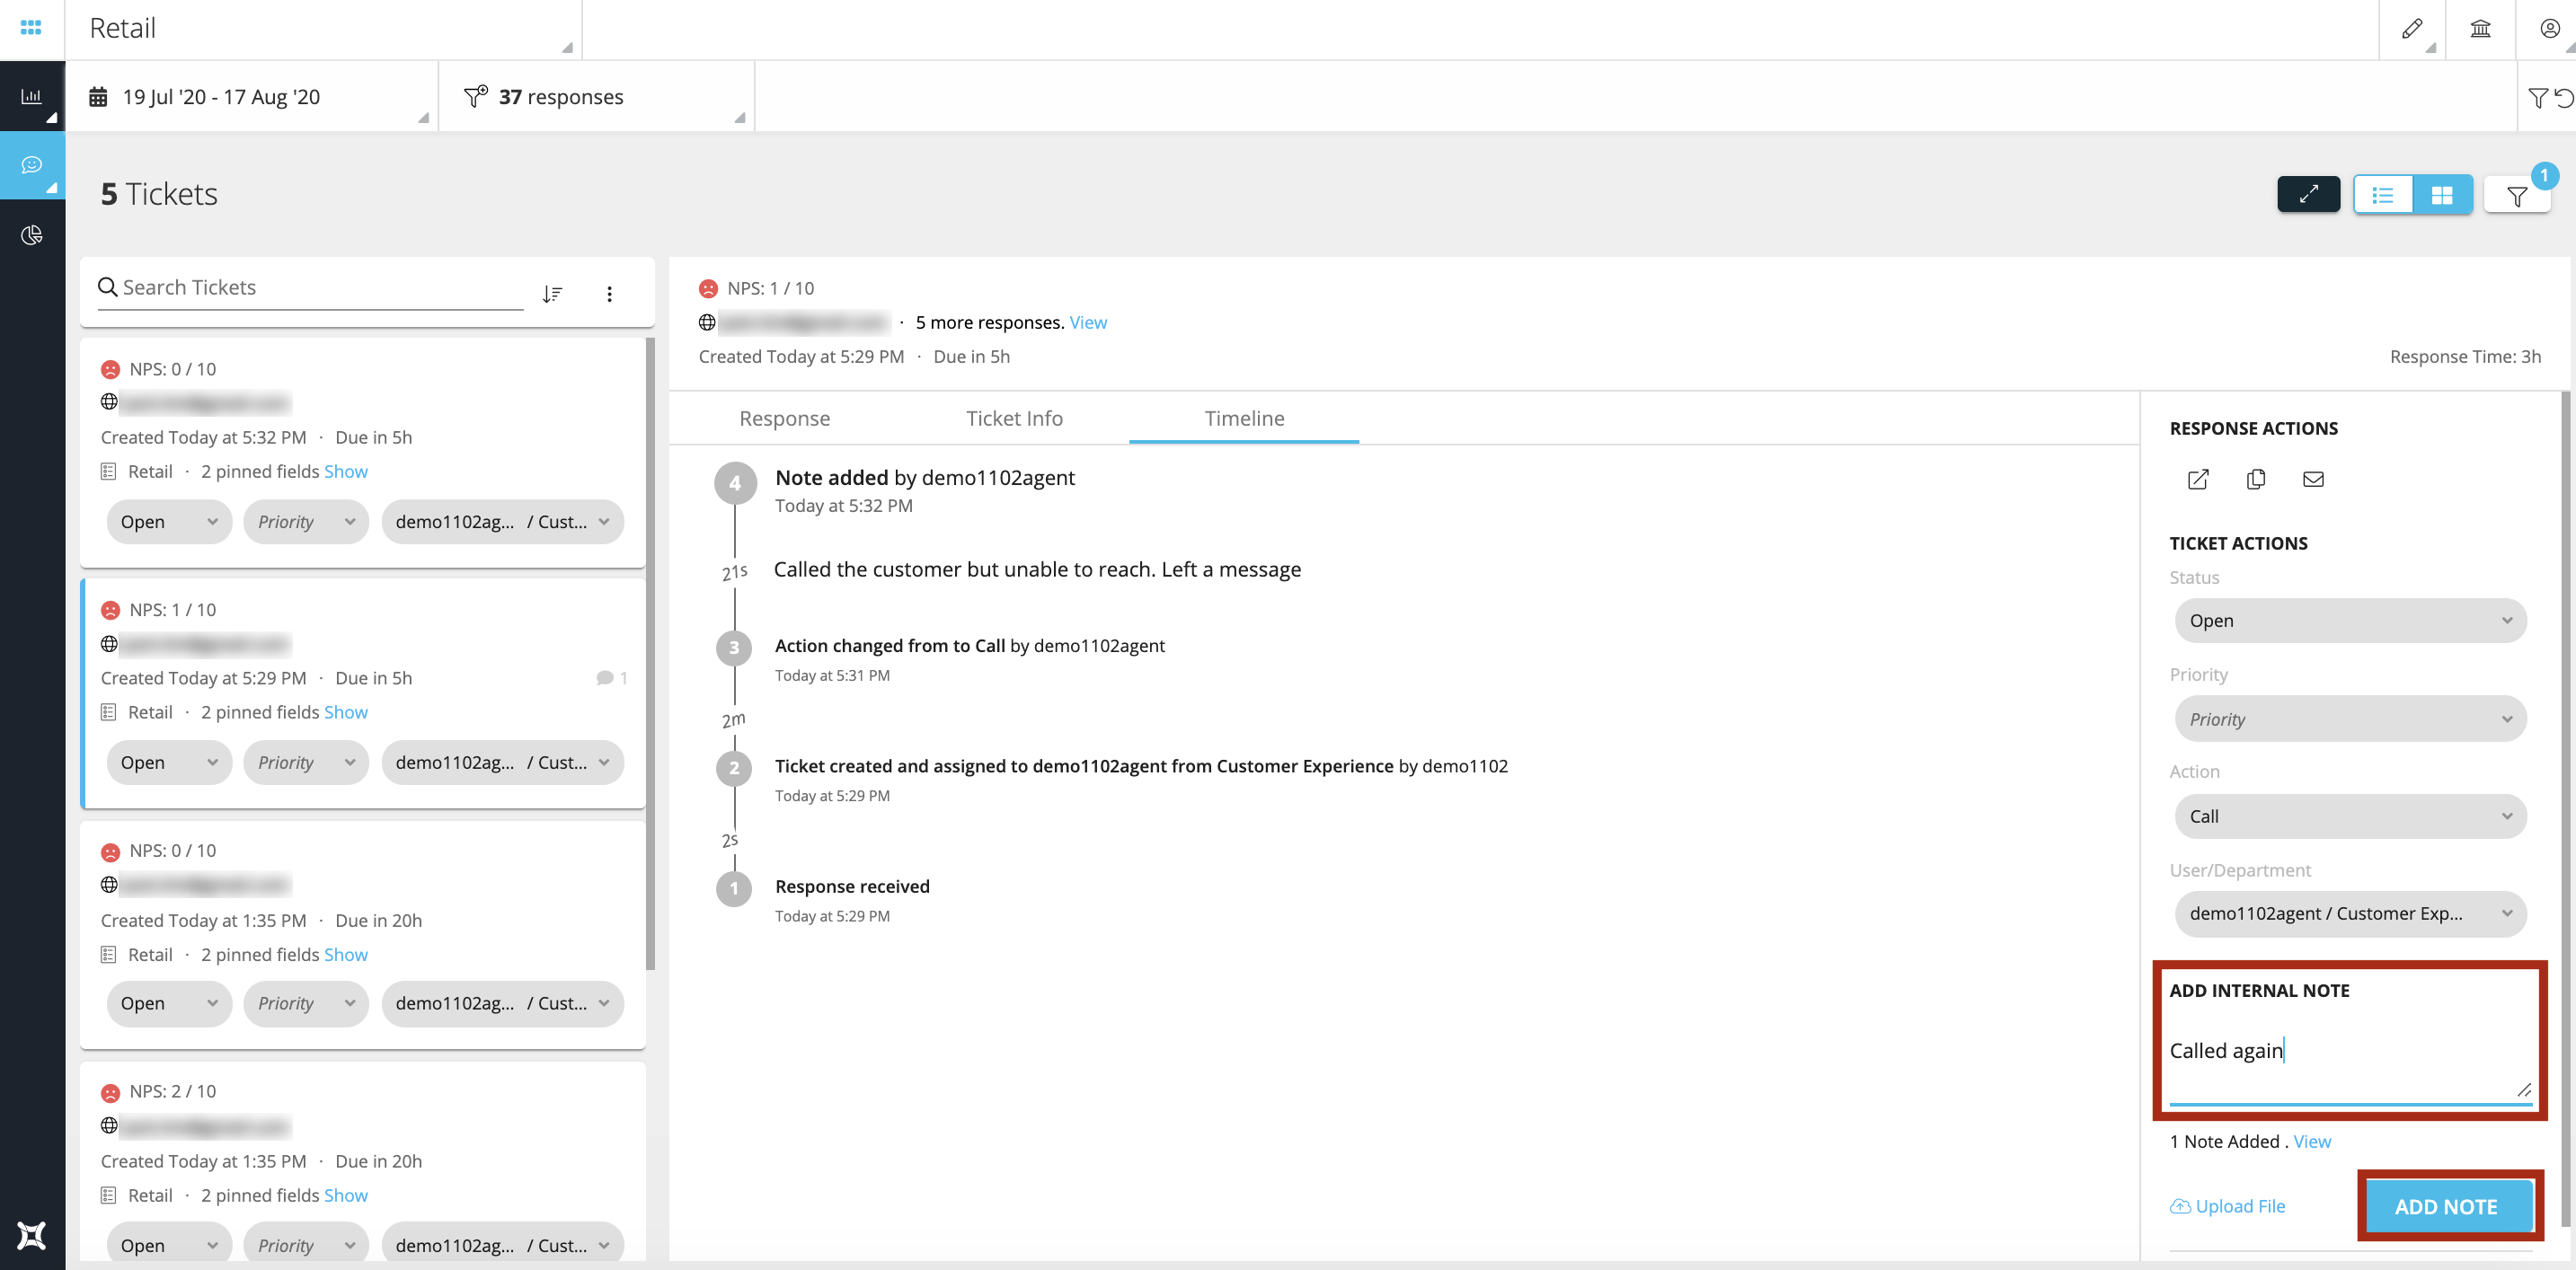
Add Notes
You can also add notes as shown below and along with that enclose any attachments like pdf or excel files. Press ‘Add Note’ to save the notes in the timeline section.
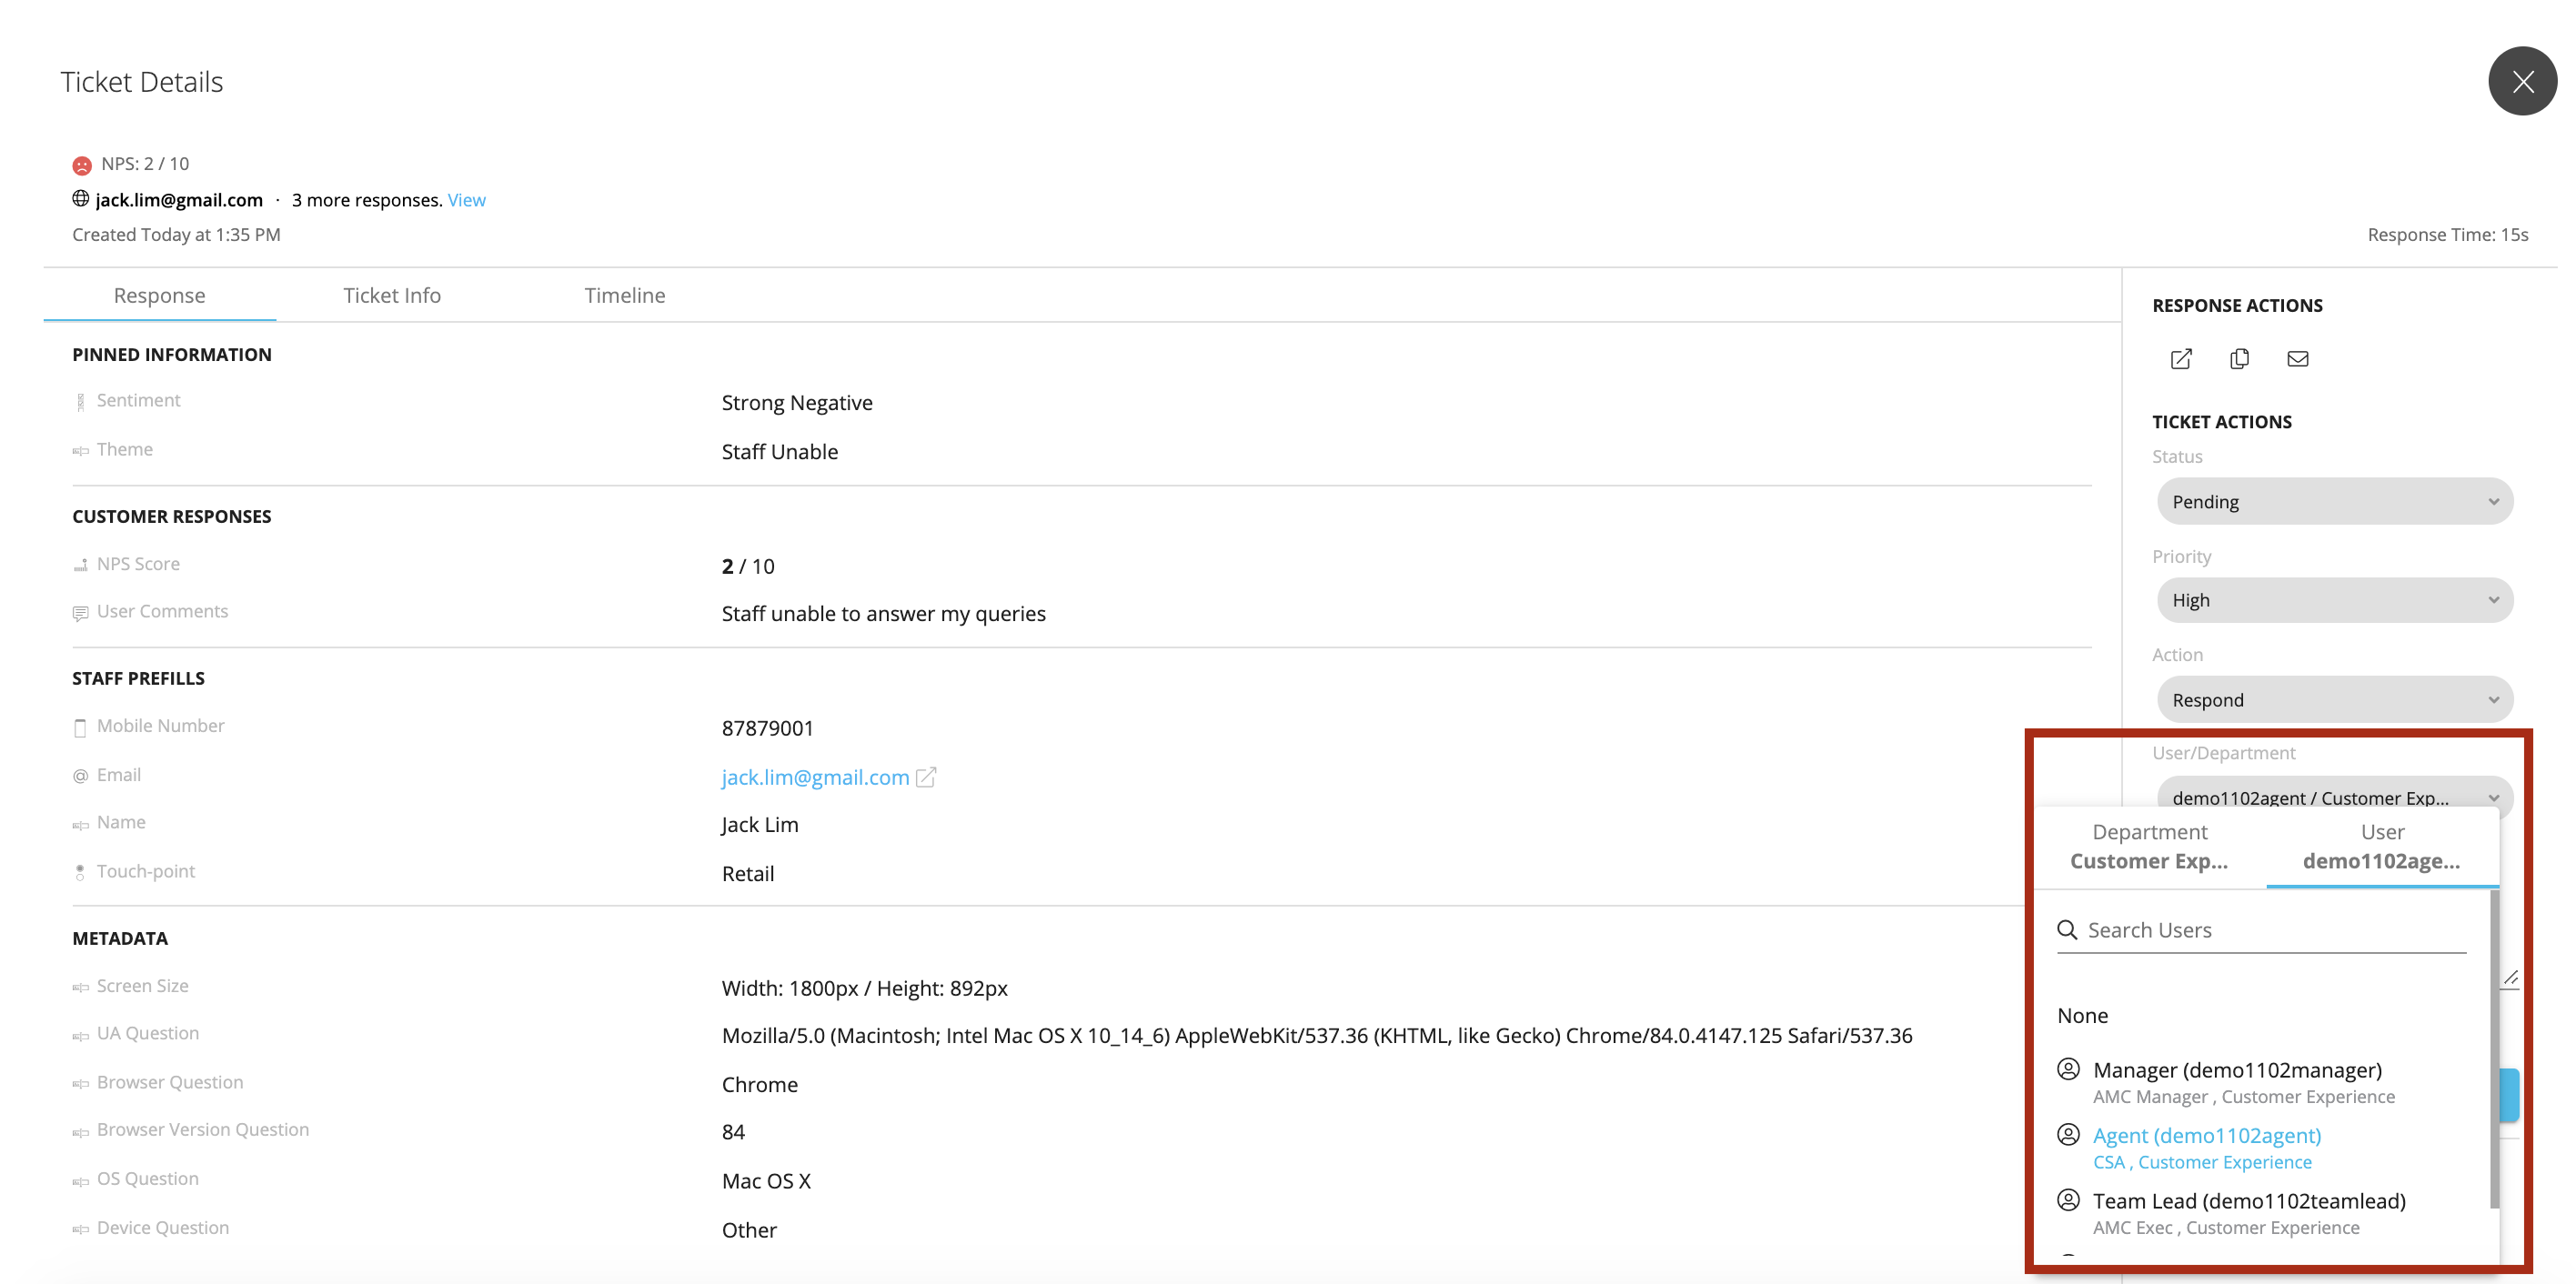
Assign to User/Department
To assign ticket to the user in a different department click on User/Department > Select the relevant department from the list
In instances the concern due to which the ticket is created is due to another department and cannot be addressed by the department users who have been assigned that ticket. For e.g.: Ticket is received by the Contact Centre that the Broadband connectivity is too intermittent but this issue can only be resolved by the Technical Department. So in this case the agent can assign the ticket to the concerned technician of the technical department.
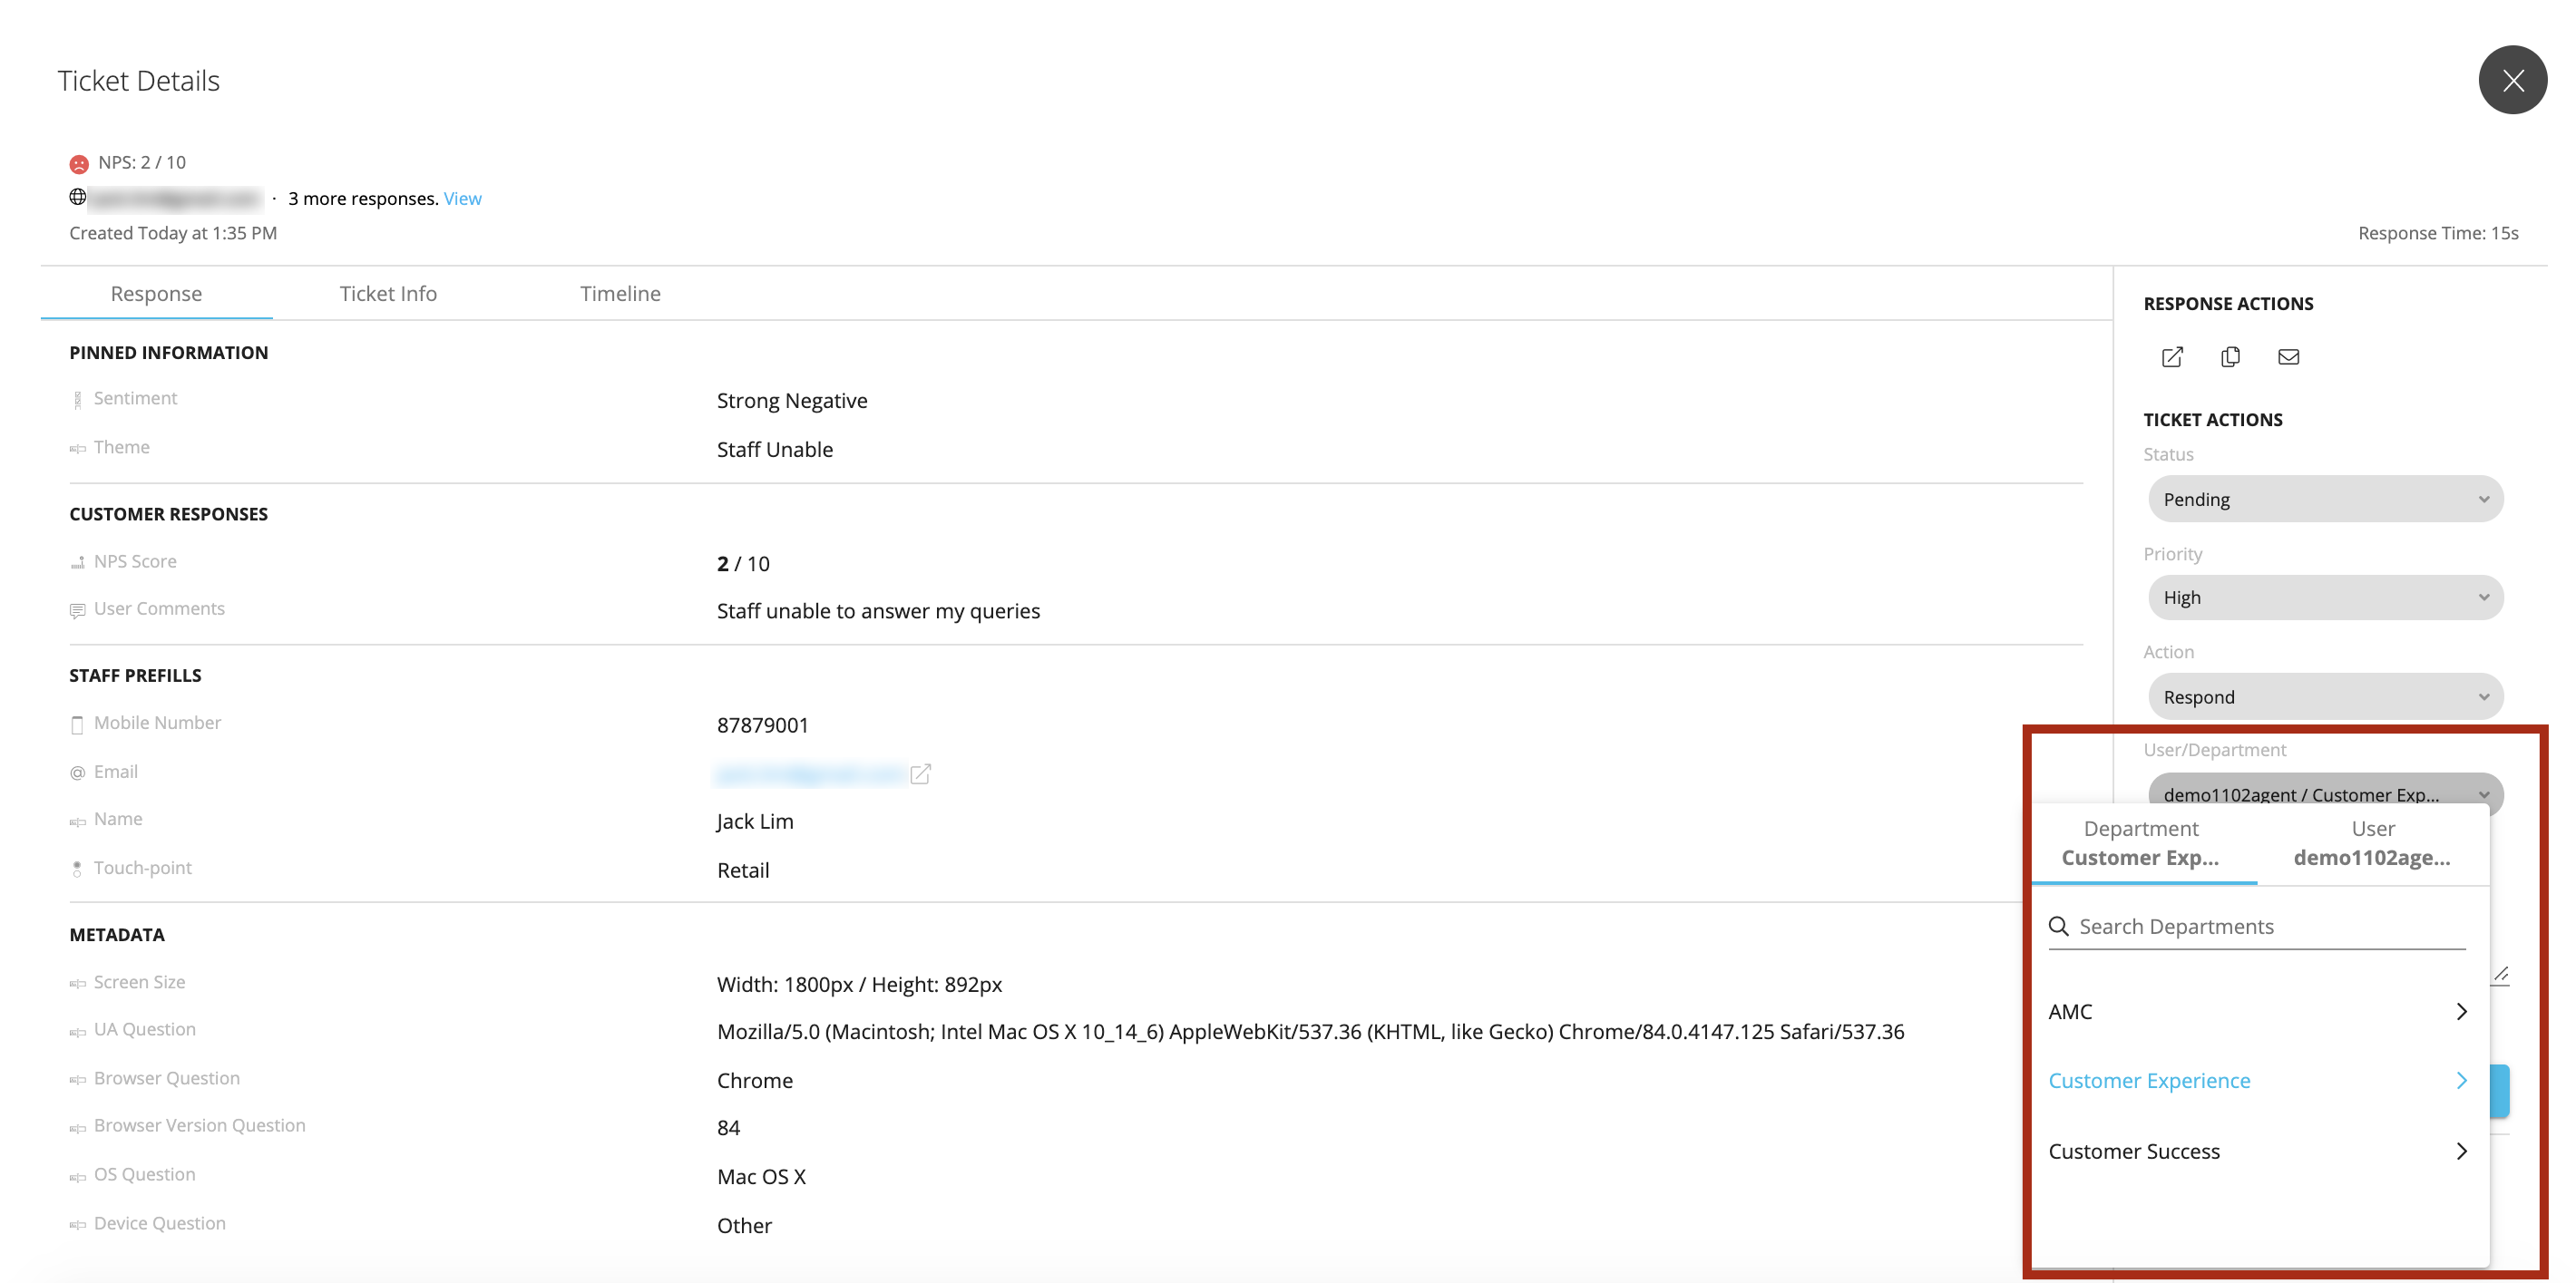
Once you select the department then select to which user you would like to assign this ticket to from the list of users.
Tickets Report
To download the Tickets Excel Report with all relevant details and communication history (Notes, Timeline etc.) click on the cloud icon.

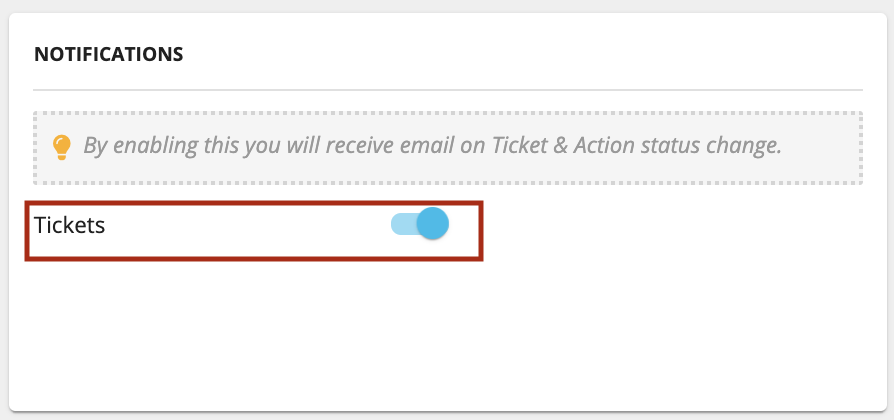
Automatic Notifications
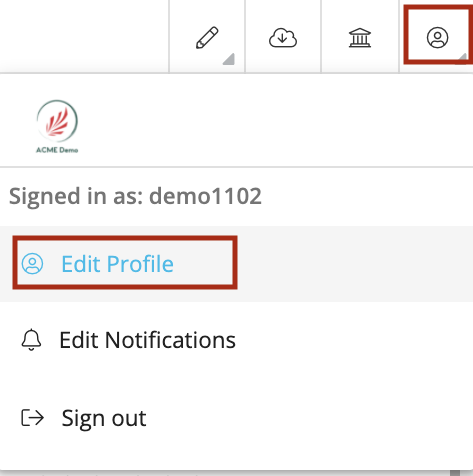
By enabling the notifications from profile settings, you can receive the ticket email alerts automatically on Ticket & Action status change. For instance, the ticket status is changed from Pending to Closed then you will receive an email alert.
 |
 |