
Deployment Guide For Cisco Webex Experience Management Invitation Module
Content Outline
1. Introduction
In an economy where customer experience trumps price and product, the Cisco Webex Experience Management (referred to as Experience Management here on in the document) platform helps organizations exceed customer expectations and deliver business outcomes through its three pillars of customer experience:
-
Measuring the customer journey: Understanding the customer experience through a continuous collection of moments across their journey.
-
Obtaining a 360-degree view of the customer: Bringing disparate data together to enable actionable insights, proactive support, and advanced marketing automation.
-
Becoming predictive: Understanding predictively how changes to the customer experience will affect outcomes and impact financial metrics.
One of the key steps in measuring customer experience is to reach out to customers over various channels such as email, SMS, web intercept, etc to solicit feedback. Amongst all the survey distribution channels, email and SMS are 2 of the popular ones. Global delivery invitation management enables a personalized experience for receiving survey invitations across various channels on the journey using workflows that can be configured and reused across chosen transmission channels like SMS and Email while requiring no PII information in the Experience Management platform.
Invitations module has 2 parts.
- Experience Management hosted module
- Partner hosted module
For more details on the architecture, please refer the “Invitations Module Architecture Document” document.
In this document, we will concentrate on the Partner hosted module of the Invitations feature. This involves configuring webserver, downloading code from GIT repo, generating binaries, configuration and deployment of these binaries. This module will be hosted outside of Experience Management Product infrastructure and will be completely managed by partners.
By the end of this document, you would know the working URL of hosted APIs for further configurations.
2. Scope
This document outlines the deployment process for the components of the Invitations feature:
-
Dispatch Request – hosts Dispatch request, EventLog and Account Configurations APIs. This involves ASP.Net Core Web API Deployment
-
Account Configurations Front-End – Configures vendor details for the Dispatches. Uses the Configurations APIs as mentioned in #1 above
-
Dispatcher – Dispatches invitations to the vendors for their respective deliveries to the end customers/recipients
-
Notification - Sends out real-time and EOD notifications based on DIWEF logs
3. Target Audience
-
Infra team
The Infra team is assumed to be the team that will deploy servers and configure the environment required to run the Partner hosted side of the Invitations module.
-
Devops team
The Devops team is assumed to be the team that will be monitoring the partner hosted setup that is running on the infra provisioned by the Infra team.
4. Prerequisites
- Must have gone through the “Invitations Module Architecture Document” to have an understanding of the overall architecture and the various components involved in the module you are trying to set up
- Must have gone through the “Infra Provisioning Guide” and provisioned all necessary services
- Access to an Ubuntu 18.04 server with a standard user account with sudo privilege
- Must have a domain pointing to provisioned Ubuntu server
- Must have a signed SSL cert and key bought from valid authority for all servers
- Must have Mongo DB connection string
- Access with required permissions to Azure or AWS portal to deploy Azure functions or AWS lambda respectively
- The deployment steps should be tried from Windows computer only. If you are using any other OS than Windows, you should use the alternatives for SSH and SFTP tool.
5. Dispatch Request - ASP.Net Core Web API deployment
The Web API to be deployed is developed on ASP.Net Core 3.1 framework. The target servers are Linux servers only and currently focused on Ubuntu 18.04 only. All the steps in subsequent sections are provided keeping Ubuntu 18.04 servers in mind.
5.1 Ubuntu Server installation guide
5.1.1 Login to Ubuntu Server
-
This is an optional step and should be skipped if you are already able to access your Ubuntu Server.
-
Get the Public IP of server and .pem file (Private Key) to access the server. .pem file will be provided by the cloud provider where the server is hosted
-
Download and install MobaXterm on Windows from here which provided SSH and SFTP tools in one place. For mac computers, ssh can be done to this ubuntu server from Terminal itself.
-
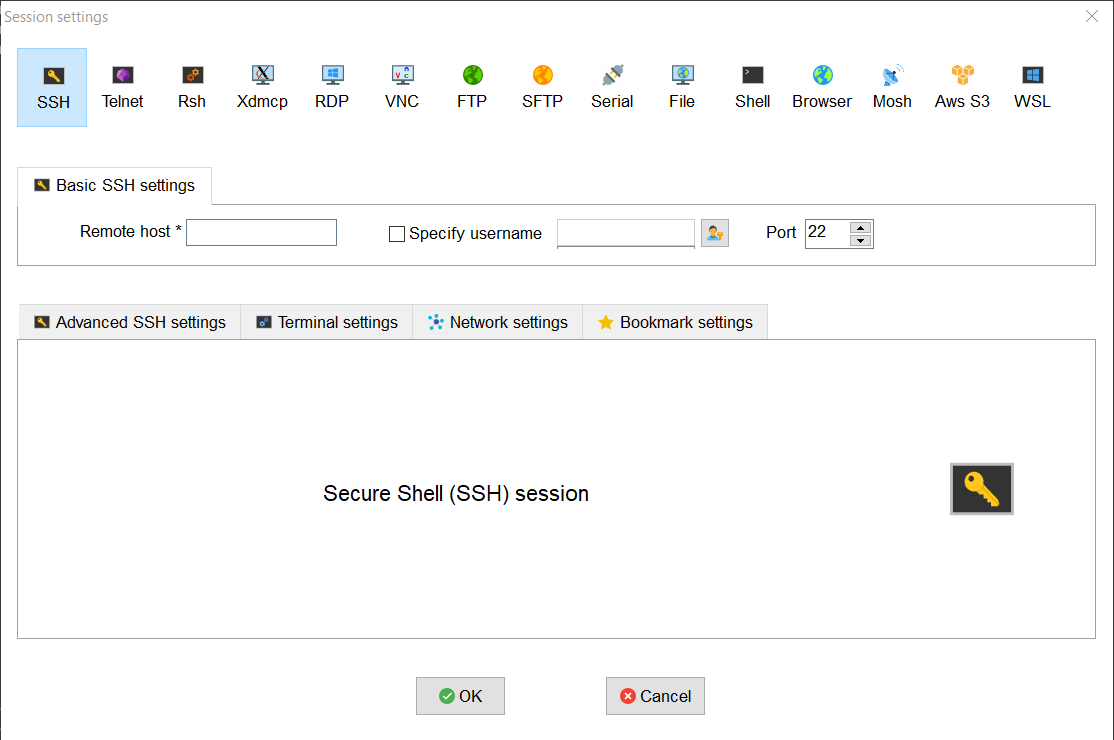
Click on “Session” to create new session and then click on “SSH” as per below screenshot
-
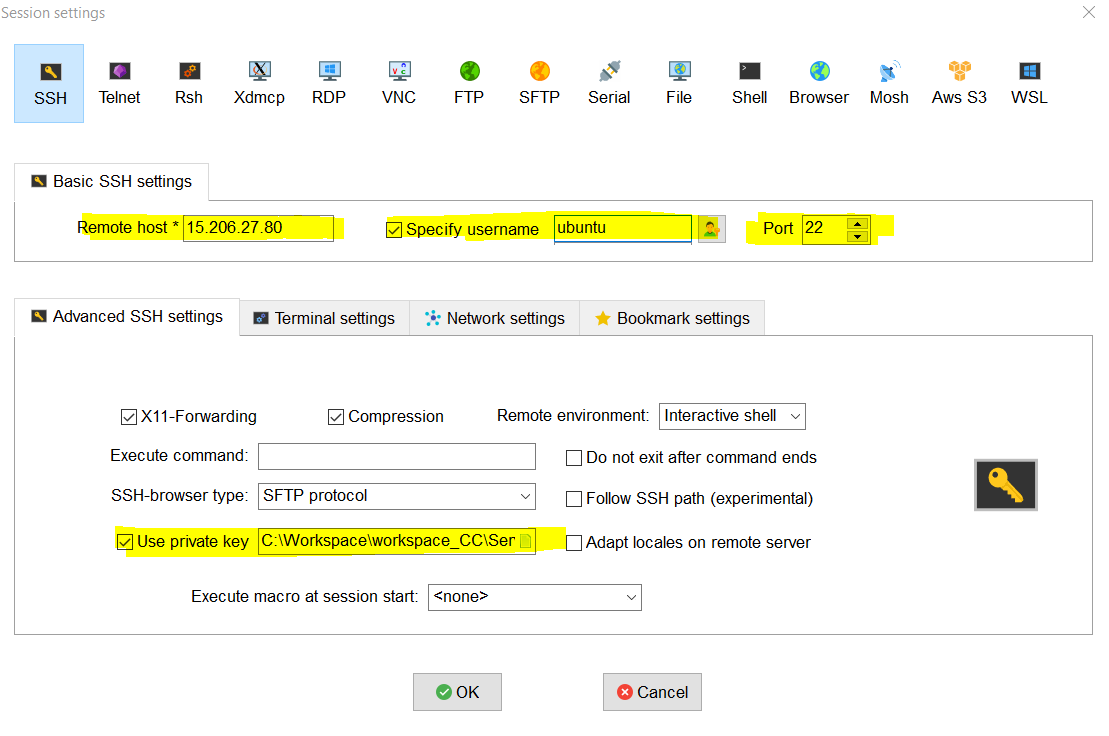
Enter Server IP under “Remote host”, username and Provide full path of Pem file under “Advanced SSH settings” -> “Use private key”. Click Ok to save the settings.
-
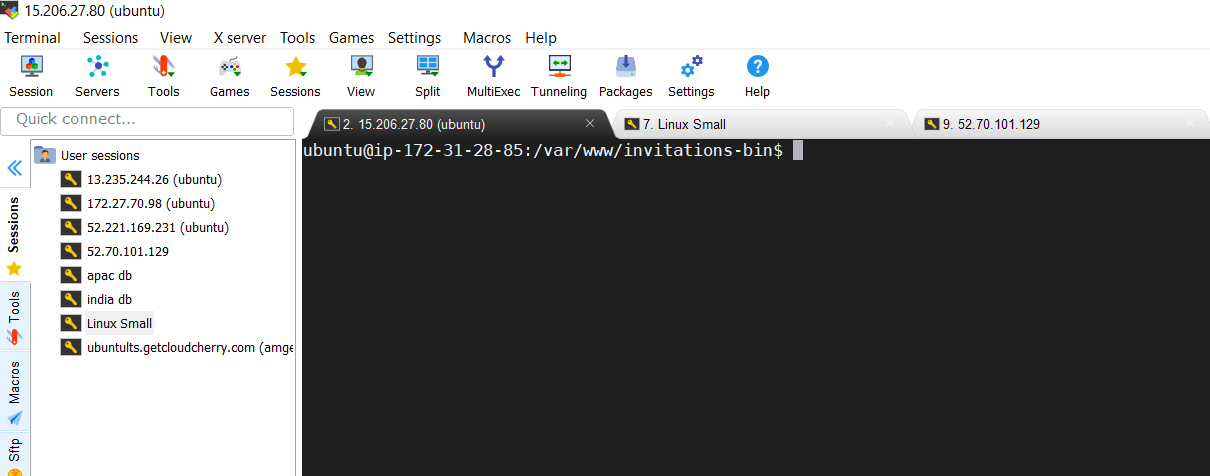
Launch the Terminal by clicking on saved User Sessions on the left. Multiple Terminals and Sessions can be opened and operated in parallel.
-
Same tool we will use to copy the API binaries to this server at later steps.
By this step, you should be able to login to the Ubuntu server. Next we will be installing .NET Core SDK and runtime.
5.1.2 Install the .NET Core SDK & runtime on the server
-
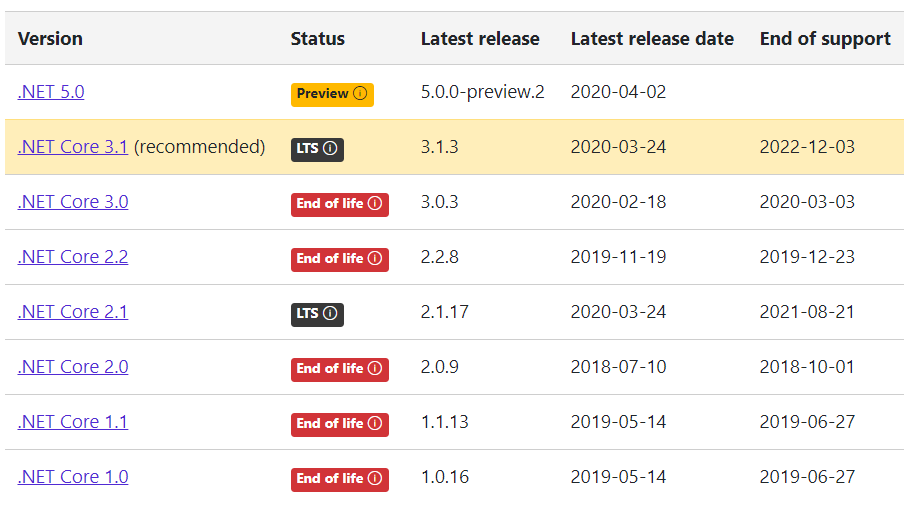
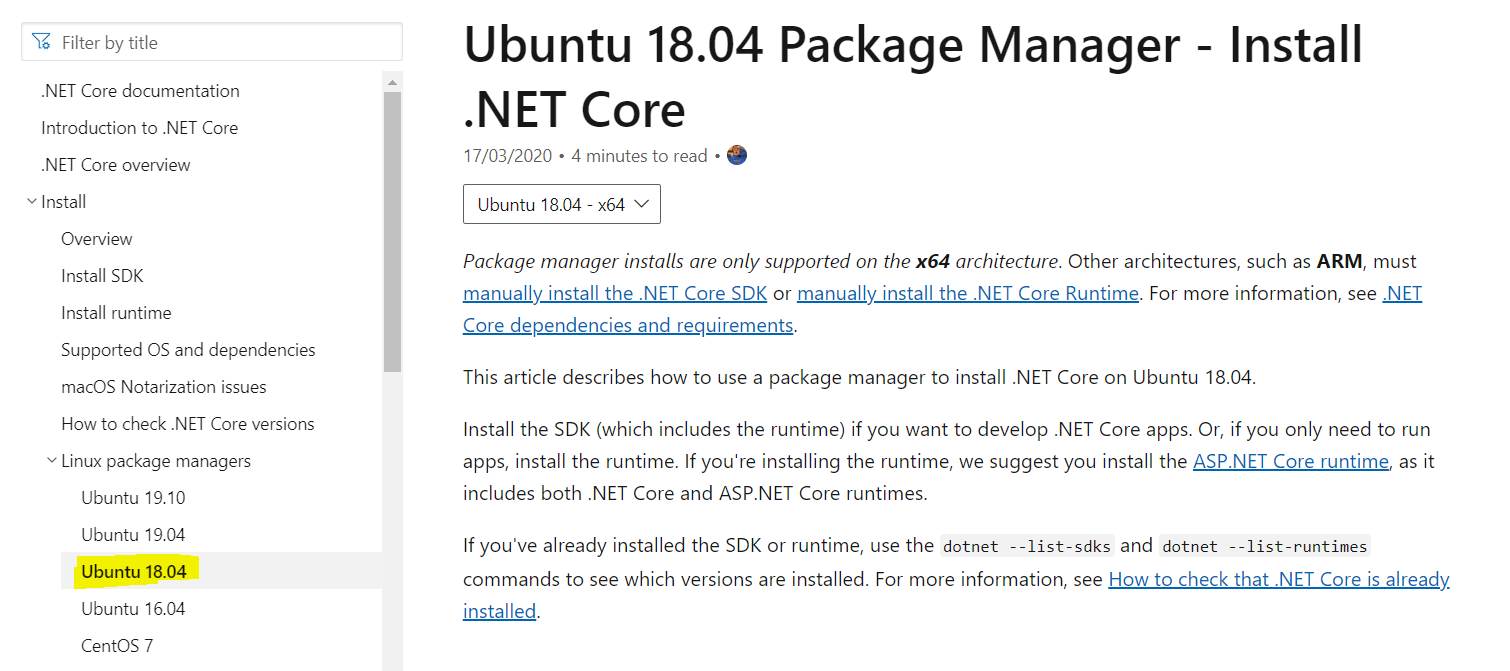
Go to official download page(https://dotnet.microsoft.com/download/dotnet-core) of dotnet core and choose recommended download of .Net Core 3.1
-
Look for latest available version which as per the below screenshot is SDK 3.1.201 and ASP.NET Core Runtime 3.1.3 (highlighted in Yellow)

-
Click on “Packet Manager Instructions” and choose Ubuntu 18.04 from the menu on the left side of the web page.
-
The further steps are to install ASP.Net Core runtime on Ubuntu 18.04 can also be referred from here or continue to follow the below steps
-
Register Microsoft key and feed
Open a terminal and run following command
wget https://packages.microsoft.com/config/ubuntu/18.04/packages-microsoft-prod.deb -O packages-microsoft-prod.deb sudo dpkg -I packages-microsoft-prod.deb -
Install the .NET Core SDK and ASP.NET Core runtime
    sudo add-apt-repository universe
    sudo apt-get update
    sudo apt-get install apt-transport-https
    sudo apt-get update
    sudo apt-get install dotnet-sdk-3.1
    sudo apt-get install aspnetcore-runtime-3.1
Important
If you receive an error message similar to Unable to locate package dotnet-sdk-3.1 or Unable to locate package aspnetcore-runtime-3.1, see the Troubleshoot the package manager section.
-
Verify the installed .Net Core SDK and runtimes version. Results are highlighted in yellow.
dotnet --versiondotnet --info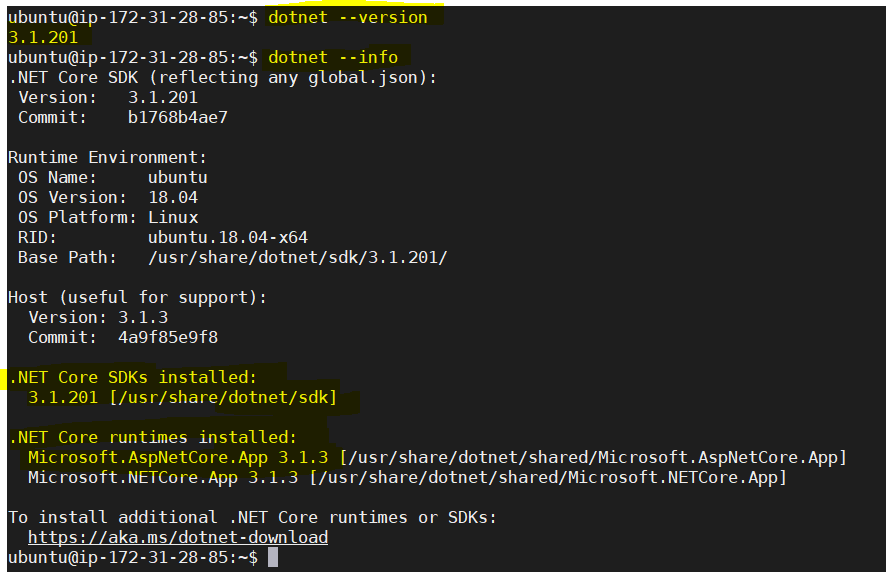
By this step, you should be able to install .NET Core and run time successfully. Next section is just information on Kestrel server. No action is required.
5.1.3 Kestrel with a reverse proxy server
-
Kestrel is a cross-platform web server for ASP.NET Core. Kestrel is the web server that’s included by default in ASP.NET Core project templates.
-
When to use Kestrel with a reverse proxy

-
When Kestrel is configured to listen on a port, Kestrel handles all the traffic for that port regardless of requests’ Host headers.
-
A reverse proxy that can share ports could forward requests to Kestrel on a unique IP and port.
-
A reverse proxy (in this case Nginx)
- Can limit the exposed public surface area of the apps that it hosts.
- Provide an additional layer of configuration and defense.
- Might integrate better with existing infrastructure.
- Simplify load balancing and secure communication (HTTPS) configuration. Only the reverse proxy server requires an X.509 certificate, and that server can communicate with the app’s servers on the internal network using plain HTTP.
By this step, how Kestrel to be used with a reverse proxy server should be understood. Next, we will install the Nginx Webserver.
5.1.4 Install Nginx
sudo apt-get update
sudo apt install nginx-full- The installer creates a System init script that runs Nginx as daemon on system startup.
- Follow the installation instructions for Ubuntu at Nginx: Official Debian/Ubuntu packages in case of any issues with Nginx installation using above commands.
- Since Nginx was installed for the first time, explicitly start it by running:
sudo service nginx start - Verify in your computer browser if the default landing page for Nginx loads up successfully. The landing page is reachable at
Check the server firewall from respective cloud portal to make sure port 80 is allowed to verify using above command.
http://<server_IP_address>/index.nginx-debian.html
By this step, you should be able to install Nginx successfully and if firewall permits, should be able to access default landing page for Nginx.
5.1.5 Set-up monitoring for ASP.NET Core app
The server is setup to forward requests made to http://<serveraddress>:80 on to the ASP.NET Core app running on Kestrel at http://127.0.0.1:5000. However, Nginx isn’t set up to manage the Kestrel process. ystem can be used to create a service file to start and monitor the underlying web app. ystem is an init system that provides many powerful features for starting, stopping, and managing processes.
-
Executable of .Net Core Web API app will be stored and managed in /var/www/invitations-bin working directory.
-
Create a directory as “dummy_build” under /var/www (only for the first time, so that we can create soft link on this folder. From next deployment, instead of dummy_build folder, it will be actual webapp executable folder)
-
All related commands and screenshots are mentioned below:
    cd /var/www/
    sudo mkdir dummy_build
    sudo chown ubuntu:ubuntu dummy_build/
    sudo chown ubuntu:ubuntu dummy_build/*
    sudo ln -s dummy_build/ invitations-bin
    sudo chown ubuntu:ubuntu invitations-bin
    ls -lrt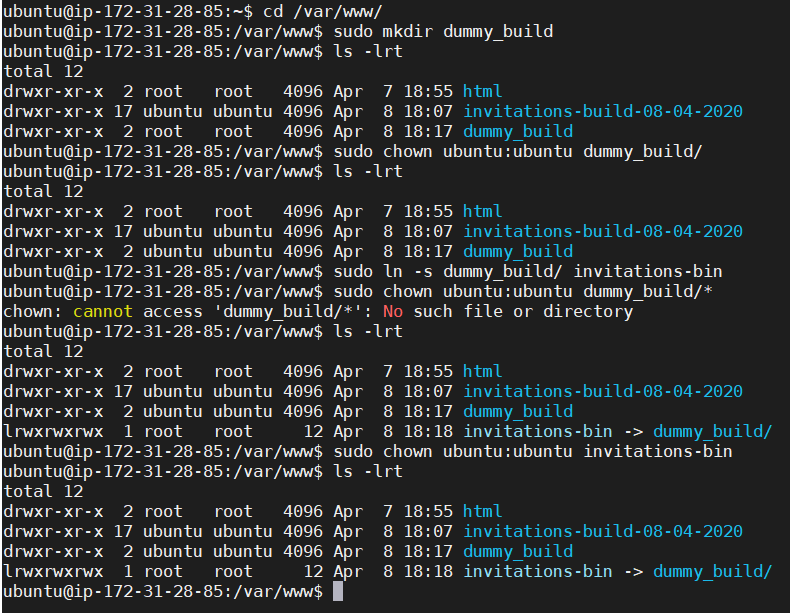
-
Create the service definition file:
sudo nano /etc/systemd/system/kestrel-invitations.service -
Copy the following content into the kestrel-invitations.service
    [Unit]
    Description=Invitations API controllers (ASP.NET Core) running on ubuntu 18.04
    [Service]
    WorkingDirectory=/var/www/invitations-bin
    ExecStart=/usr/bin/dotnet /var/www/invitations-bin/XM.ID.Invitations.API.dll
    Restart=always
    # Restart service after 2 seconds if the dotnet service crashes:
    RestartSec=2
    KillSignal=SIGINT
    SyslogIdentifier=dotnet-invitations
    User=ubuntu
    Environment=ASPNETCORE_ENVIRONMENT=Development
    Environment=DOTNET_PRINT_TELEMETRY_MESSAGE=false
    [Install]
    WantedBy=multi-user.target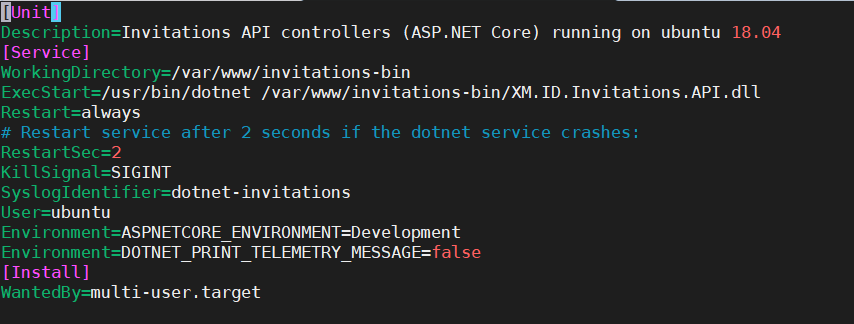
-
Enable the service
sudo systemctl enable kestrel-invitations.service -
Enable the SSL for dotnet
dotnet dev-certs https
At the end of this step, you should have monitoring set-up for Invitations WebAPI successfully and this also completes the basic server configuration. Remaining tasks are to publish and deploy the build into server and confiugre Nginx.
5.2 Generate executable of ASP.Net core Web API for Ubuntu Server
At this step, we will be downloading the Invitations project file and compile the code using Visual Studio 2019 to make sure all the necessary libraries are available and compiling without any issues. The required tools at this step are: Visual Studio 2019(Version 16.4.6+) and Git bash.
Following steps are provided for Visual Studio installed on Windows. If trying on other OS than Windows, then use these steps as reference to publish the code. Screenshots may not match exactly for Visual Studio running on other OS.
5.2.1 Download the code from the public repo of Invitations Project
-
Git clone https://github.com/cisco/WXM-Invitations.git or download from the same link
-
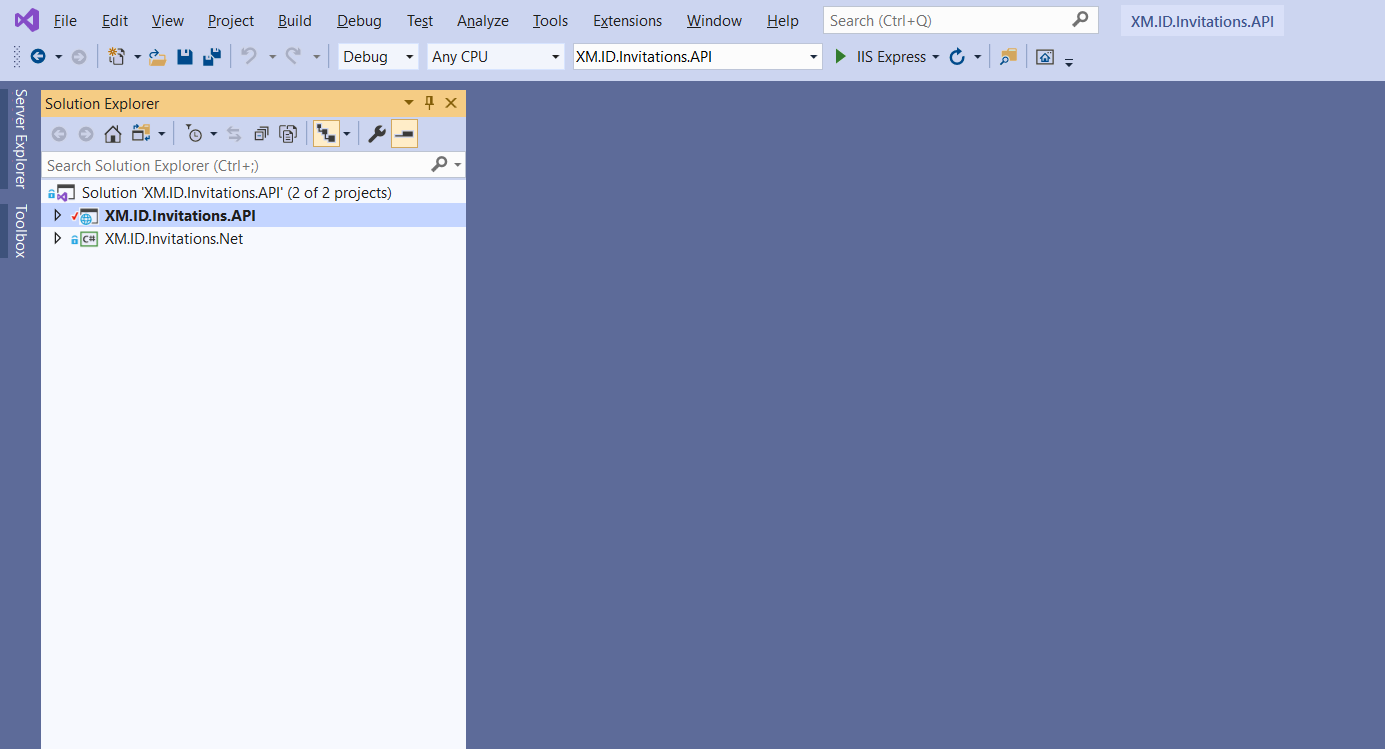
Go to the downloaded folder. Click on “XM.ID.Invitations.API” folder and open the Visual studio solutions file. You should see the following project structure.
-
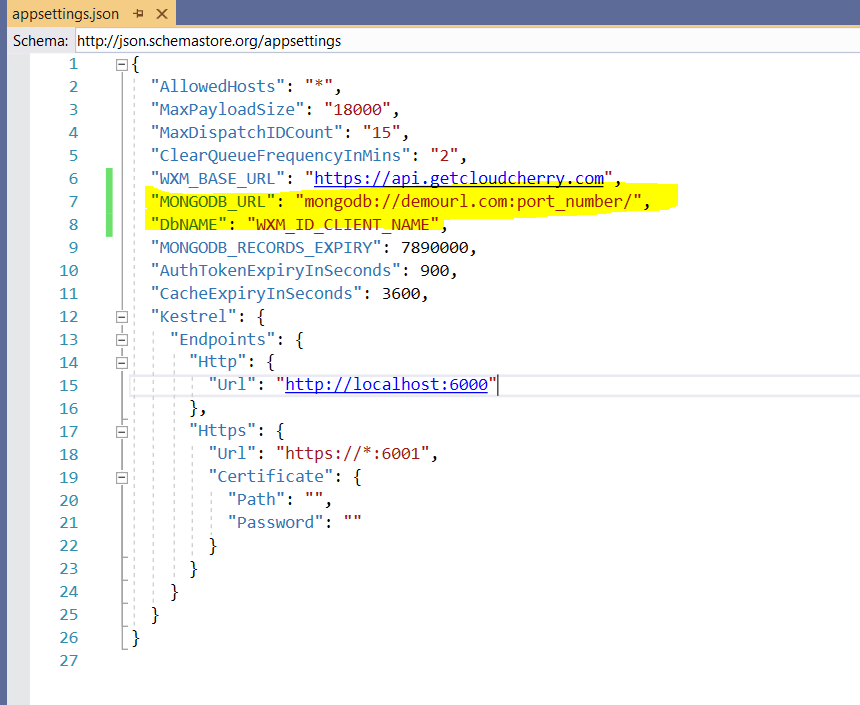
Update the following settings in appsettings.json file. All the other settings should be untouched except these two
    "MONGODB_URL": "mongodb://demourl.com:port_number/",
    "DbNAME": "WXM_ID_CLIENT_NAME",
Provide the Mongo DB URL as provisioned earlier. This is a must before proceeding for deployment. Also, provide DbNAME which is unique for this entire DB. Same Mongo DB URL and Name will be used in “Dispatcher” component deployment too.
By this step, you must have downloaded the Invitations Feature code base and configured the appsettings.json file for XM.ID.Invitations.API solution. In next step, we will be publishing the binaries compatible for Ubuntu servers.
5.2.2 Configure Visual Studio to publish the ubuntu binaries
-
This is one-time configuration for the first-time deployment. From subsequent deployment, same configuration can be used.
-
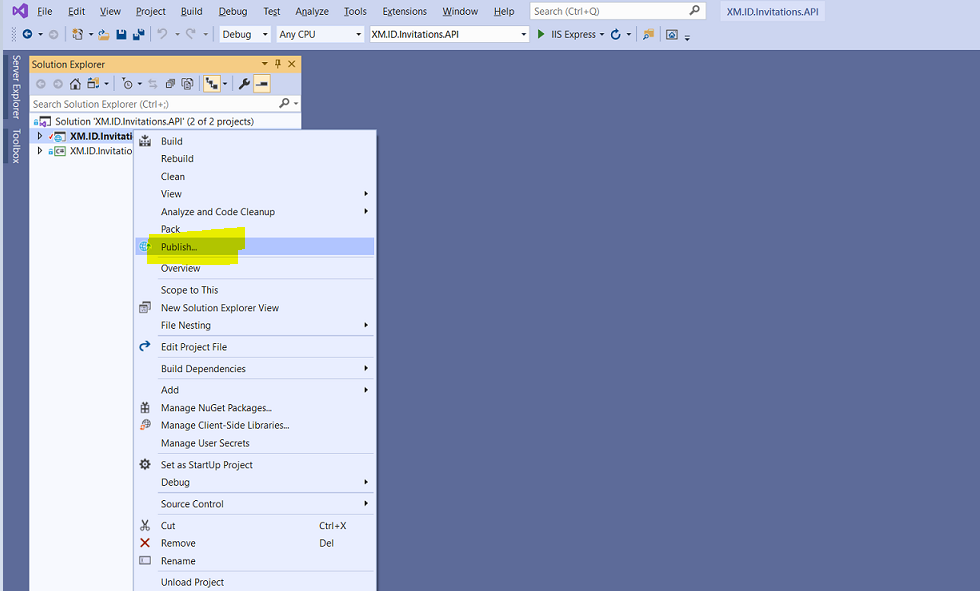
Right click on “Invitations” project and click on “Publish”
-
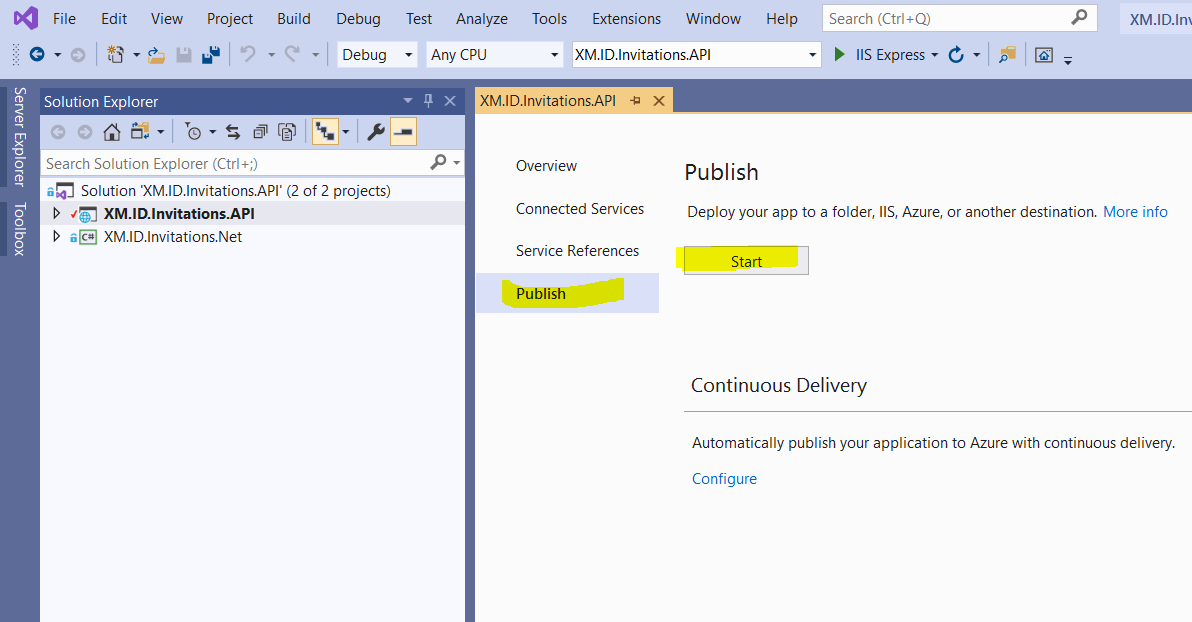
Click on “Start” to set-up a dedicated folder for publishing build
-
Choose “Folder” on the left menu option and provide the path of the folder where binaries should be published. Create a dedicated folder in your system if already not done.

-
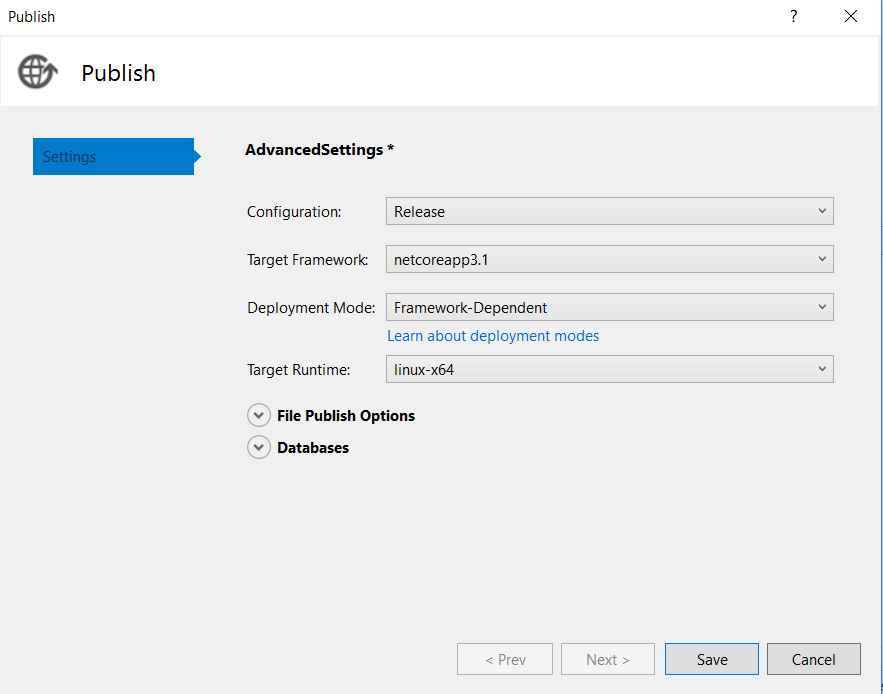
Click on “Advanced” and choose “Target Runtime” as “linux-64”
-
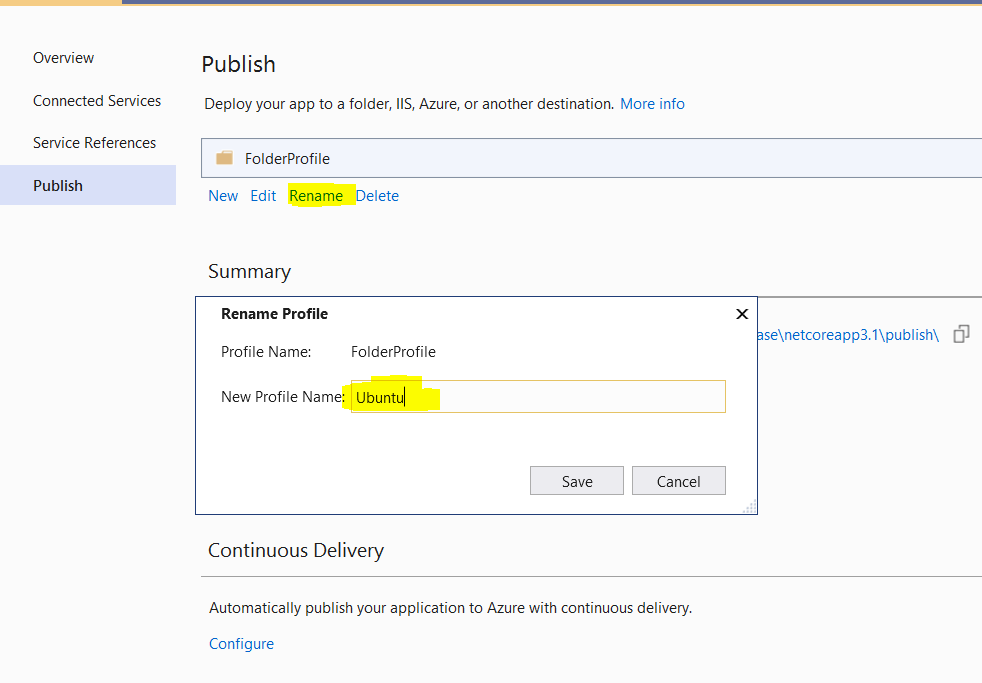
Once saved, click on “Rename” and provide “New Profile Name” as “Ubuntu” to easily recognize the profile name next time.
-
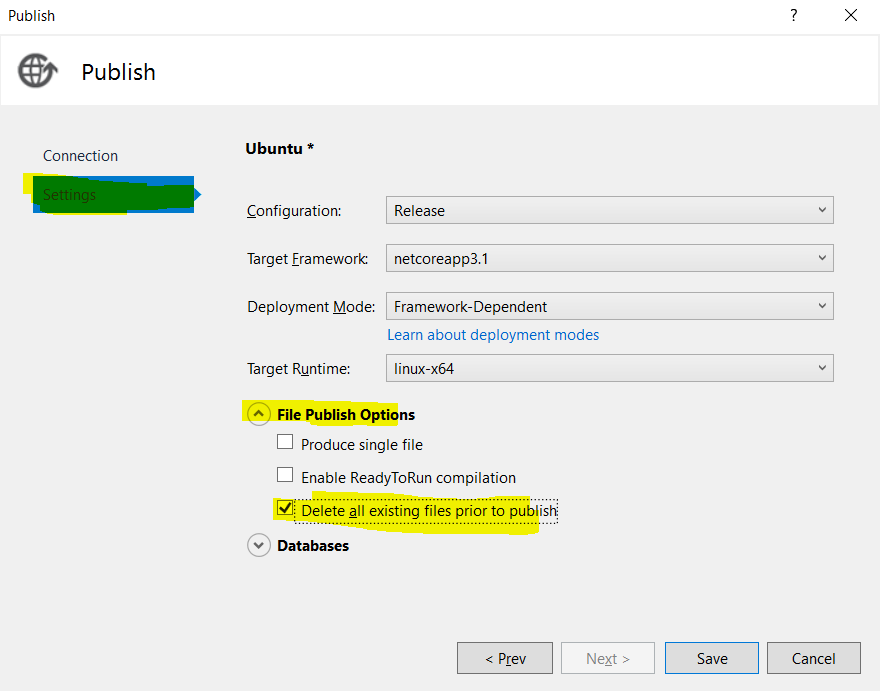
Click on “Edit” -> “Settings” -> “File Publish Options” and check “Delete all existing files prior to publish” option. Save once done.
By this step, you should be able to generate the binaries successfully. Next step would cover the deployment for this binaries.
5.2.3 Deploy the published folder to Ubuntu Server
We will be using the same MobaXterm tool to transfer the published zip folder to Ubuntu Server.
-
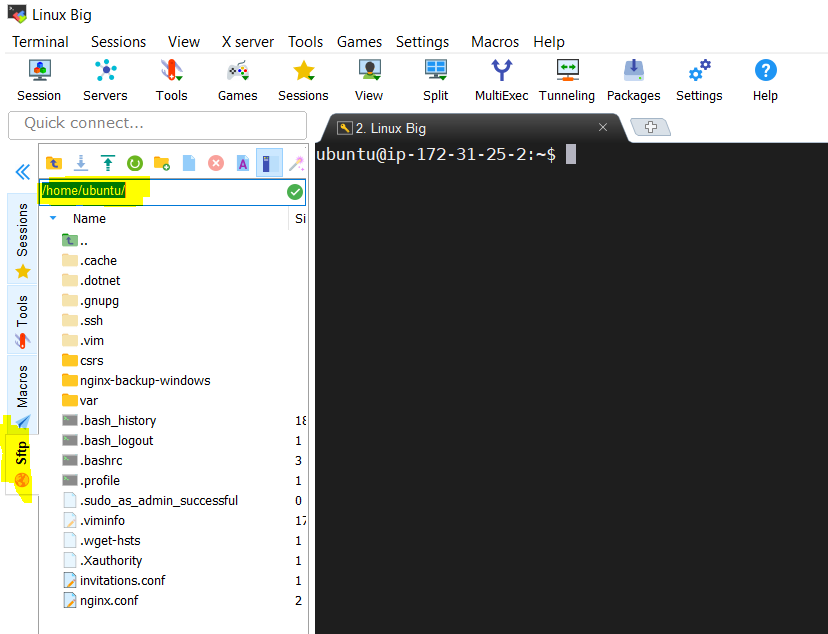
Login to the Ubuntu Server Terminal by clicking on the saved user session in this tool.
-
Then click on “Sftp” menu item on the left side as per below screenshot.
-
Make sure you are in home directory in Sftp console as per the above screenshot. Now click on the Upoad button(Up arrow) as per the below sceenshot.
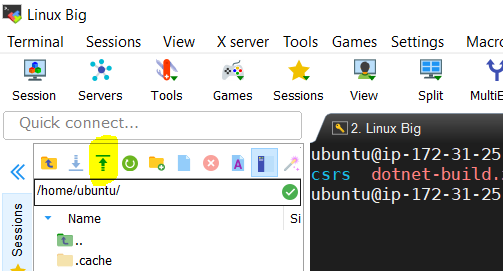
-
Choose the published zip created in previous steps and it will be transferred to /home/ubuntu directory in Ubuntu server.
-
As per this screenshot, the transferred build folder is “dotnet-build.zip”. So, the same name will be used in all the commands in all the subsequent linux commands.

-
In next few commands, we will unzip the build folder, rename and move to /vaw/www folder.
    sudo apt-get install unzip (install if first time using this)
    sudo unzip dotnet-build.zip
    sudo mv -f dotnet-build dotnet-build-19-04-2020 //(append current date to make it unique)
    sudo rm dotnet-build.zip  //(delete this zip file)
    sudo mv -f dotnet-build-19-04-2020 /var/www/
    cd /var/www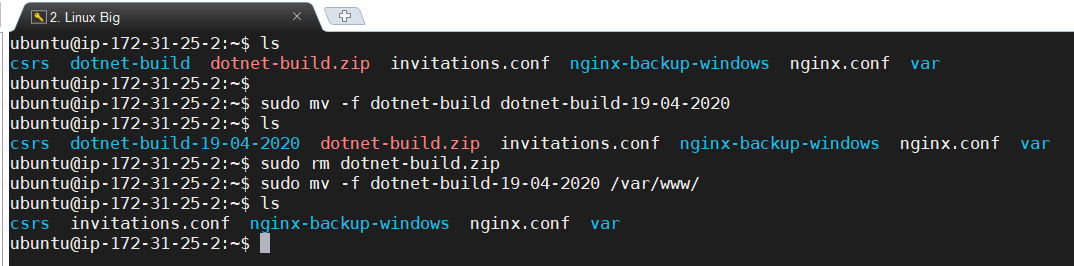
-
Now we will create the “invitations-bin” soft link to newly transferred build folder. Verify the output using the below screenshot.
    ls -lrt
    sudo unlink invitations-bin
    sudo ln -s dotnet-build-19-04-2020 invitations-bin
    sudo chown ubuntu:ubuntu invitations-bin
    sudo chown ubuntu:ubuntu invitations-bin/*
    ls -lrt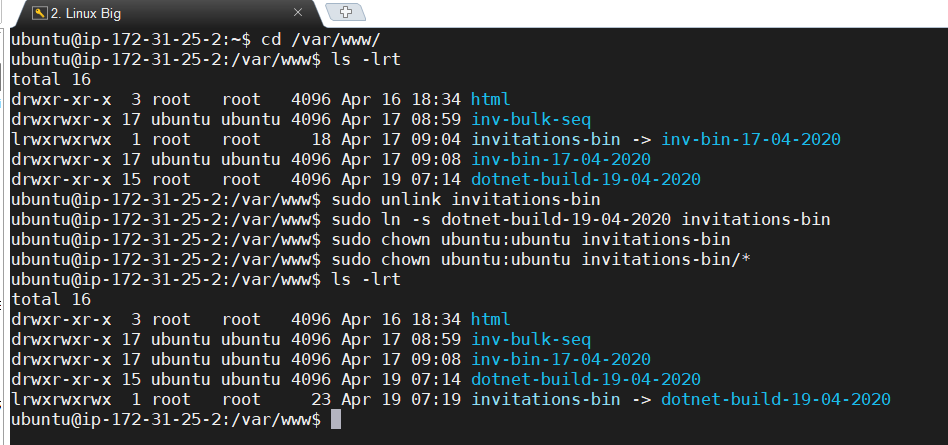
-
At this step, we start and check the status of systemctl service configured for this build. The successful status message would look like as per this screenshot
    sudo systemctl start kestrel-invitations.service
    sudo systemctl status kestrel-invitations.service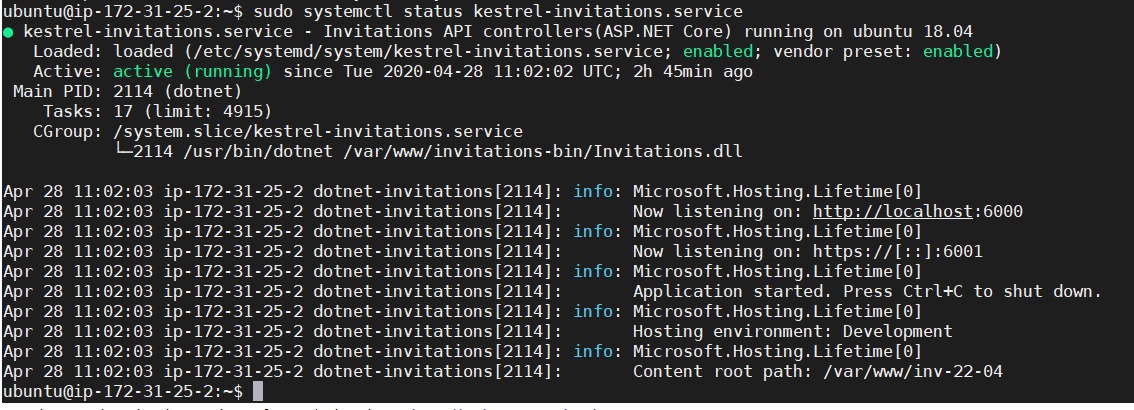
-
If any issues are encountered in “start” or “status”, then use the following commands to view the logs in a centralized journal. However, this journal includes all entries for all services and processes managed by systemd. To view the kestrel-invitations.service specific items, use the following command:
sudo journalctl -fu kestrel-invitations.service -
If logs are pointing to any failures, then look at the configuration and try resolving them. If still unresolved, contact the team with the logs and status output to debug the same.
By this step, the deployment of invitations build should be completed successfully. Next we will move to configuring the Nginx web server.
5.3 Configure Nginx Web Server
At this step, the Nginx server is already installed. You can verify the running process using this command.
ps ax | grep nginx
5.3.1 Configure Nginx
At this step, you would require domain URL, SSL certs to be configured within Nginx.
-
Go to Nginx folder(/etc/nginx) in the Ubuntu server and create proxy.conf file and add the following content.
	cd /etc/nginx
    sudo nano proxy.conf
Add the following content, save and exit
proxy_redirect off; proxy_set_header Host $host; proxy_set_header X-Real-IP $remote_addr; proxy_set_header X-Forwarded-For $proxy_add_x_forwarded_for; proxy_set_header X-Forwarded-Proto $scheme; client_max_body_size 10m; client_body_buffer_size 128k; proxy_connect_timeout 90; proxy_send_timeout 90; proxy_read_timeout 90; proxy_buffers 32 4k; -
Copy the SSL cert and key into the following directory -> /etc/ssl/certs/
If you are copying from home directory (/home/ubuntu) then use the below commands
sudo cp {certname} /etc/ssl/certs sudo cp {keyname} /etc/ssl/certs -
Open nginx.conf and remove all existing content and copy-paste the below content and change the Yellow highlighted string as per your domain name, cert name and key name
    cd /etc/nginx
    sudo vim /etc/nginx/nginx.conf
Once vim is opened, press shift 200 dd, which will remove all contents from this file completely.
Now copy the below contents in nginx.conf. Make sure to update the values for “server_name”, “ssl_certificate” and “ssl_certificate_key”.
Save and exit.events { worker_connections 768; multi_accept on; } http { include /etc/nginx/proxy.conf; server_tokens off; # MIME include mime.types; default_type application/octet-stream; sendfile on; keepalive_timeout 39; # Adjust to the lowest possible value that makes sense for your use case. client_body_timeout 20; client_header_timeout 10; send_timeout 10; upstream hellomvc{ server localhost:6000; } server { listen *:443 ssl; root /var/www/html; server_name internal3.solutions.cloudcherry.com; ssl_certificate /etc/ssl/certs/internal1.combined.cer; ssl_certificate_key /etc/ssl/certs/internal1_solutions_cloudcherry_com.key; ssl_protocols TLSv1.1 TLSv1.2 TLSv1.3; ssl_prefer_server_ciphers on; ssl_ciphers "ECDHE-ECDSA-AES256-GCM-SHA384:ECDHE-RSA-AES256-GCM-SHA384:ECDHE-ECDSA-CHACHA20-POLY1305:ECDHE-RSA-CHACHA20-POLY1305:ECDHE-ECDSA-AES128-GCM-SHA256:ECDHE-RSA-AES128-GCM-SHA256:ECDHE-ECDSA-AES256-SHA384:ECDHE-RSA-AES256-SHA384:ECDHE-ECDSA-AES128-SHA256:ECDHE-RSA-AES128-SHA256"; ssl_ecdh_curve secp384r1; ssl_session_cache shared:SSL:10m; ssl_session_tickets off; #ssl_stapling on; #ensure your cert is capable ssl_stapling_verify on; #ensure your cert is capable add_header Strict-Transport-Security "max-age=63072000; includeSubdomains; preload"; add_header X-Frame-Options "SAMEORIGIN"; add_header X-Content-Type-Options nosniff; location / { try_files $uri $uri/ =404; } #Redirects all traffic location /api { proxy_pass http://hellomvc; } } } -
Verify if the Nginx configuration is correct and restart Nginx
    sudo nginx -t
    sudo nginx -s reload
-
Verify one more time if all the deployed components are running on the configured ports
    sudo lsof -i:6000
    sudo lsof -i:443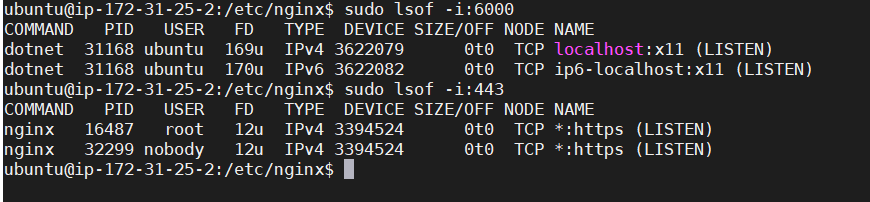
By this step, Nginx must be running without any issues and linked to deployed invitation binary.
5.4 Final Output of Web API Deployment
- BASE URL: https://{ Domain Name }
- Dispatch API URL: https://{ Domain Name }/api/dispatchRequest
- EventLog API URL: https://{ Domain Name }/api/EventLog
By the end of this step,the deployment of Dispatch Request API is completed. Next we will move next to ACM Module deployment.
6. Account Configuration Module(ACM) Deployment
6.1 Deployment Configuration
-
Go to source code folder which was downloaded at this step.
-
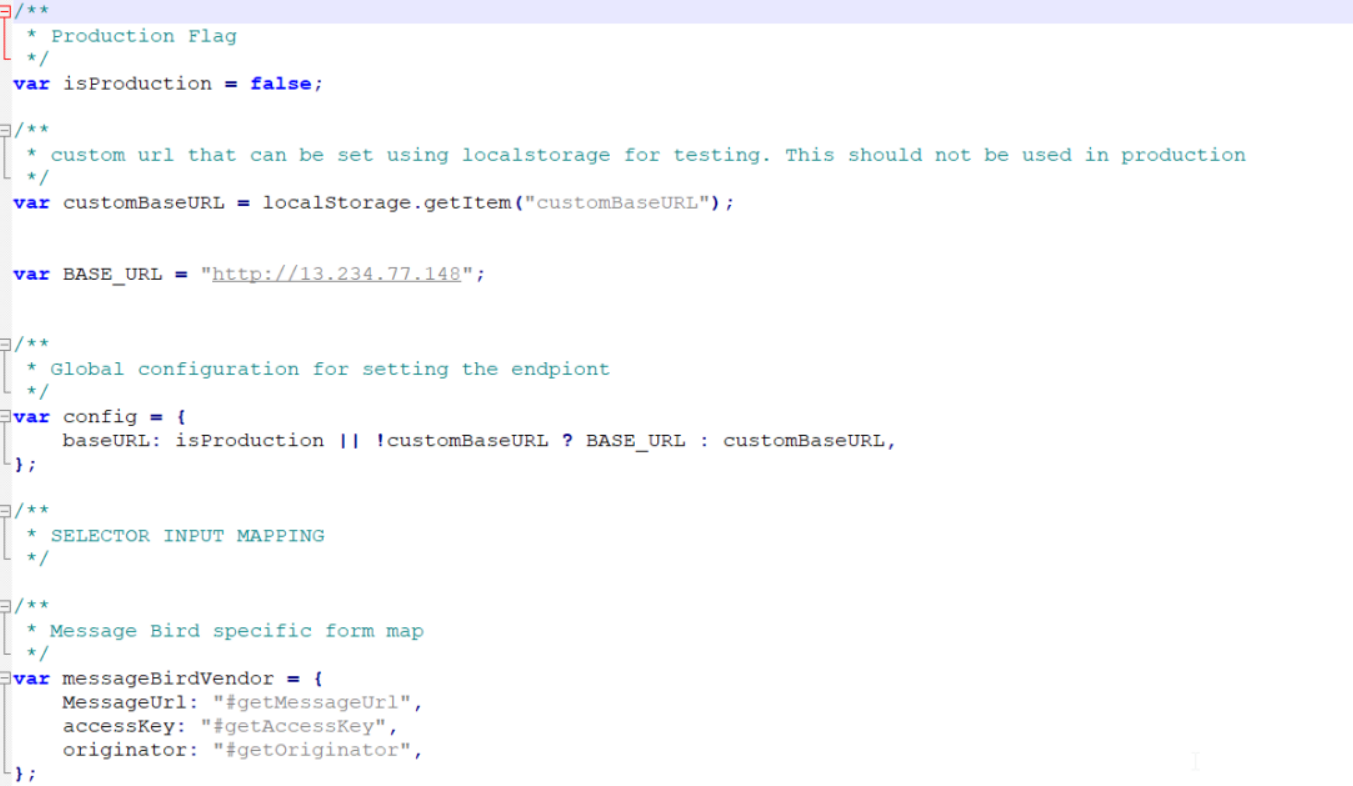
Navigate to “ACM-Frontend” folder
-
The file js/main.js has a config object that defines the baseURL . This URL is the base URL of the ASP.Net core web API deployment and can be used from this step. Change the yellow highlighted URL to the newly deployed base URL.
-
Zip the entire folder and transfer it to home directory of the Ubuntu Server using the same steps mentioned here.
-
Once moved to Ubuntu server(/home/ubuntu), unzip the folder and move to /var/www/html
-
rename the folder to “acm” from current folder name.
-
ACM module is deployed now and the URL to access this portal will be https://{ Domain Name }/acm/index.html
7. Notification Module Deployment
Notification module can either be deployed in same server or in a separate linux server. Our recommendation is to deploy it on separate linux server always. The following instructions covers the deployment on the new server.
7.1 Steps to deploy Notification
Steps to deploy Notification module is similar to WebAPI deployment mentioned in Section 5. So reference is provided wherever required.
-
Login to Ubuntu server where Notification module is to be deployed - this step
-
Install .NET Core SDK and run time on the server - this step
-
Install Nginx web server - this step
-
Set-up monitoring for Notification .NET Core app - this step
The provided link here is to set-up monitoring for Dispatch API build(invitations-bin), so we will run the commands modified for Notifications build
-
Executable of .Net Core Web API app will be stored and managed in /var/www/notifications-bin working directory.
-
Create a directory as “dummy_build” under /var/www (only for the first time, so that we can create soft link on this folder. From next deployment, instead of dummy_build folder, it will be actual webapp executable folder)
-
All related commands and screenshots are mentioned below:
cd /var/www/ sudo mkdir dummy_notifications sudo chown ubuntu:ubuntu dummy_notifications/ sudo chown ubuntu:ubuntu dummy_notifications/* sudo ln -s dummy_notifications notifications-bin sudo chown ubuntu:ubuntu notifications-bin ls -lrt -
Create “logs” folder under “/var/www” to be used to store log file which will go as a link in email EOD by notification module
cd /var/www/ sudo mkdir logs sudo chown ubuntu:ubuntu logs/ sudo chown ubuntu:ubuntu logs/* ls -lrt -
Create the service definition file:
sudo nano /etc/systemd/system/kestrel-notifications.service -
Copy the following content into the kestrel-notifications.service
[Unit] Description=Notifications build (.NET Core) running on ubuntu 18.04 [Service] WorkingDirectory=/var/www/notifications-bin ExecStart=/usr/bin/dotnet /var/www/notifications-bin/XM.ID.Invitations.Notifications.dll Restart=always # Restart service after 2 seconds if the dotnet service crashes: RestartSec=2 KillSignal=SIGINT SyslogIdentifier=dotnet-notifications User=ubuntu Environment=ASPNETCORE_ENVIRONMENT=Development Environment=DOTNET_PRINT_TELEMETRY_MESSAGE=false [Install] WantedBy=multi-user.target -
Enable the service
sudo systemctl enable kestrel-notifications.service
-
Download the code using the steps mentioned already here - this step
-
For Notifications project, go inside “XM.ID.Invitations.Notifications” folder and open the Visual studio solutions file.
-
All application level settings in appsettings.json for which sample is provided below.
{ "DBConnectionString": "your db connection stsring", "DBName": "DB Name", "CustomeMailServer": { "FromName": "From name", "FromAddress": "fromaddress@domain.com", "Server": "smtp server", "Login": "smtp login", "Password": "password", "Port": "587", "EnableSSL": true }, "Frequency": { "Every": "Minute", "Hour": 0, "Minute": 5, "RealtImeMaxLevel": 2, "AccountLevleIsEod": true }, "PathToEmail": "http://{domain.com}/logs/", "ApplicationLogpath": "/home/ubuntu/notifi-logs", "LogFilePath": "/var/www/logs" } -
Configuration Parameters Explained:
Details to connect to your data base
“DBConnectionString”: “your db connection stsring”
“DBName”: “DB Name”,
SMTP details to send out notifications
“CustomeMailServer”: {
“FromName”: “From name”,
“FromAddress”: “fromaddress@domain.com”,
“Server”: “smtp server”,
“Login”: “smtp login”,
“Password”: “password”,
“Port”: “587”,
“EnableSSL”: true
},
Frequency to send out notification.
Every => Hour or Minute.
“Hour”: 0, => When Every is “Hour” add the frequency in hour ex. every 2 hours
“Minute”: 5, => When “Every” is “Minute”, add the frequency in minute
“RealtImeMaxLevel”: 2, => 2 to define send Error and Failure as realtime, 1 to define just Failure as real time and rest all as EOD
“Frequency”: {
“Every”: “Minute”,
“Hour”: 0,
“Minute”: 5,
“RealtImeMaxLevel”: 2,
“AccountLevleIsEod”: true
},
Turn on/off account level notification
“AccountLevleIsEod”: true => Account level notification to be sent in EOD or real time
Logs Paths
“PathToEmail”: => This is the URL where the logs are available to be accessed via internet. {domain.com} should be replaced with actual domain which will used in Nginx configuration also.
“ApplicationLogpath” => The path where the application log can be stored. should create a folder named “notifi-logs” in /home/ubuntu directory
“LogFilePath”: => The path where the log files can be saved to be accessible via the above URL provided. Can be used as it is.
“PathToEmail”: “http://{domain.com}/logs/”,
“ApplicationLogpath”: “/home/ubuntu/notifi-logs”,
“LogFilePath”: “/var/www/logs”
-
-
Publish the Notification binary for Ubuntu server using this step
-
Deploy the published folder to Ubuntu Server using this step
At this step, use the notification build instead of invitation build. The softlink for “notifications-bin” should be tagged to notification recent build deployed to server
sudo systemctl start kestrel-notifications.service sudo systemctl status kestrel-notifications.service -
If any issues are encountered in “start” or “status”, then use the following commands to view the logs in a centralized journal. However, this journal includes all entries for all services and processes managed by systemd. To view the kestrel-notifications.service specific items, use the following command:
sudo journalctl -fu kestrel-notifications.service -
Create a basic auth password file which will be used in Nginx configuration to authenticate a user before accessing logs
Follow this link to create a password file using apache2-utils tools.
Please note the credentials created here should be shared with CCE/X admin so that they can access the log link included in EOD email which containts Debug/Info/Warning logs
-
Configure Nginx to make the “logs” available to be accessed over a URL. Follow this step
Except nginx.conf, rest all details remains same. Below is the nginx.conf which should be used.
    cd /etc/nginx
    sudo vim /etc/nginx/nginx.conf
Once vim is opened, press shift 200 dd, which will clean the file
Now copy the below contents in nginx.conf. Make sure to update the values for “server_name”, “ssl_certificate” and “ssl_certificate_key”
Save and exitevents { worker_connections 768; multi_accept on; } http { include /etc/nginx/proxy.conf; server_tokens off; # MIME include mime.types; default_type application/octet-stream; sendfile on; keepalive_timeout 39; # Adjust to the lowest possible value that makes sense for your use case. client_body_timeout 20; client_header_timeout 10; send_timeout 10; server { listen *:443 ssl; root /var/www/html; server_name internal3.solutions.cloudcherry.com; ssl_certificate /etc/ssl/certs/internal1.combined.cer; ssl_certificate_key /etc/ssl/certs/internal1_solutions_cloudcherry_com.key; ssl_protocols TLSv1.1 TLSv1.2 TLSv1.3; ssl_prefer_server_ciphers on; ssl_ciphers "ECDHE-ECDSA-AES256-GCM-SHA384:ECDHE-RSA-AES256-GCM-SHA384:ECDHE-ECDSA-CHACHA20-POLY1305:ECDHE-RSA-CHACHA20-POLY1305:ECDHE-ECDSA-AES128-GCM-SHA256:ECDHE-RSA-AES128-GCM-SHA256:ECDHE-ECDSA-AES256-SHA384:ECDHE-RSA-AES256-SHA384:ECDHE-ECDSA-AES128-SHA256:ECDHE-RSA-AES128-SHA256"; ssl_ecdh_curve secp384r1; ssl_session_cache shared:SSL:10m; ssl_session_tickets off; #ssl_stapling on; #ensure your cert is capable ssl_stapling_verify on; #ensure your cert is capable add_header Strict-Transport-Security "max-age=63072000; includeSubdomains; preload"; add_header X-Frame-Options "SAMEORIGIN"; add_header X-Content-Type-Options nosniff; location / { try_files $uri $uri/ =404; } #Redirects all logs traffic and enable basic auth location /logs { auth_basic "Restricted Access!"; auth_basic_user_file /etc/nginx/conf.d/.htpasswd; root /var/www/; try_files $uri $uri/ =404; } } }
8. Dispatcher - ASP.NET Core based Serverless Compute
-
Pre-requisites:
- Visual Studio 2019
- .NET Core 3.1
- Source-code: Go to source code folder which was downloaded at this step.
- Mongo-DB-Connection-String: [this will be of the form: mongodb://demourl.com:port_number/]
- Database-Name: [this will be the form: WXM_ID_CLIENT_NAME]
- Queue-Name: created during the infra-provisoning step. Refer Azure Queue Storage Setup Step or AWS SQS Setup Step
- Your Azure Storage Account Access Key or your AWS Account Access Id and Key which was created in the Step 7 of the IAM User Creation Section
-
Serverless Computes to be Deployed:
- Queue-Trigger (x1)
- Time-Trigger (x1)
8.1 Steps to deploy the two Azure Functions
- Launch Visual Studio and Sign-In with the subscription under which the Azure Functions have been provisioned.
- Launch AzureQueueTrigger.sln from the
AzureQueueTriggerdirectory that is part of the provided source-code. - Right Click + Publish the solution. This will open the following screen where you need to hit New to create a new
Publish Profile.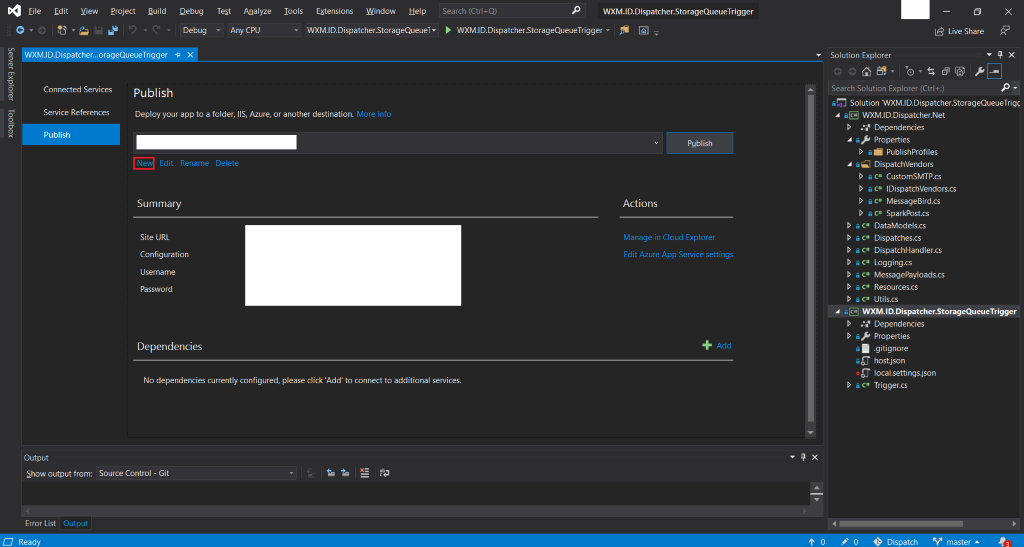
- As we have already provisioned the required function apps, we will be publishing the code to an Existing slot
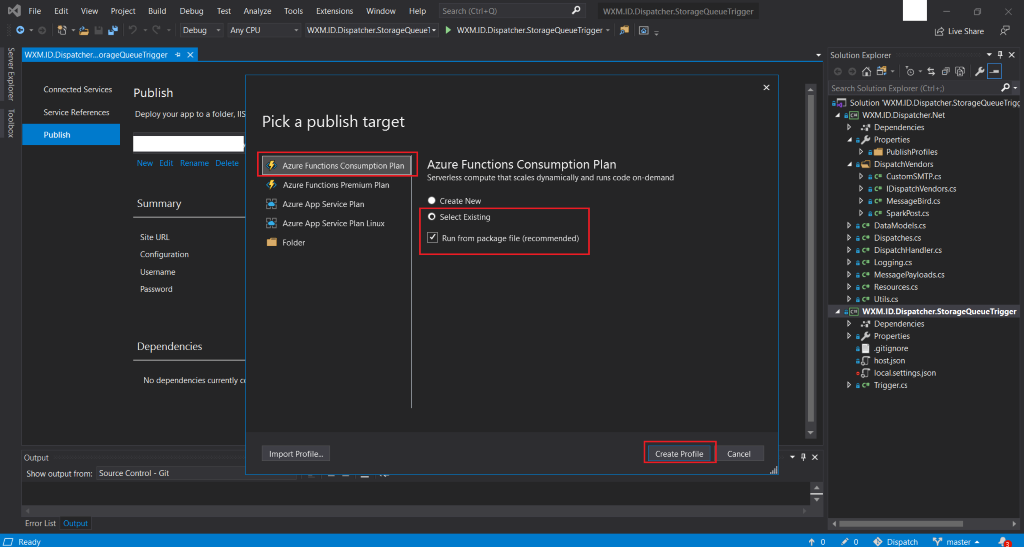
- From the next screen choose one of the already provisioned
Azure Functionsand hit OK.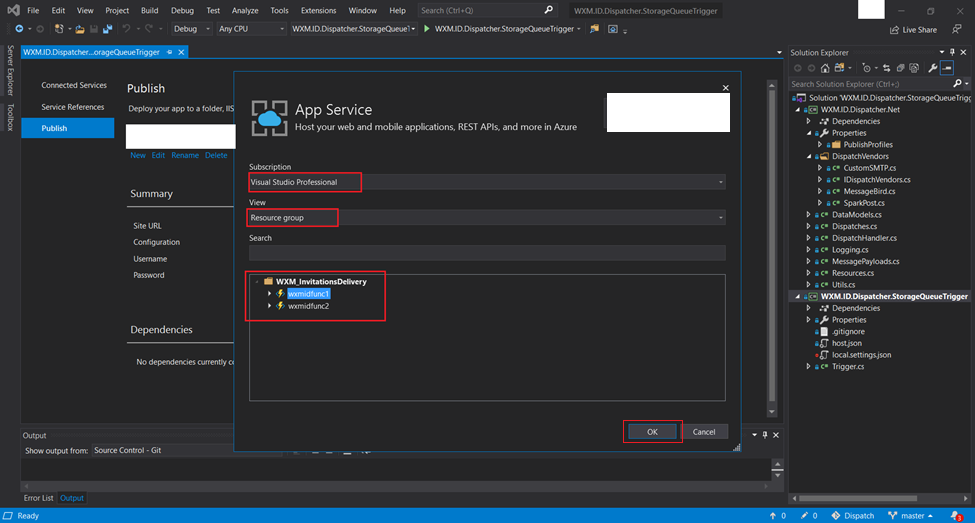
- Now we will Edit Azure App Service Settings where we will provide details about the Storage Account, Queue Storage and MongoDB.
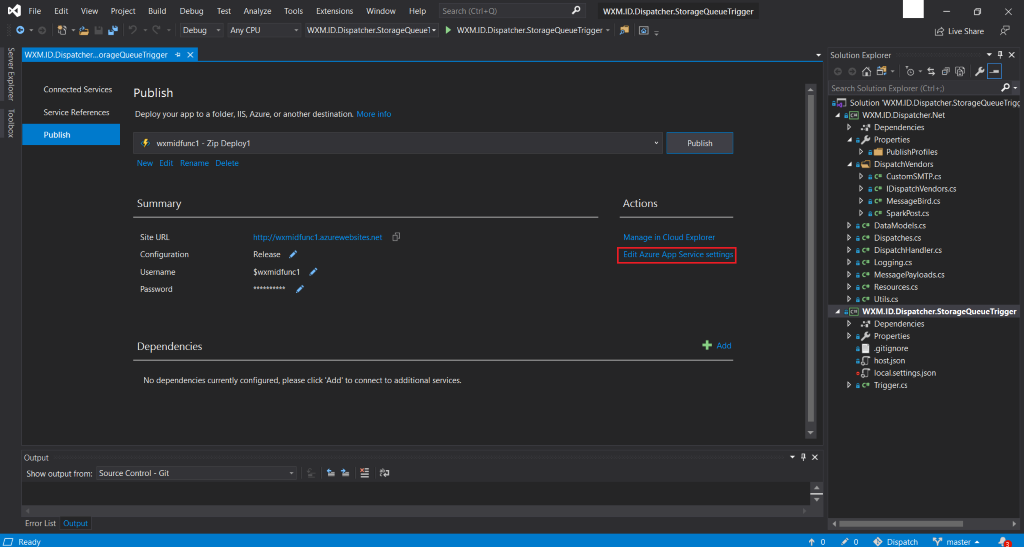
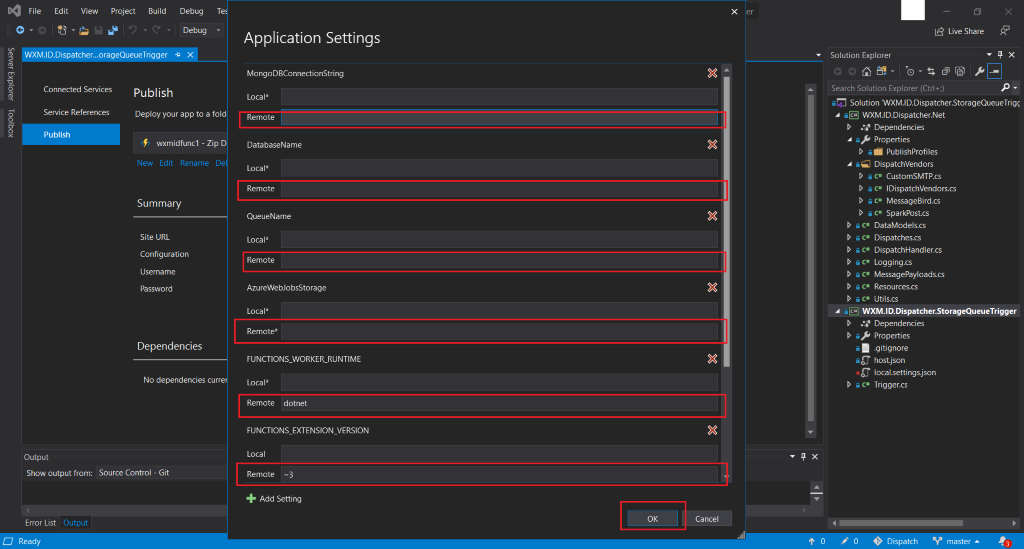
- Fill all the required information into the remote settings and then click OK:
- MongoDBConnectionString
- DatabaseName
- QueueName
- AzureWebJobStorage: Azure Storage Account’s Access Key
- FUNCTIONS_WORKER_RUNTIME: dotnet
- FUNCTION_EXTENSION_VERSION: ~3
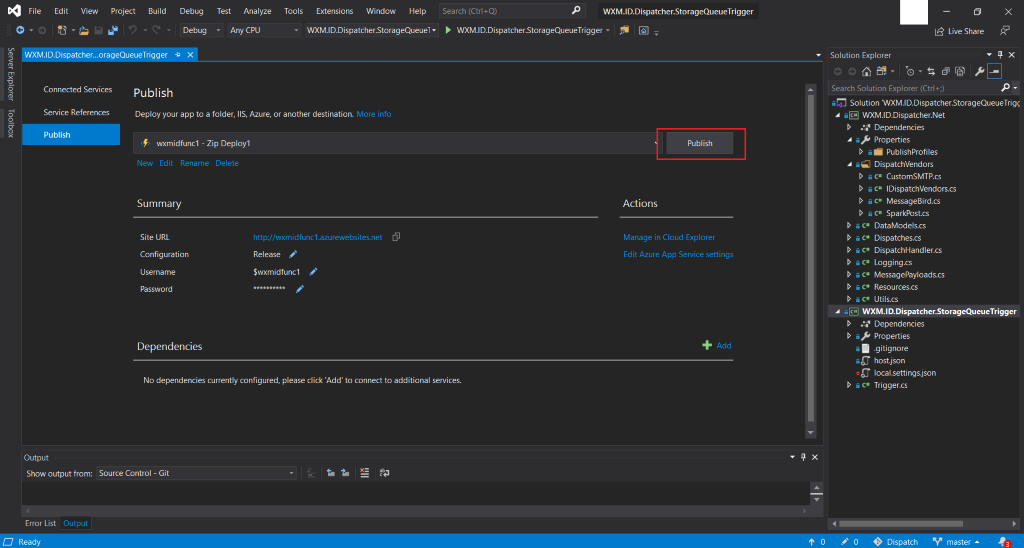
- Finally hit Publish.
- Similarly launch AzureTimeTrigger.sln from the
AzureTimeTriggerdirectory. Right Click + Publish the code into the second provisioned function slot while following the same steps as above. For this you will again have to provide the following details, as was done in step number 7:- MongoDBConnectionString
- DatabaseName
- AzureWebJobStorage
- FUNCTIONS_WORKER_RUNTIME: dotnet
- FUNCTION_EXTENSION_VERSION: ~3
8.2 Steps to deploy the two AWS Lambdas
- Configure your SQS primary queue (not the dead letter queue) with the following details. Make sure you are providing the correct dead letter queue name. Both these queues were created at this step -
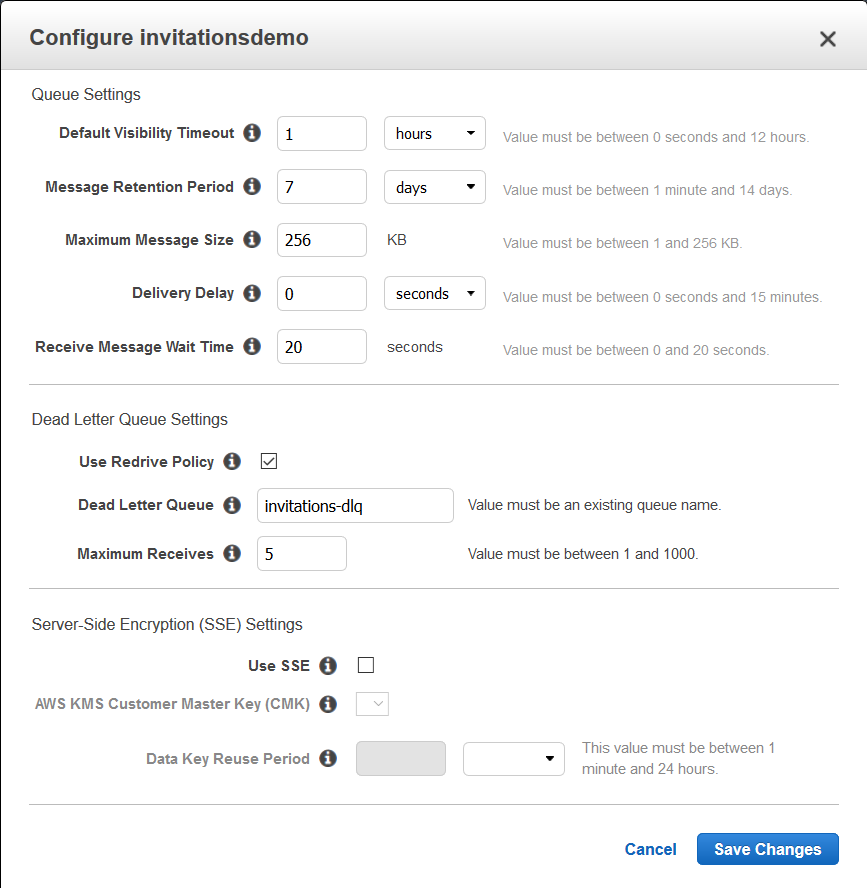
- To do so, Login into your
AWS Management Consoleand then search for SQS. Select you primary queue and from Queue Actions select Configure Queue. After entering the correct details hit Save Changes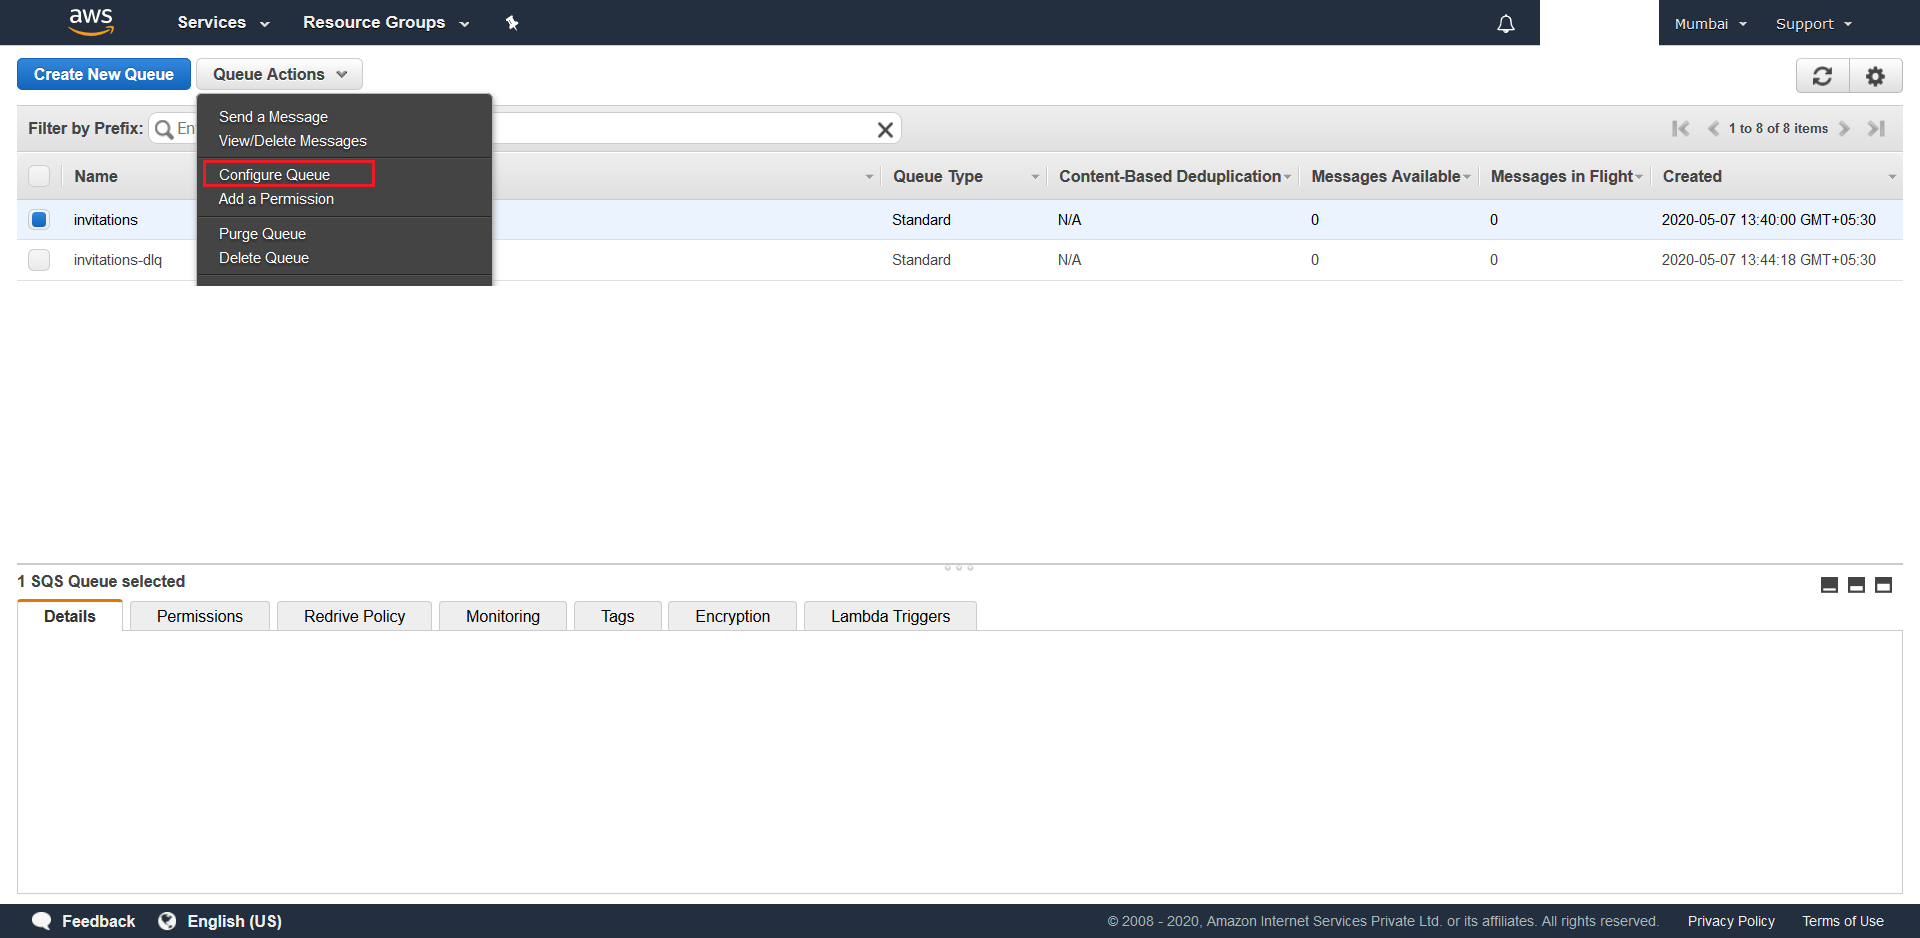
- Next you need to install the AWS ToolKit for Visual Studio.
- Now we need to create a
AWS Named Profile. To do so launch your Visual Studio and click on AWS Explorer from the View menu. Click on New profile and fill in the required details. Make sure you do this in the same region where all the resources were provisioned before.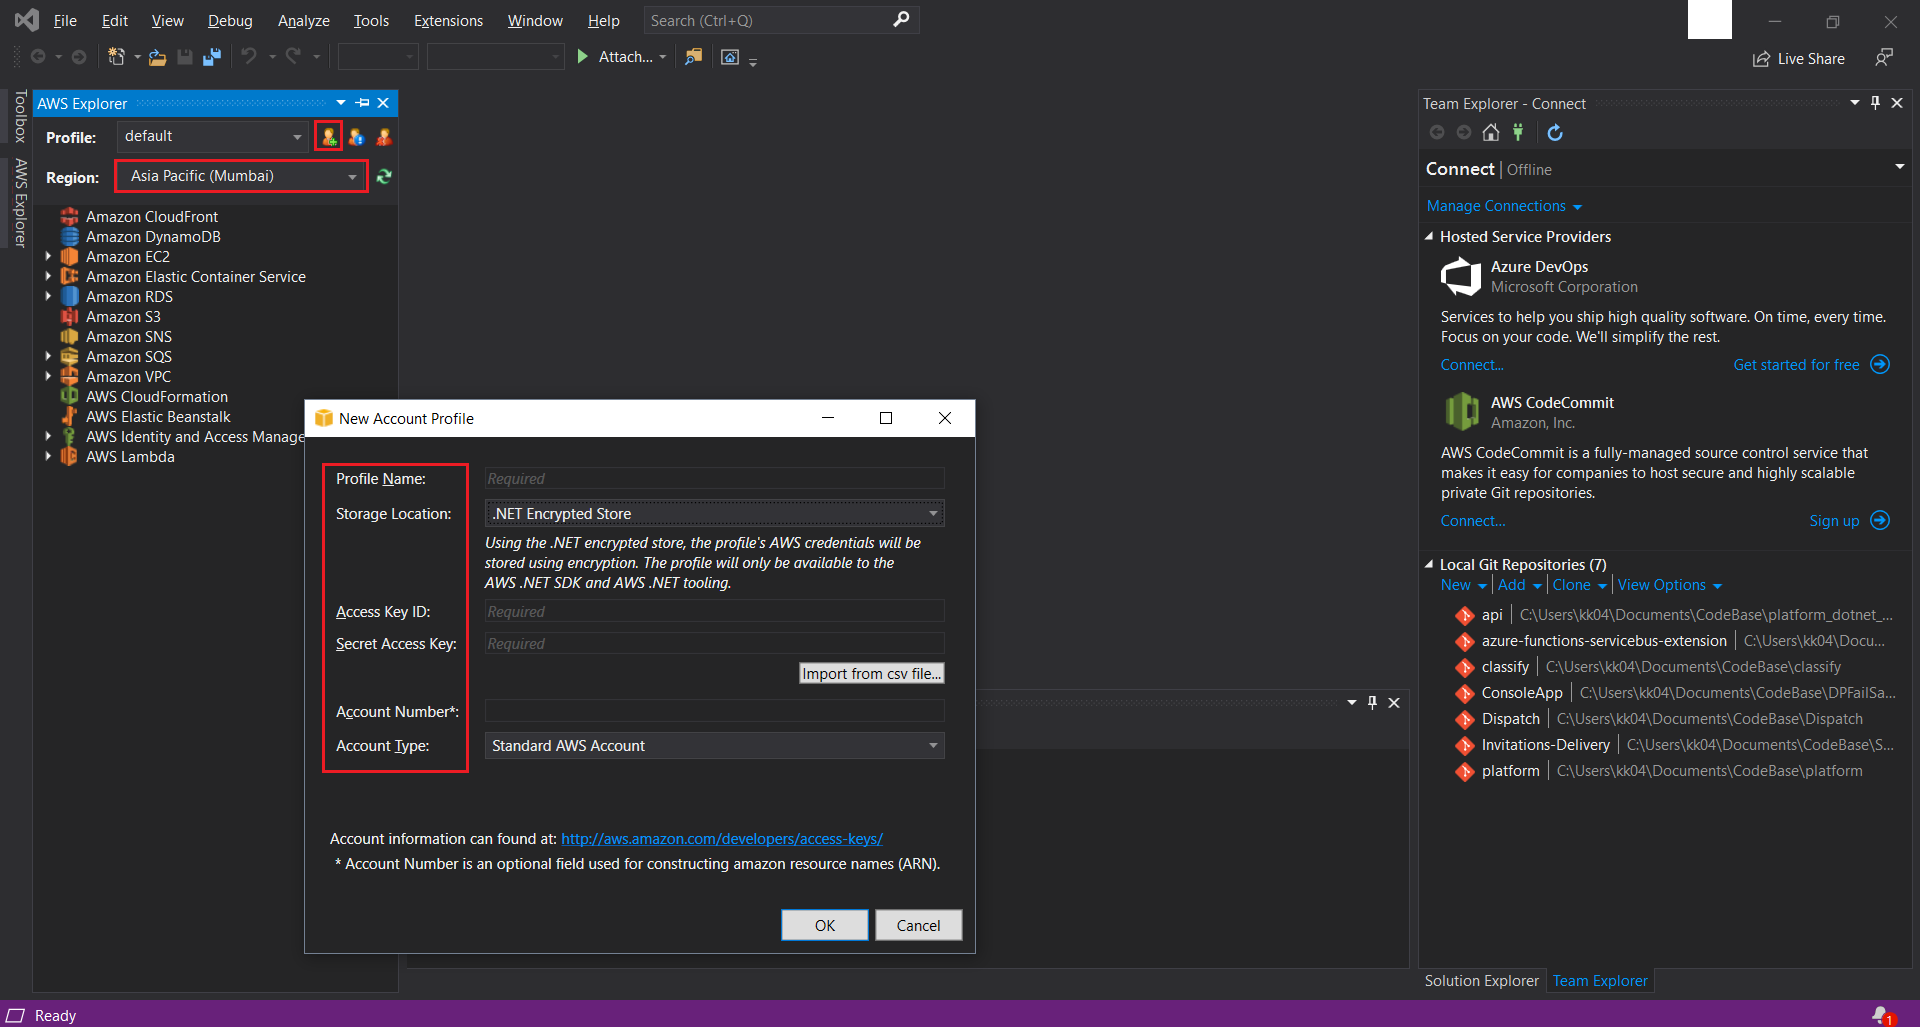
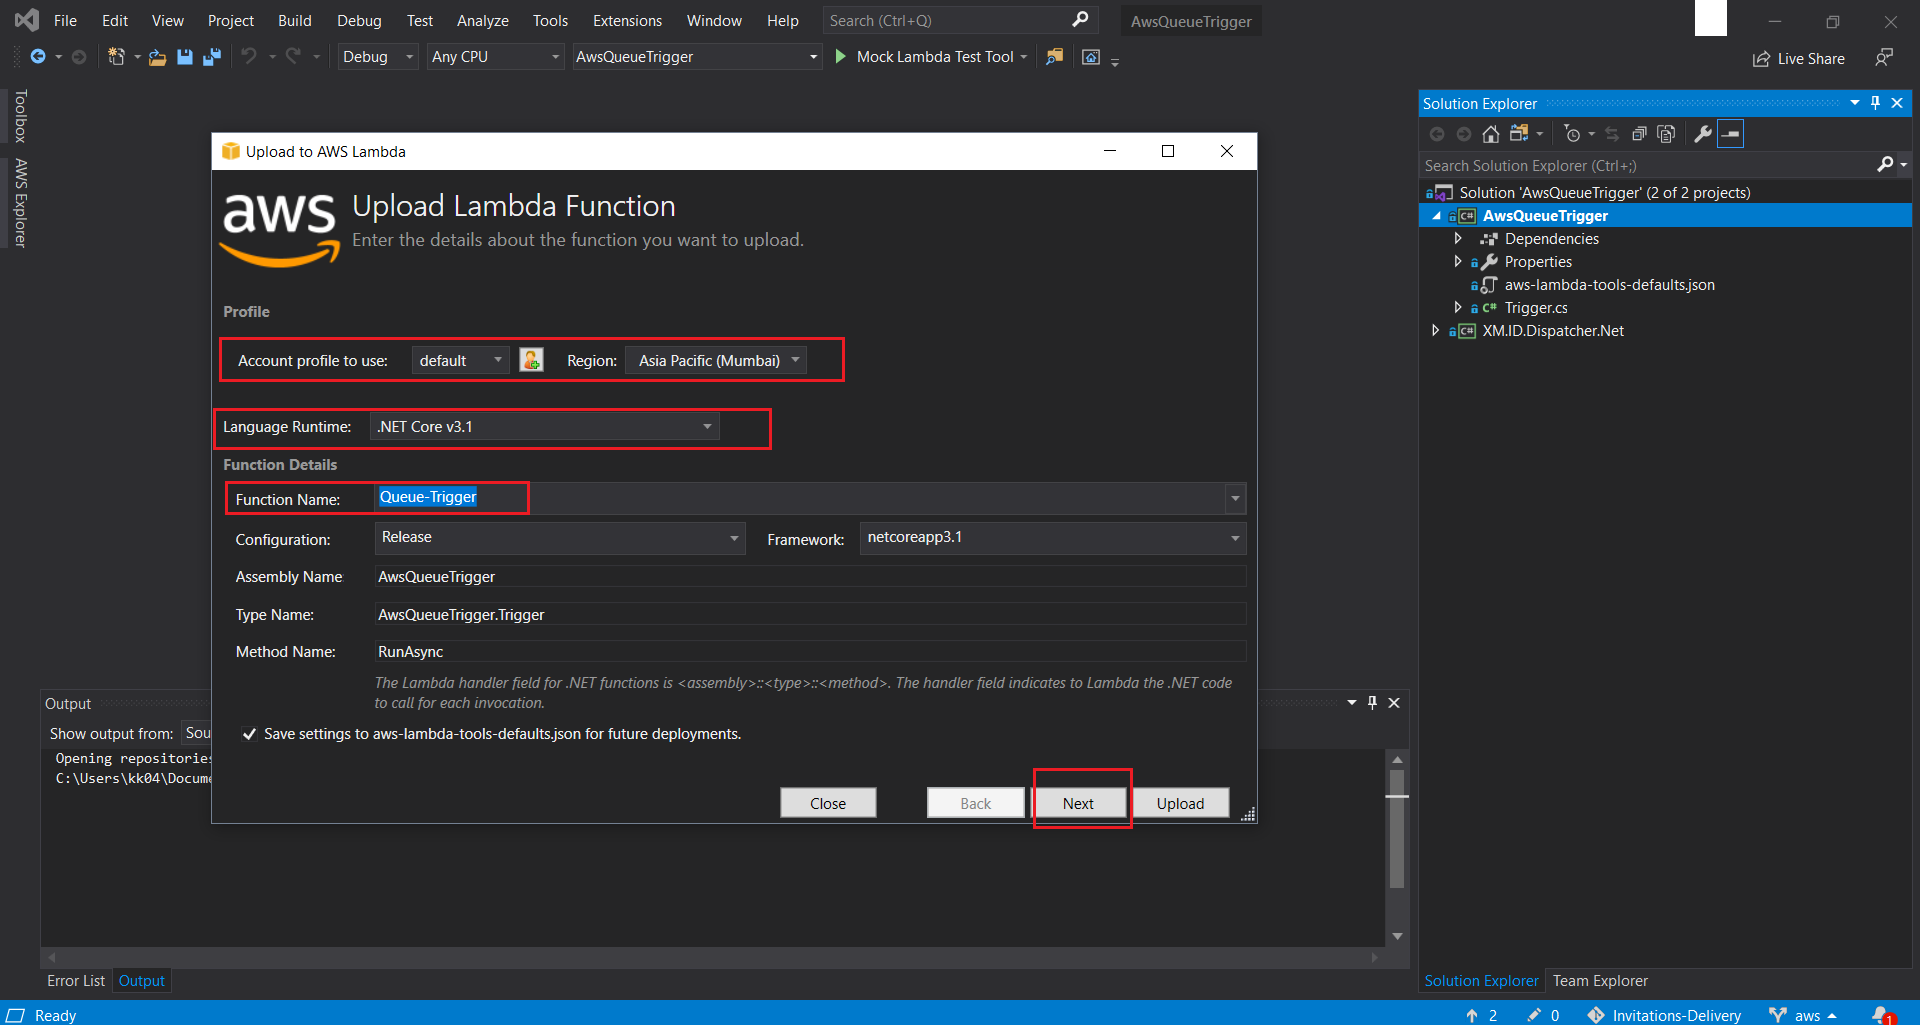
- Launch AwsQueueTrigger.sln from the
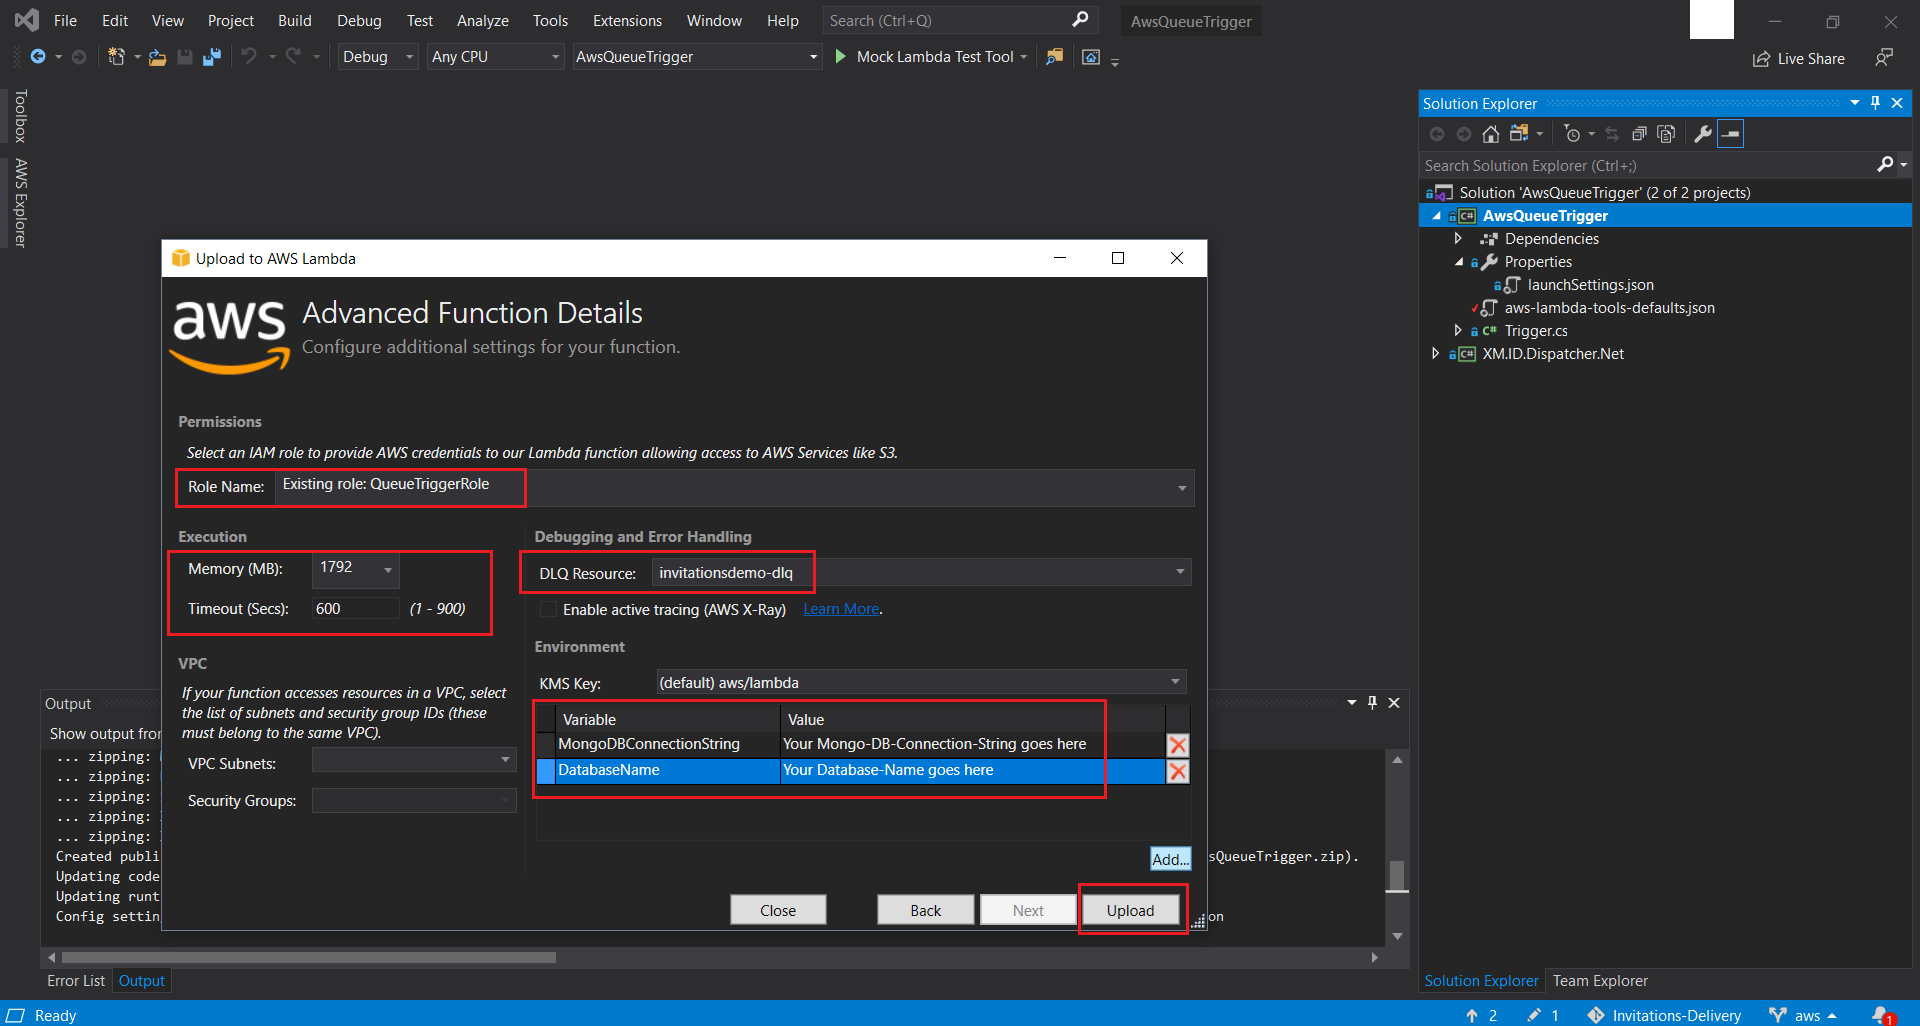
AwsQueueTriggerdirectory that is part of the provided source-code. - Right Click + Publish to AWS Lambda the solution. In the pop-up screen select your newly created Named Profile and select Region, where you would have provisioned all your resources uptil now. Next choose Queue-Trigger from the drop-down list of available Funcion names. You would have created two AWS Lamdas in this step. Then hit Next. On the next screen make sure you choose the existing QueueTriggerRole IAM Role that was created for the Queue-Trigger Function as the Role Name and also configure the dead letter queue that was created in this step as your DLQ Resource. Next configure the Memory, the Timeout, and the required Environment Variables. Finally hit Upload.
- Similarly launch AwsTimeTrigger.sln from the
AwsTimeTriggerdirectory and publish the solution to the second provisioned AWS Lambda. Do this while using the sameNamed Profile,Region,Memory,Timeout,Environment Varaiblesvalues as before, however select the already created Time-Trigger as its function name and TimeTriggerRole as its Role Name. However for this Lambda you don’t need to setup a DLQ Resource. - Next we need to set up
Event-Triggersfor the 2 deployed Lambdas. To this go to yourAWS Management Consoleand search for Lambda. From the next screen click on your Queue-Trigger Function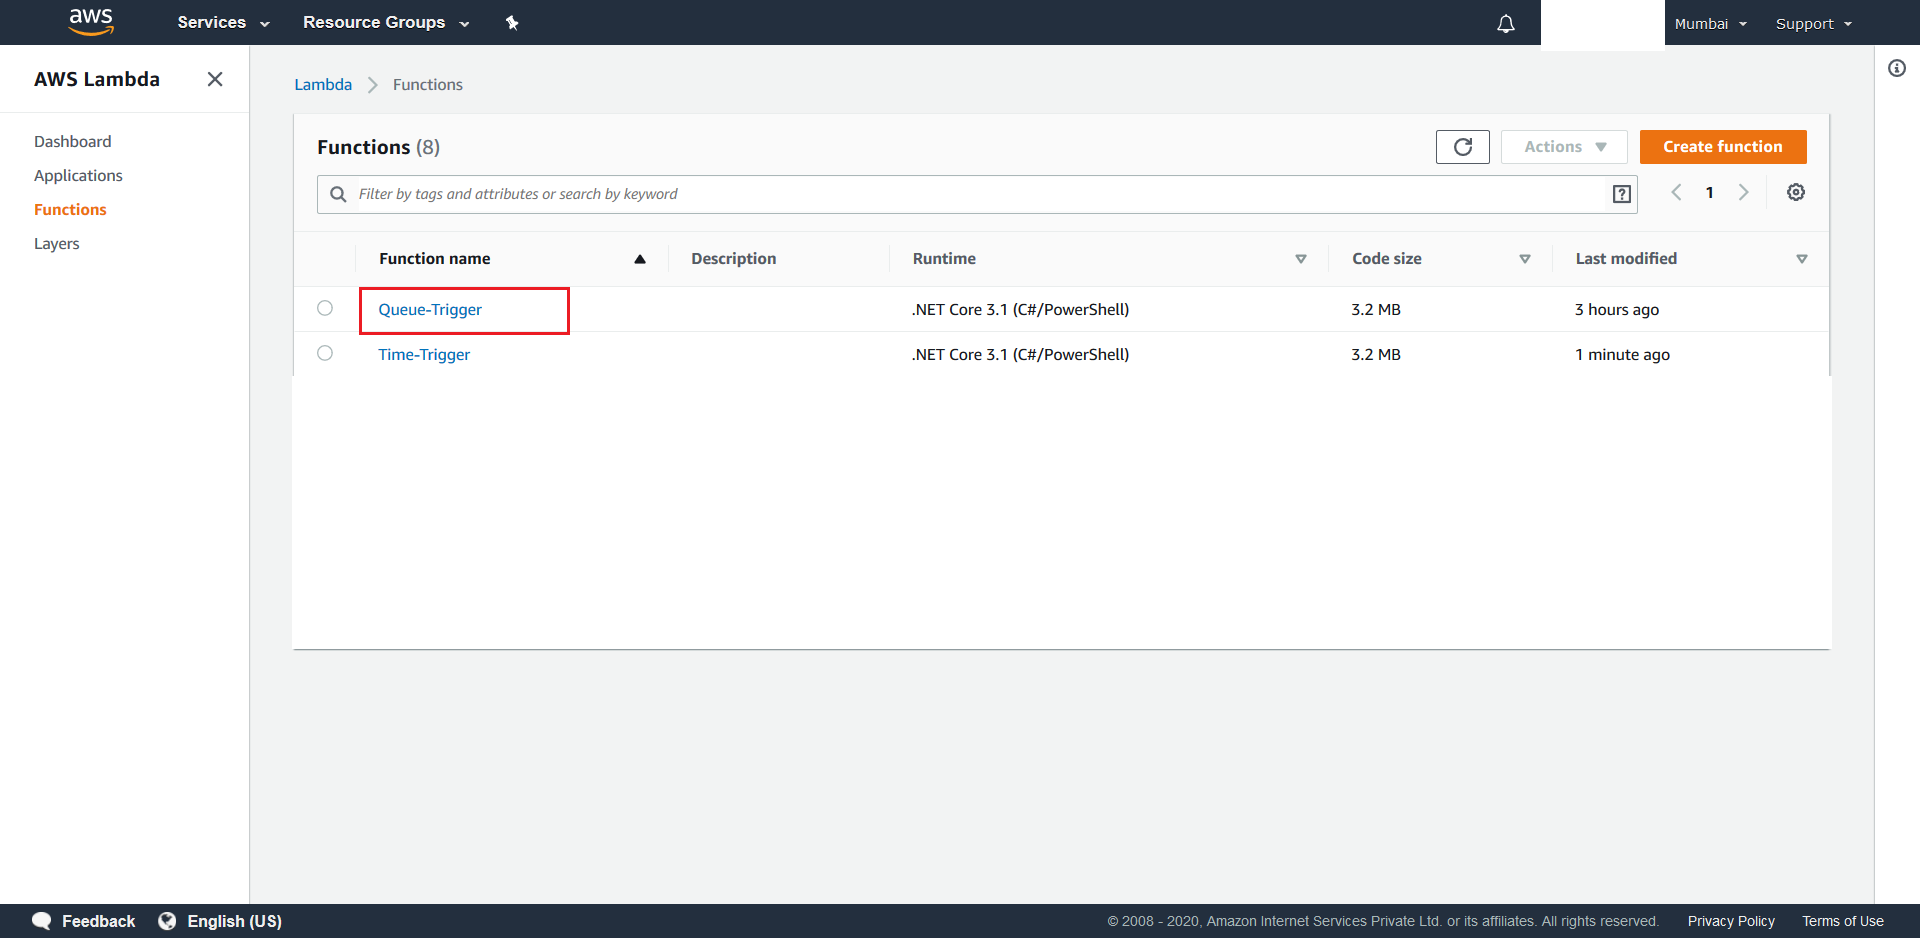
- Click on Add Trigger
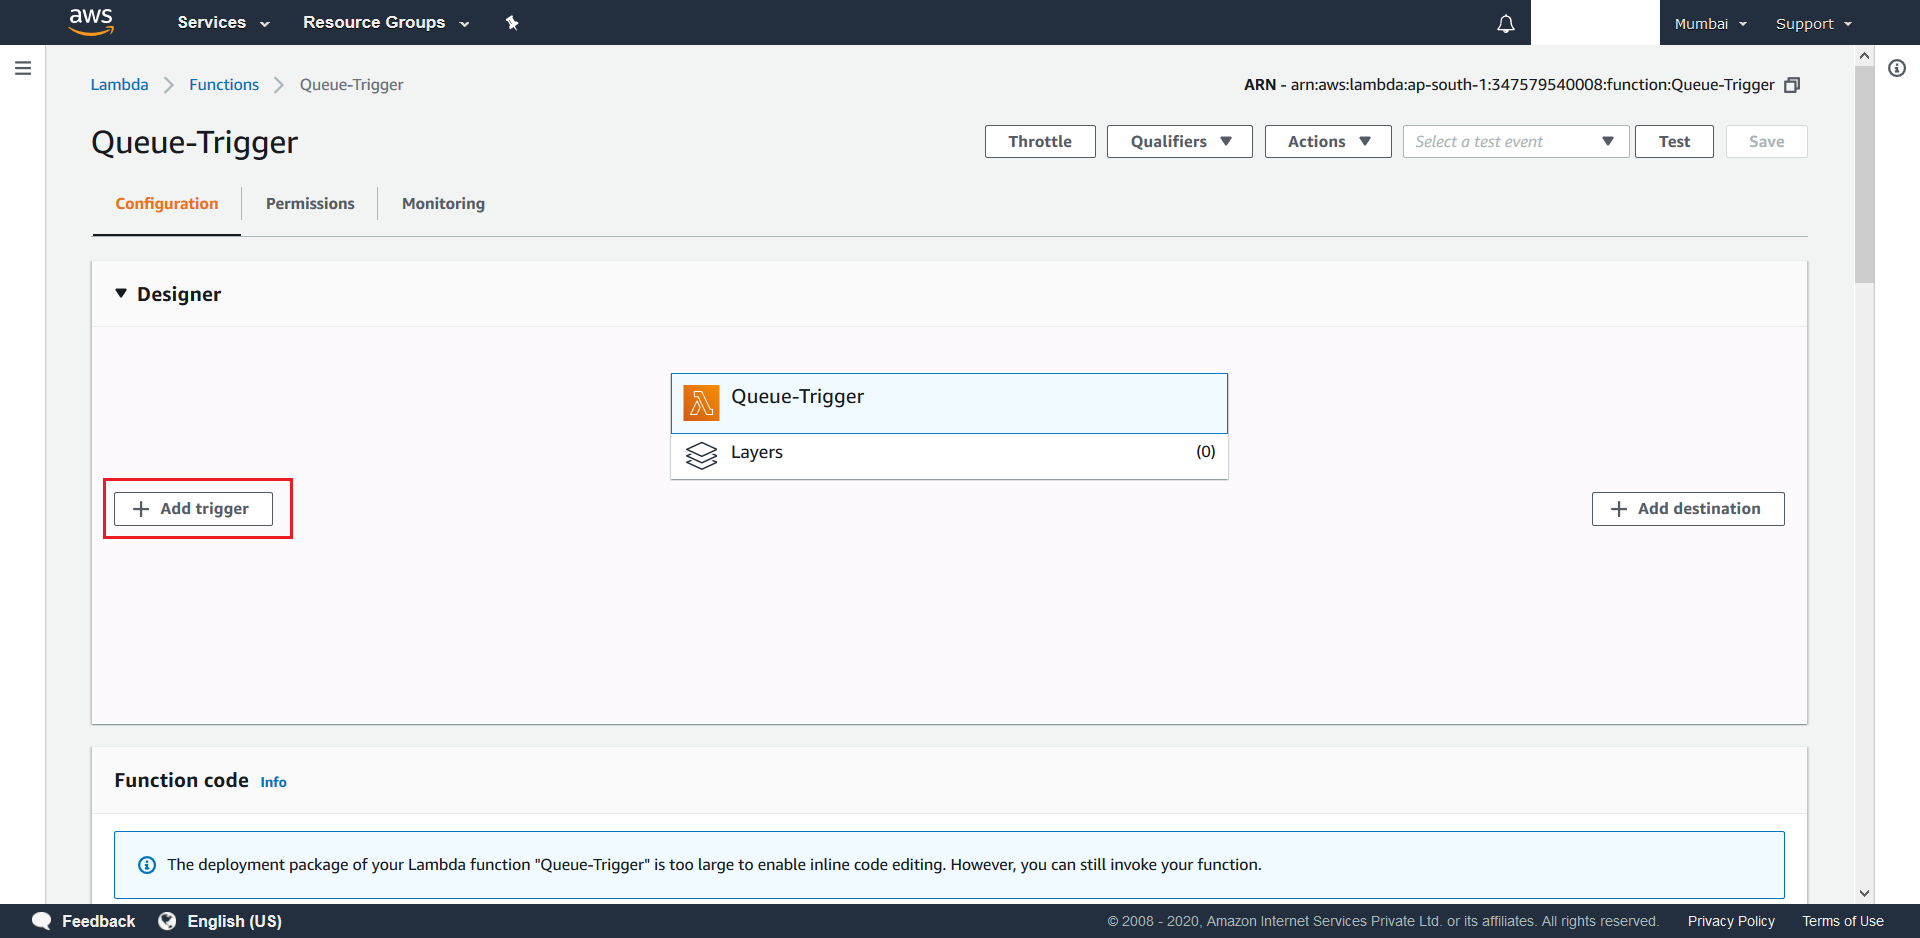
- Search and select SQS as the desired trigger. Now select your
primary SQS standard queueunder the SQS Queue section, so as to configure it as the lambda’s event source. Next, set the batch size as10, with the trigger enabled option, and finally hit the Add Button.
- Now for the Time-Trigger function we need to create a CloudWatch Event. To do this search and select CloudWatch in the
AWS Managemt Console. From theCloudWatchconsole, select Rules and then hit the Create Rule button.
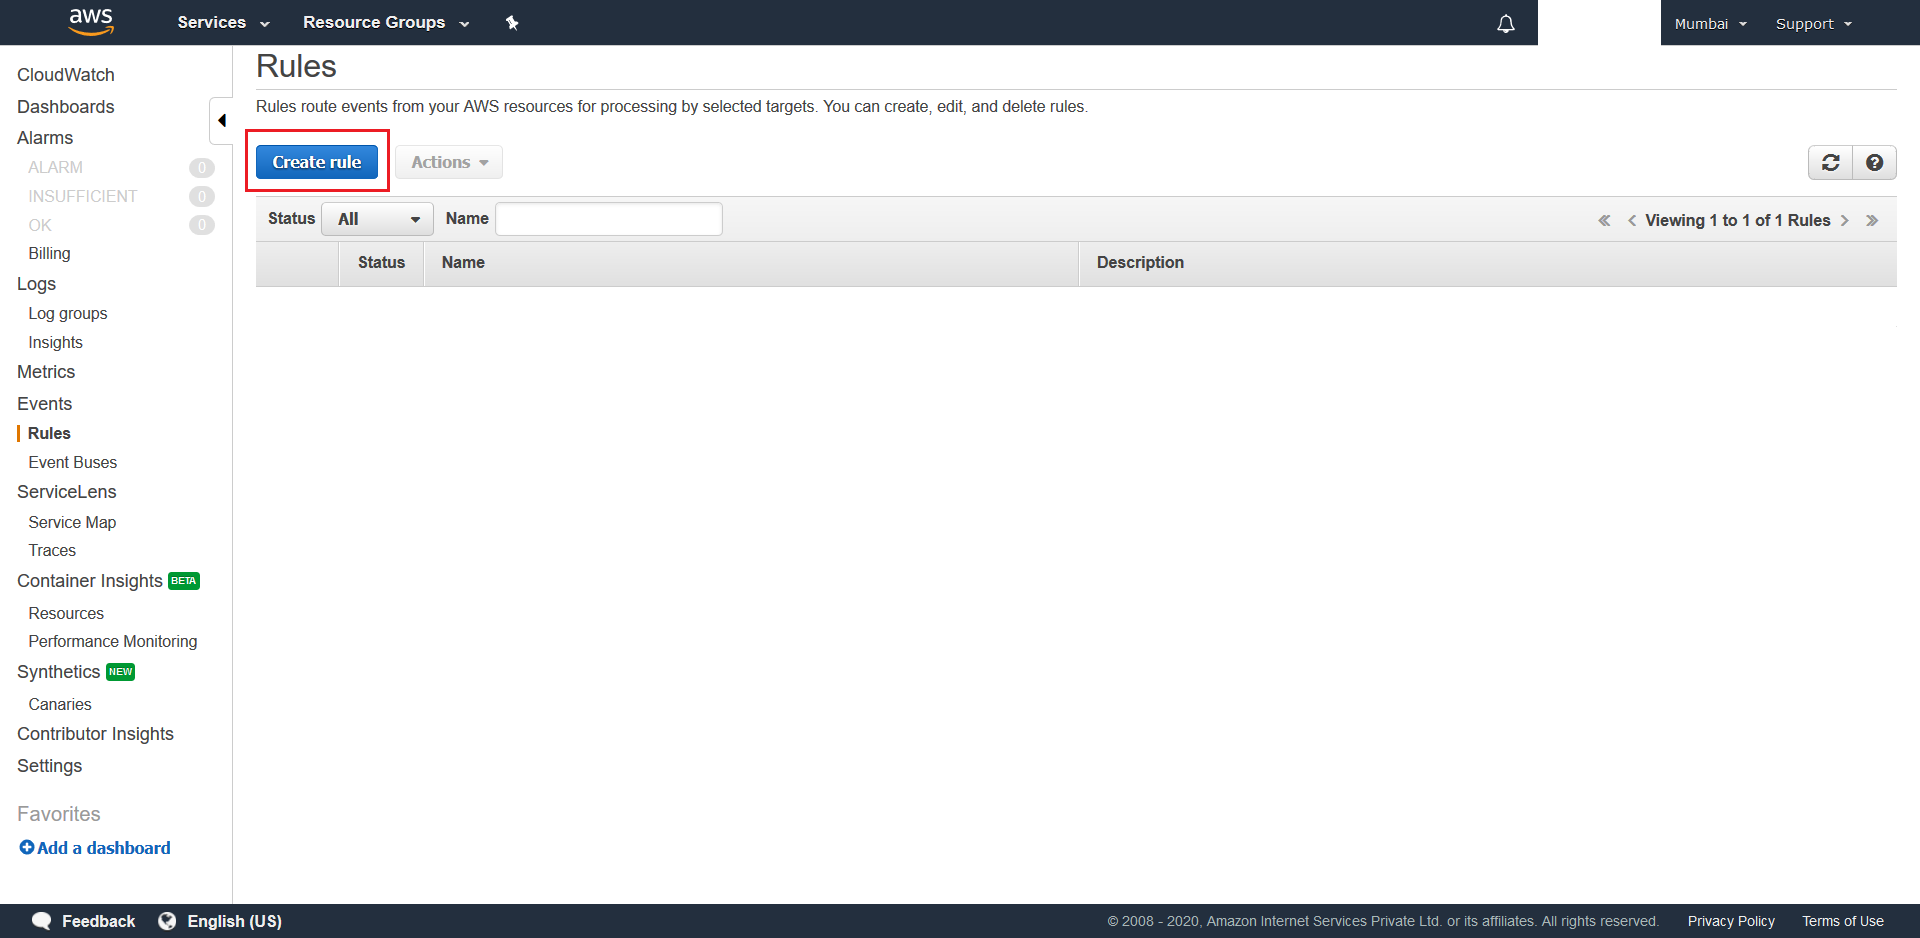
- Next select Schedule as the Event-Source type, configure
0/5 * * * ? *as the CRON Expression, which is every 5th minute of each hour, and setup your Time-Trigger Lambda as the schedule’s target resource. After this, click the Configure details button. Now give an appropiate name Name and finally hit Create Rule. And with this your deployment is complete.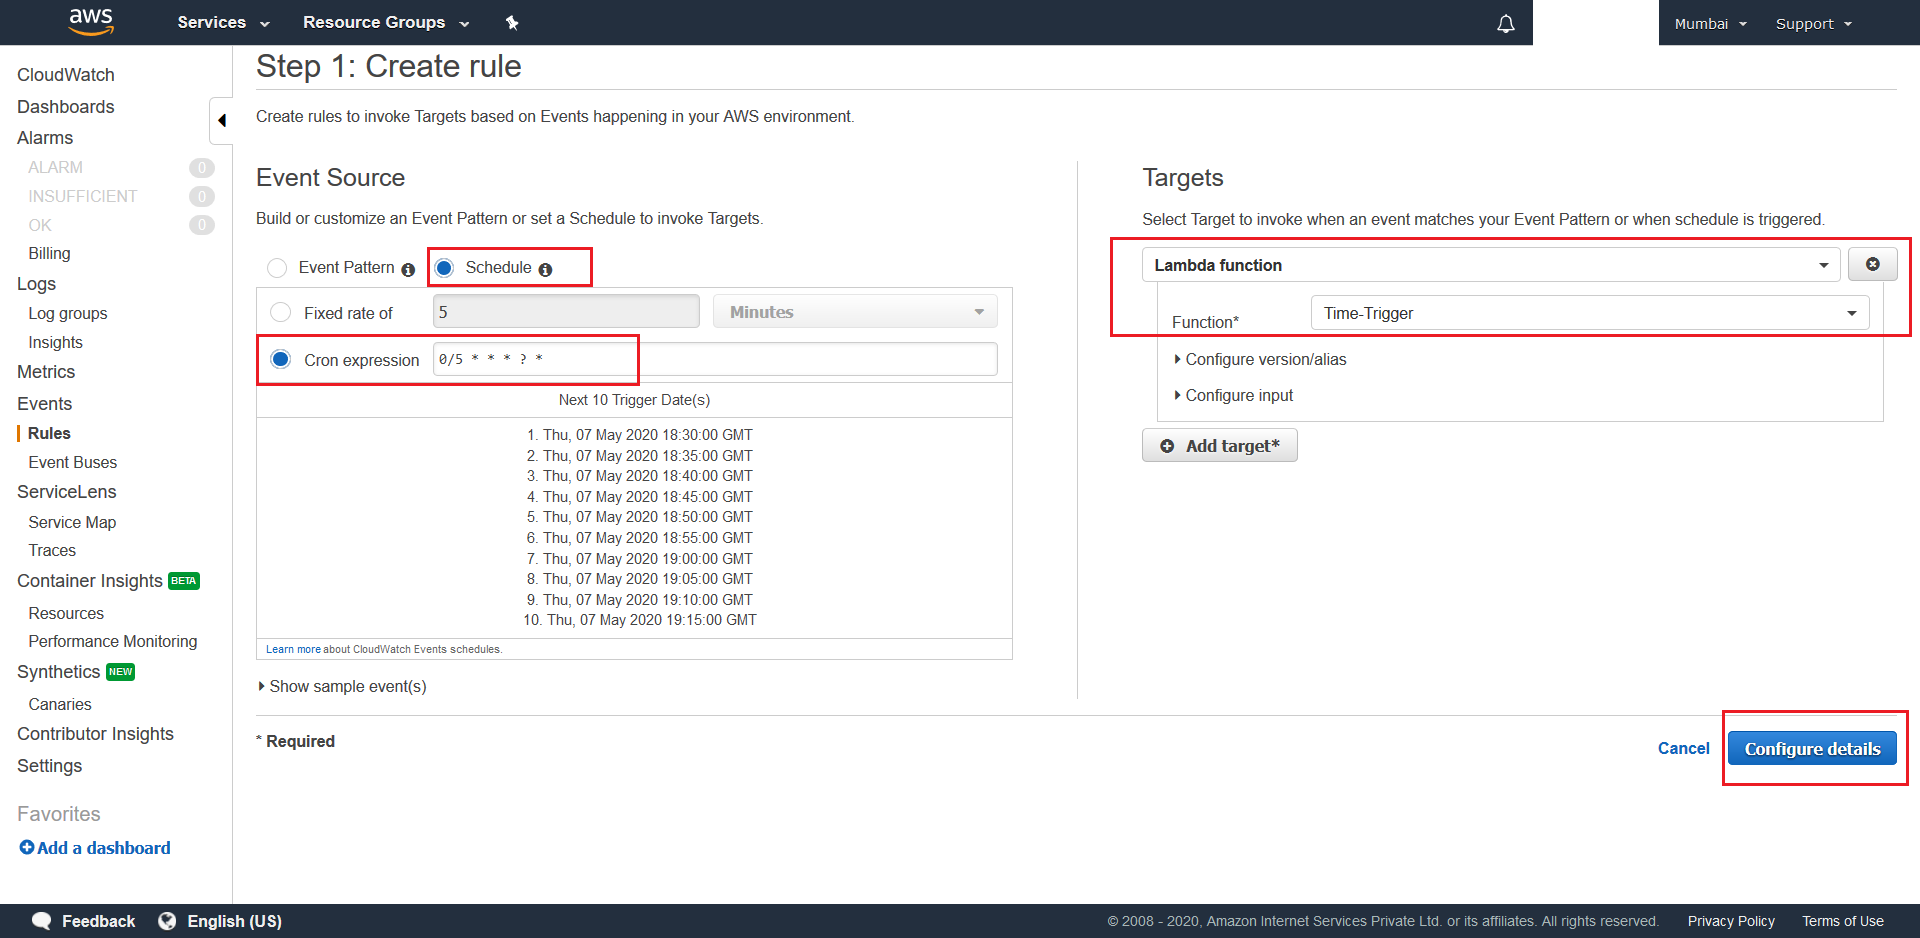

9. Initiator - ASP.NET Core based Serverless Compute
-
Pre-requisites:
- Visual Studio 2019
- .NET Core 3.1
- Source-code: Go to source code folder which was downloaded at this step.
- Mongo-DB-Connection-String: [this will be of the form: mongodb://demourl.com:port_number/]
- Database-Name: [this will be the form: WXM_ID_CLIENT_NAME]
- Your Azure Storage Account Access Key or your AWS Account Access Id and Key which was created in the Step 7 of the IAM User Creation Section
-
Serverless Computes to be deployed:
- RequestInitiator (x1)
9.1 Steps to deploy the required Azure Function
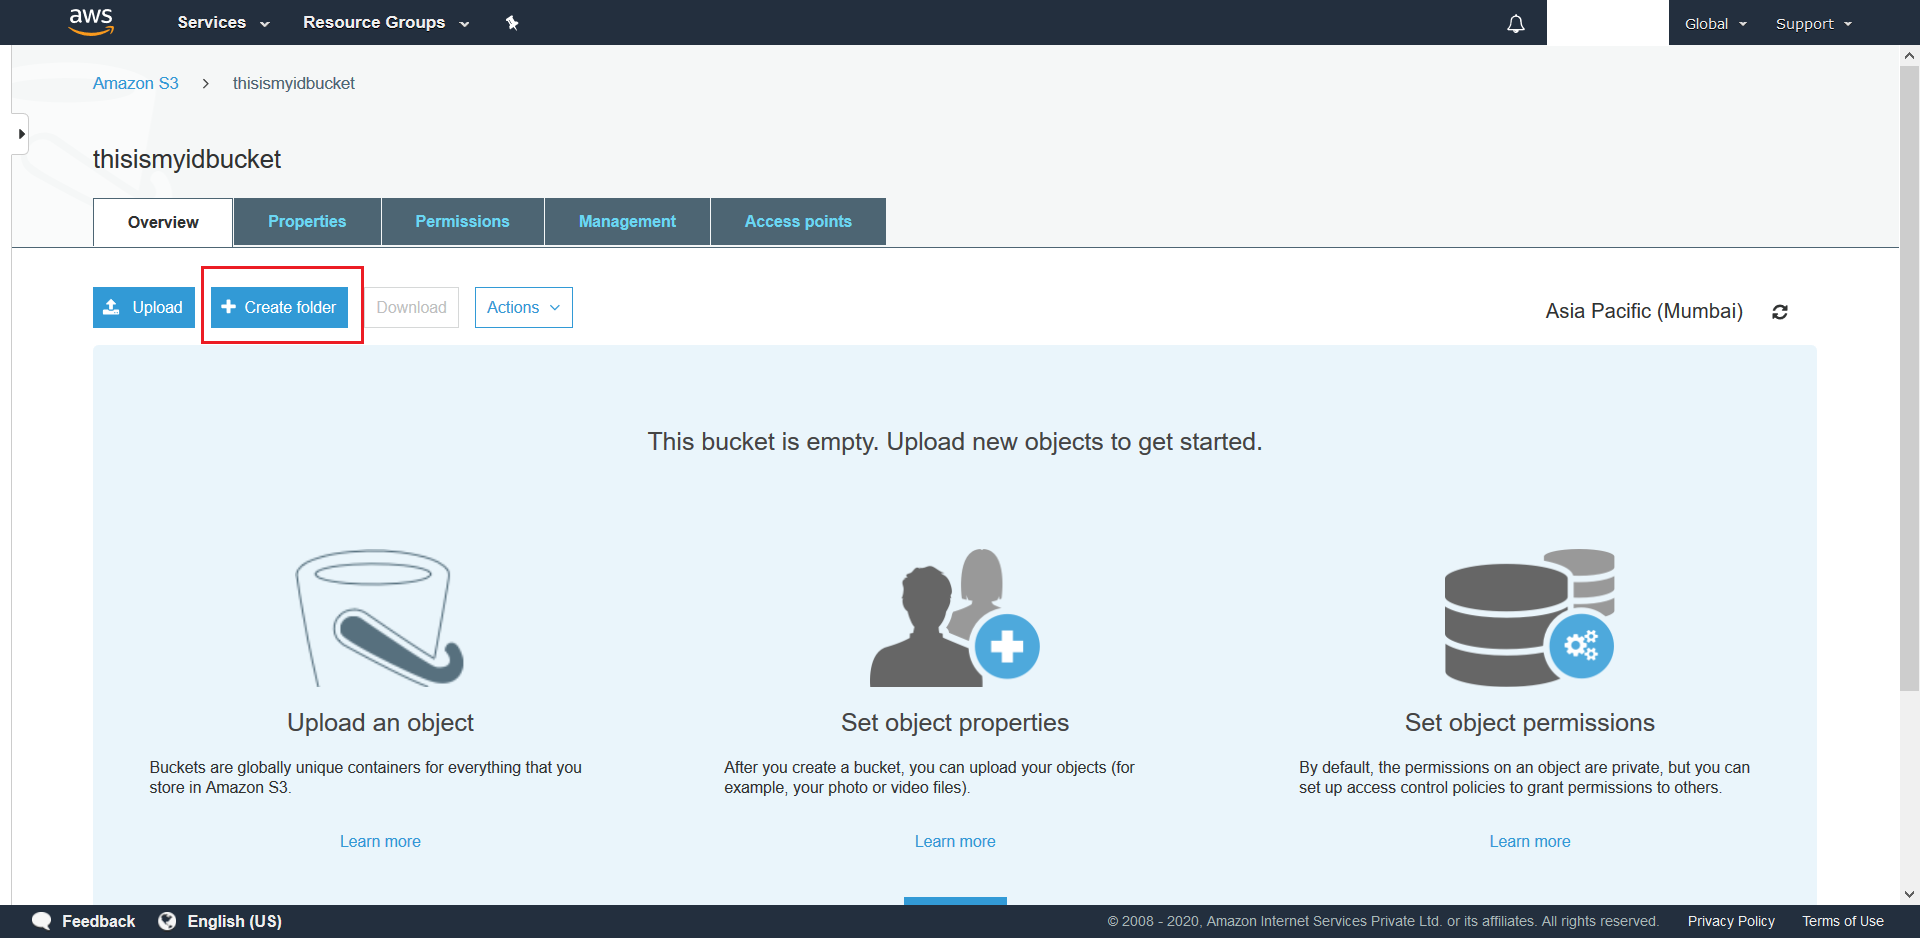
- First we need to correctly configure the S3 Bucket that was created at this step. This involves creating the required Folders inside the bucket as per details that have been explained here and subsequently uploading one config.json into each of the folders created. To do this navigate to your created bucket and click + Create Folder.
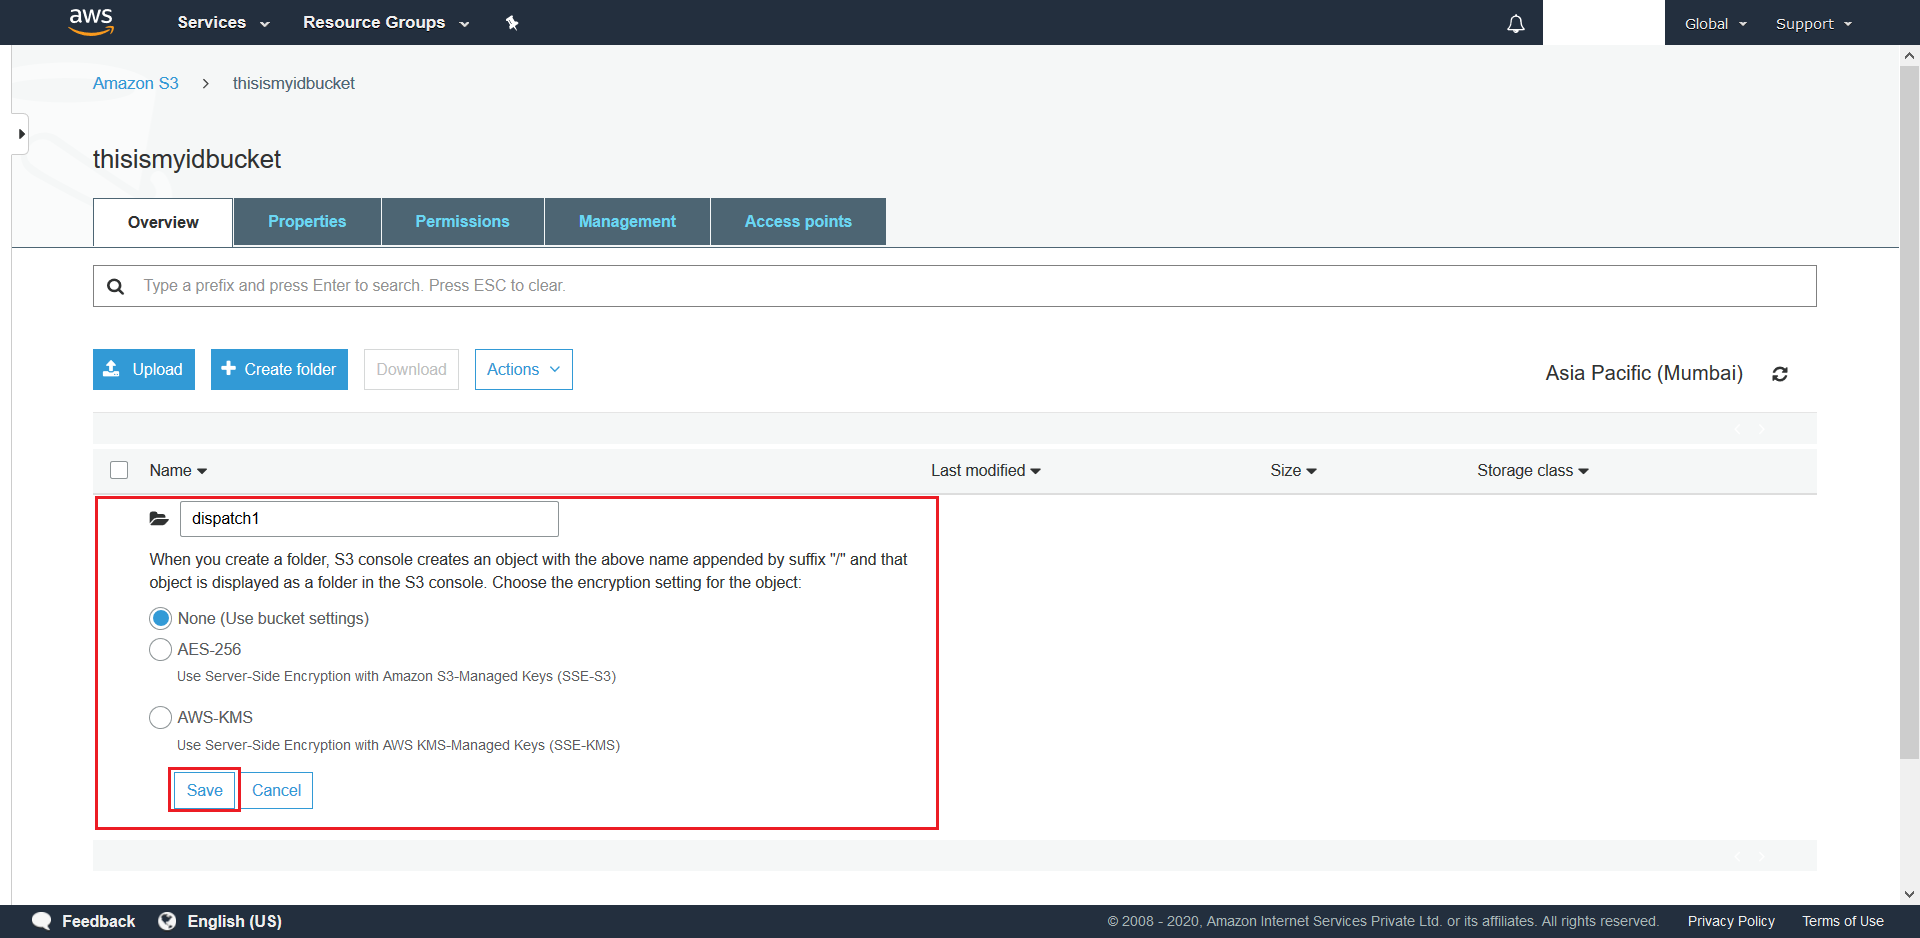
- Next give a suitable name to your Folder and choose None as the folder’s encryption option. Finally hit Save.
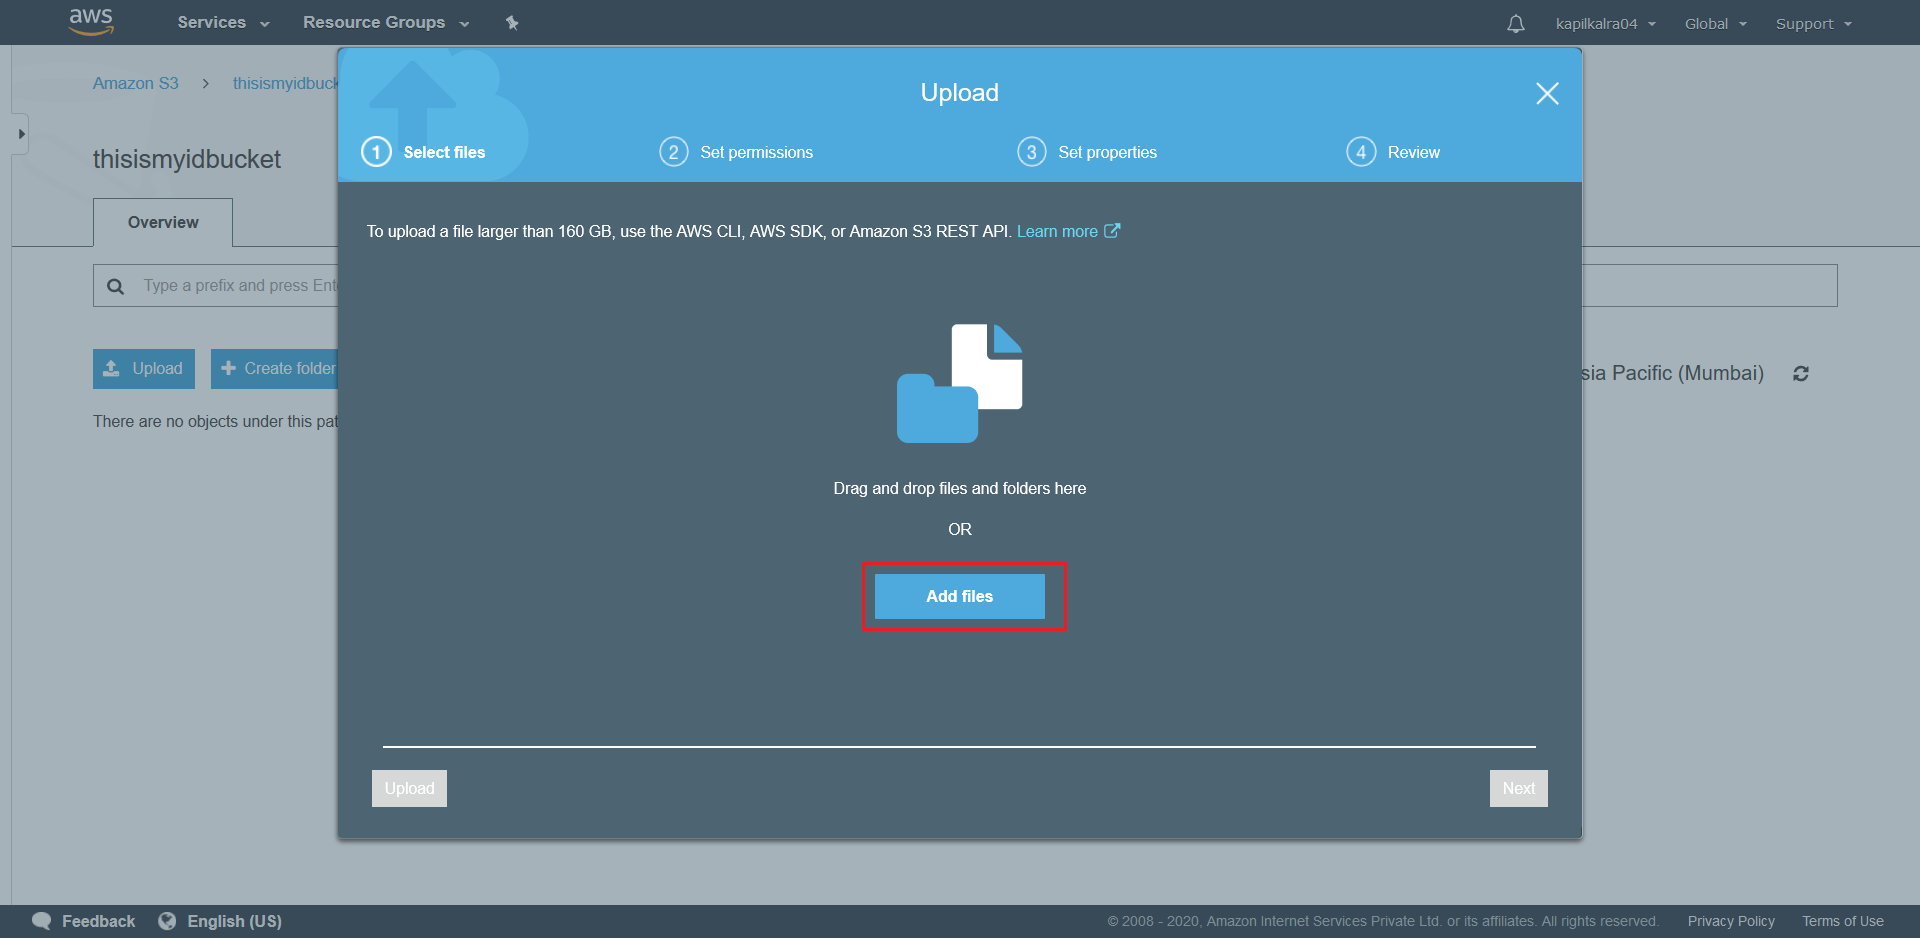
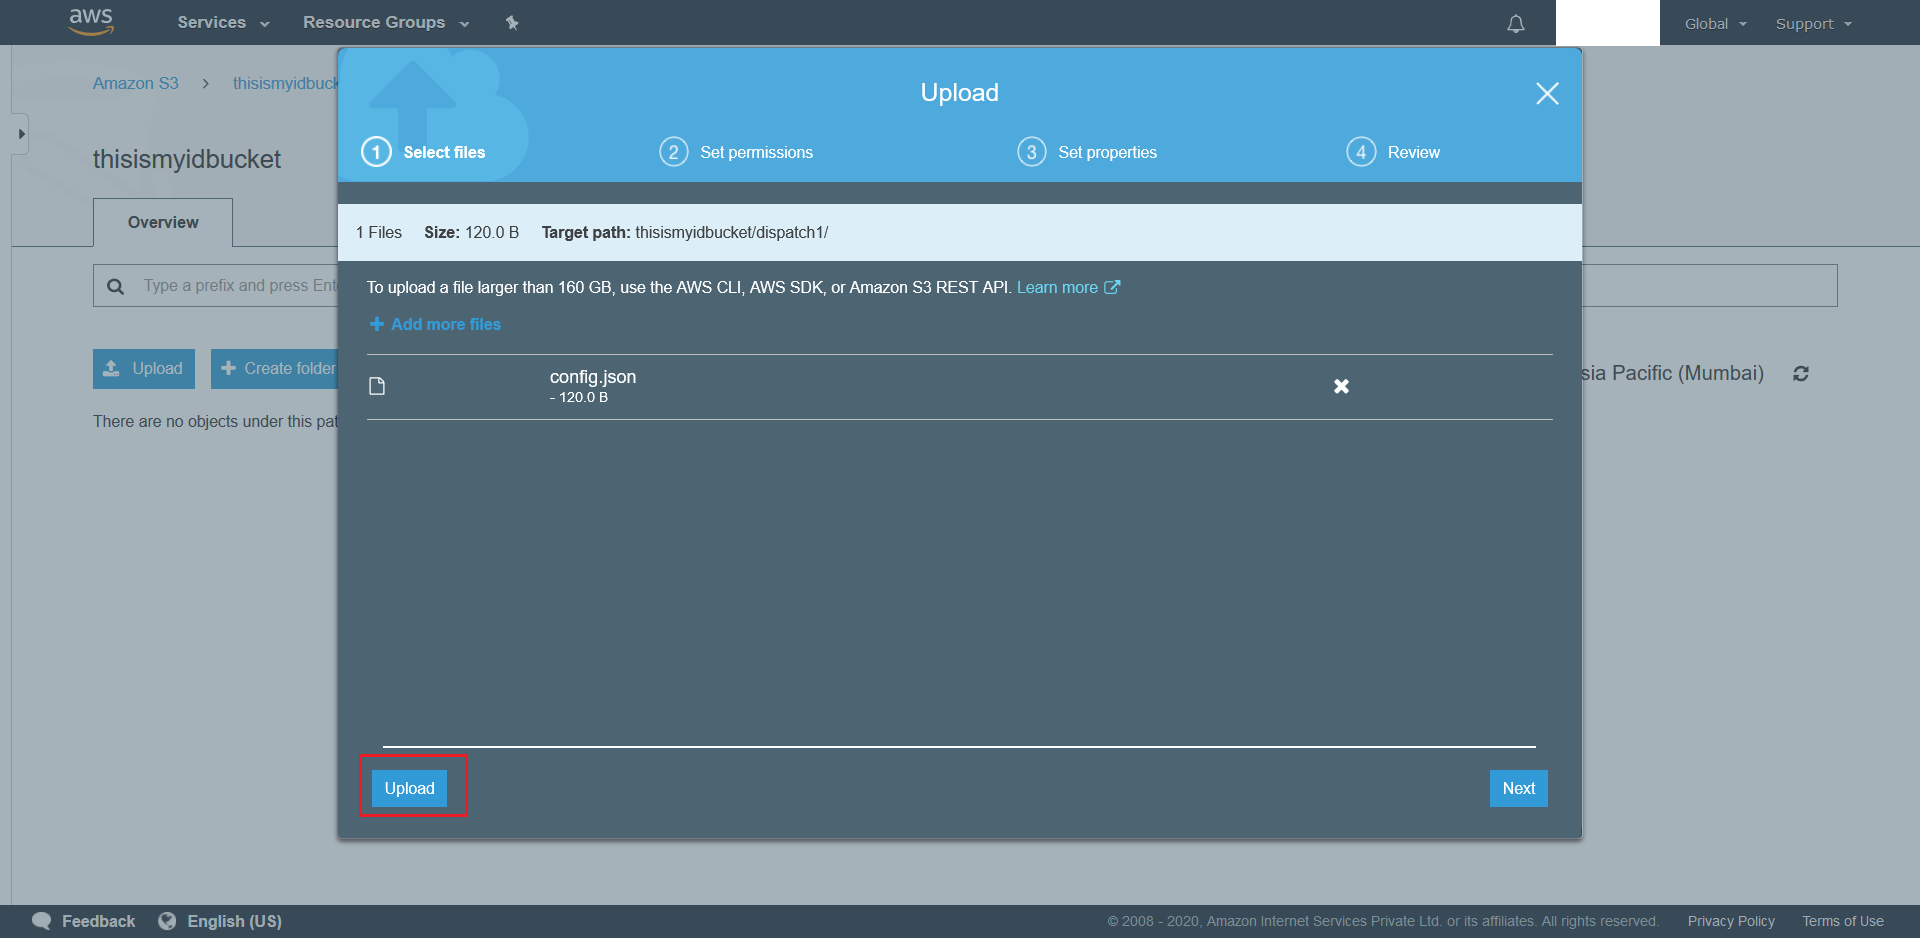
- Now navigate to the newly created folder and hit + Upload to upload the required config.json.

- From the next screen click on Add Files.
- Finally hit the Upload button at bottom right to upload the config.json.
- To upload Target Files in the future simply follow Steps 3-5.
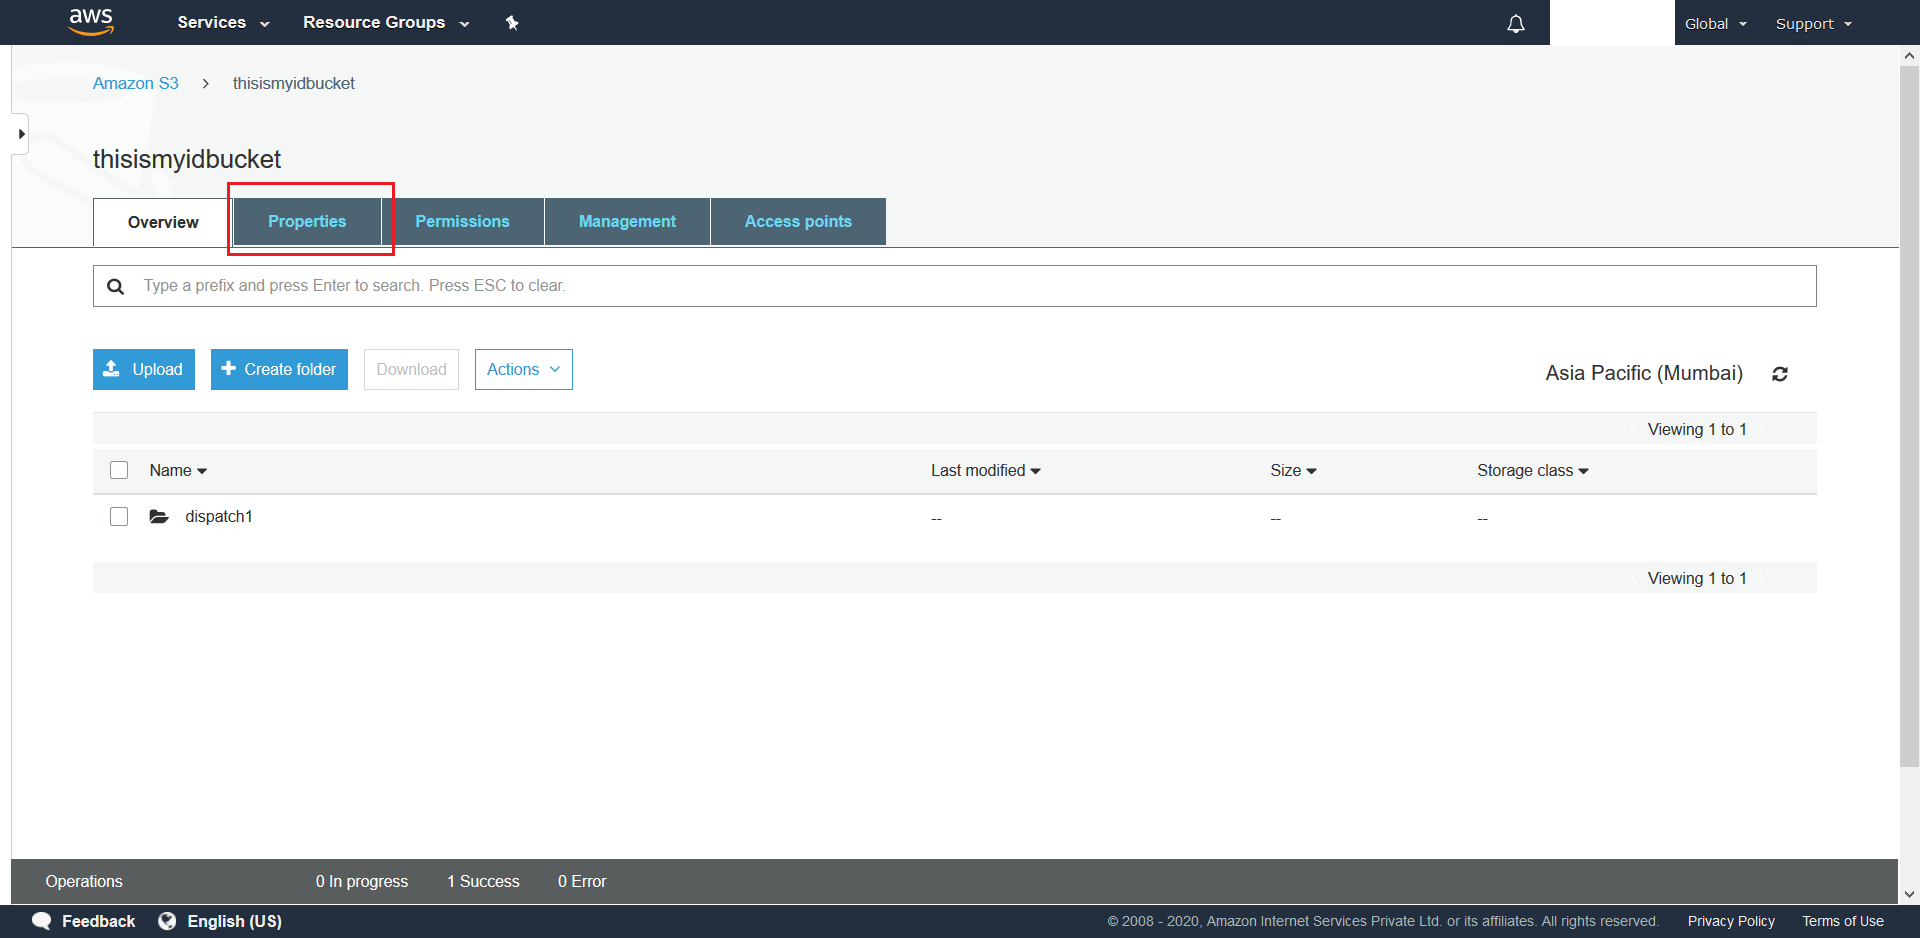
- Next we need to configure S3 Events for the bucket. To do this navigate to the bucket and click on Properties
- Scroll down and click on Events.
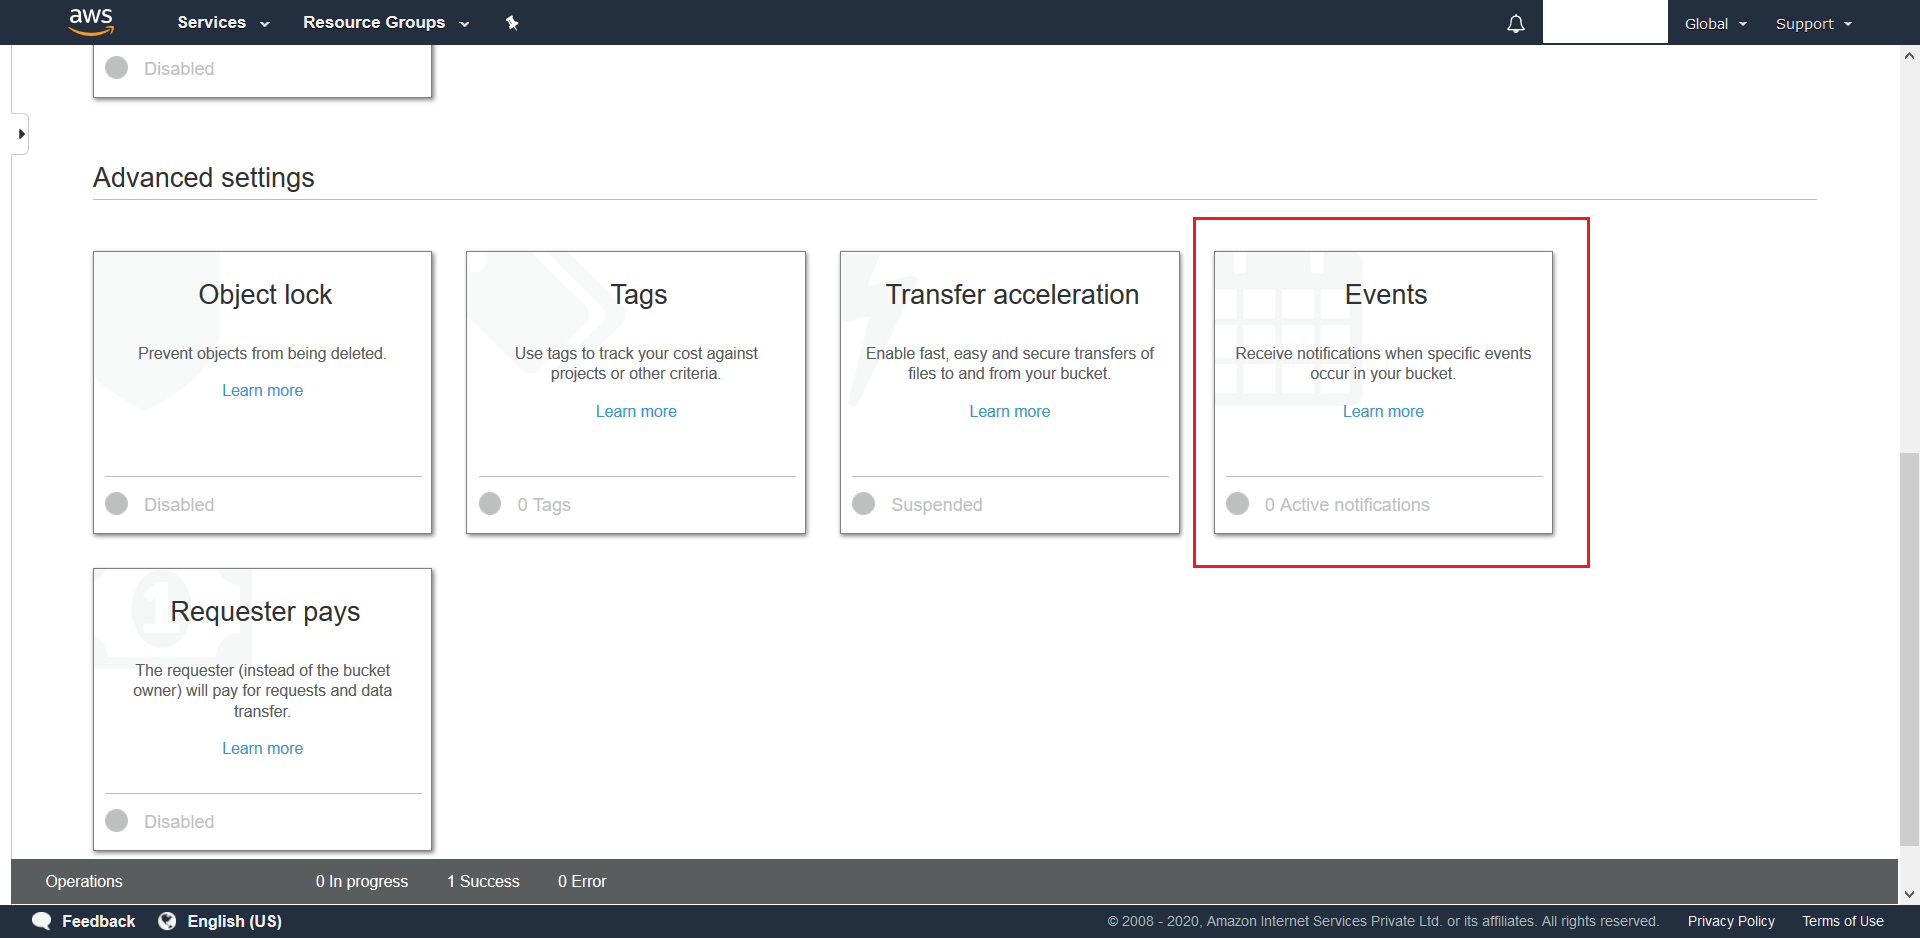
- This will pop-up a new menu. In this menu click on Add Notification.
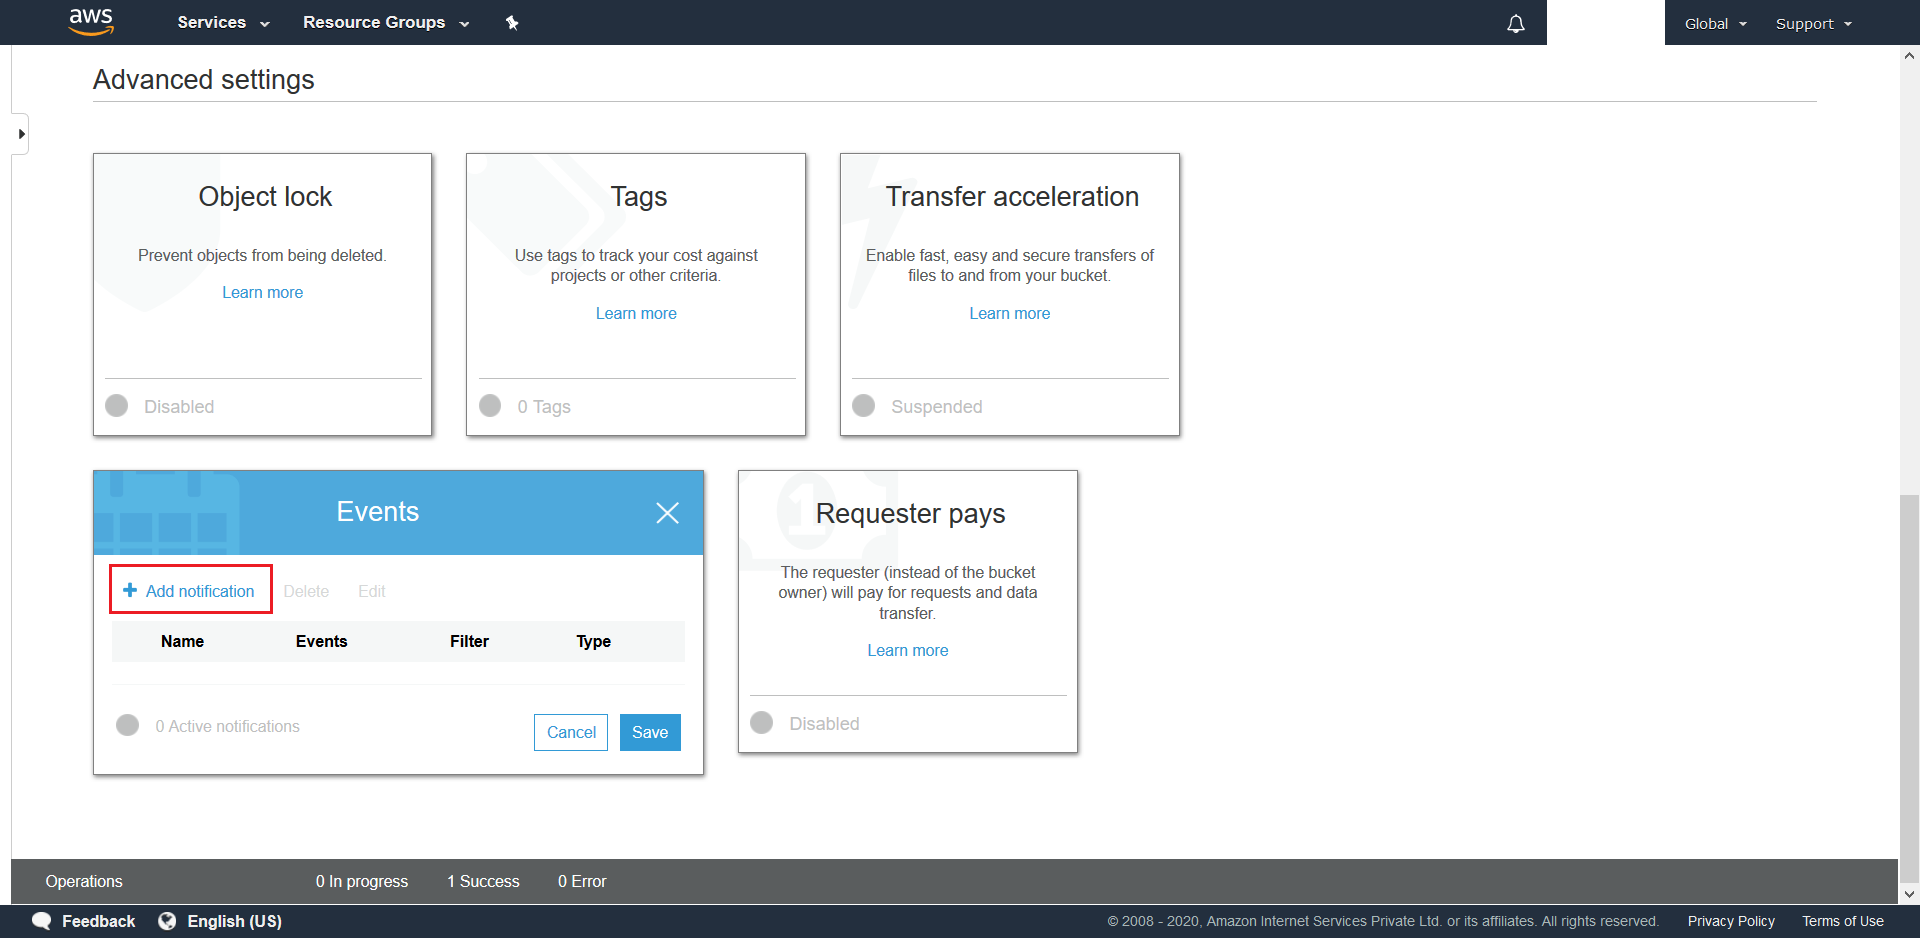
- Create a csvS3Event for
.csvtarget files with the mentioned settings. Make sure to choose SNS Topic for Send to along with the SNS-Topic-Name that was created in this step.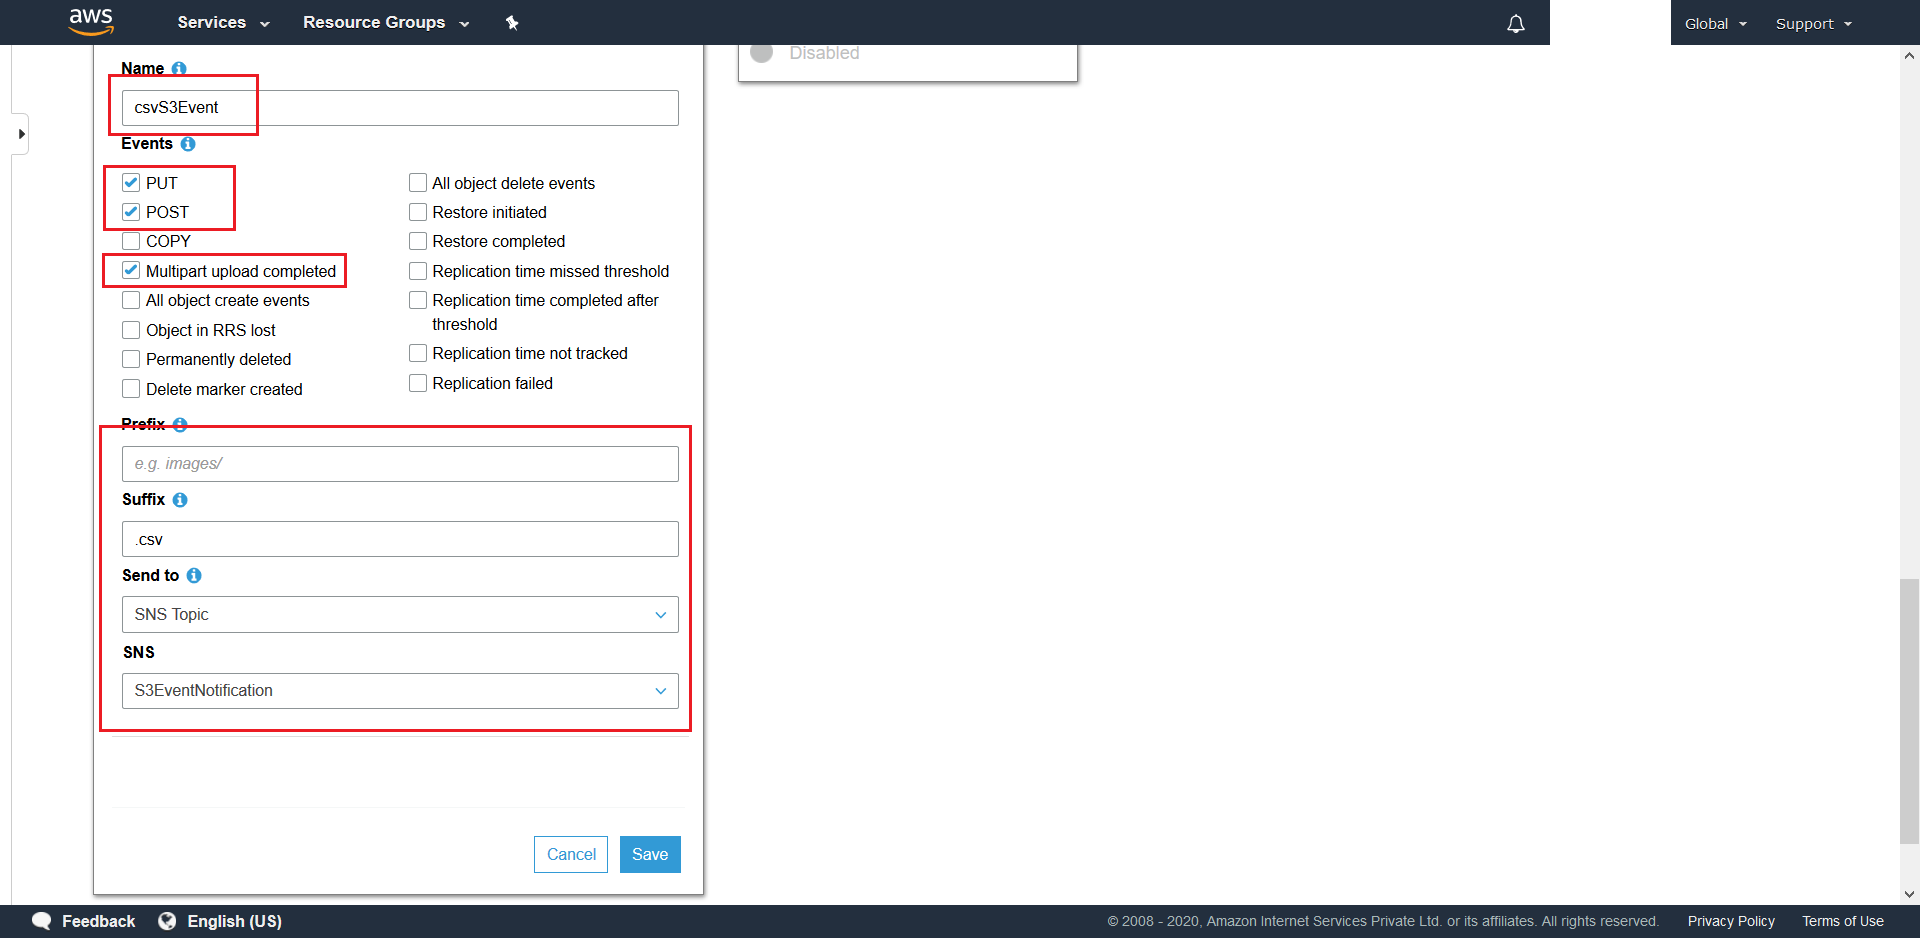
- Similarly create a xlsxS3Event for
.xlsxfiles with the Suffix set to .xlsx. - Now we need to deploy the source-code into the Azure Fuction App. To do this begin with launching AzureRequestInitiator.sln from the
AzureRequestInitiatordirectory that is part of the provided source-code. Then follow Steps 3 to 8 of this section while using the Initiator slot that was created at this step and making sure of providing the following as the Azure App Service Settings.- MongoDBConnectionString
- DatabaseName
- AzureWebJobStorage
- Region (Provide Regional Code of the configured S3 Bucket)
- AwsAccessKeyId
- AwsSecretAccessKey
- FUNCTIONS_WORKER_RUNTIME: dotnet
- FUNCTION_EXTENSION_VERSION: ~3
- Next we need make the Azure Function App a subscriber of the configured SNS Topic. To do this go to the Initiator Function App on the Azure Portal. On select Fucntions.
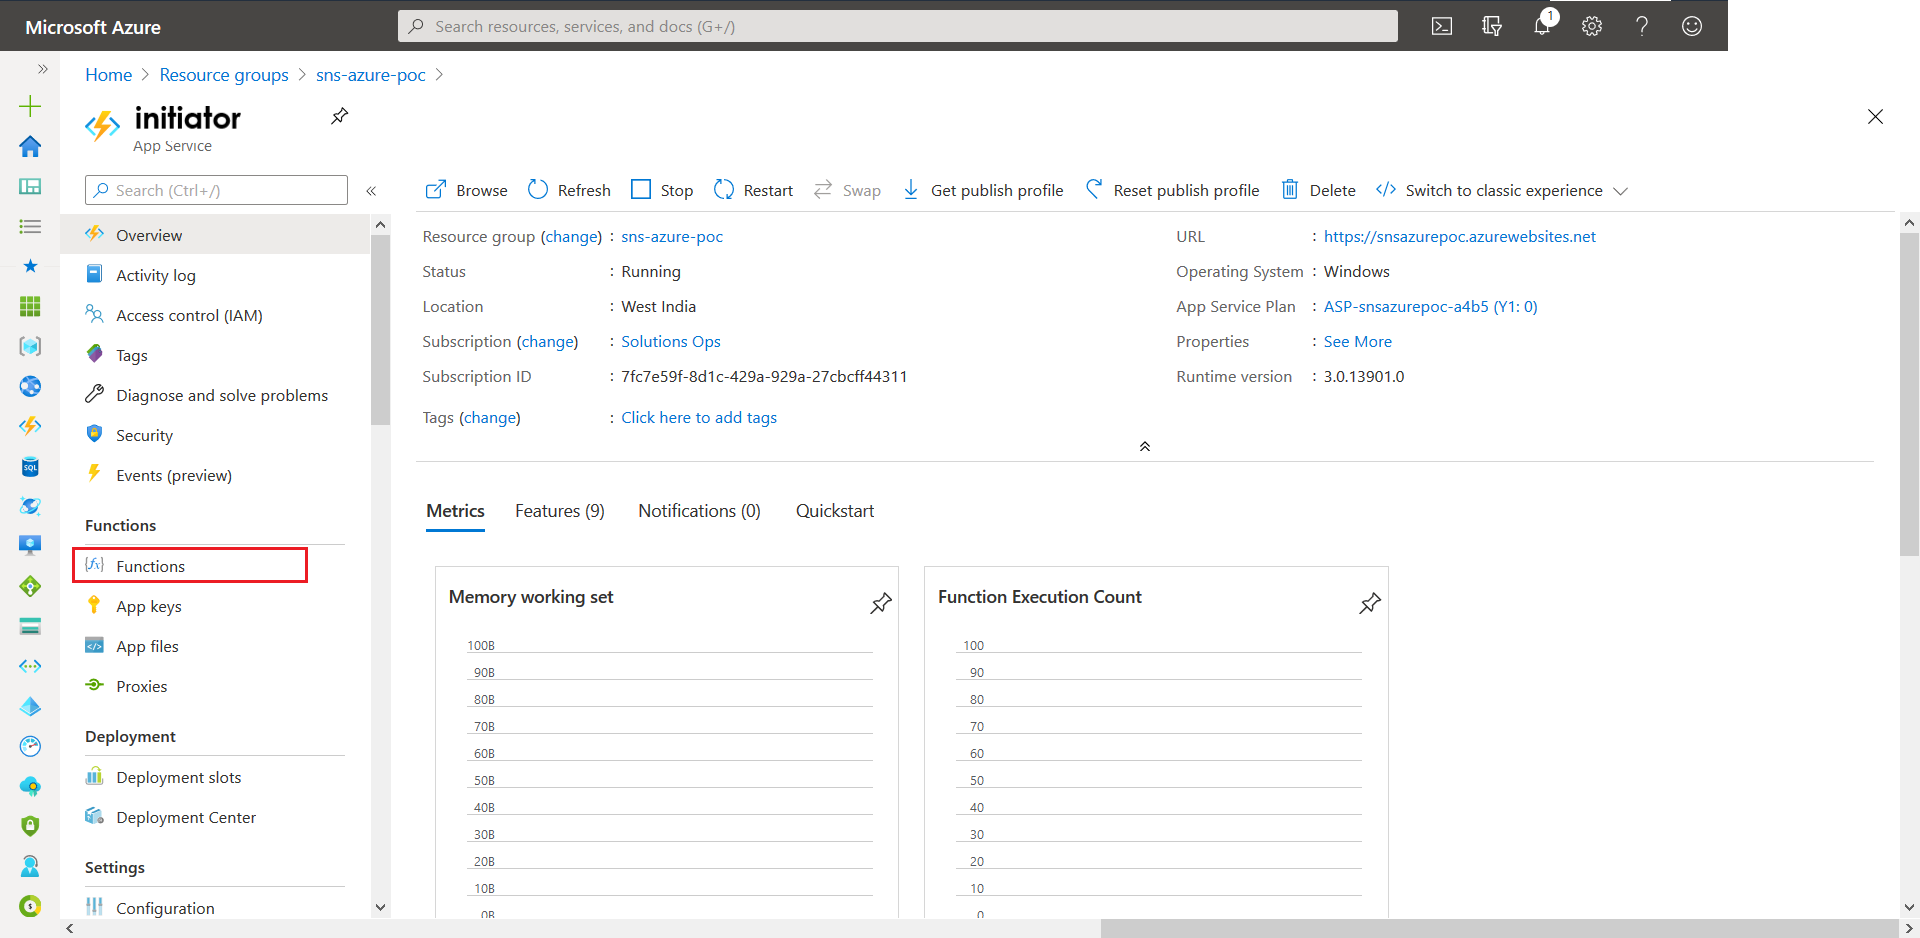
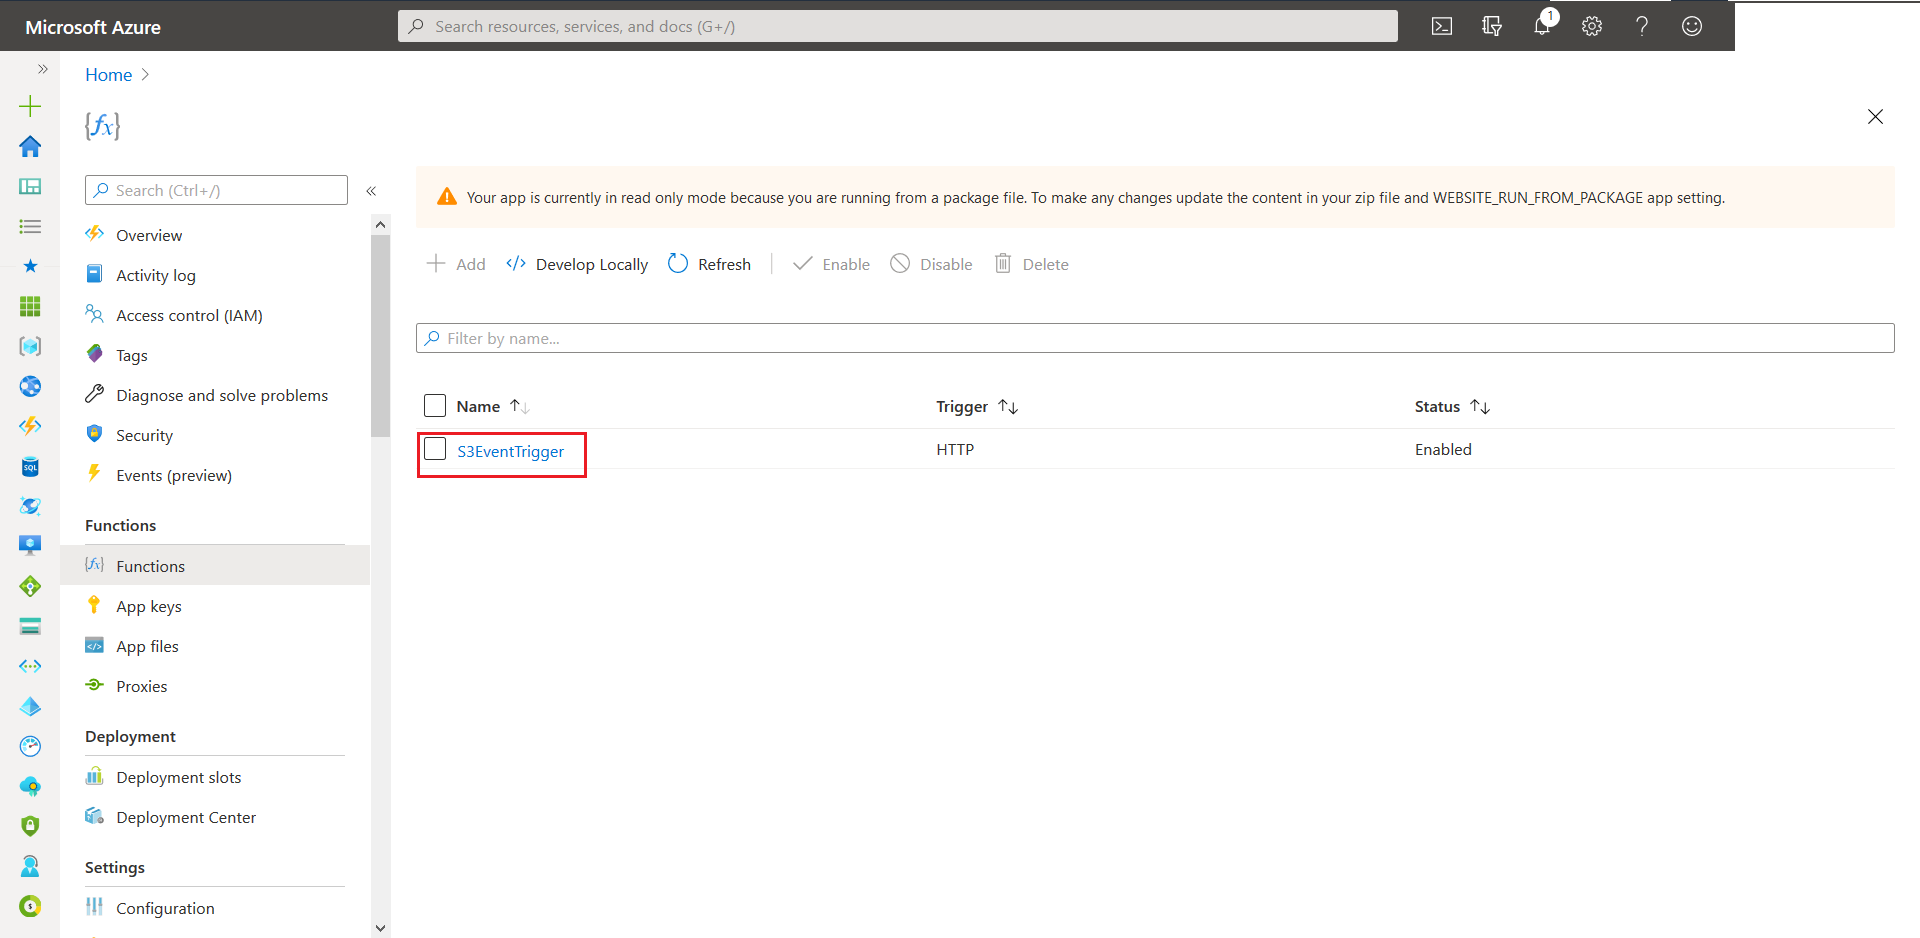
- From the next screen elect S3EventTrigger.
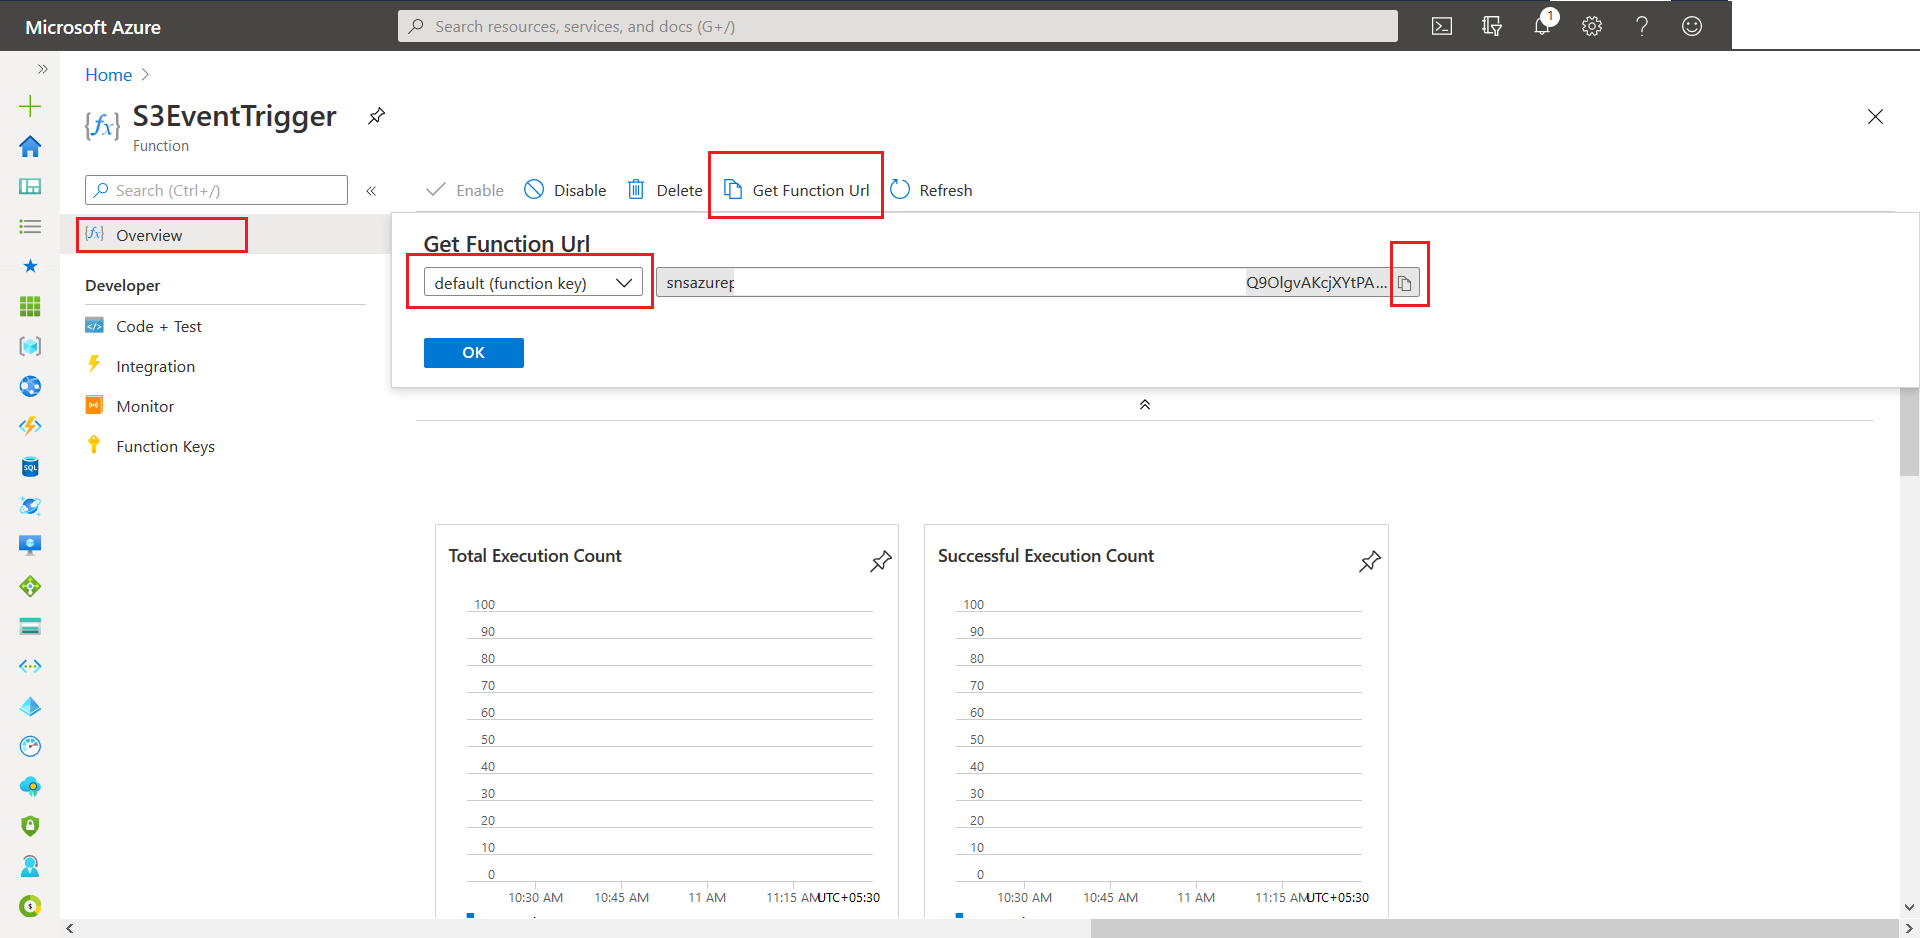
- Now head over to Overview and click on Get Function Url. Next click on the copy button to copy the value onto the clickboard.
- Next head over to the configured SNS Topic, which was created at this step, and hit Create Subscription.
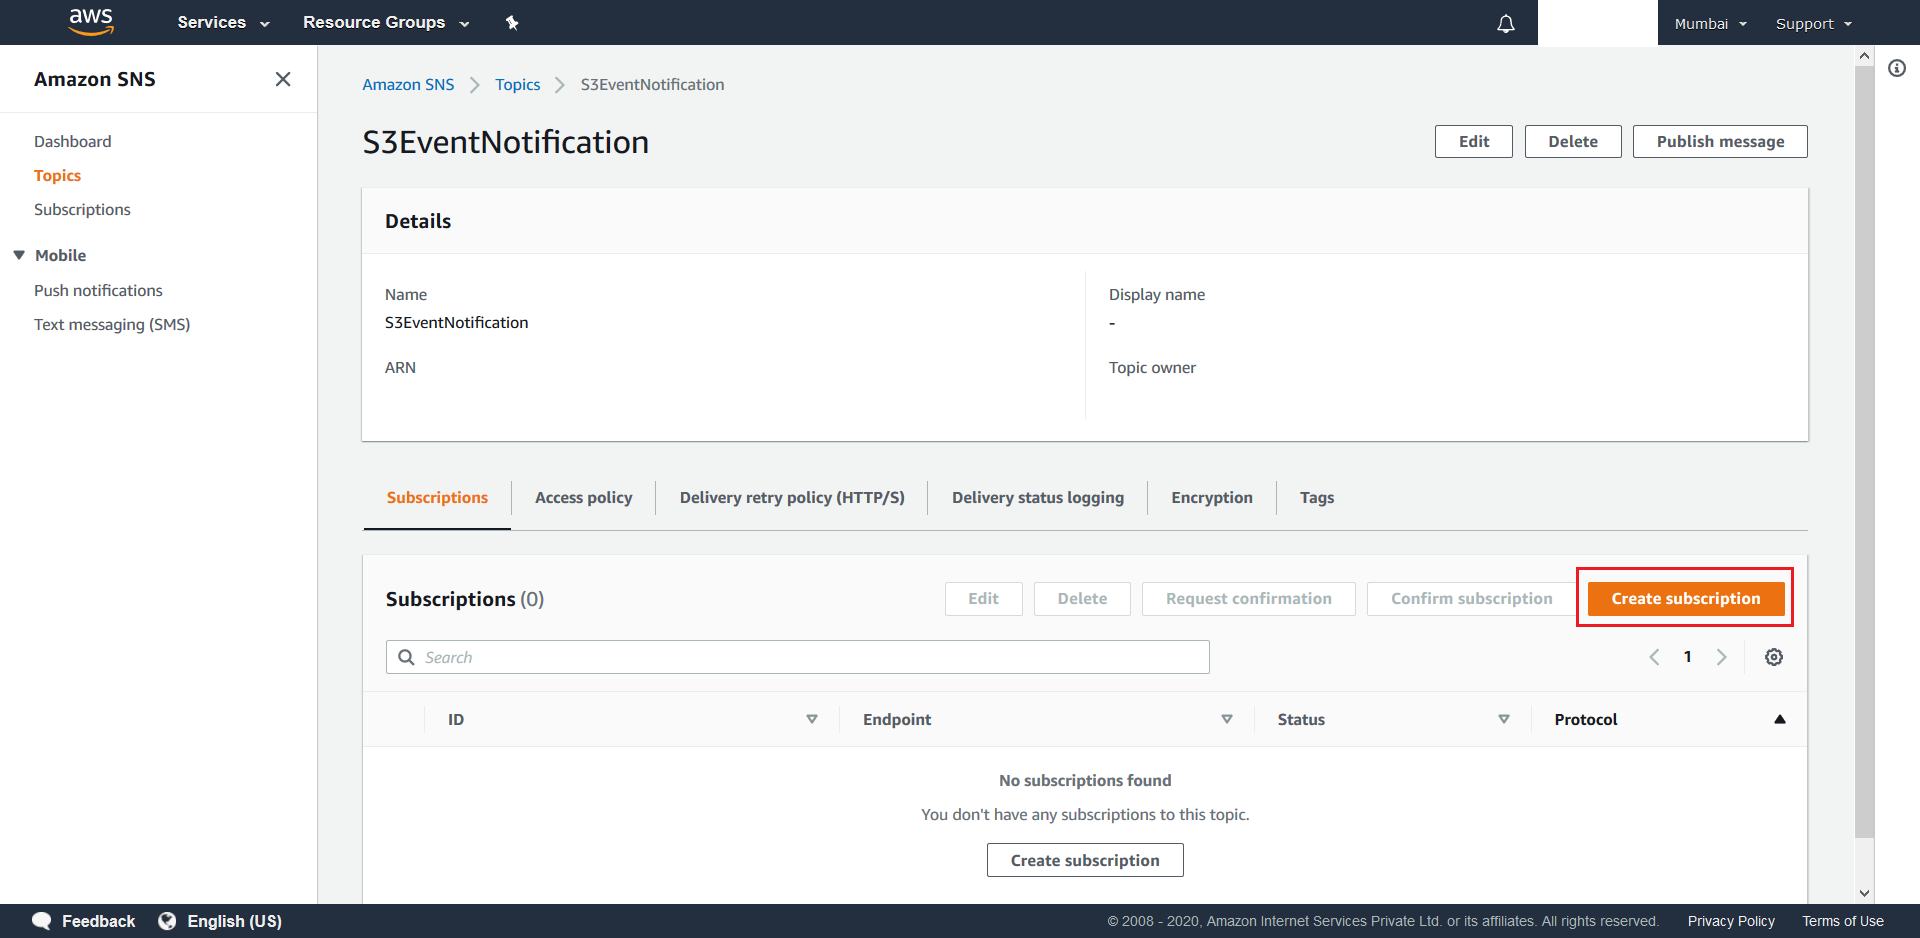
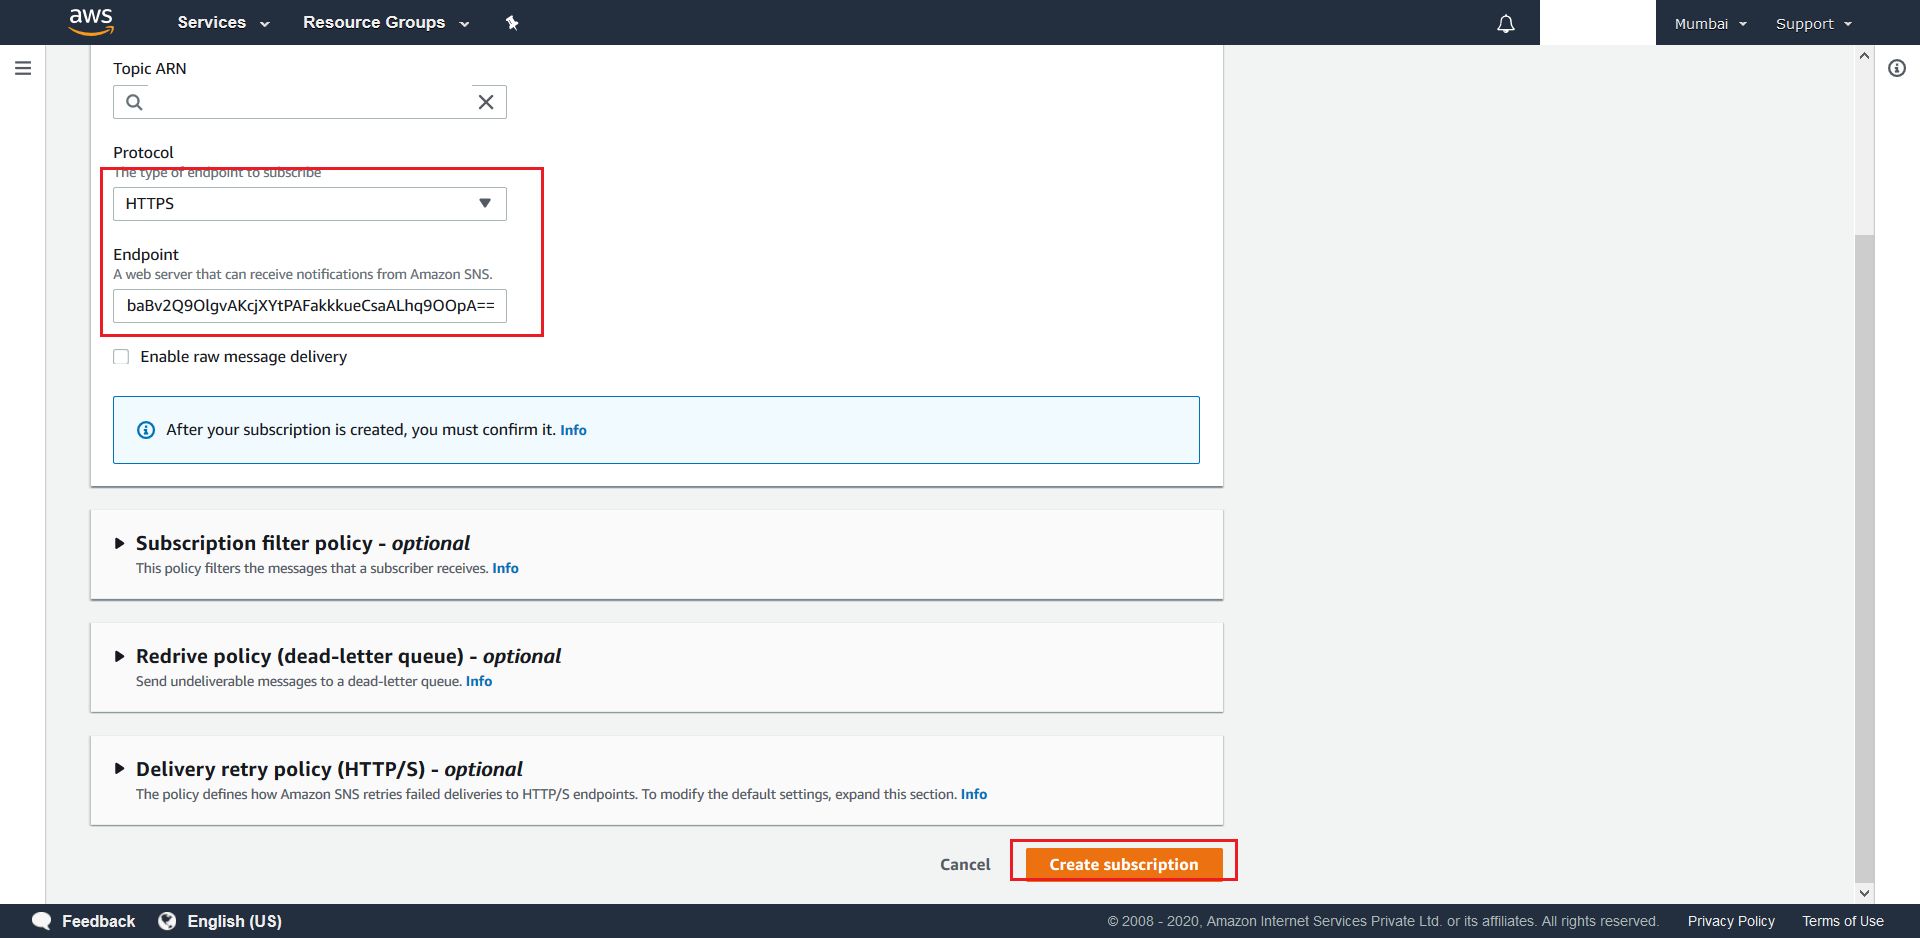
- On the next screen select HTTPS as the desired protocol and provide the URL from Step 15 as the Endpoint (append “https://” to the Url obtained in Step 15). Once done hit Create Subscription. You should receive a success message on the next screen.
- This completes the setup and deployment of the Initiator Component.
9.2 Steps to deploy the required AWS Lambda
- First we need to correctly configure the S3 Bucket that was created at this step. This involves creating the required Folders inside the bucket as per details that have been explained here and subsequently uploading one config.json into each of the folders created. To do this navigate to your created bucket and click + Create Folder.
- Next give a suitable name to your Folder and choose None as the folder’s encryption option. Finally hit Save.
- Now navigate to the newly created folder and hit + Upload to upload the required config.json.
- From the next screen click on Add Files.
- Finally hit the Upload button at bottom right to upload the config.json.
- To upload Target Files in the future simply follow Steps 3-5.
- Next we need to configure S3 Events for the bucket. To do this navigate to the bucket and click on Properties
- Scroll down and click on Events.
- This will pop-up a new menu. In this menu click on Add Notification.
- Create a csvS3Event for
.csvtarget files with the mentioned settings. Make sure to choose Lambda Function for Send to along with the AWS Lambda that was created in this step.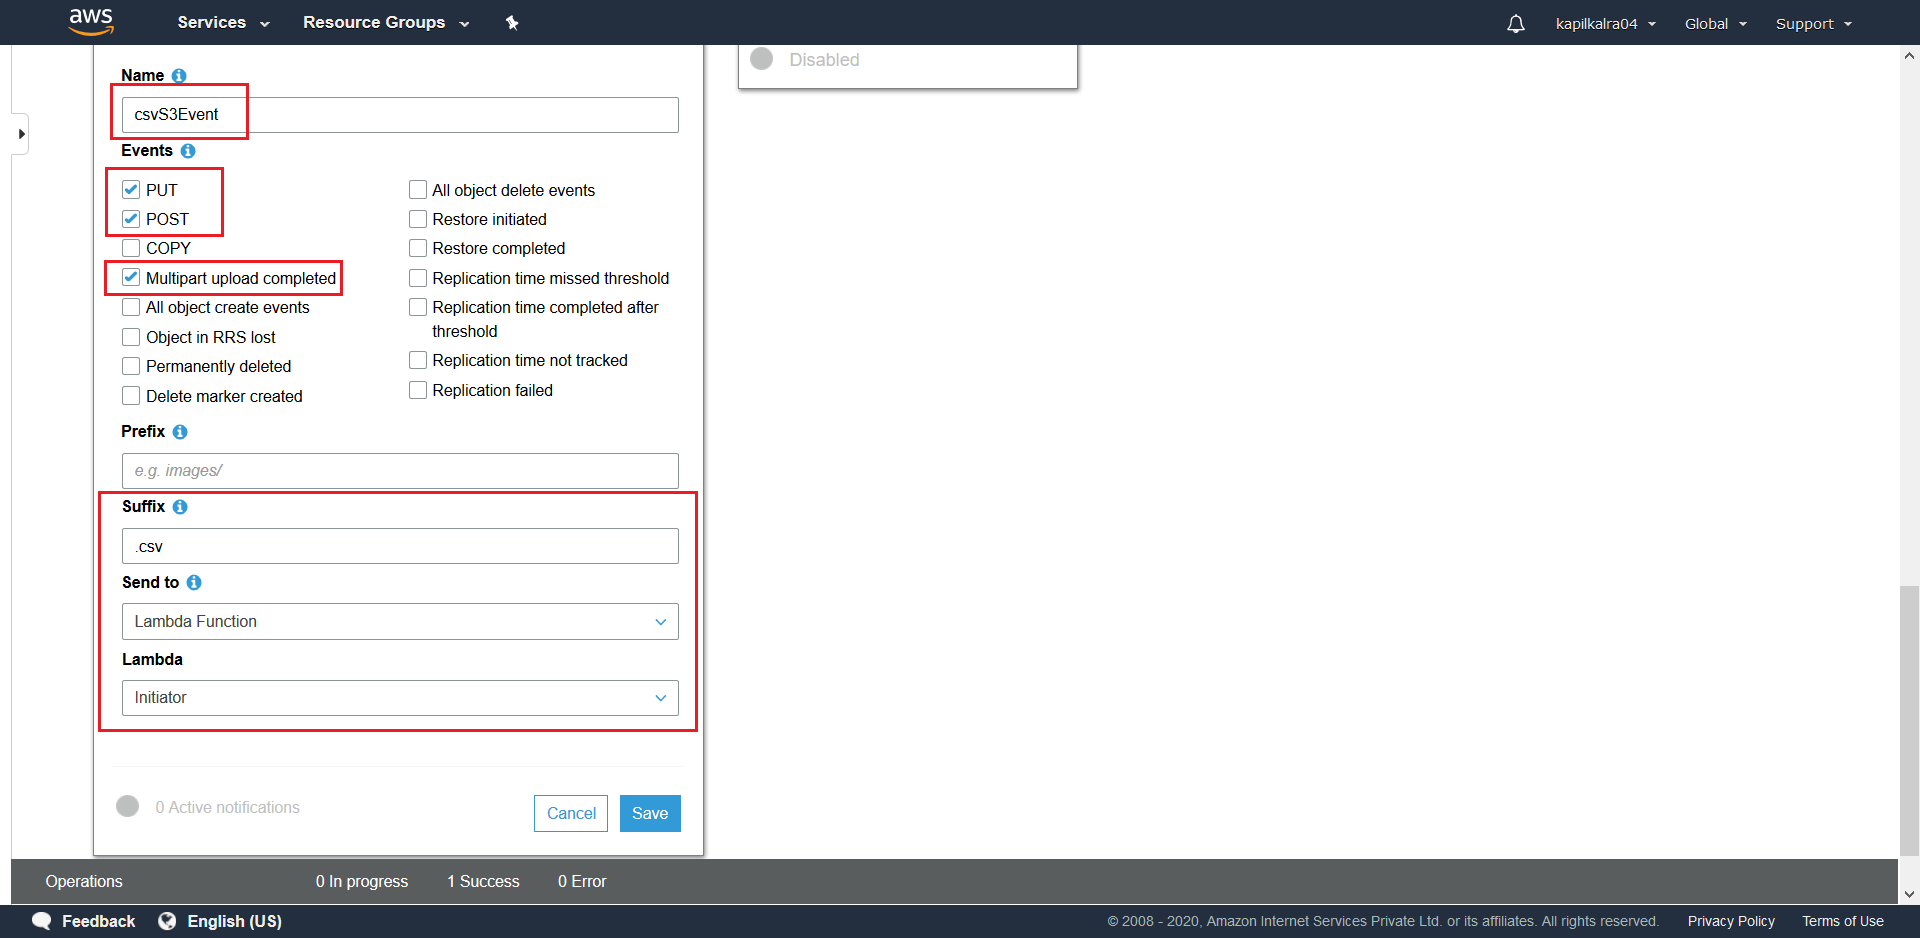
- Similarly create a xlsxS3Event for
.xlsxfiles with the Suffix set to .xlsx. - Now we need to deploy the source-code into the AWS Lambda. To do this begin with launching AwsRequestInitiator.sln from the
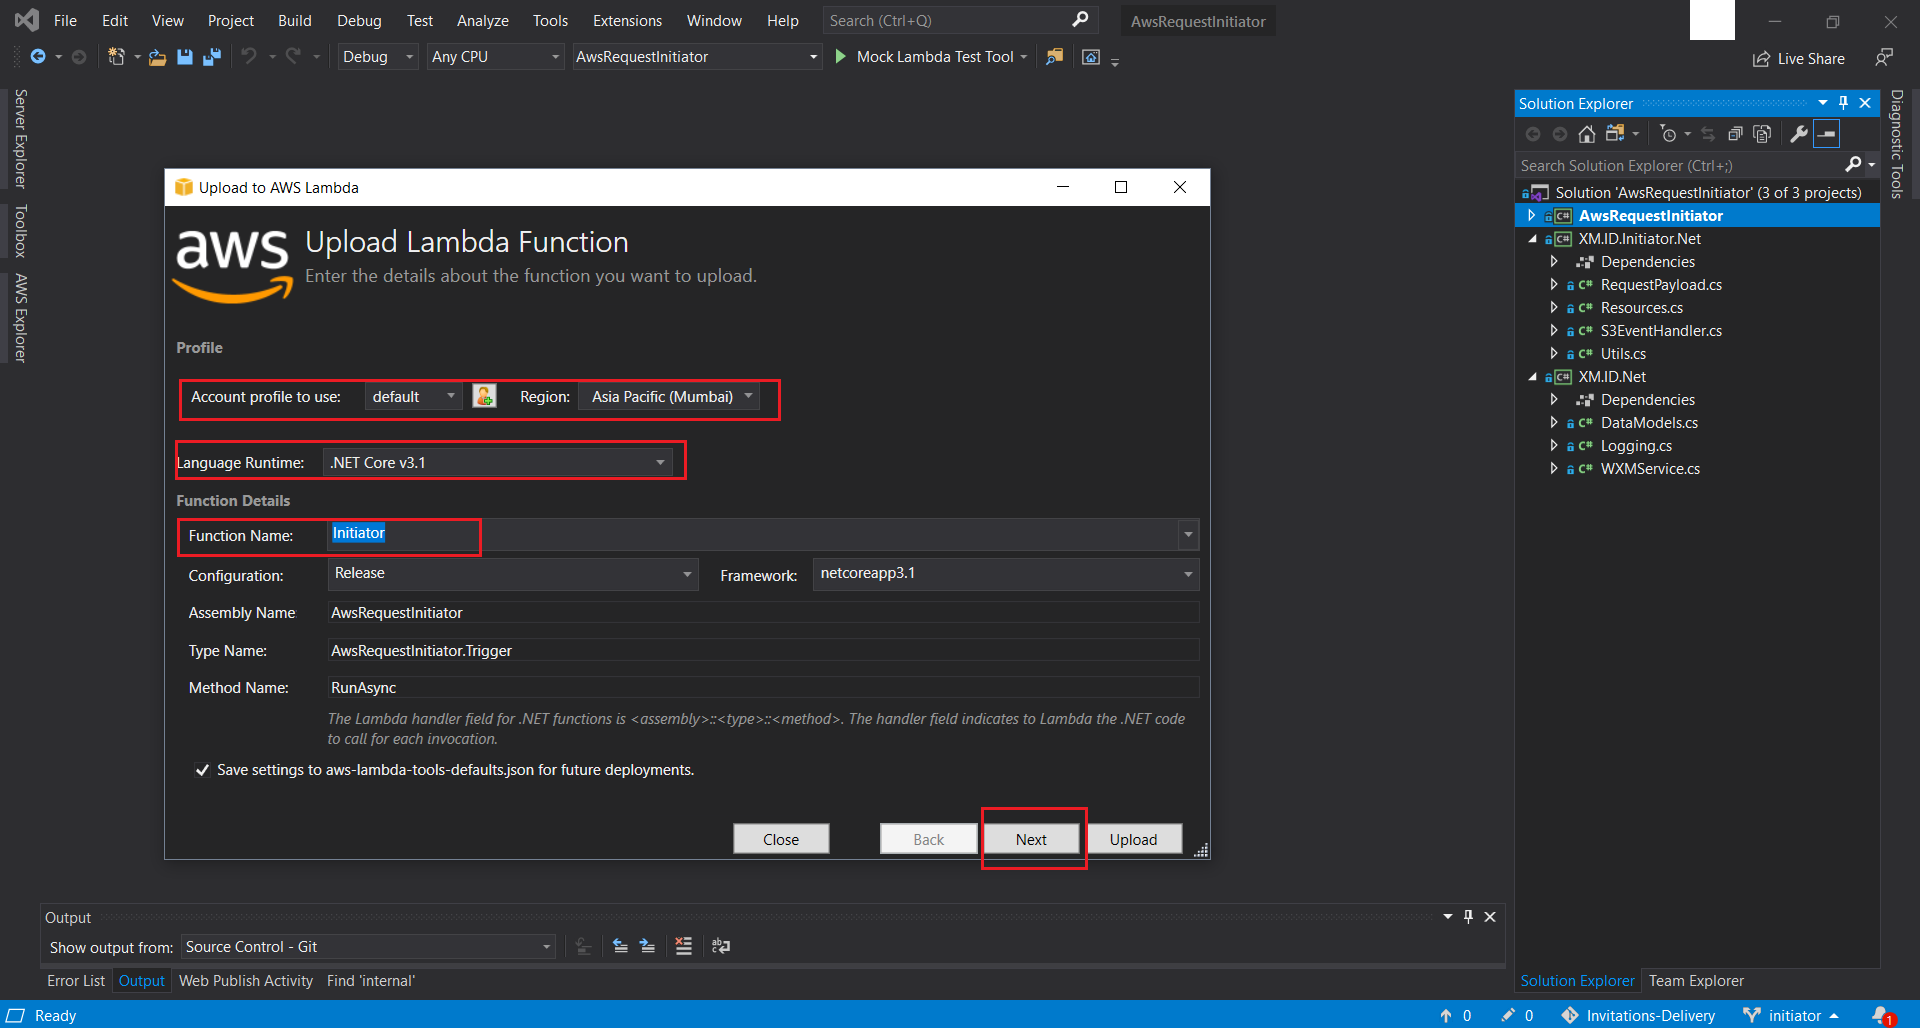
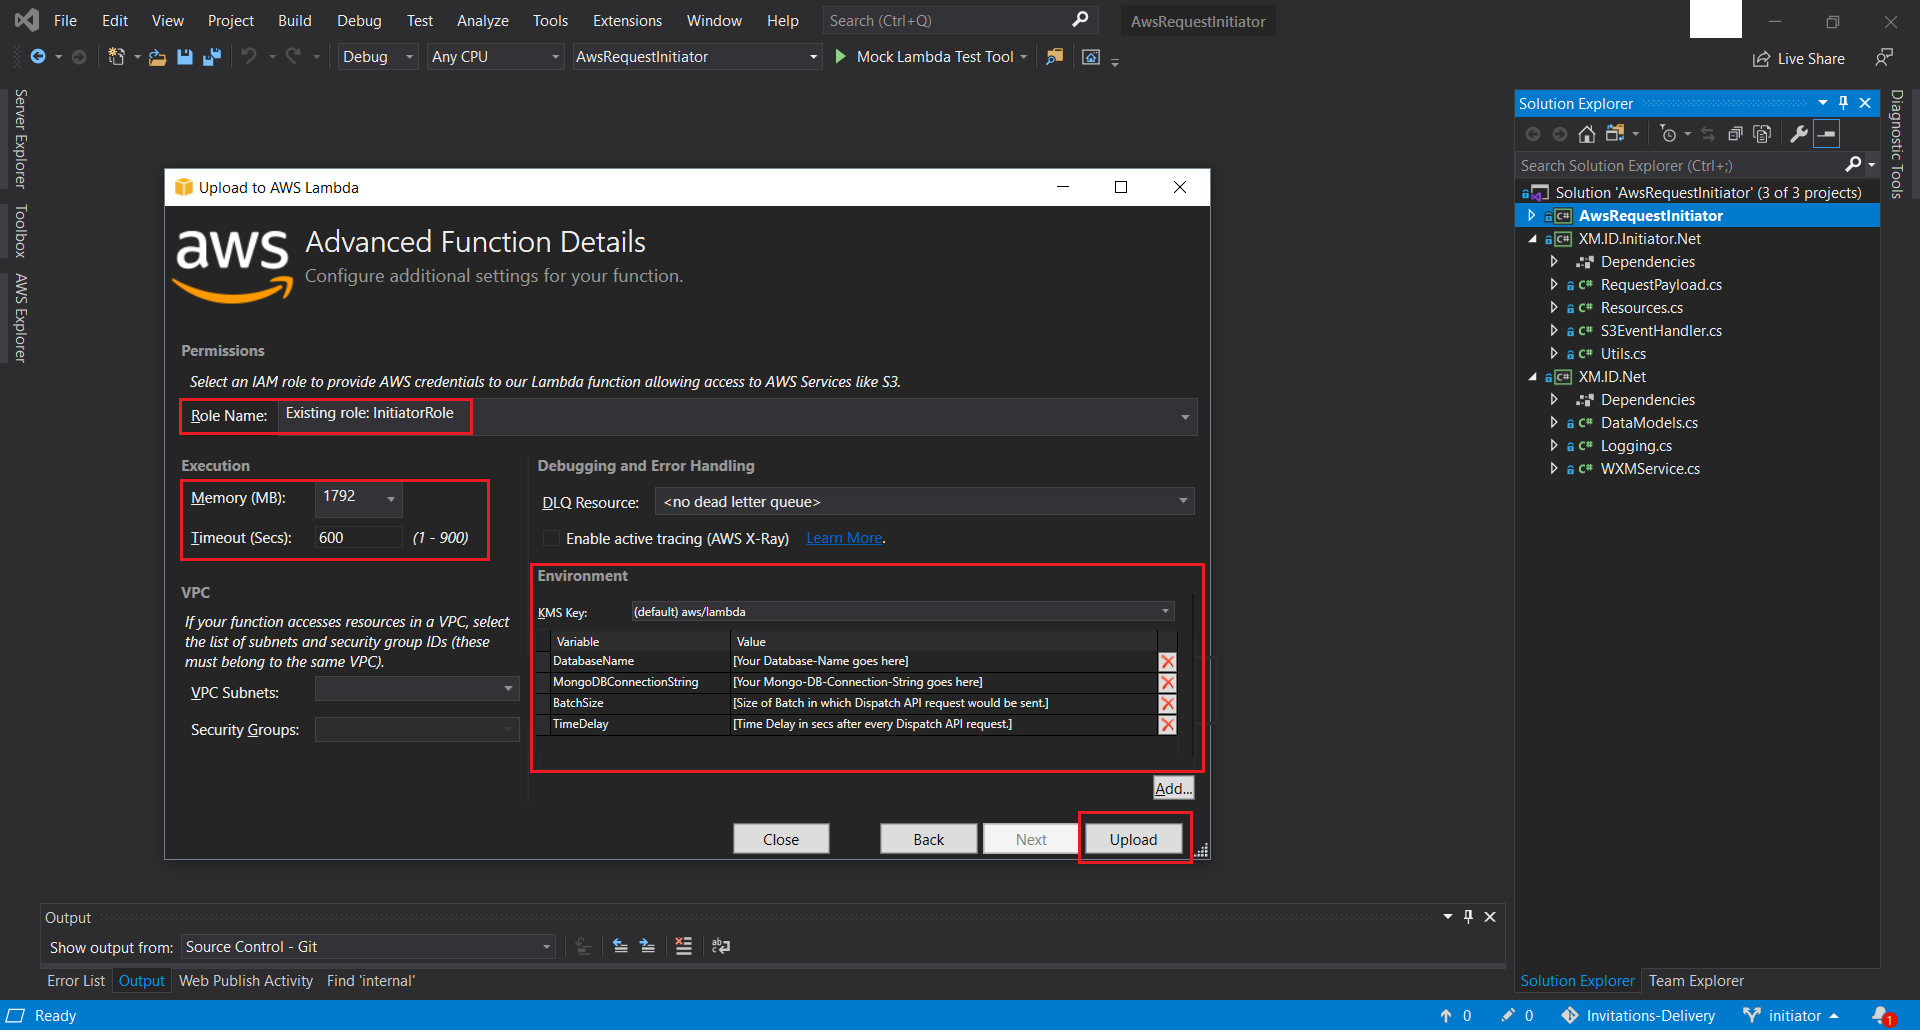
AwsRequestInitiatordirectory that is part of the provided source-code. - Right Click + Publish to AWS Lambda the solution. In the pop-up screen, select the previously created Named Profile. This was created at Step 4 of this. Moving forward, select the Region, where you would have provisioned all your resources uptil now and subsequently choose Initiator from the drop-down list of all available functions. This function was created here. Once done hit Next. On the next screen make sure you choose the existing InitiatorRole IAM Role that was created for the Initiator Function. Finally, configure the Memory, the Timeout, and the required Environment Variables and hit Upload.
- This completes the setup and deployment of the Initiator Component.
10. Reporting Module Deployment
Steps to deploy reporting modules will be exactly same as Notifications module deployment as mentioned in section 7. There are two sub-modules deployment(DPReporting and DataMerger) as part of Reporting module and both follows the similar steps. These two modules will be deployed in same server where Notification module is also running.
Following steps to be performed for deployment of each of sub modules of reporting module.
- Login to Ubuntu server where Reporting modules are to be deployed - this step
- Set-up monitoring for each of Rerporting modules .NET Core app - this step
- Download the code using the steps mentioned already here - this step
10.1 DataMerger Module - Configurations
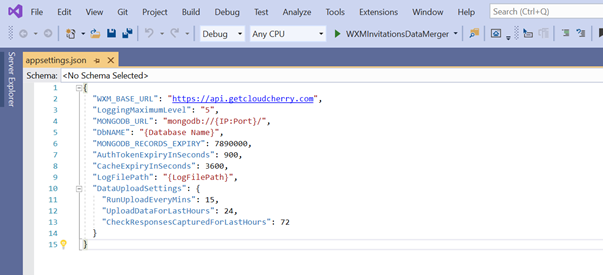
The DpReporting job in a way depends on the data merging job, so make sure you deploy the data merger first. Here we would be covering the “DataUploadSettings”.
- First one is the “RunUploadEveryMins” parameter, which is basically the frequency value (in minutes) that you need to specify which will tell you how often the Data Merging and Upload should happen.
- Then there is “UploadDataForLastHours”, which basically is a rolling period for specifying the date range to look the data for.
- Specifying a value of 15 and 24 for these first 2 parameters would mean that the Data Merging would happen every 15 mins for data which is 24 hours old from the beginning of each 15 minute cycle.
- The “CheckResponsesCapturedForLastHours” has a special function. Once the survey is sent, data will be merged at that moment and just stored. The merged survey token log should get updated once the survey is answered. So, we use the period specified here to check if any Unanswered Survey tokens, that were already merged, in this time range have been answered or not.
10.2 DPReporting Module - Configurations
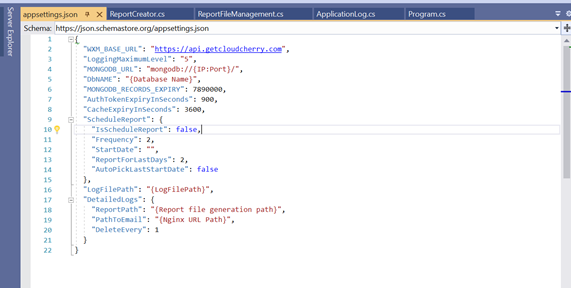
Here we will be covering the configurations parameters - “ScheduleReport”, “LogFilePath” and “DetailedLogs” in detail.
- Using the “ScheduleReport” parameter, report delivery can be scheduled.
- “IsScheduleReport” parameter is the switch which turns the report scheduler On/Off.
- “Frequency” param denotes the frequency in which the reports are required in hours. So if you want the report once every week, the “Frequency” would be 24*7 hours.
- “StartDate” is the timestamp when scheduler is supposed to start the service. Format- “yyyy-MM-ddTHH:mm:ss”.
- The “ReportForLastDays” parameter specifies the time range for the report. You need to specify for how many past days from the time the report was triggered should the job look back for while fetching the data.
- The “AutoPickLastStartDate” parameter is there to pick up the next report date trigger. If the reporting job was running previously, it would’ve generated a file in the Logs folder, which will tell the job when the next reporting dispatch is. If this is set to false, then you’ll have to specify a “StartDate”.
- You’ll have to specify the path for the Log files that are generated to be stored. You can specify that in “LogFilePath”. If the path doesn’t already exist, it’ll get created.
Next, we have the settings for the Detailed Logs report. The detailed logs report is a large file which cannot be sent through email. Hence, this is stored in App Server and provide the user with a URL which will give them the report. The app service deletes all detailed logs report which were generated more than 2 days ago.
- The “ReportPath” is the path in the App Server, where the detailed logs reports which are generated, will be stored.
- “PathToEmail” is the App Server URL path(Accesible over internet using pre-defined creds), using which the user can download the report.
- The “DeleteEvery” parameter specifies how often to clear the reports which are more than 2 days old.
-
Publish these binaries one by one to Ubuntu server using this step
-
Deploy the published folder to Ubuntu Server using this step
-
Create a basic auth password file which will be used in Nginx configuration to authenticate a user before accessing logs
Follow this link to create a password file using apache2-utils tools.
Please note the credentials created here should be shared with CCE/X admin so that they can access the reports link received through email. Also, use the same credentials created for Notification logs in Reporting files as well.
-
Configure Nginx to make the “logs” available to be accessed over a URL. Follow this step
Except nginx.conf, rest all details remains same. Below is the nginx.conf snippet which should be used addtionally for reporting module.
    cd /etc/nginx
    sudo vim /etc/nginx/nginx.conf
location /reports { auth_basic "Restricted Access!"; auth_basic_user_file /etc/apache2/.htpasswd; root /var/www/; try_files $uri $uri/ /error_mess.html; } location /error_mess.html { return 404 "The file you are trying to download is no longer available and this link has expired."; } -
Restart Nginx to reflect the above changes.