
Infra Provisioning Guide For Cisco Webex Experience Management Invitation Module
Content Outline
1. Introduction
In an economy where customer experience trumps price and product, the Cisco Webex Experience Management (referred to as Experience Management here on in the document) platform helps organizations exceed customer expectations and deliver business outcomes through its three pillars of customer experience:
-
Measuring the customer journey: Understanding the customer experience through a continuous collection of moments across their journey.
-
Obtaining a 360-degree view of the customer: Bringing disparate data together to enable actionable insights, proactive support, and advanced marketing automation.
-
Becoming predictive: Understanding predictively how changes to the customer experience will affect outcomes and impact financial metrics.
One of the key steps in measuring customer experience is to reach out to customers over various channels such as email, SMS, web intercept, etc to solicit feedback. Amongst all the survey distribution channels, email and SMS are 2 of the popular ones. Global delivery invitation management enables a personalized experience for receiving survey invitations across various channels on the journey using workflows that can be configured and reused across chosen transmission channels like SMS and Email while requiring no PII information in the Experience Management platform.
Invitations module has 2 parts.
- Experience Management hosted module
- Partner hosted module
For more details on the architecture, please refer to the Invitations Module Architecture Document document.
In this document, we will concentrate on the Partner hosted module of the Invitations feature. This module will be hosted outside of Experience Management Product infrastructure and will be completely managed by partners.
This document details out the infrastructure required to host the partner hosted module using Azure or AWS Cloud. By the end of this document, you would know the required services for each of the cloud service which will be used for deployment of the partner hosted module.
Please read the Invitations Module Architecture Document before going through the rest of this document.
2. Target Audience
- Infra team The Infra team is assumed to be the team that will deploy servers and configure the environment required to run the Partner hosted side of the Invitations module.
- Devops team The Devops team is assumed to be the team that will be monitoring the partner hosted setup that is running on the infra provisioned by the Infra team.
3. Prerequisites
- Must have gone through the “Invitations Delivery Architecture Document” to have an understanding of the overall architecture and the various components involved in the module you are trying to set up
- Should have a valid Azure or AWS account with admin access
- Should know the region where the infrastructure will be provisioned. For this reference documentation, we are using Asia Pacific(Mumbai) region.
4. Types of Deployment
The partner hosted environment can be run on any of the following cloud services.
-
Using Azure Cloud Requires Servers, Storage Queue and Functions
-
Using AWS Cloud Requires Servers, SQS Queue and Lambdas
The Cisco Contact Center enterprise solution is built for large enterprises with up to 105 calls per second traffic in its contact center. For a solution that receives email/SMS dispatch requests at that scale is expected to process requests at that scale as well. Hence, it is essentials to choose one of these cloud services because the architecture involves running Dispatcher(Dispatching Email/SMS) component in serverless components such as “Azure functions” or “AWS Lambda” as these would handle scale better than simple services running on a server.
5. Cloud Services Per Invitation Module
Here is the list of services per cloud service which are required for each of the components in Invitation Module. Based on the choice of Azure or AWS, respective services should be provisioned.
| Serial No | Invitation Module Component | Functioning | Azure Cloud Service | AWS Cloud Service |
|---|---|---|---|---|
| 1 | Web API | To host Dispatch Request, Event Log, Account Configuration front-end | Azure VM | EC2 Instance |
| 2 | Dispatcher | Makes use of Vendors API to dispatch SMS/Email Surveys | Azure Functions + Queue | AWS Lambda + Queue |
| 3 | Mongo Database | Stores all persistent state related data | MongoDB Atlas | MongoDB Atlas |
| 4 | Notifications | Makes use of DIWEF Logs added in DB to send email notifications | Azure VM | EC2 Instance |
| 5 | Reporting | Generates reports to track the performance of a dispatch | Azure VM | EC2 Instance |
| 6 | Initiator(Optional) | Optional module, only applicable for file based bulk surveys | Azure Function + S3 bucket | AWS Lambda + S3 Bucket |
6. Infra Provisioning
6.1 Using Azure Cloud
Pre-requisites: You should have a valid Azure Cloud Service account.
6.1.1 Web API
Development Environment: ASP.Net Core 3.1
Since its developed using ASP.Net Core, we have flexibility to host it on Windows or Linux server. However, we will be using only Linux servers. Server configurations heavily depends on the volume and concurrency of the Dispatch Request API which is captured under “Benchmarking Data” section later in the document. Since the process of provisioning the server remains same, we are covering the basic server set-up. Based on the “Benchmarking Data”, server configuration can be selected as needed based on the load the system is expecting to handle.
Linux VM Server
Linux VM server on AWS Cloud can be provisioned by going through the instructions as per the below link.
https://docs.microsoft.com/en-us/azure/virtual-machines/linux/quick-create-portal
After completion of this, you should have
-
Linux VM server in the Azure portal
-
SSH key to access above server using MobaXterm/Putty
6.1.2 Dispatcher
Resources to be provisioned:
-
Azure Resource Group (x1)
-
Azure Storage Account (x1)
-
Azure Queue Storage (x1)
-
Azure Function App (x2)
6.1.2.1 Steps to create a resource-group:
-
Login into your Azure Portal. From there click on Subscriptions
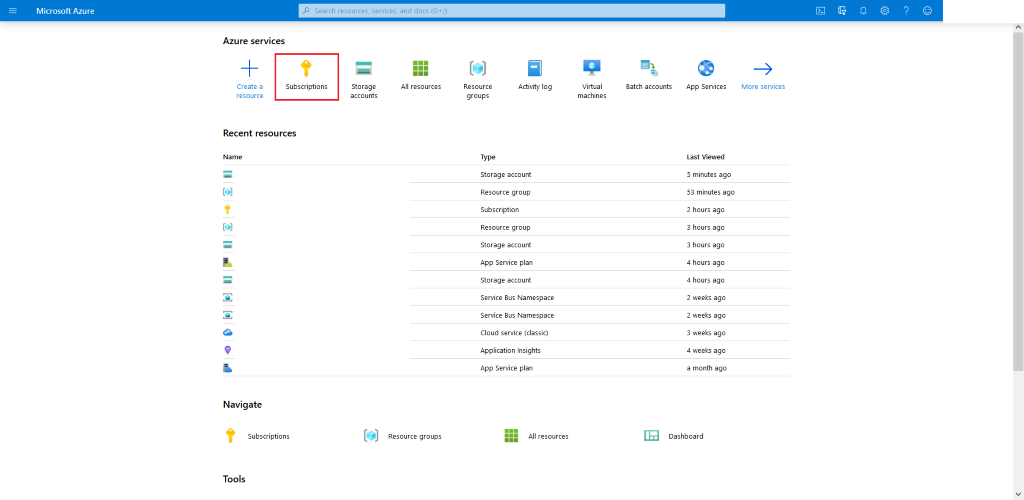
-
Head over to Resource Groups
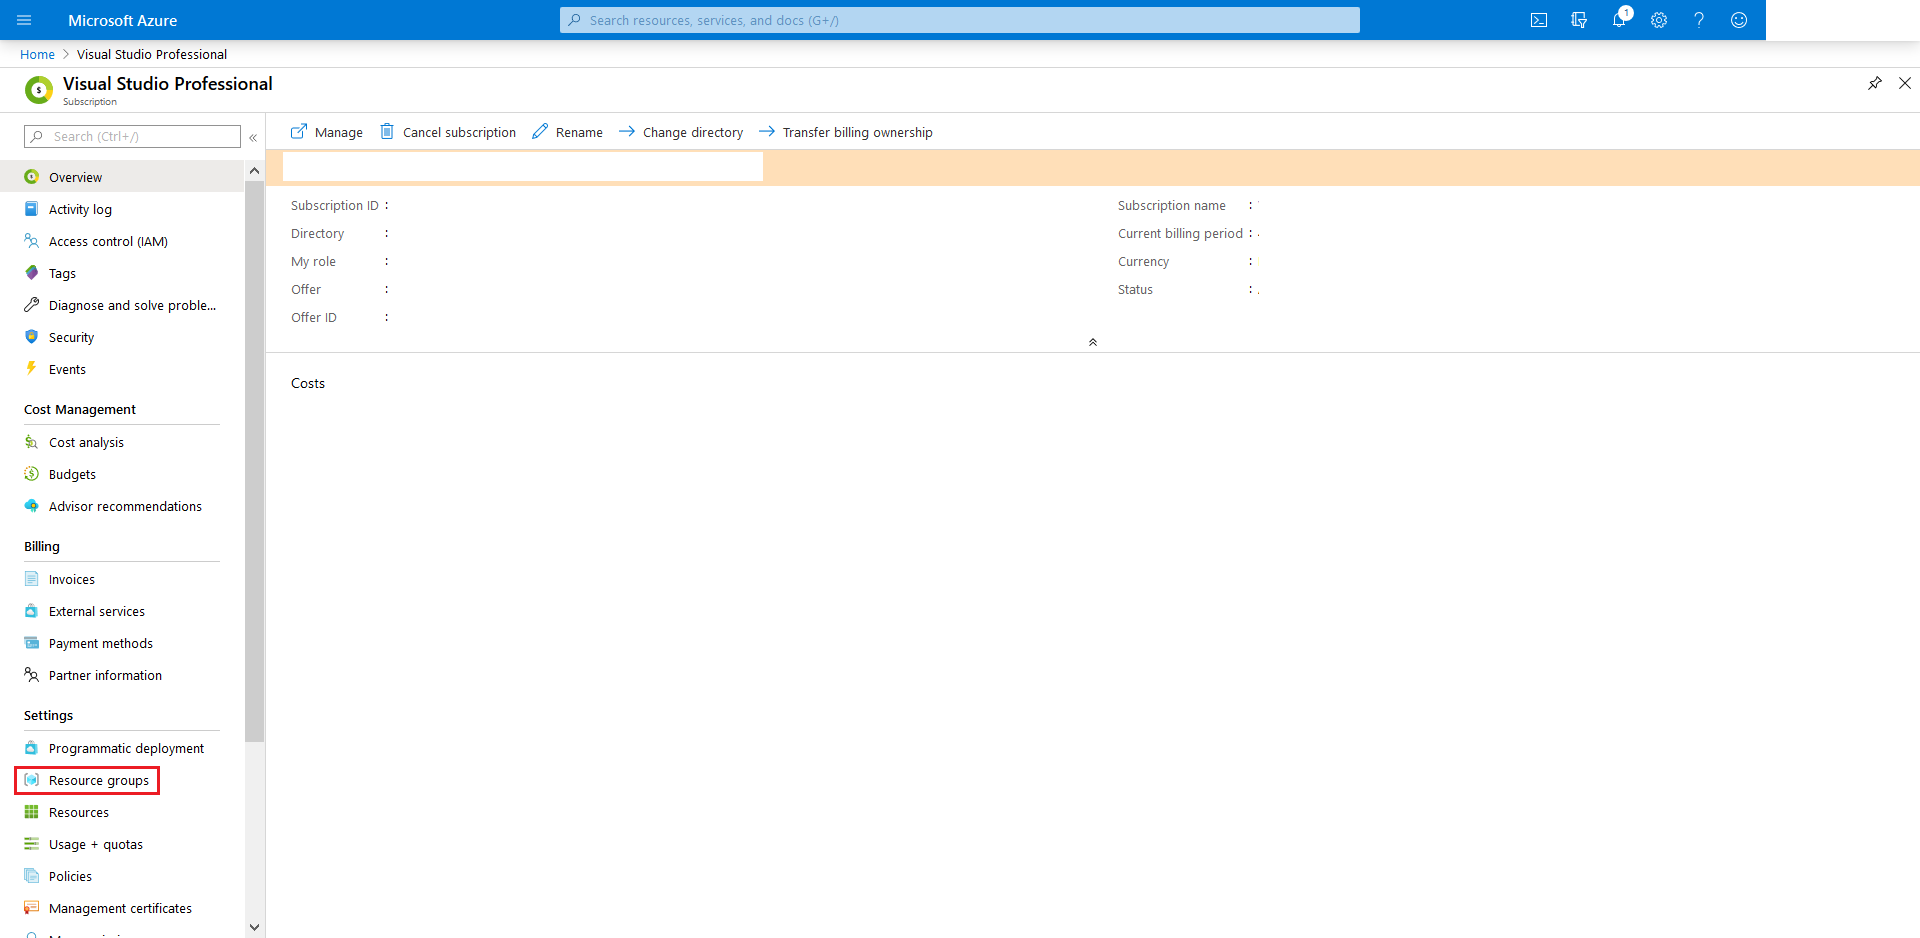
-
Click on +Add to create a new resource group under which we will provision all the other required resources
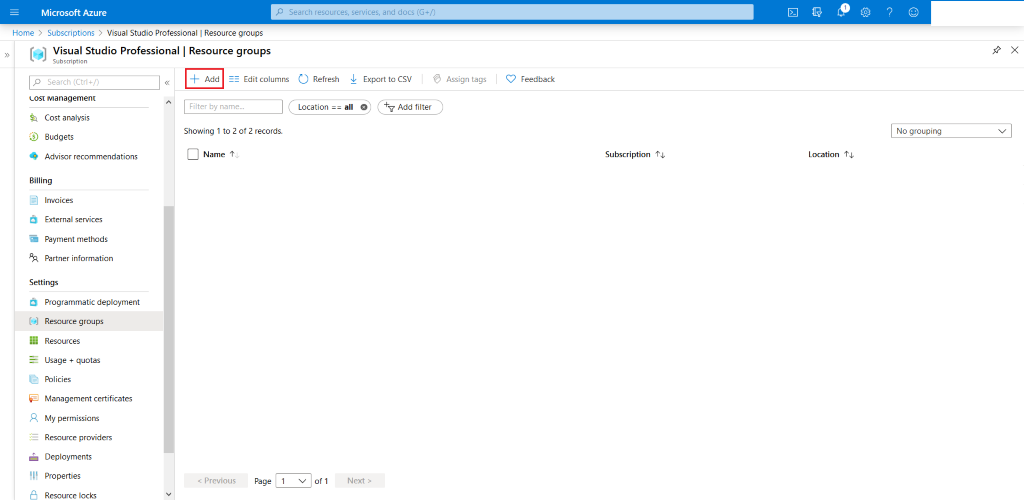
-
First give a name to your resource group (ex.
WXM_InvitationsDelivery) and then choose a suitableregion. Finally hit Review + create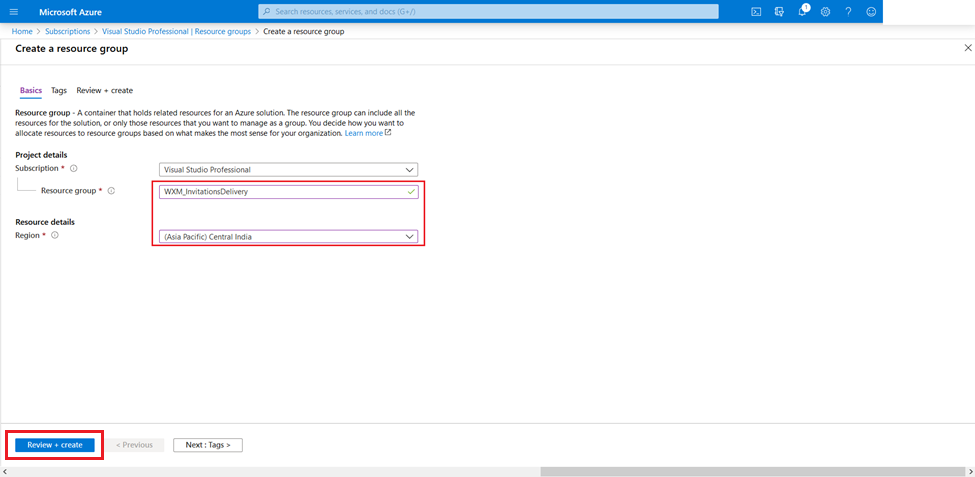
6.1.2.2 Steps to create a storage account:
(You can also refer to the official link)
-
Head over to your newly created
Resource Groupand from within click +Add
-
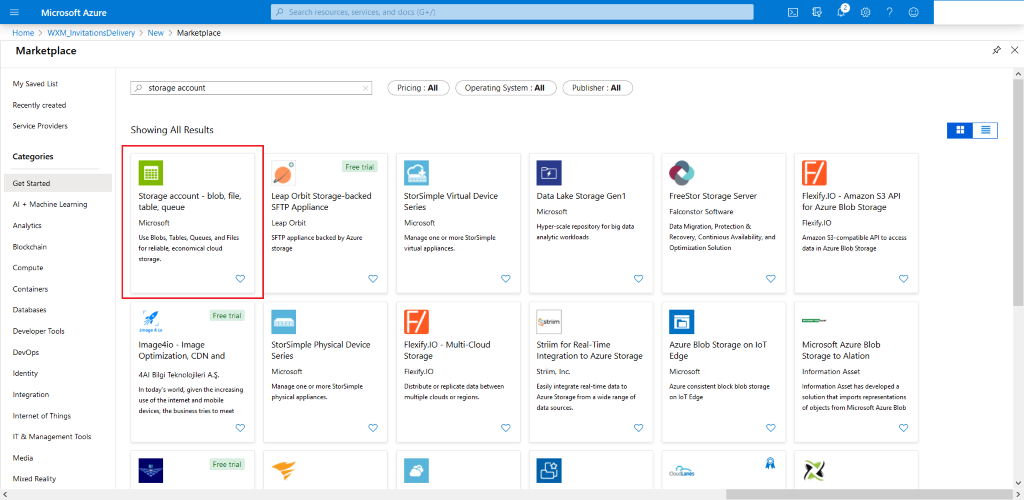
Search for Storage Account
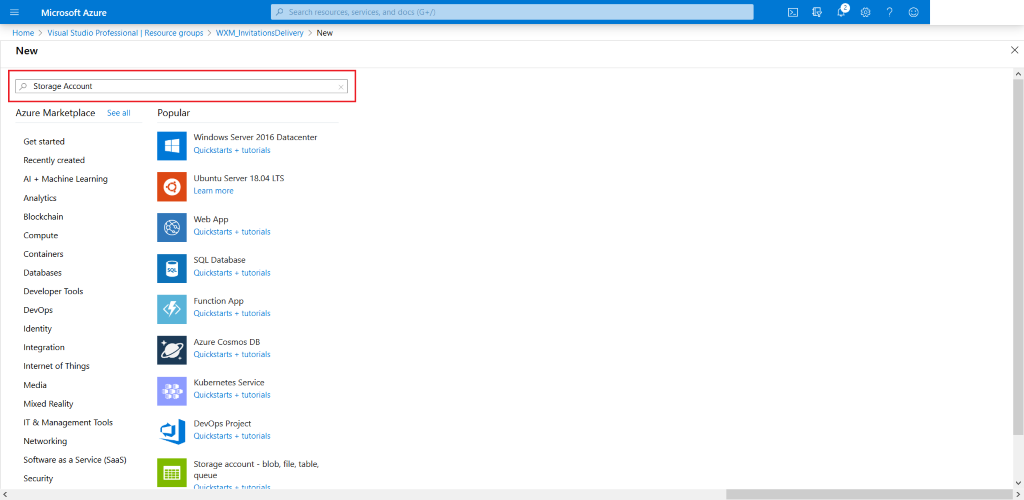
-
Select Storage Account from the search results.
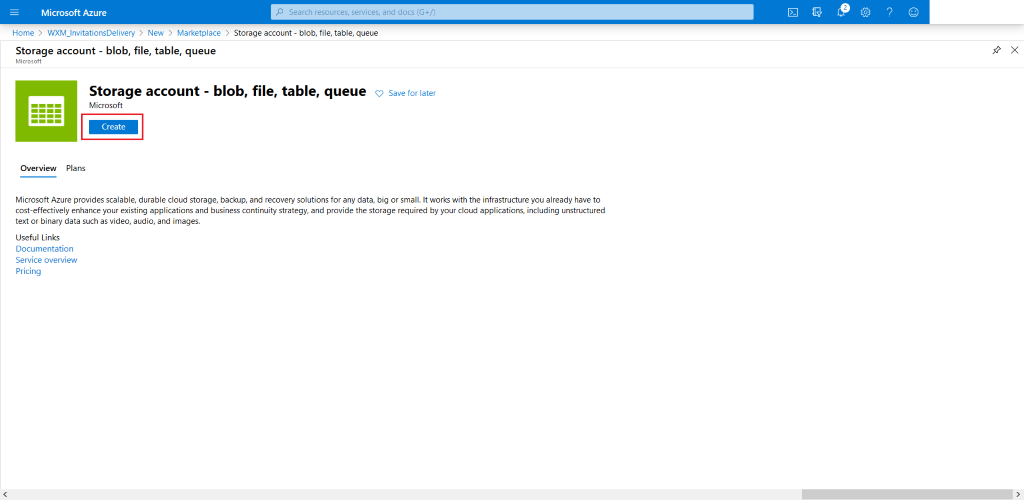
-
Hit Create
-
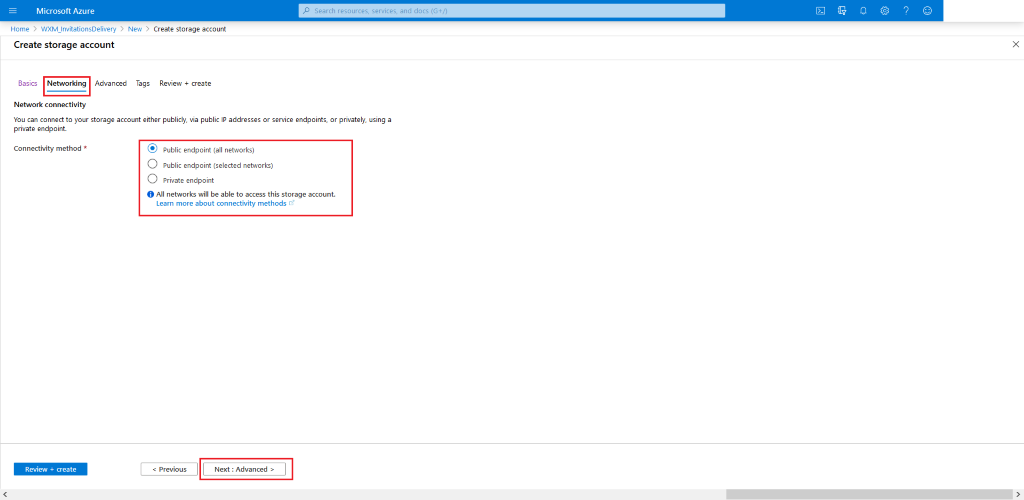
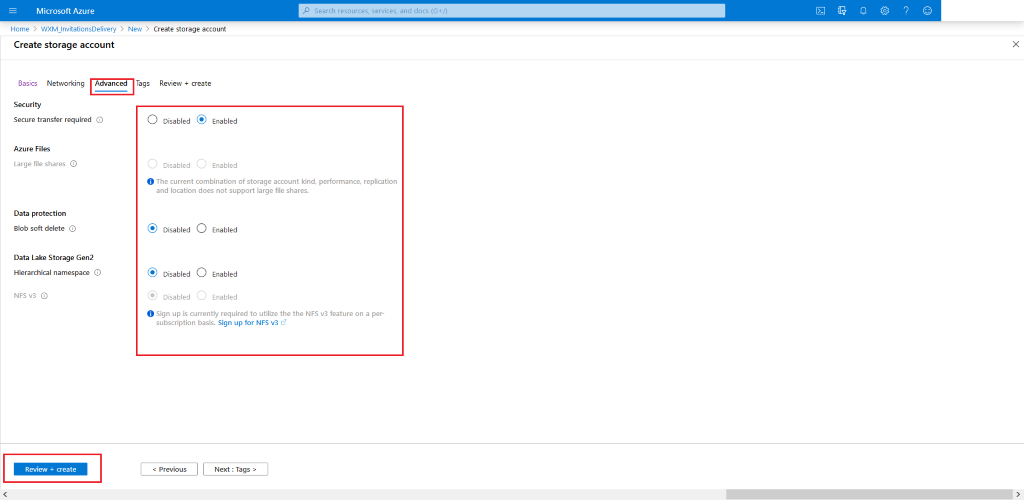
Configure your desired settings for the
Storage Accountby choosing what fits your needs (Locationshould be same as theResource Group's location, for rest of the recommended settings check the screenshots provided below). In the end click Review + Create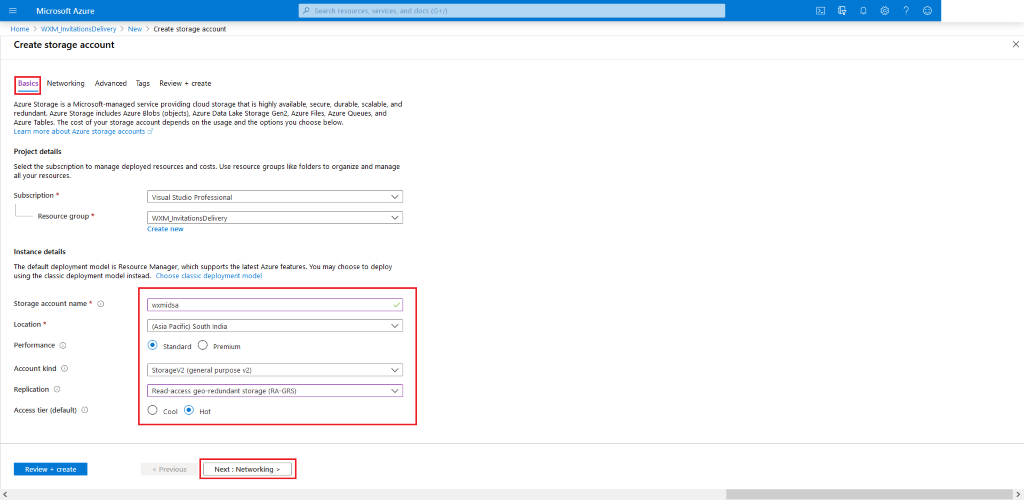
-
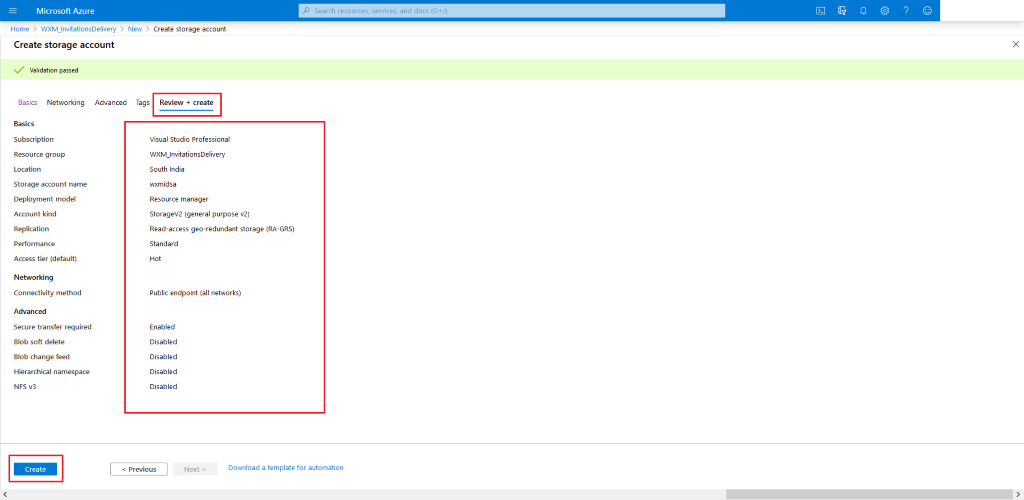
Review the chosen settings. Once satisfied, hit Create and wait for the deployment to be completed.
6.1.2.3 Steps to create Azure Queue Storage:
(You can also refer to the official link)
-
Head over to your newly create
Storage-Accountand from there click Queues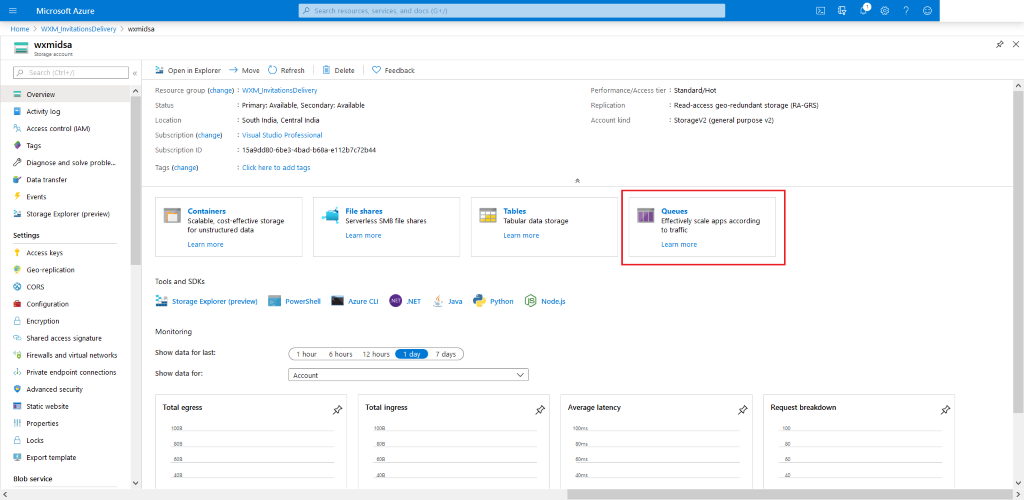
-
Press +Queue. Then type-in an appropriate name for the queue (ex.
wxmidqueue). And hit OK
6.1.2.4 Steps to create Azure Functions App:
(You can also refer to the official link)
-
Head over to your created
Resource Group, and from there click +Add
-
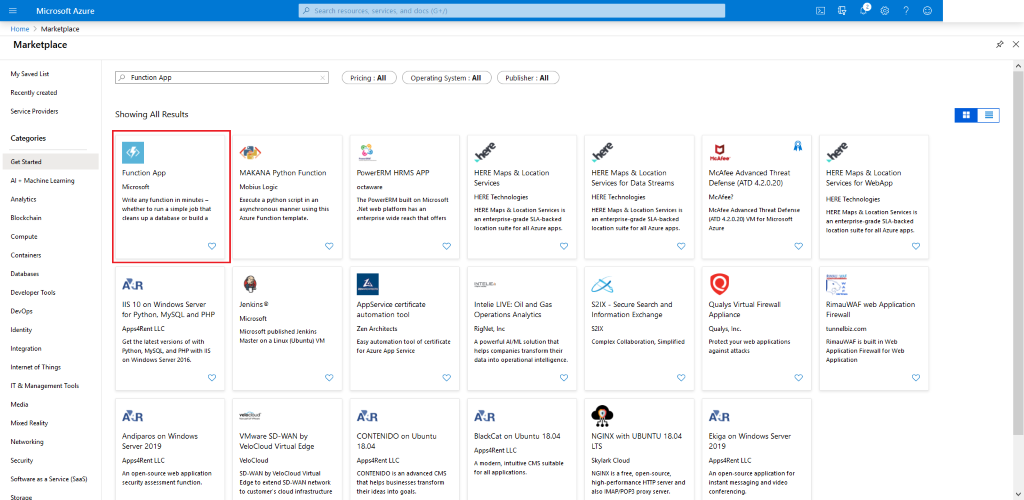
Search for Function App
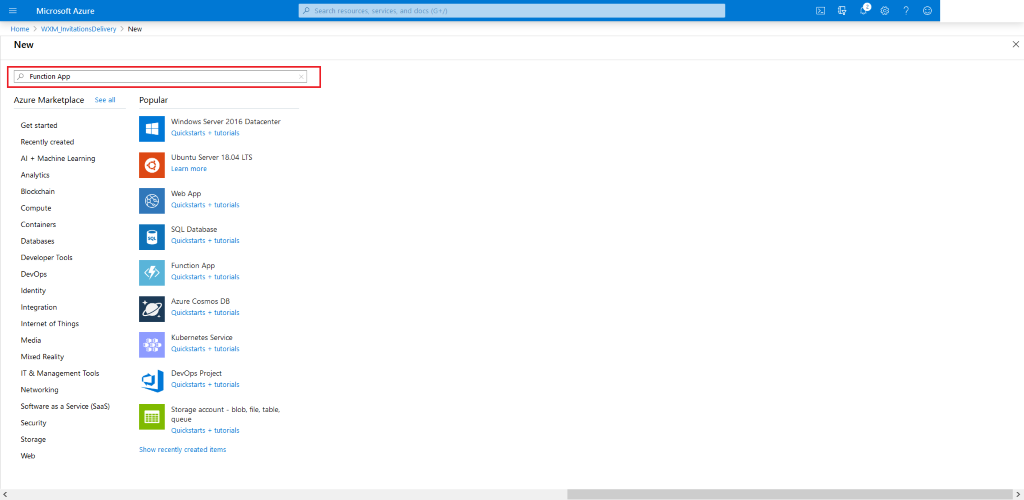
-
Select Function App from the search results
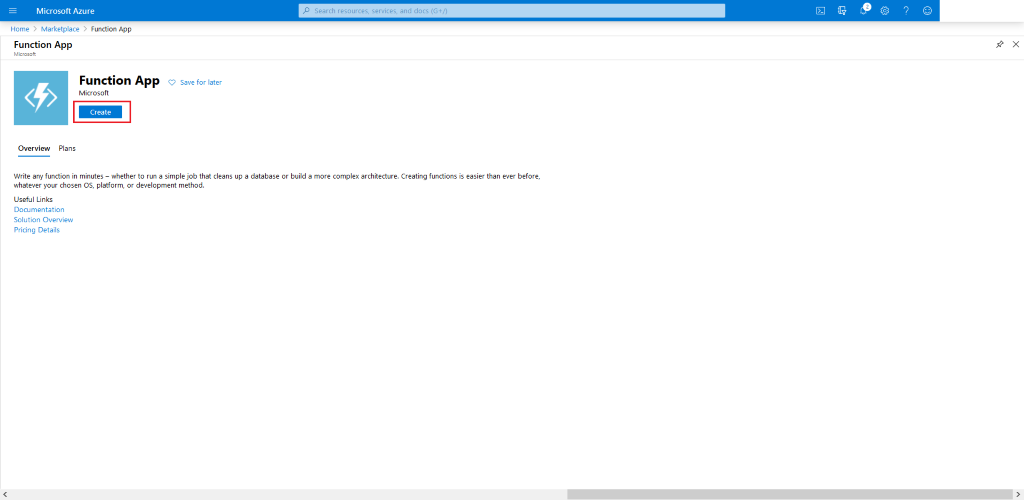
-
Hit Create on the next screen
-
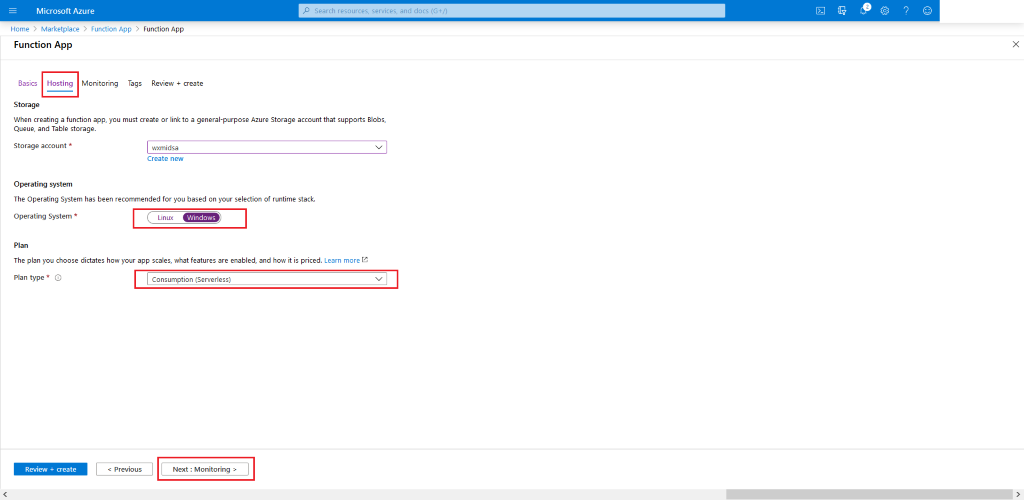
Configure your settings for Function App. Choose what fits your need. In the end click Review + Create. But Make sure to choose the following details:
-
RuntimeStack: .Net Core
-
Version: 3.1
-
Operating System: Windows
-
Plan type: Consumption (recommended)

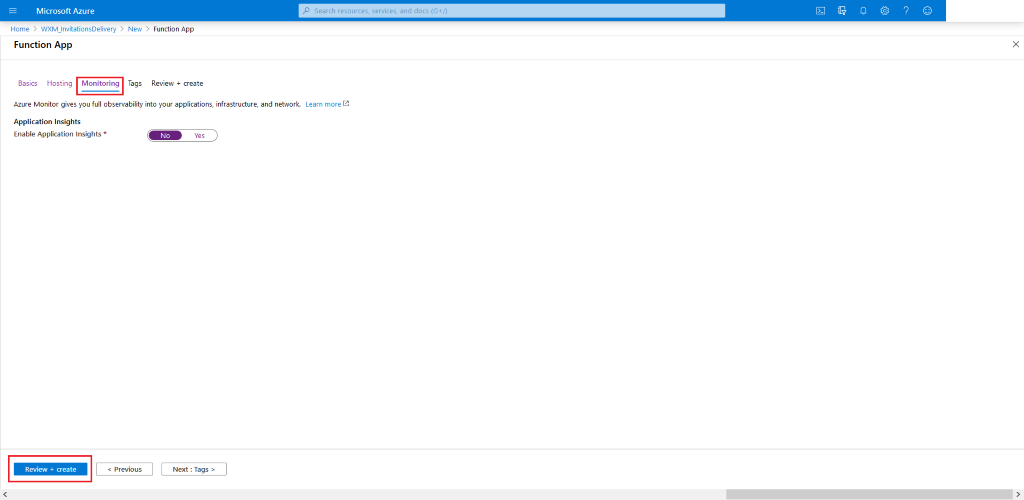
-
-
Review the chosen settings. Once satisfied, hit Create. Wait for the deployment to be completed.

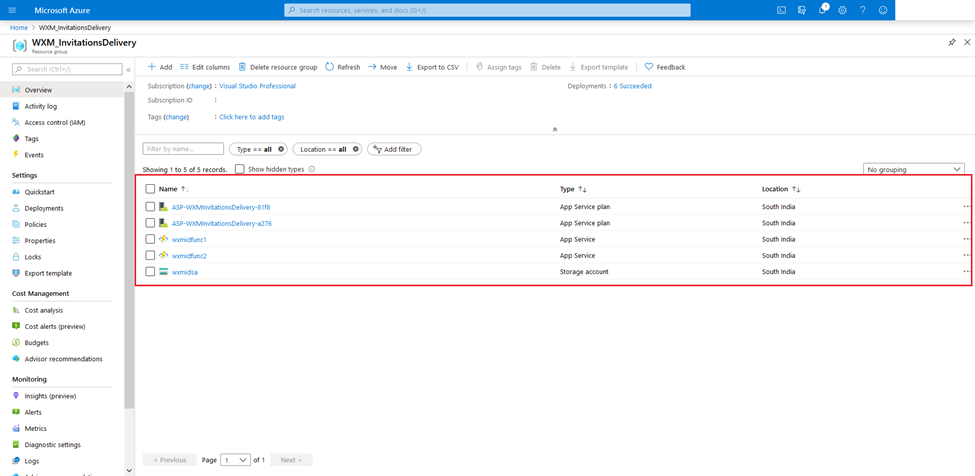
-
Similarly create another such function app. Finally, your resource group should look something like this:
6.1.3 Mongo Database
The recommended approach for Mongo DB hosting is to leverage the MongoDB Atlas service. MongoDB Atlas is a fully-managed cloud database which handles all the complexity of deploying, managing, and healing your deployments on the cloud service provider of your choice (AWS, Azure, and GCP). https://docs.atlas.mongodb.com/getting-started/
MongoDB Atlas supports three Cloud Providers.
-
Azure
-
AWS
-
GCP
In this case, it can be hosted along with Azure Cloud.
After this step, you should have a MongoDB connection string which will be used during deployment.
An alternate approach (though MongoDB Atlas is recommended) to provision Mongo DB server is to install and run the MongoDB locally in a Linux server. More details about provisioning Mongo DB in Linux server can be referred in Annexure A.
6.1.4 Initiator
(Mandatory step for stand-alone CWXM clients. Optional step for CCE/CCX/WCC clients)
- Resources to be provisioned:
- AWS IAM User (x1)
- AWS S3 Bucket (x1)
- AWS SNS Topic (x1)
- Azure Function Lambda (x1)
6.1.4.1 Steps to create an IAM User:
- Login into your
AWS Management Consoleas the root user and search for IAM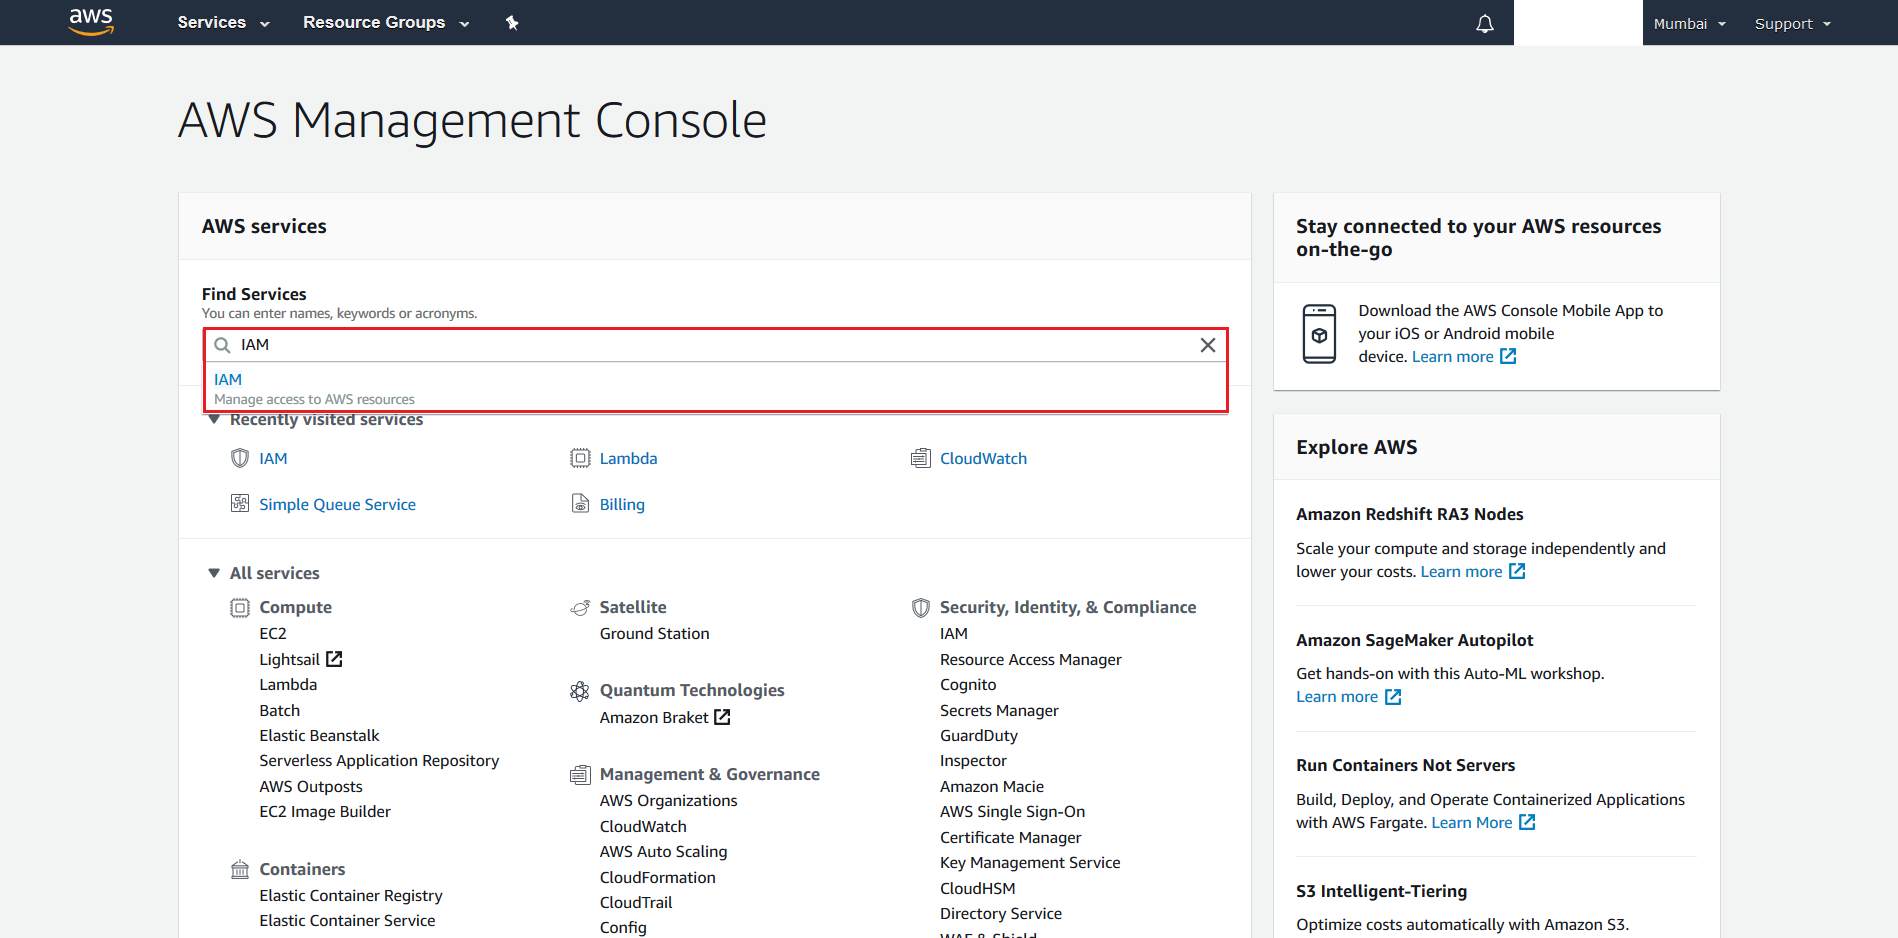
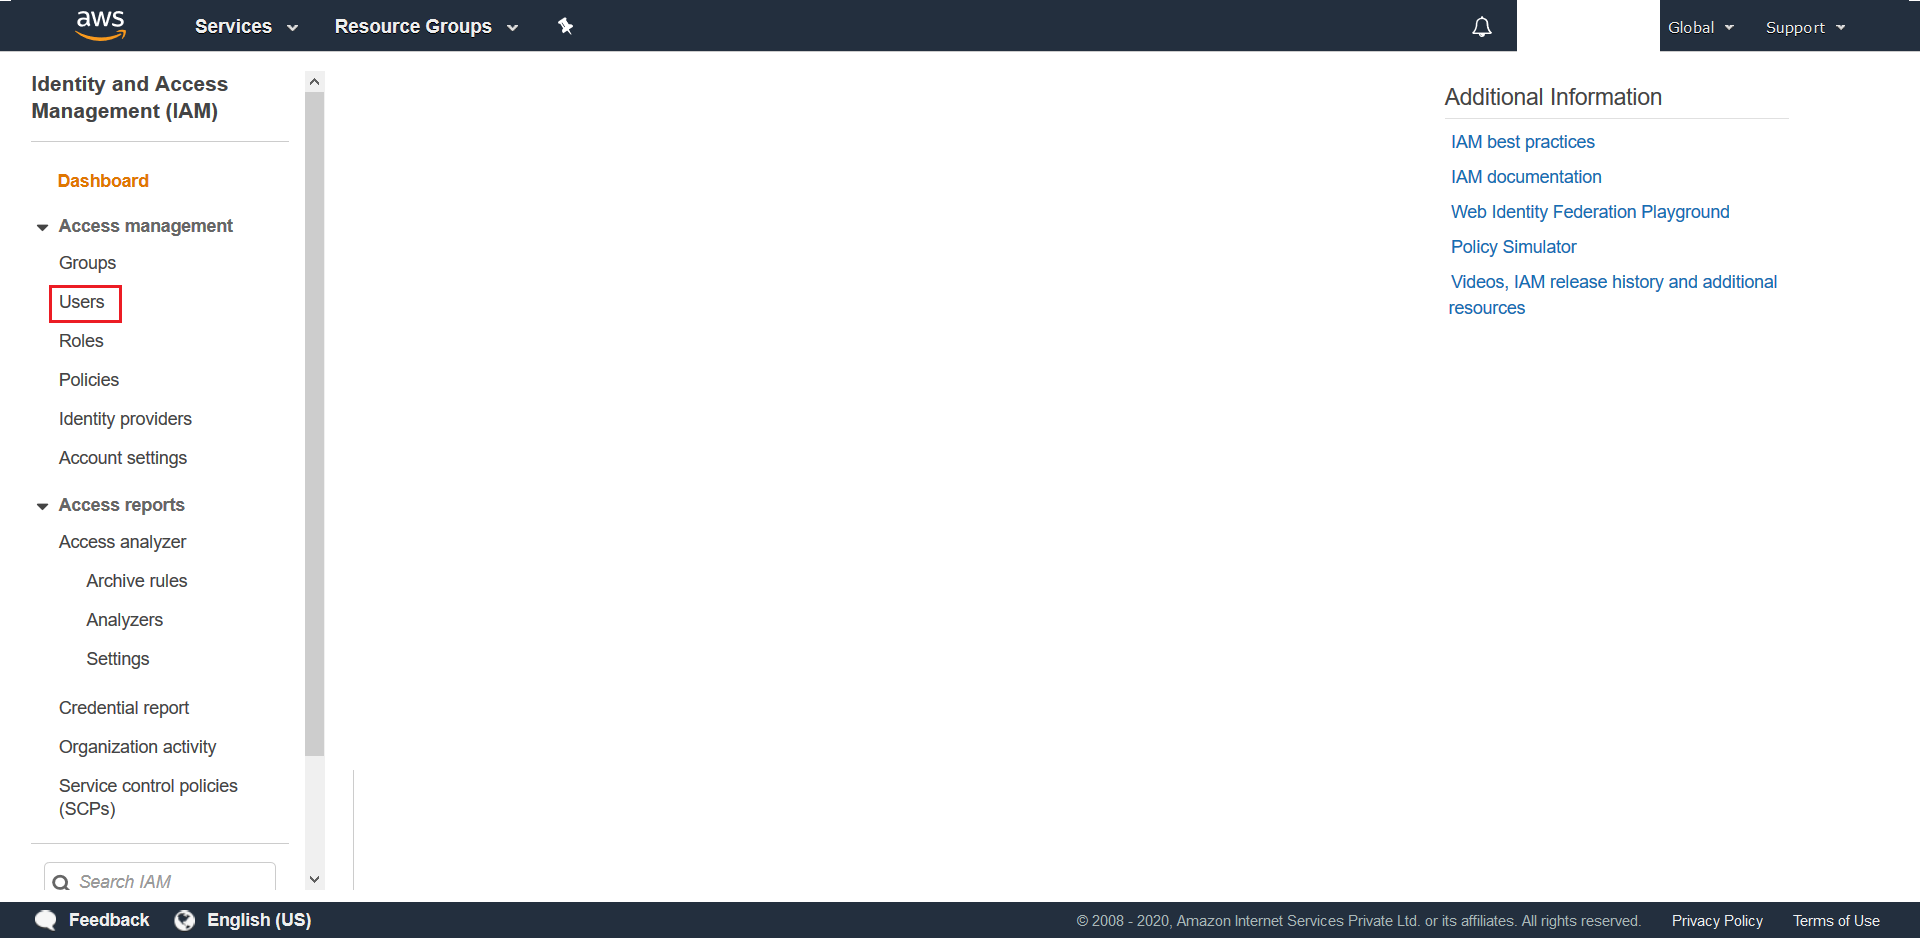
- Click on Users from the next screen
- Click on Add user from the next screen
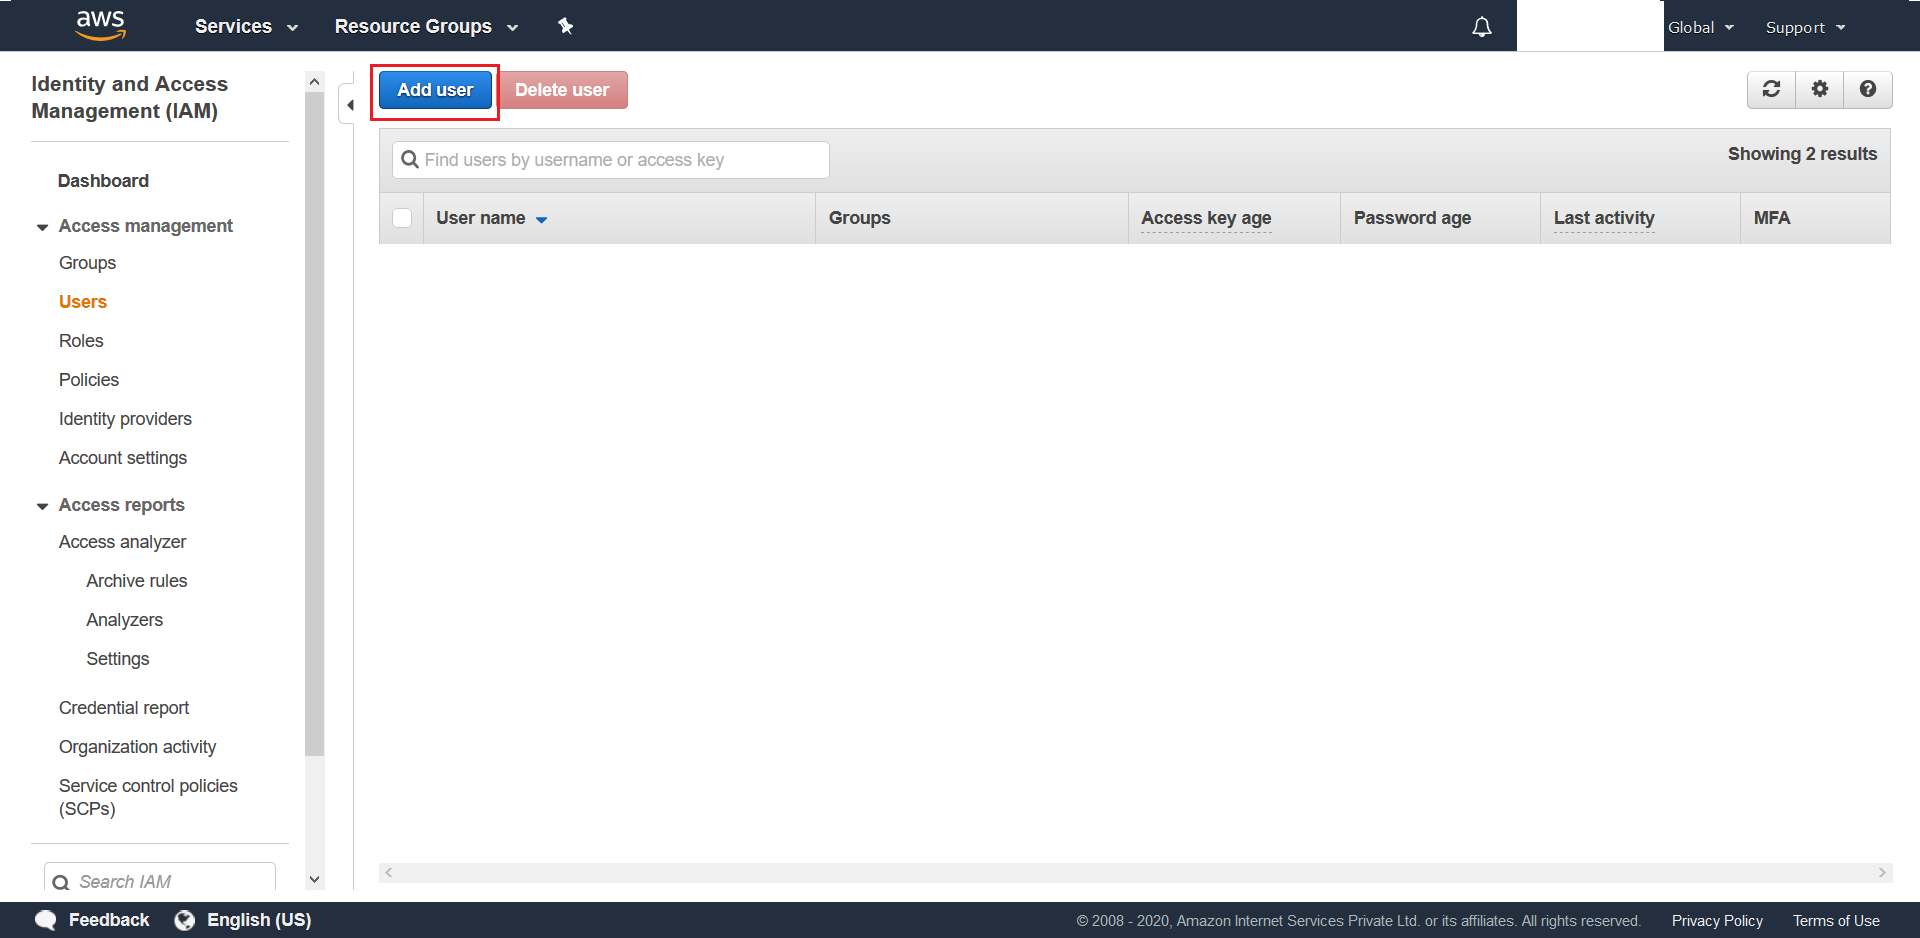
- Next choose a suitable name (ex.
subuser). Choose the desired Password settings but make sure to select both Programmatic access and AWS Management Console access options under Access-Type. Finally hit Next: Permissions.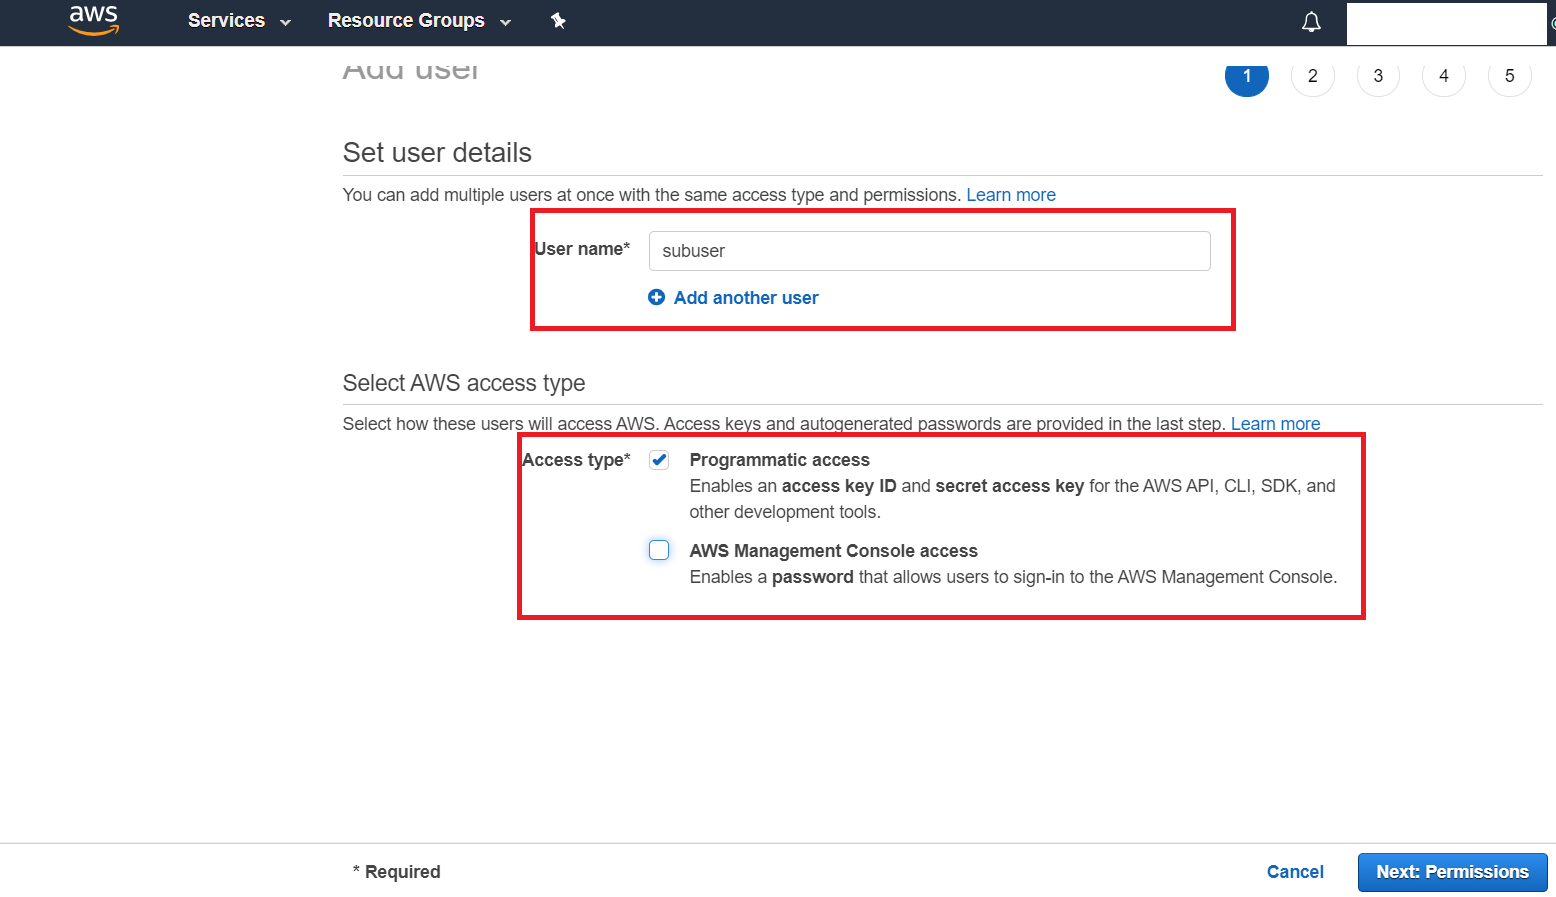
- Next choose PowerUserAccess as the desired Permission for this
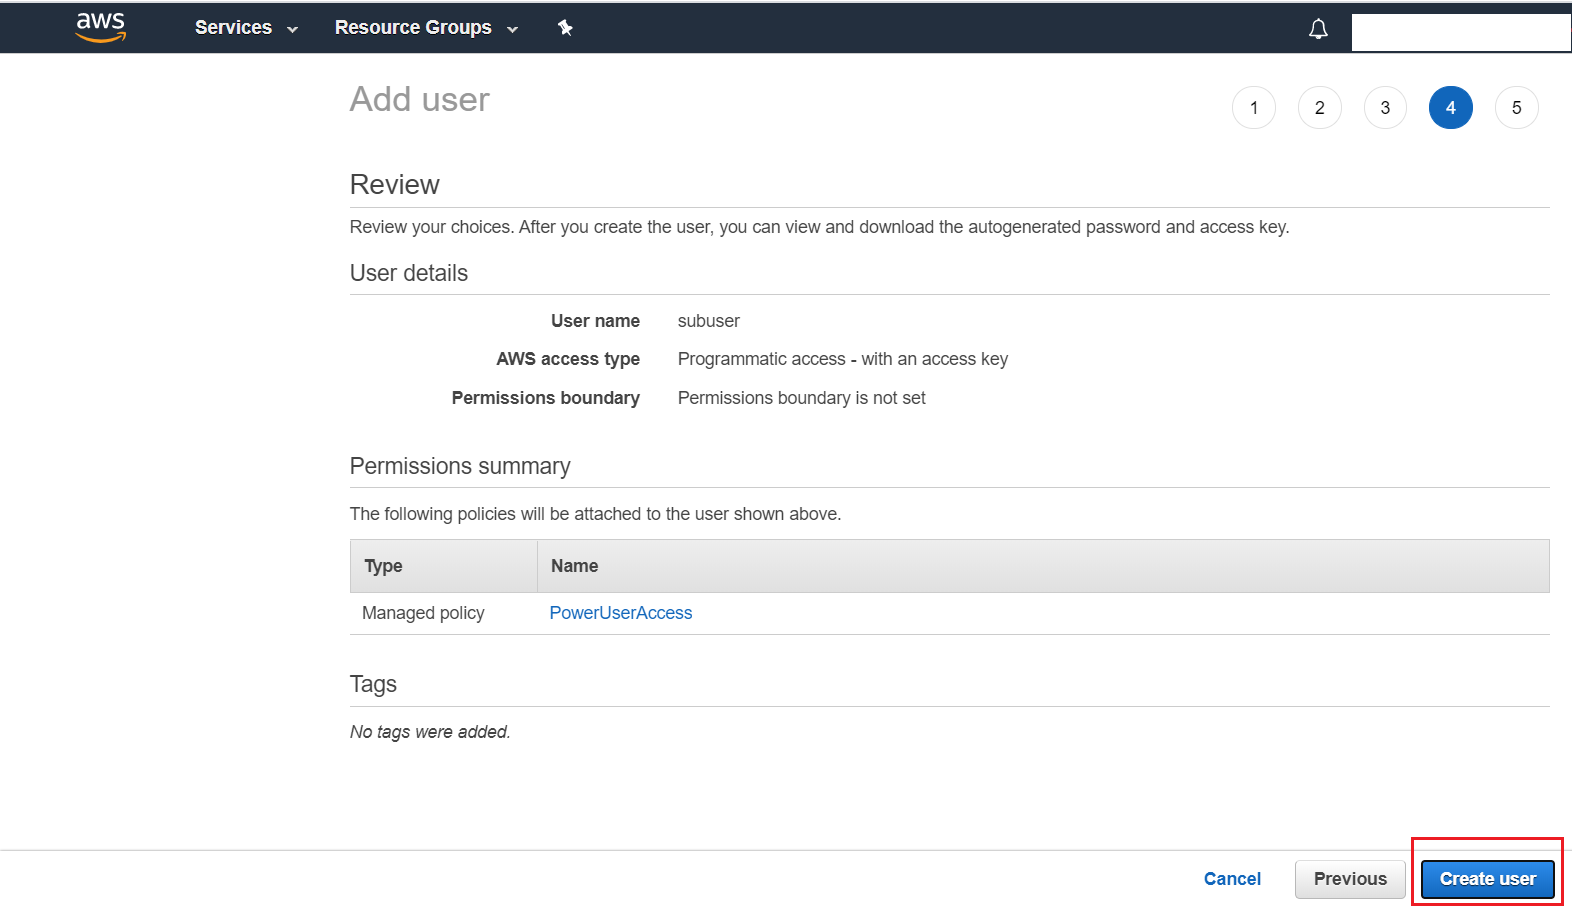
IAM User. Then proceed to Next: Tags, which is an optional step, where you can choose to provide key-value pair tags for this user. From there move to Next:Review.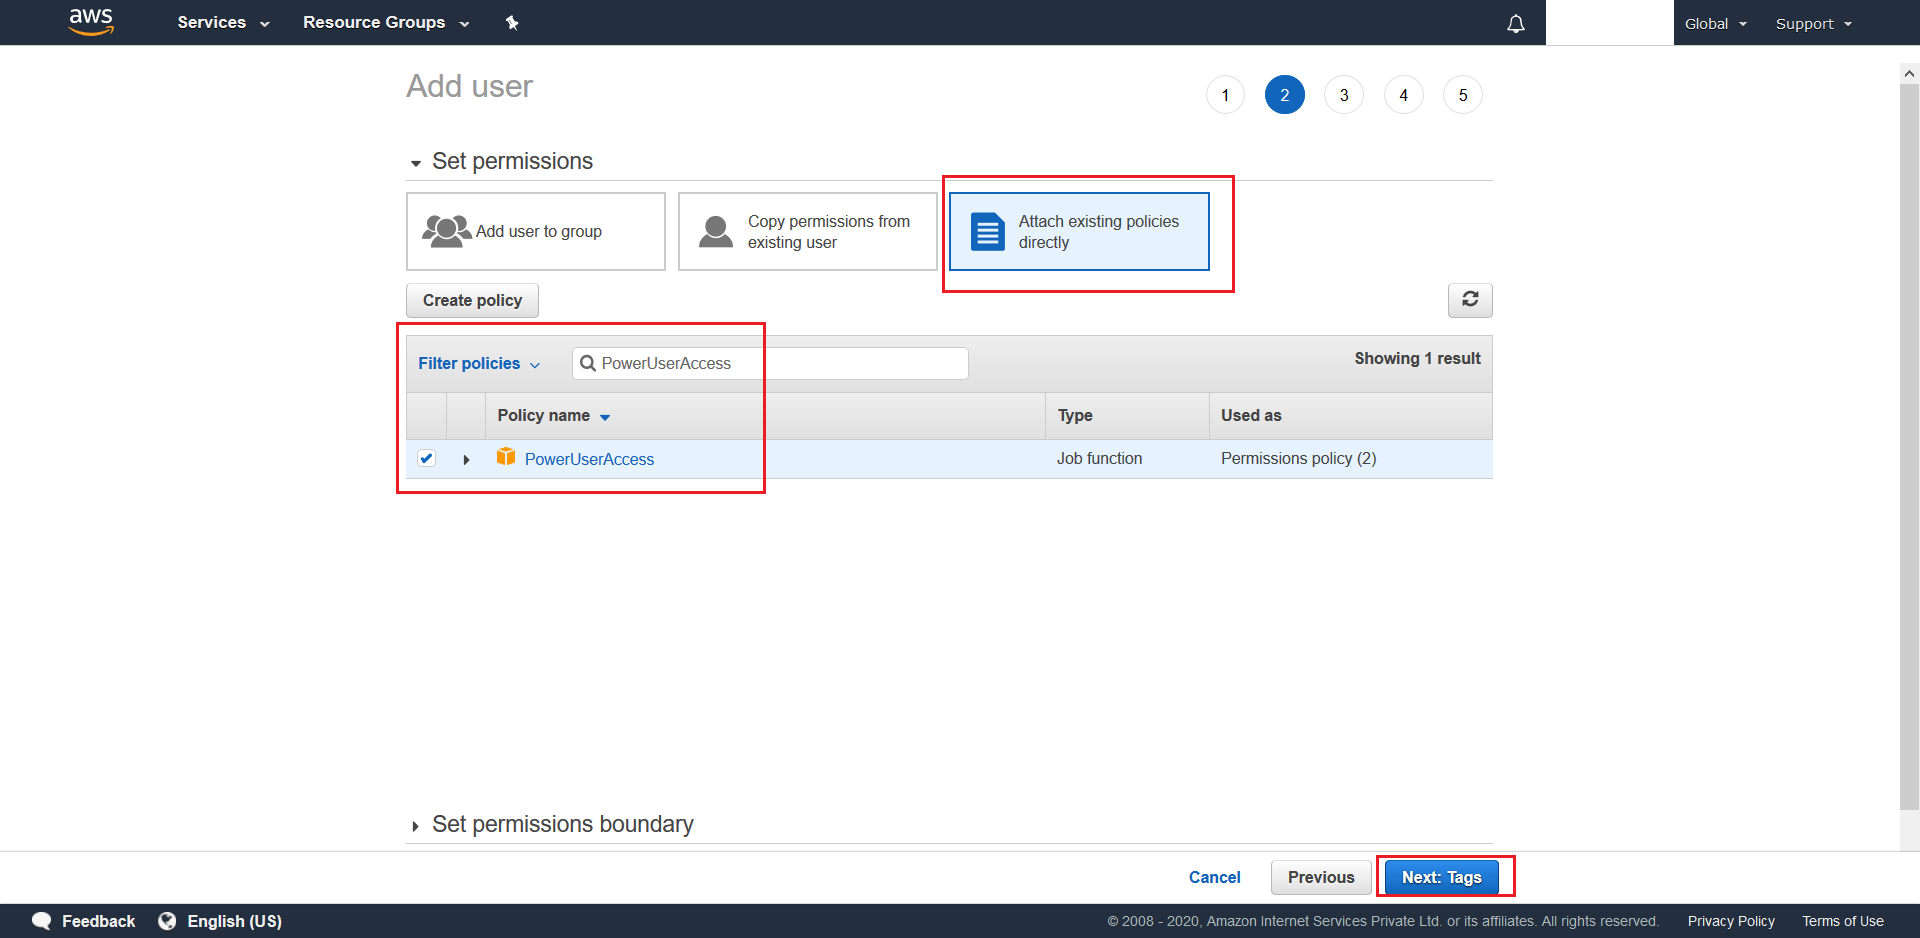
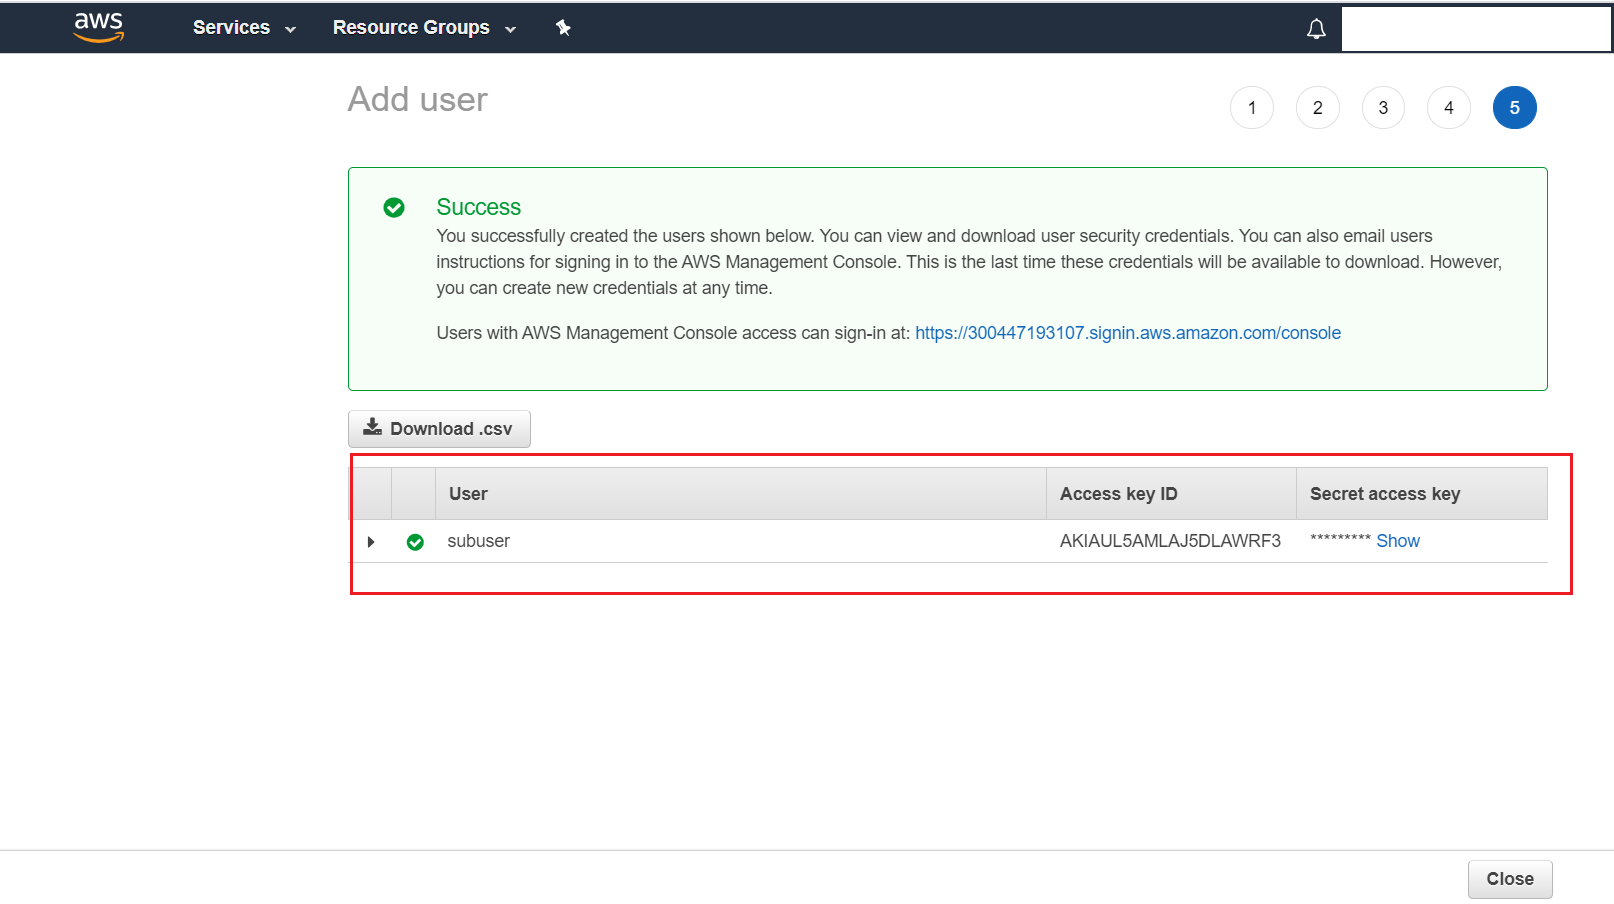
- After reviewing the details click Create user
- Note down the Access key ID and Secret access key of this newly created IAM User as this will be used elsewhere. Also, if you had opted for Autogenerated password in Step 4, then make sure to note down your Password as well.
6.1.4.2 Steps to create a S3 Bucket:
- Login into your
AWS Management Consoleas the IAM User that was created in the above section. Choose the same Region as above.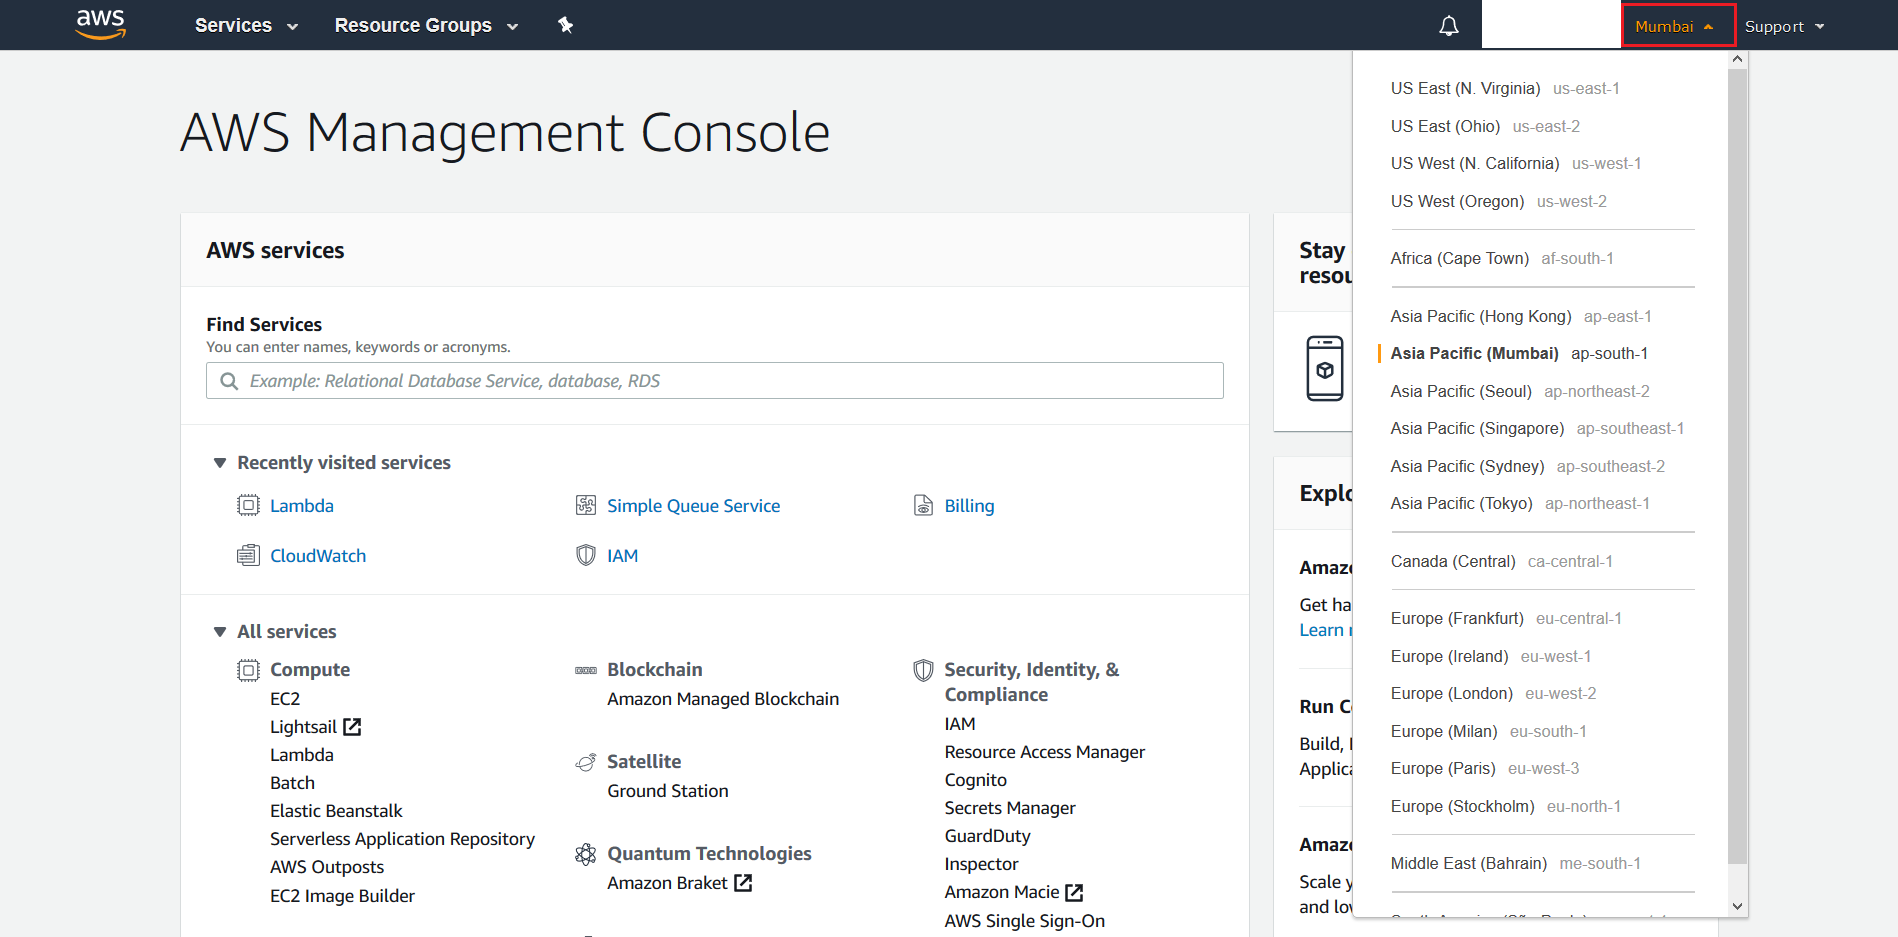
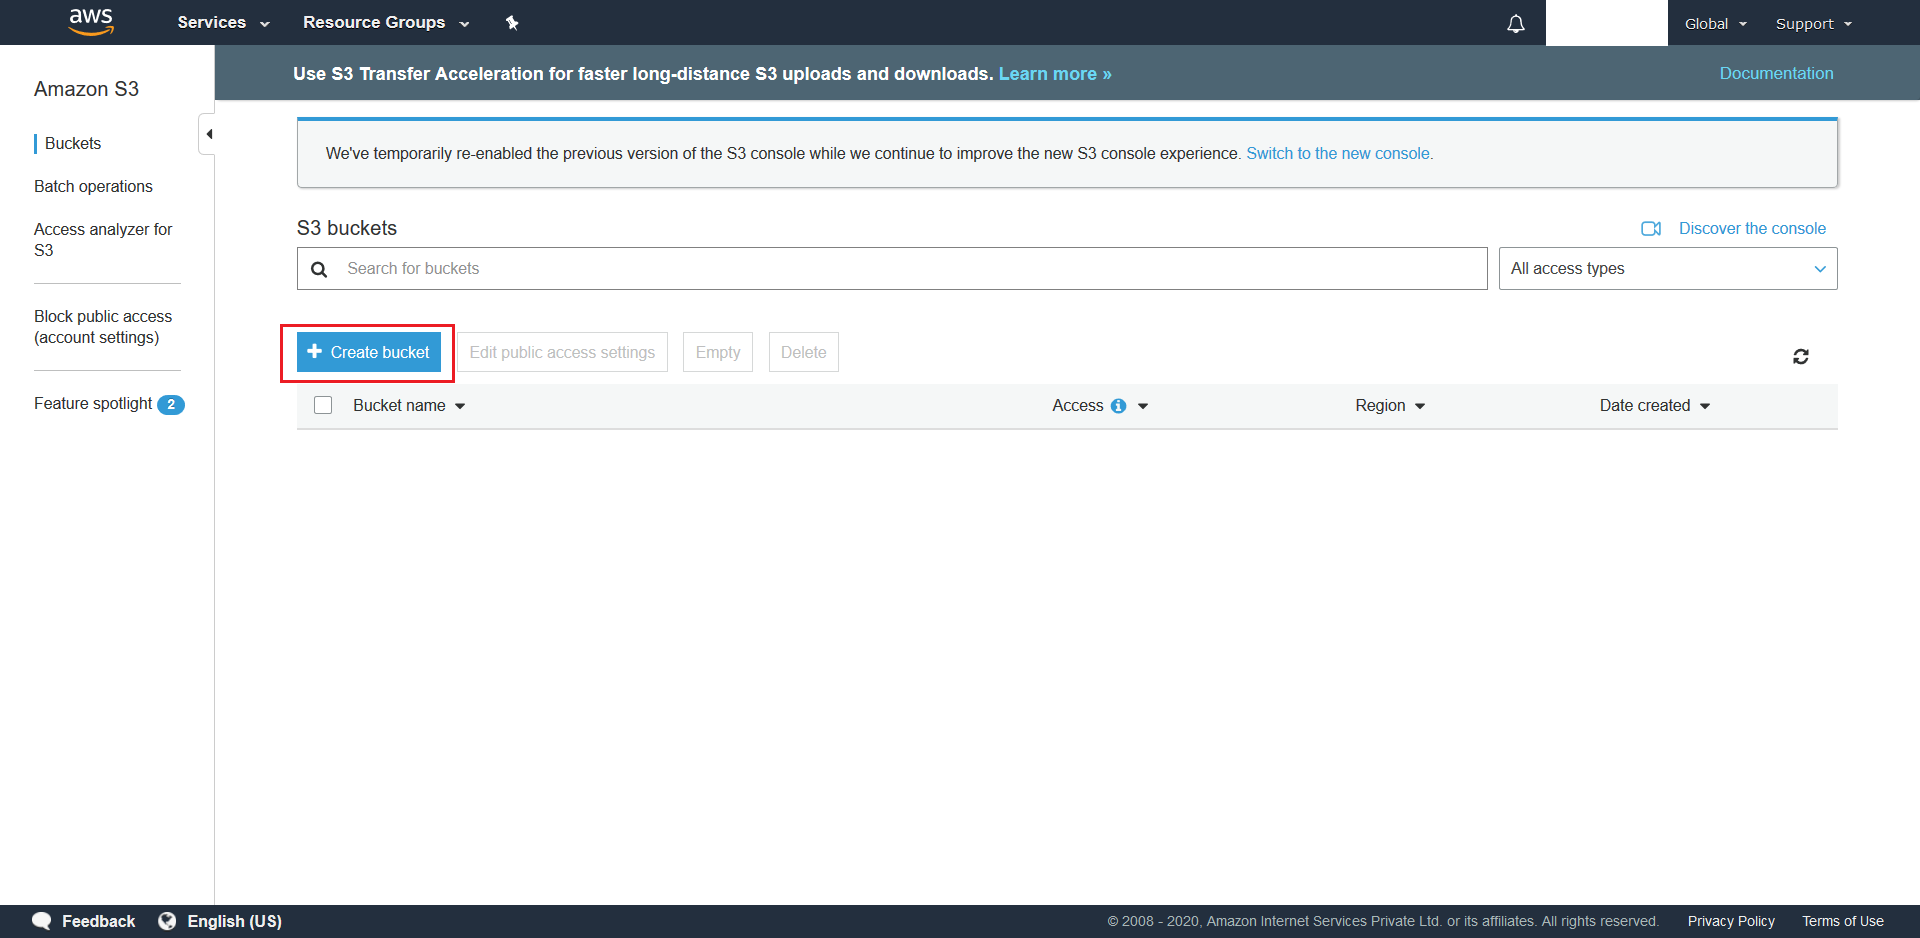
- Search for S3 from the AWS Management Console

- Click + Create Bucket.
- Give a unique name for your S3 Bucket and choose the same region as you did in step 1. Once done hit Next.

- On the next screen simply hit Next as we want to create a bucket with default settings.
(ie. No versioning. No Server Access Logging (optional). No Object level Logging(optional). No Encryption).
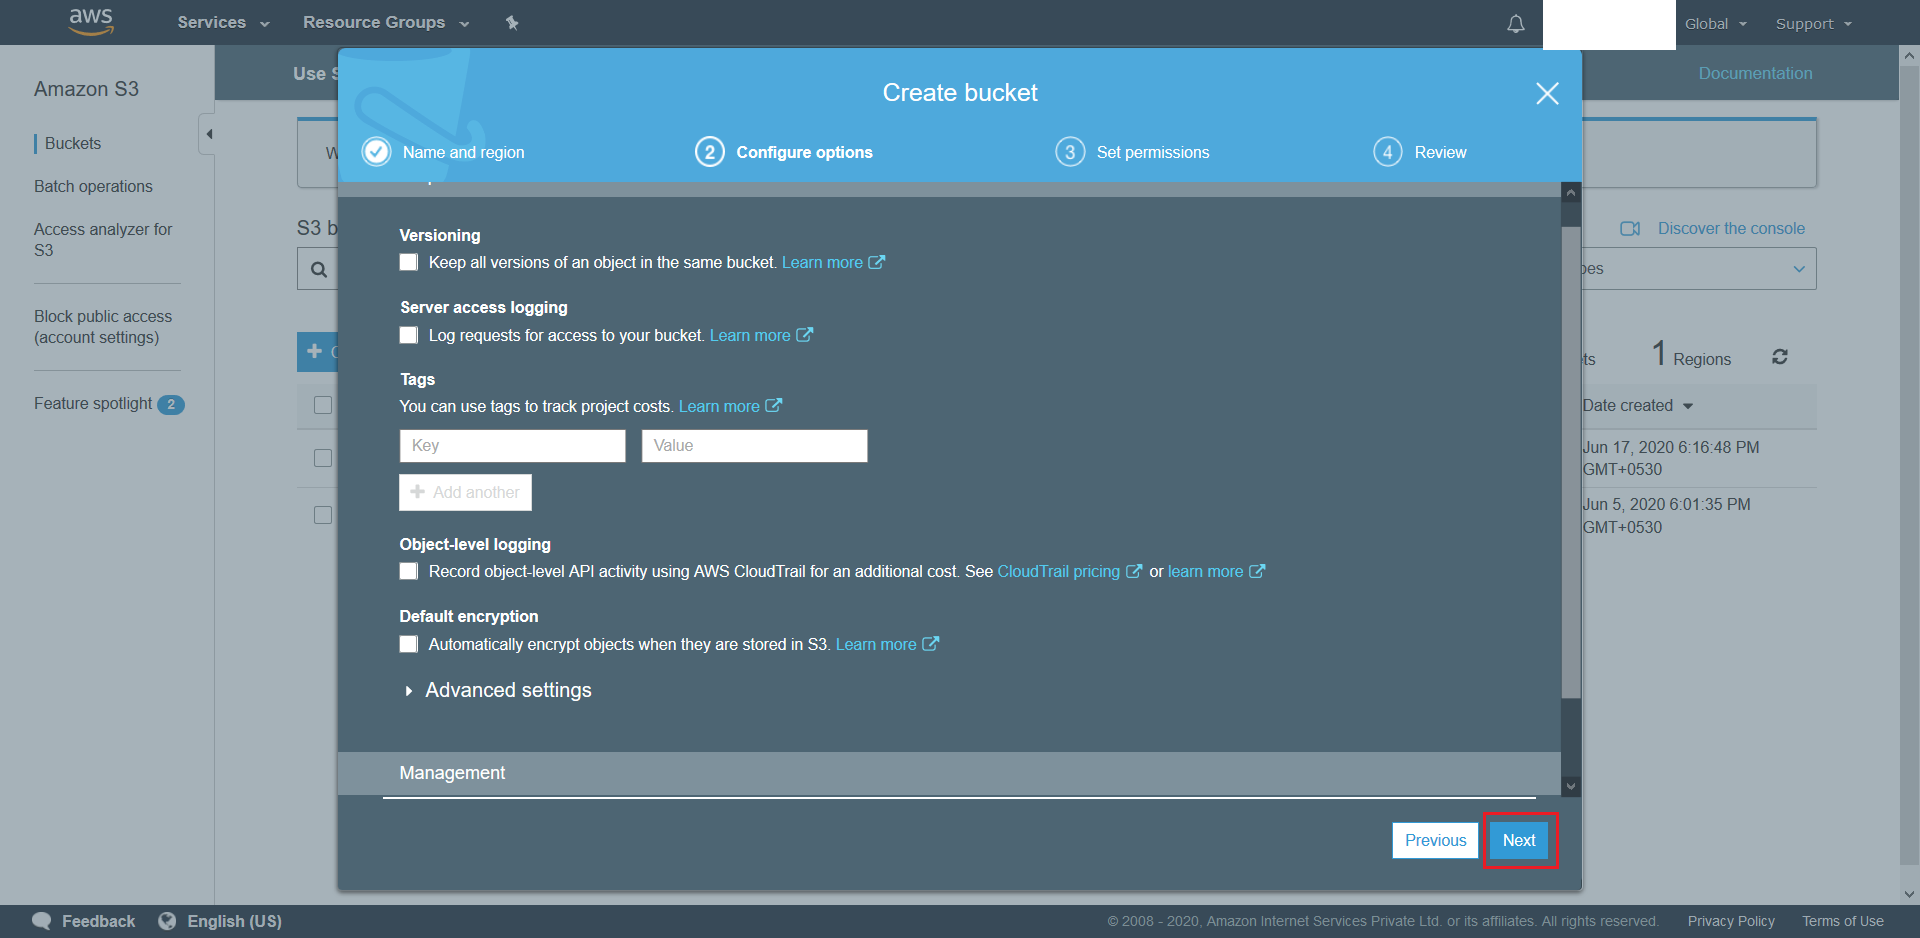
- On the next screen simply also hit Next as we want to create a bucket with default settings (ie. Blocked all public access).
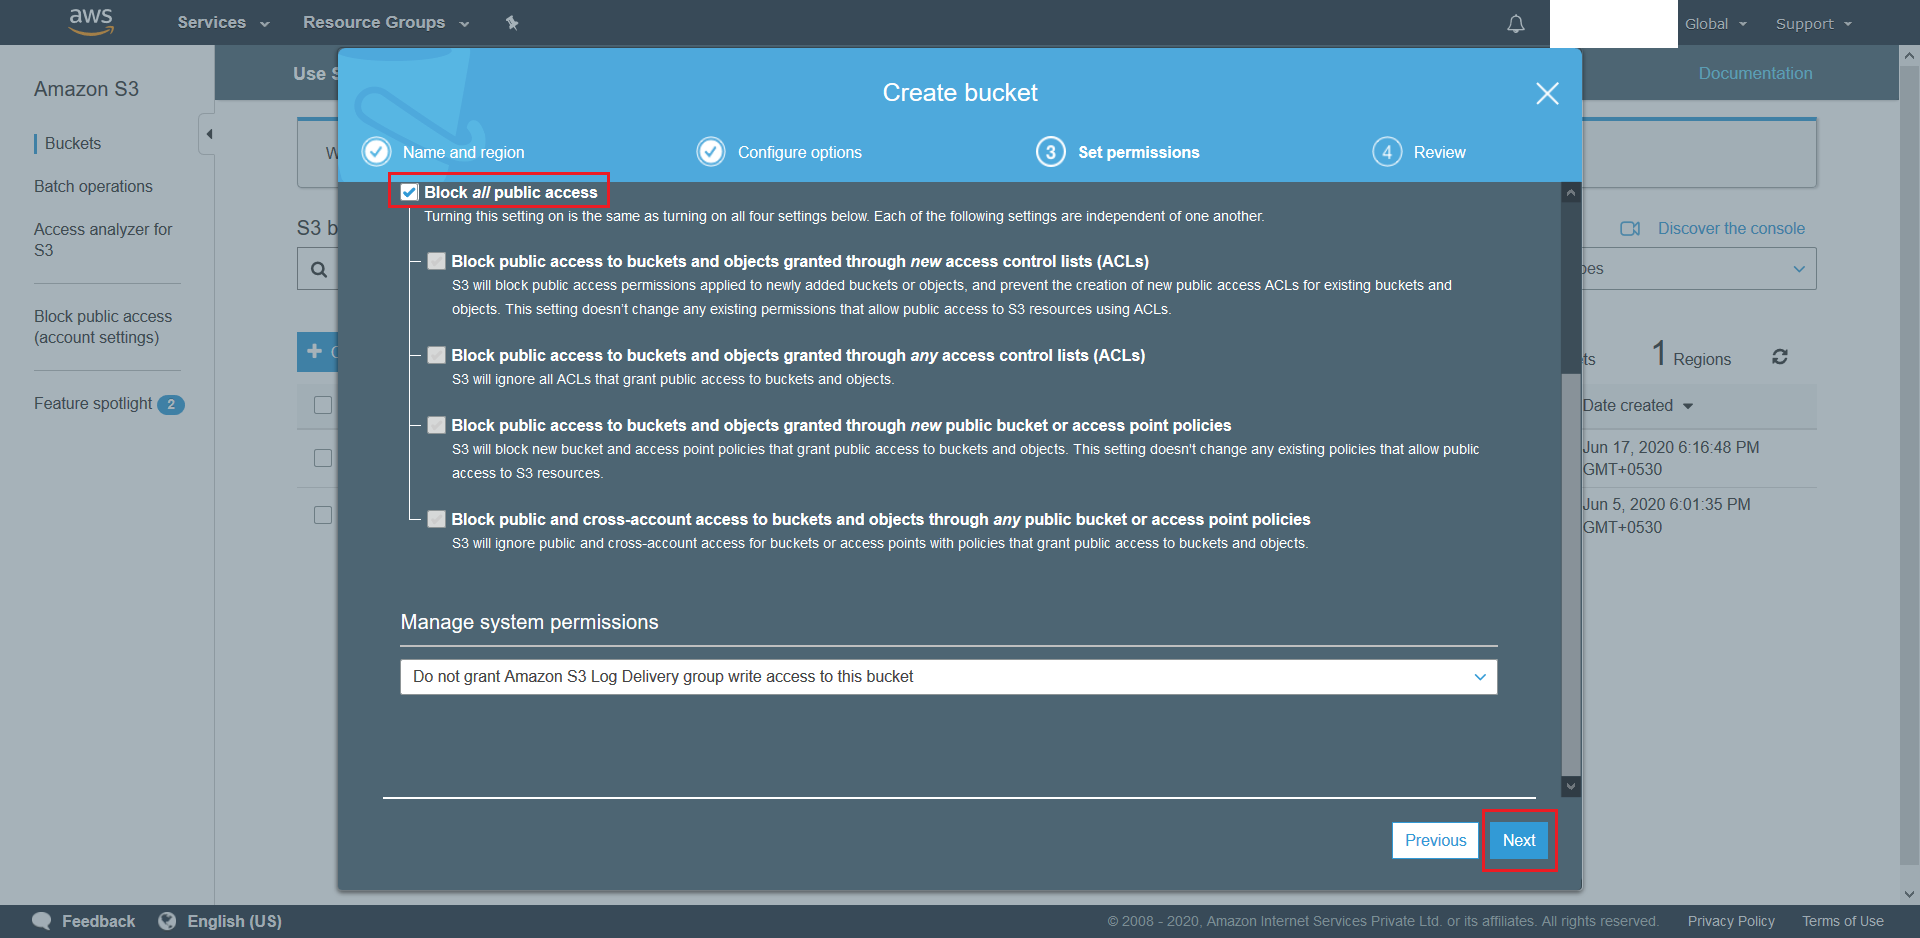
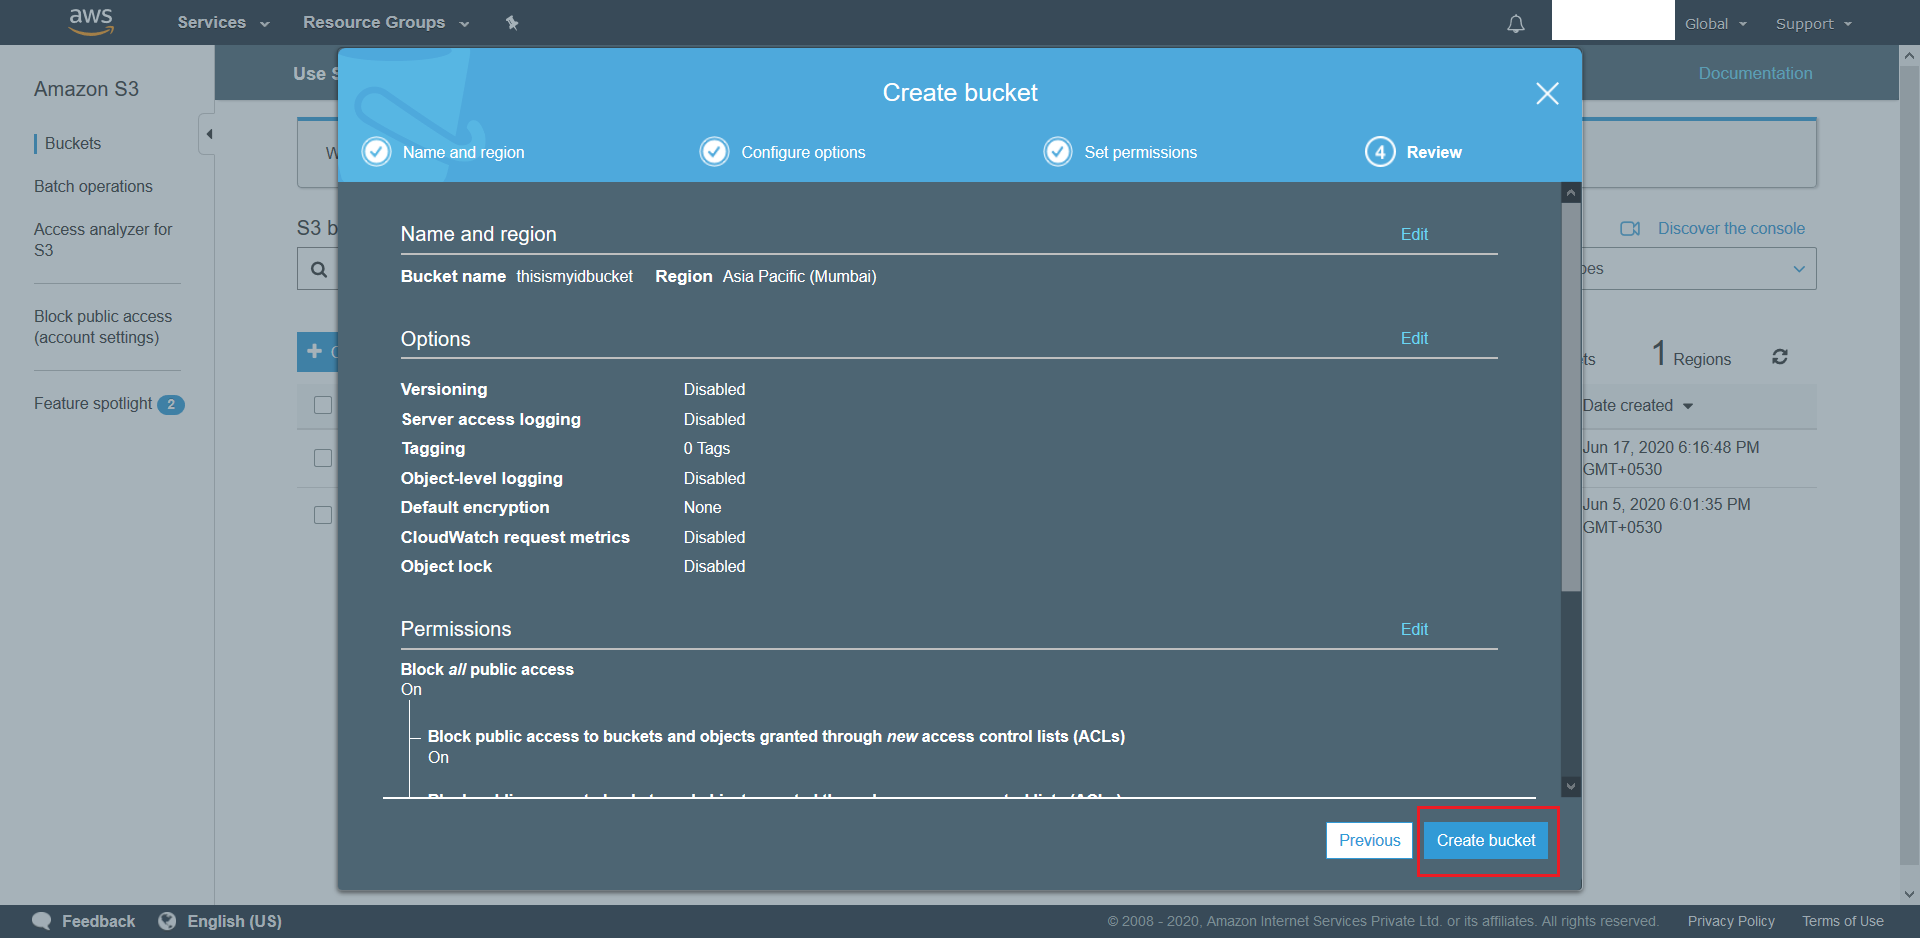
- Finally, review the configured settings and click Next once satisfied. Post this wait for the S3 to be provisioned.
 .
.
6.1.4.3 Steps to create a SNS Topic:
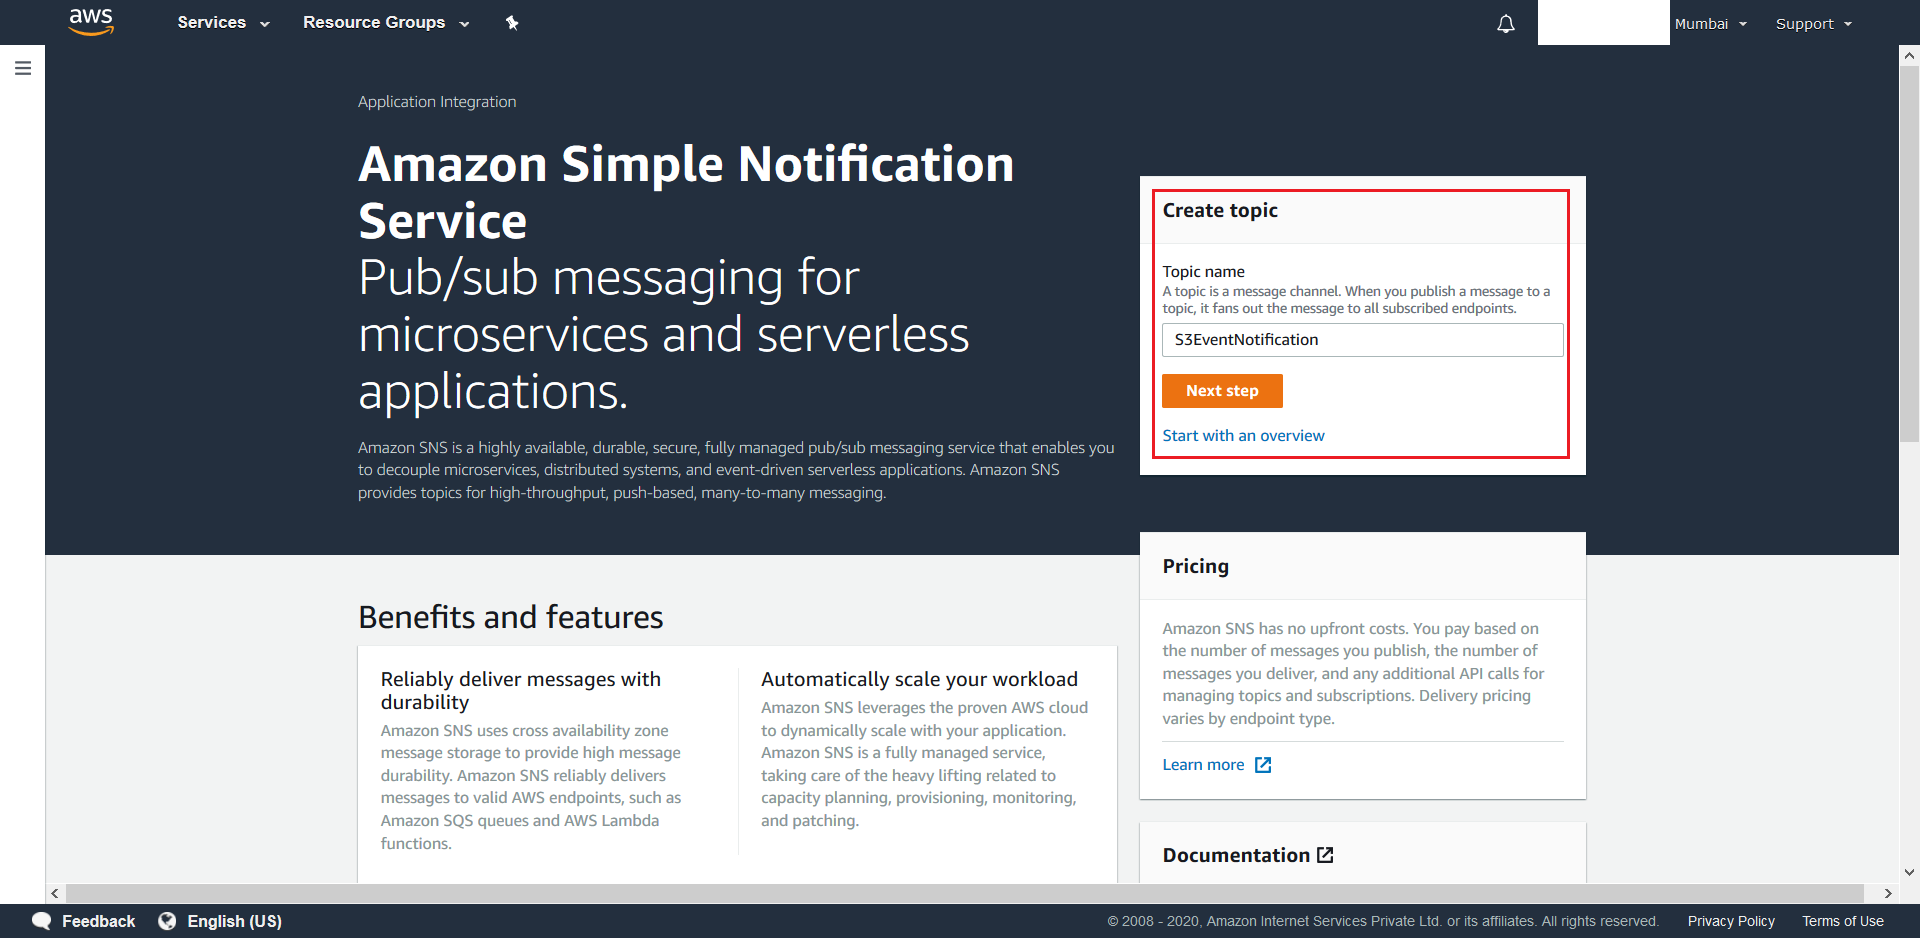
- Search for SNS from the AWS Management Console

- Create a Topic named S3EventNotification.
- From the next screen click on Access Policy.
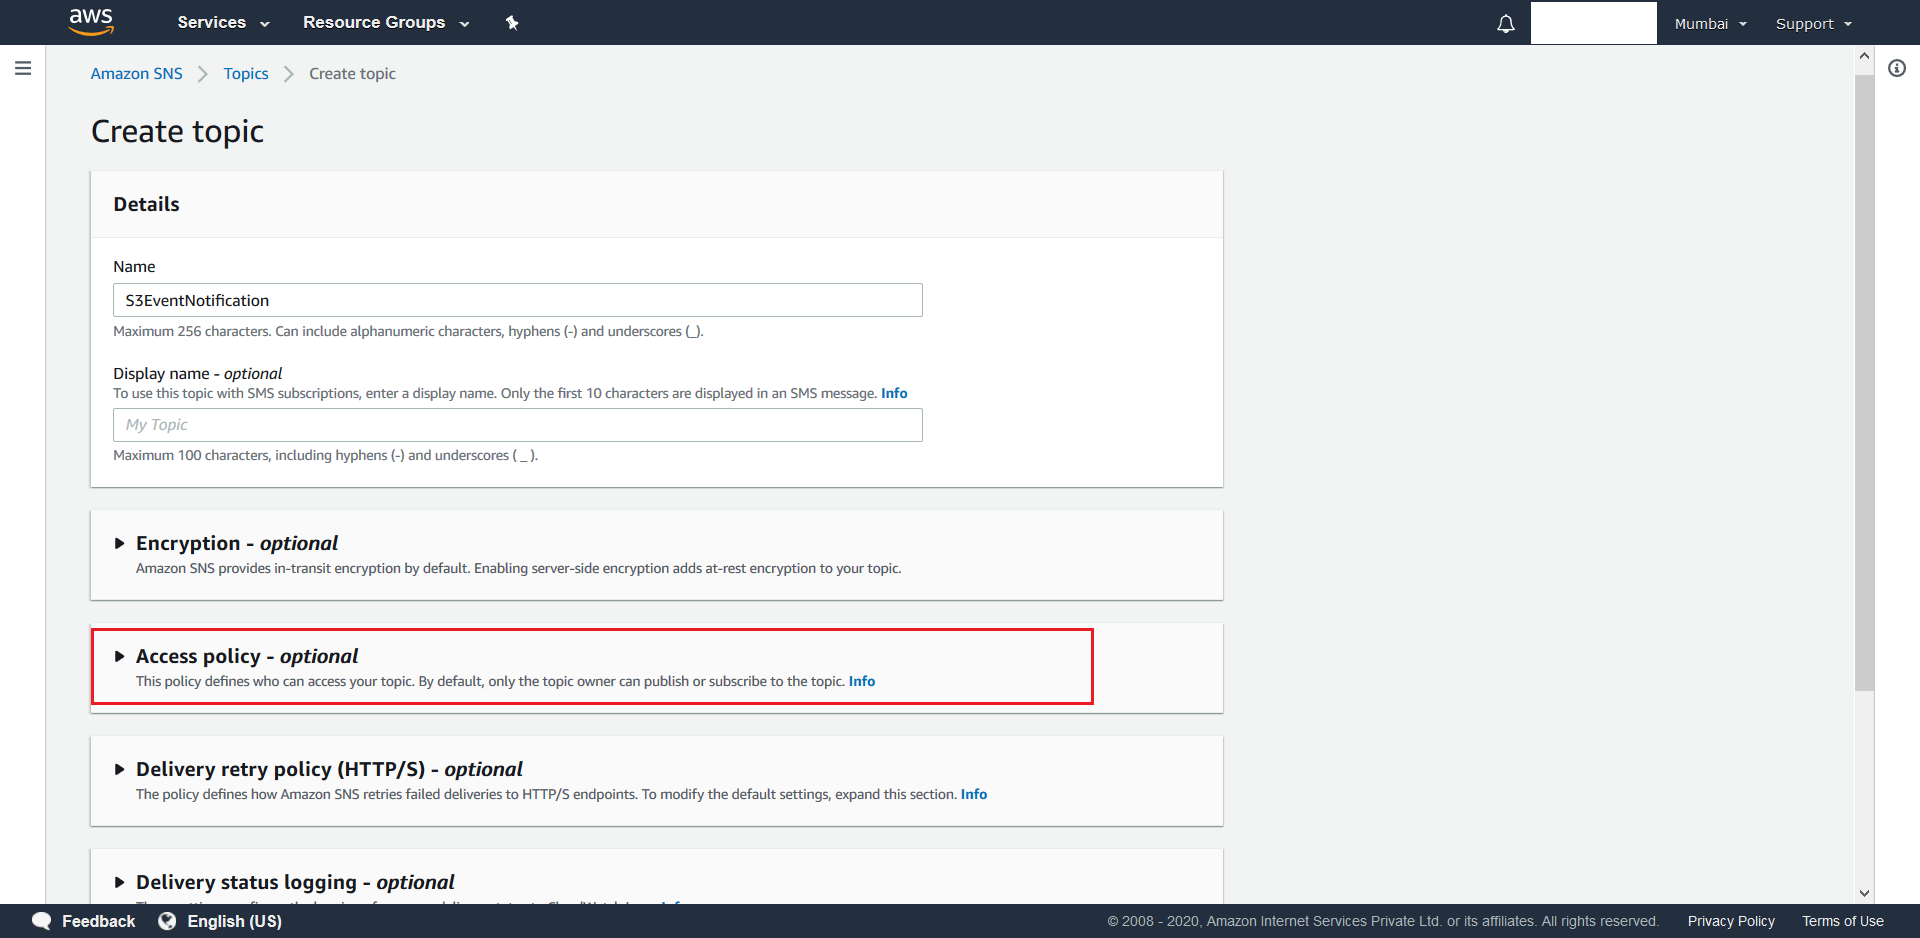
- Select Advanced.
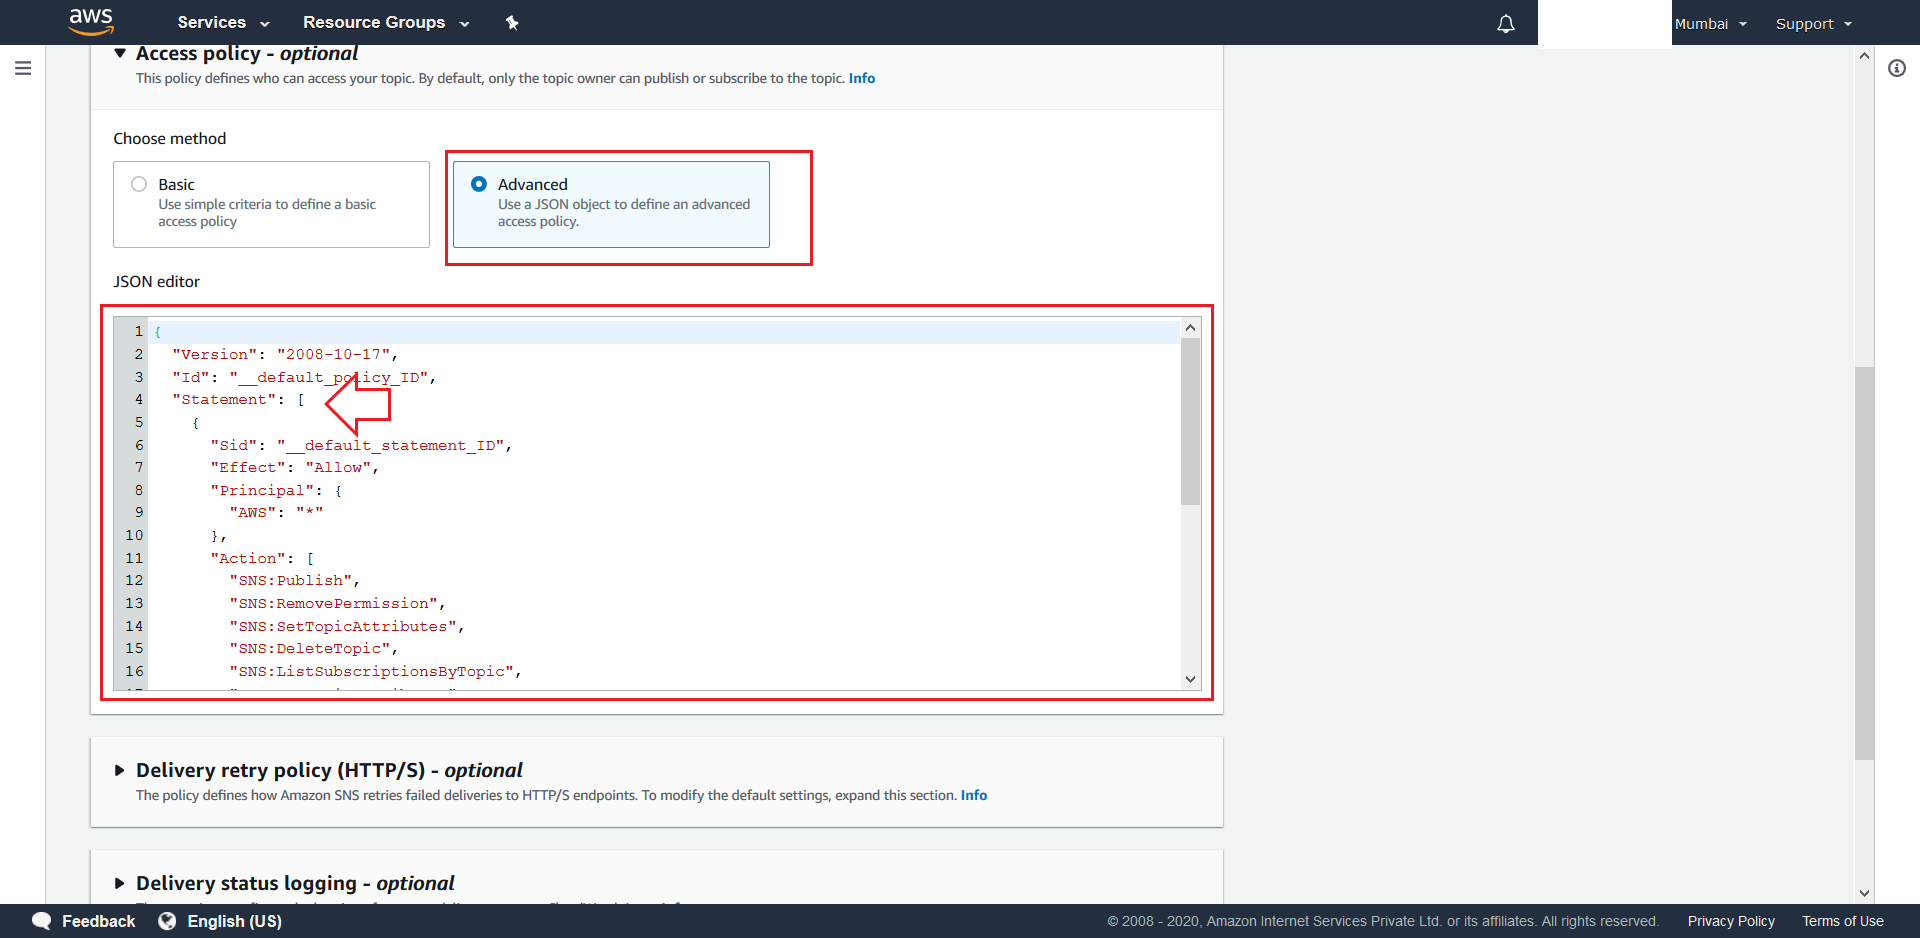
We will now add the following new statement to existing Statement Array:{ "Sid": "publish-from-s3", "Effect": "Allow", "Principal": { "Service": "s3.amazonaws.com" }, "Action": "SNS:Publish", "Resource": "arn:aws:sns:Region:account-id:topic-name", "Condition": { "ArnLike": { "aws:SourceArn": "arn:aws:s3:::bucket-name" } } }
Here “Region”, “account-id” and “topic-name” have to replaced with certain values from the exisiting default statement present. First replace “Region” with the word that has been underlined with red in the picture shown below. Next replace “account-id” with the green underlined word and replace “topic-name” with blue underlined word. Finally replace “bucket-name” with the name of the S3 Bucket that was created in the above section.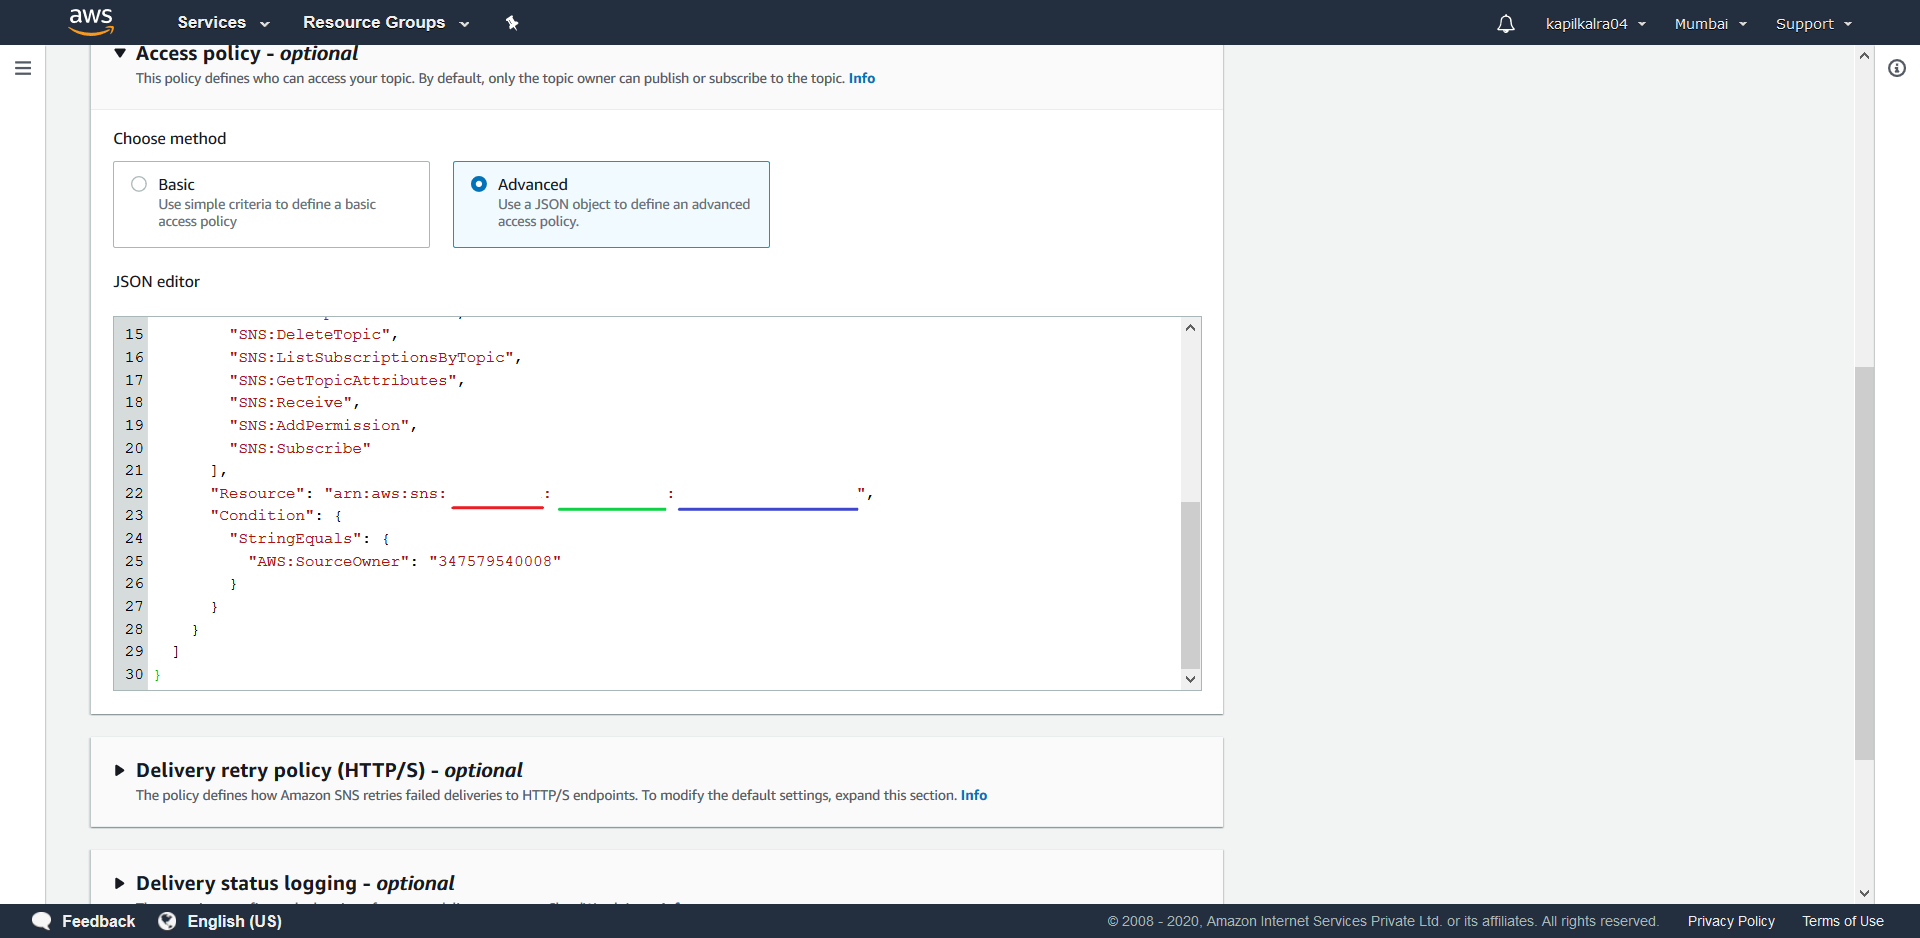
- After adding the new statement policy hit Create topic at the bottom of the screen.
6.1.4.4 Steps to create a Azure Function:
Create a new Azure Function App called Initiator by following these steps
6.2 Using AWS Cloud
Pre-requisites: You should have a valid AWS Cloud Service account.
6.2.1 Web API
Development Environment: ASP.Net Core 3.1 Since its developed using ASP.Net Core, we have flexibility to host it on Windows or Linux server. Server configurations heavily depends on the volume and concurrency of the Dispatch Request API which is captured under “Benchmarking Data” section later in the document. Since the process of provisioning the server remains same, we are covering the basic server set-up. Based on the “Benchmarking Data”, server configuration can be selected as required.
Linux VM Server
Linux VM server on AWS Cloud can be provisioned by going through the instructions as per the below link.
https://docs.aws.amazon.com/AWSEC2/latest/UserGuide/EC2_GetStarted.html
If you are new to AWS, then you can use the following steps to provision the EC2 server.
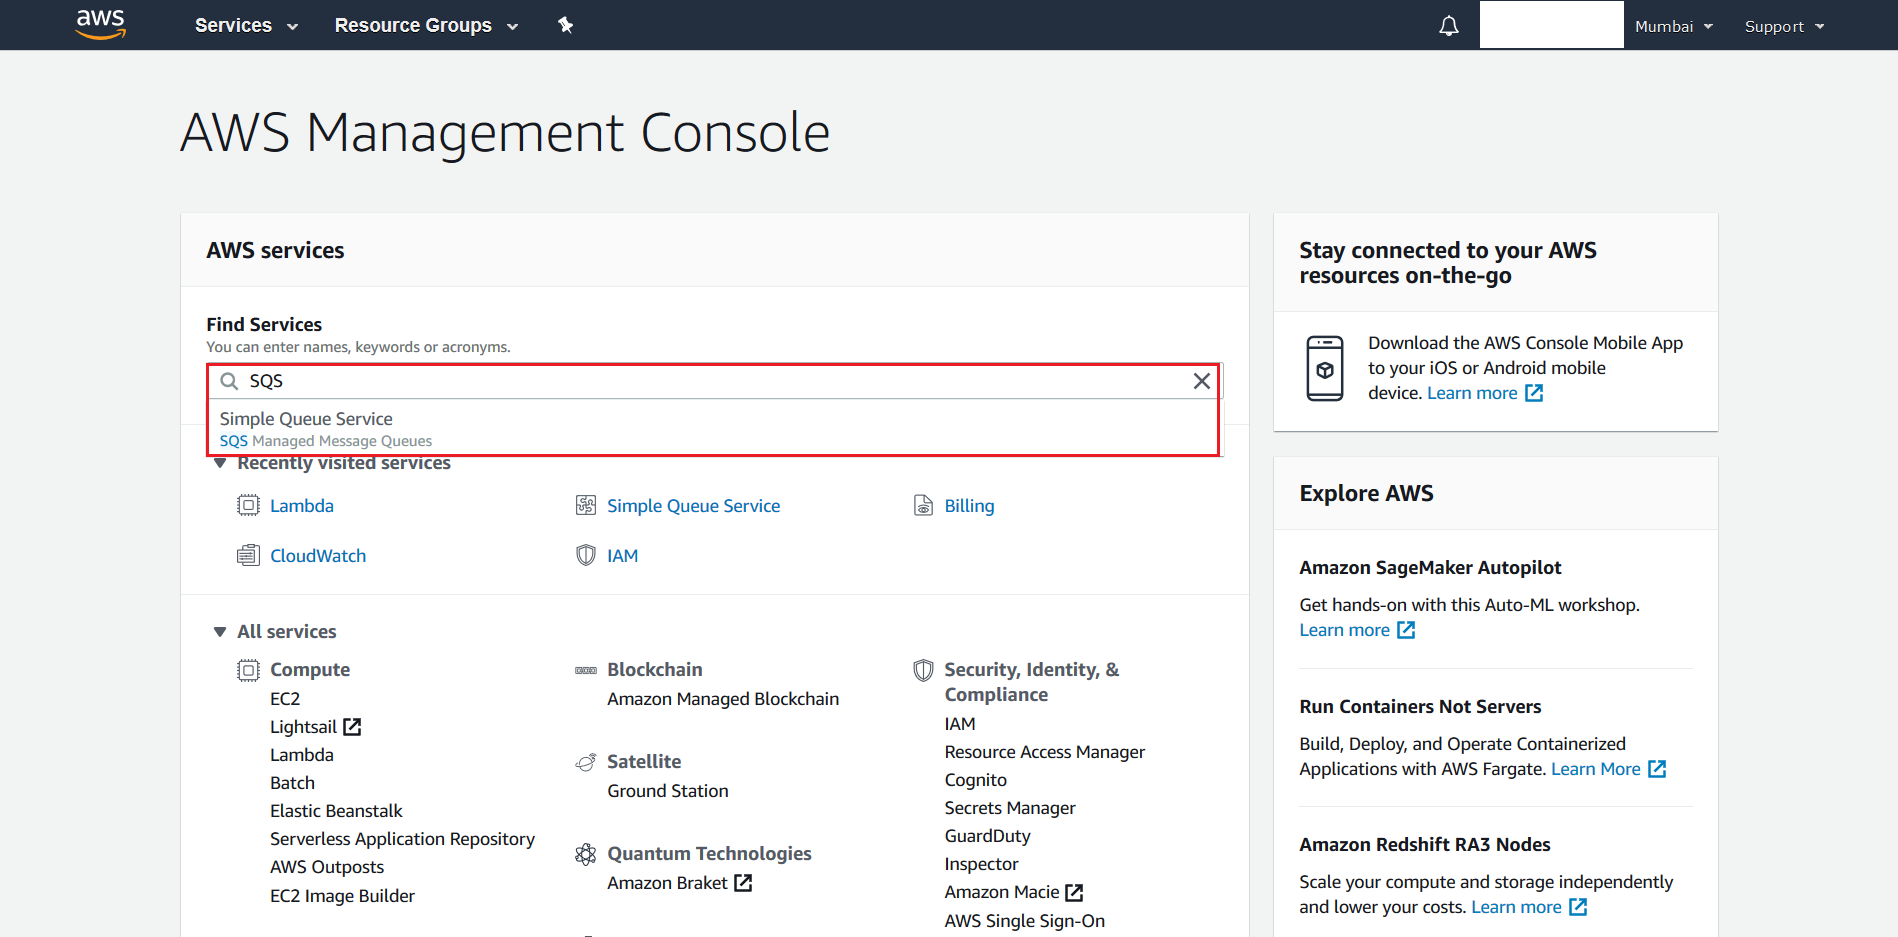
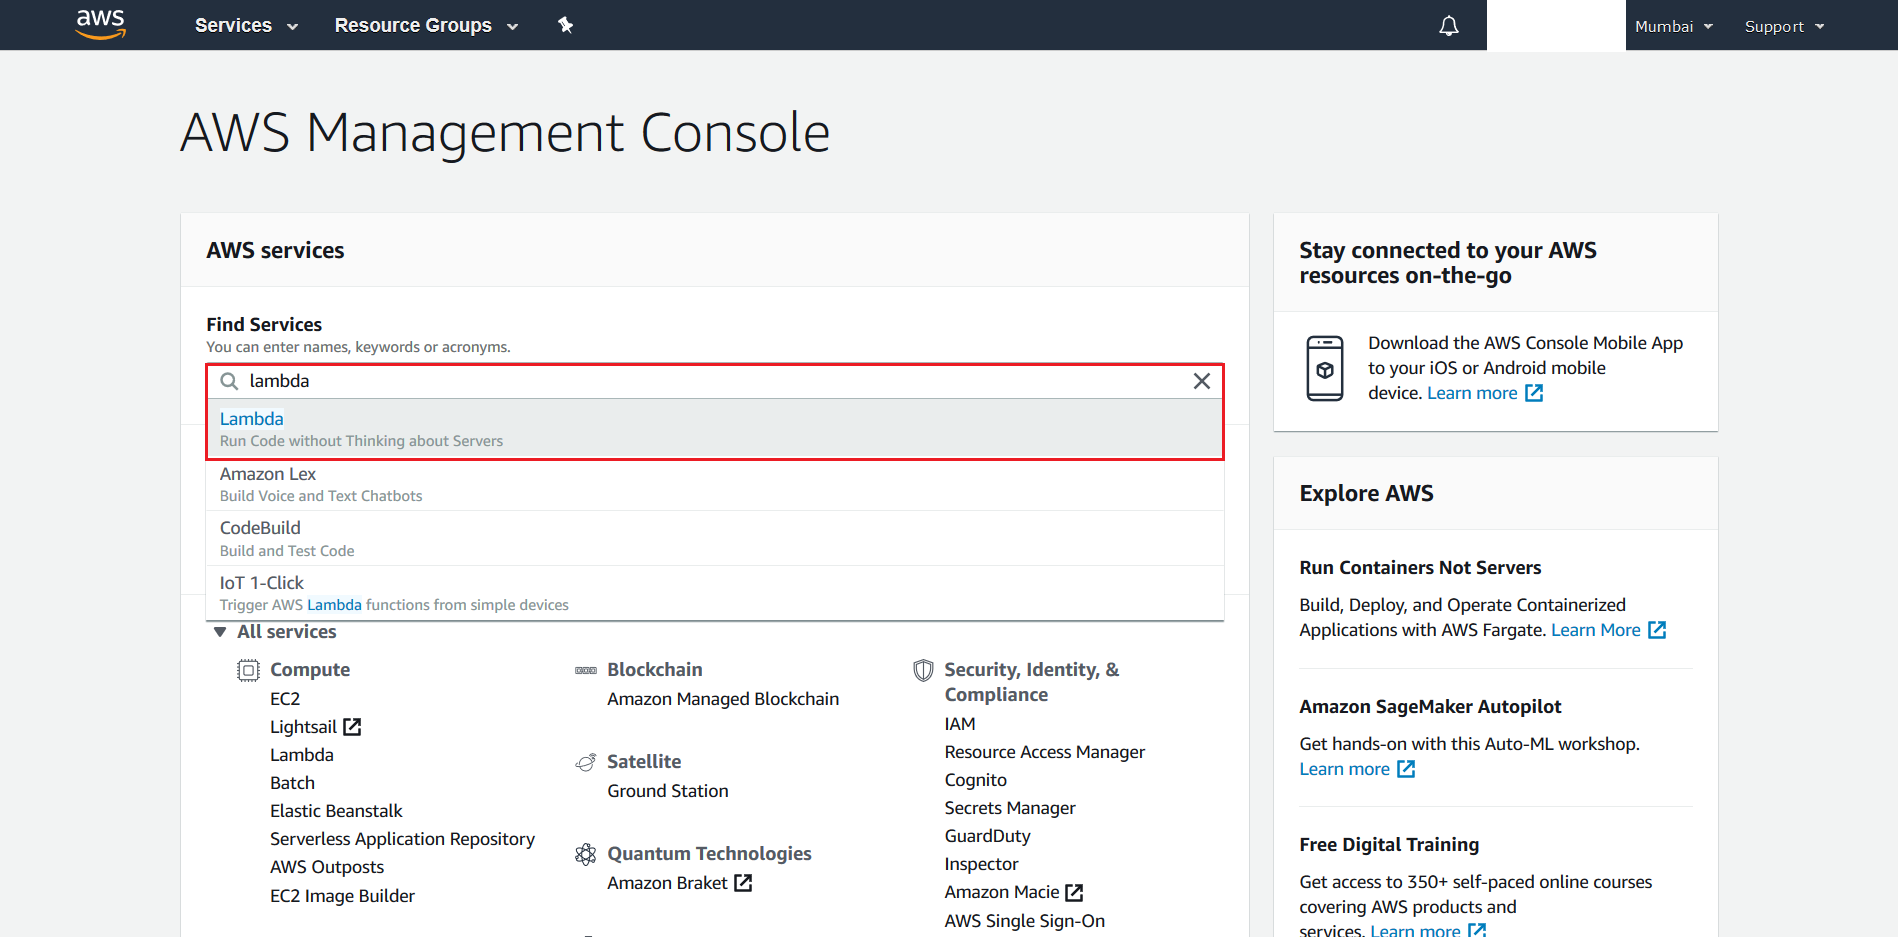
- Login into your “AWS Management Console”. All necessary steps are highlighted in Yellow in the screenshots.
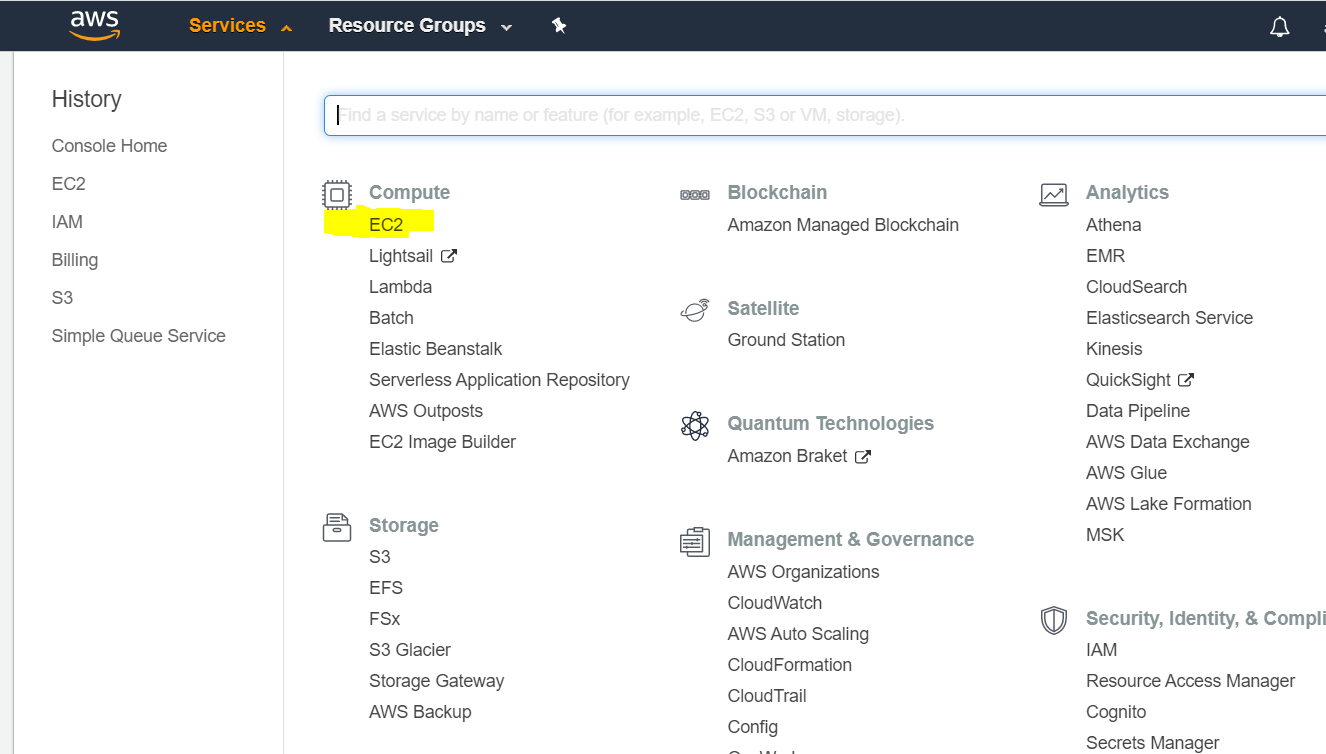
- Click on “Services” and look for “EC2”. This is the entry point for searching any AWS services and to launch these services.
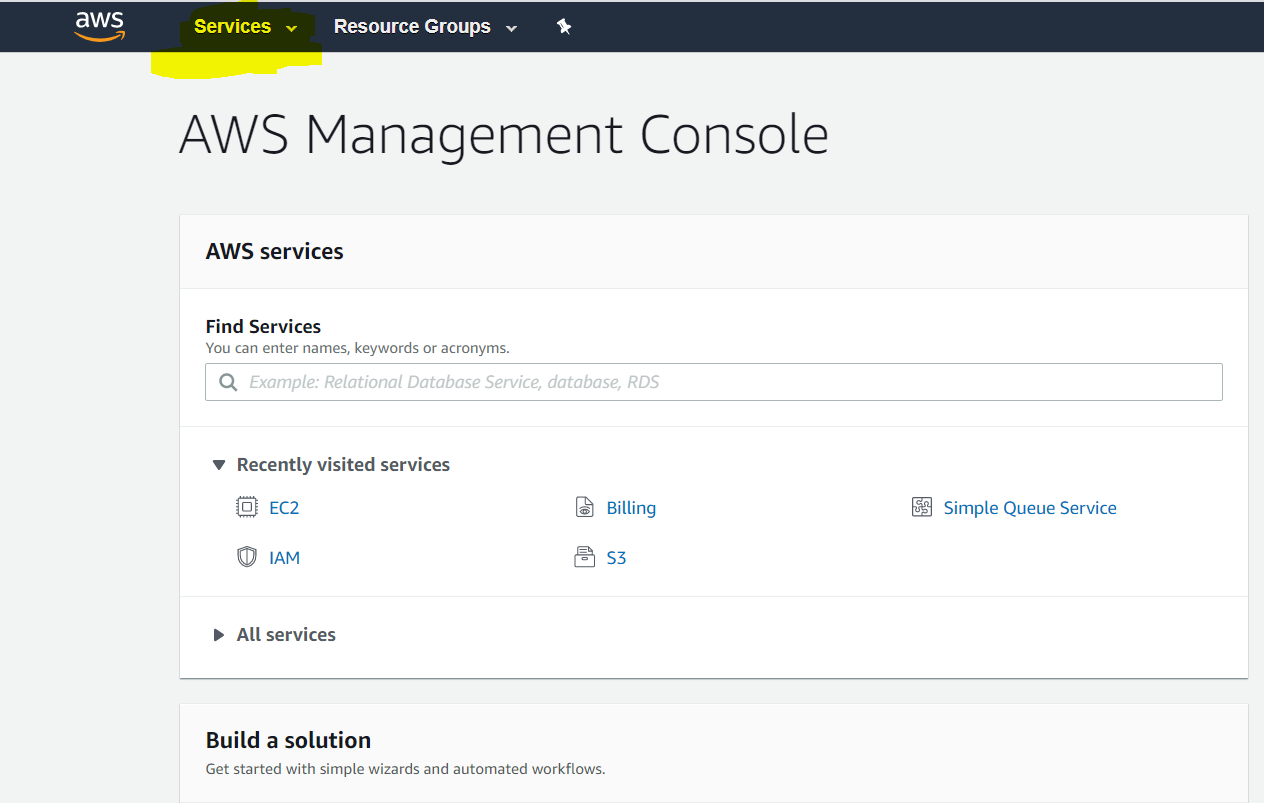
- Click on “EC2” service as per below screenshot.
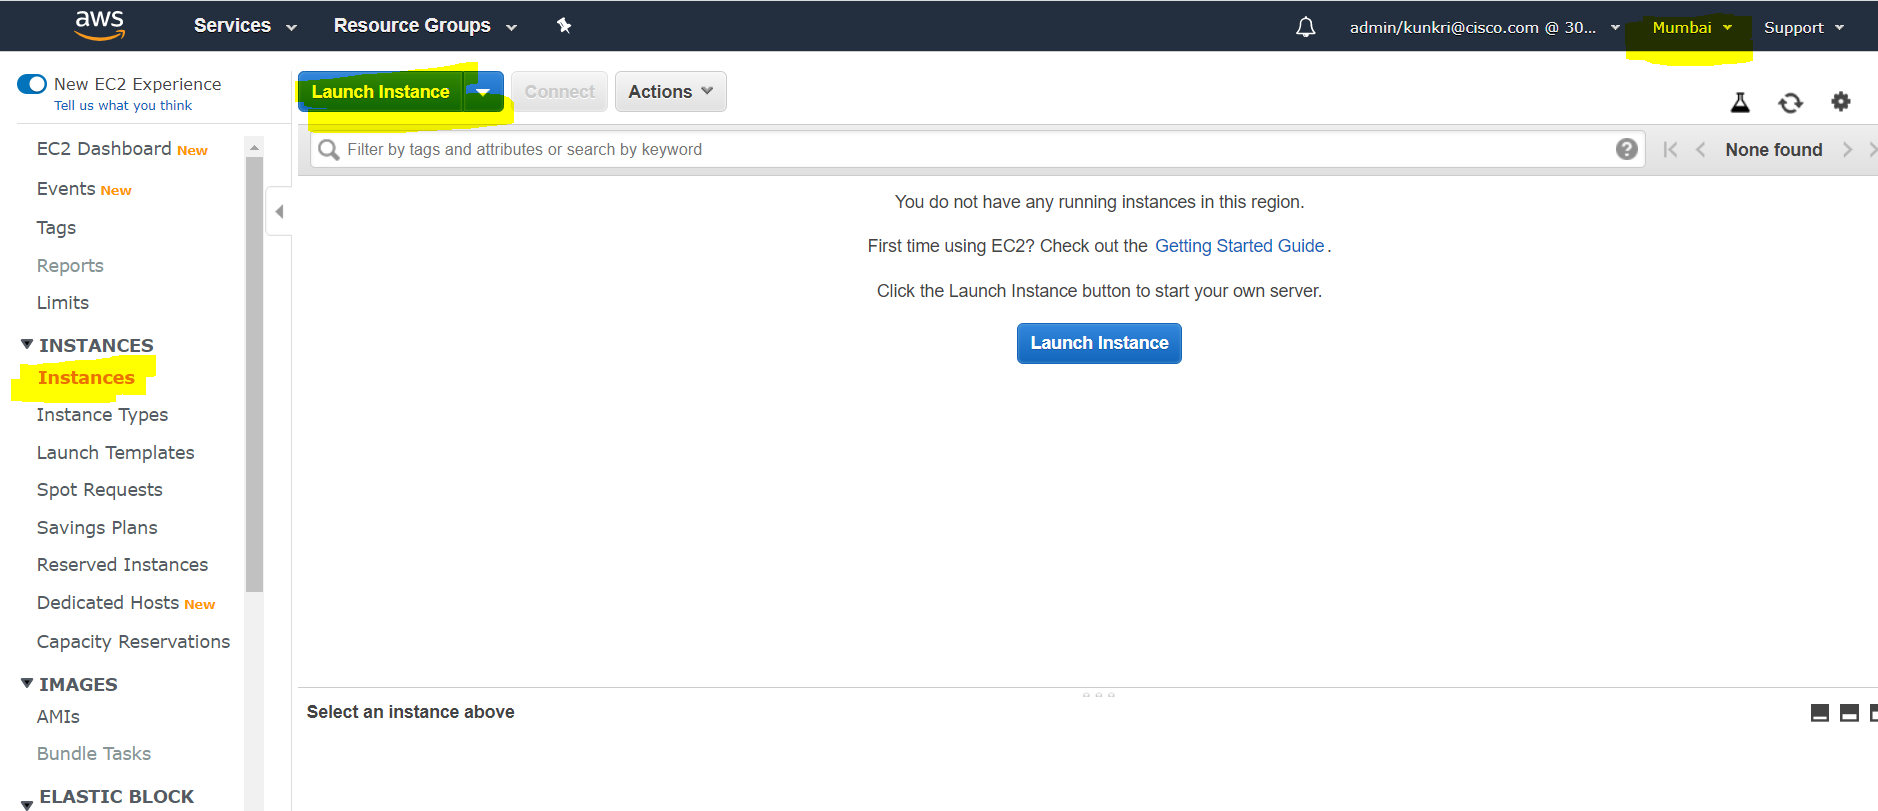
- On the left side menu, look for “Instances” and click on that. Now click on “Launch Instance” as per the below screenshot. You should also choose the desired region in the right top corner. For this document, we have chosen “Mumbai”.
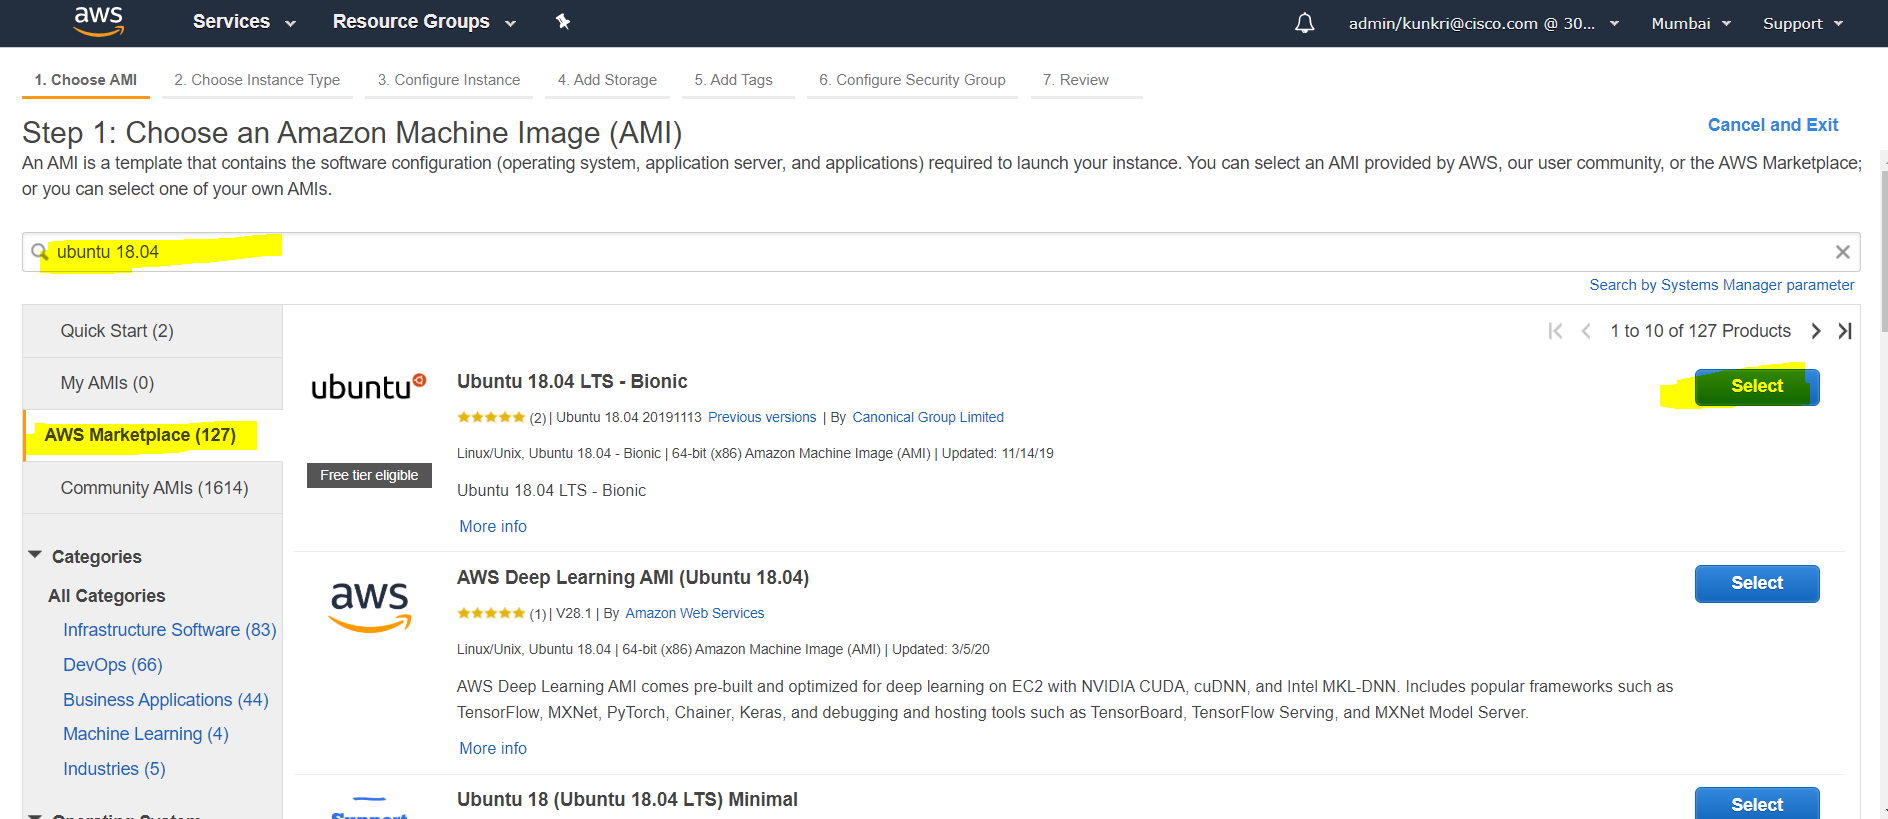
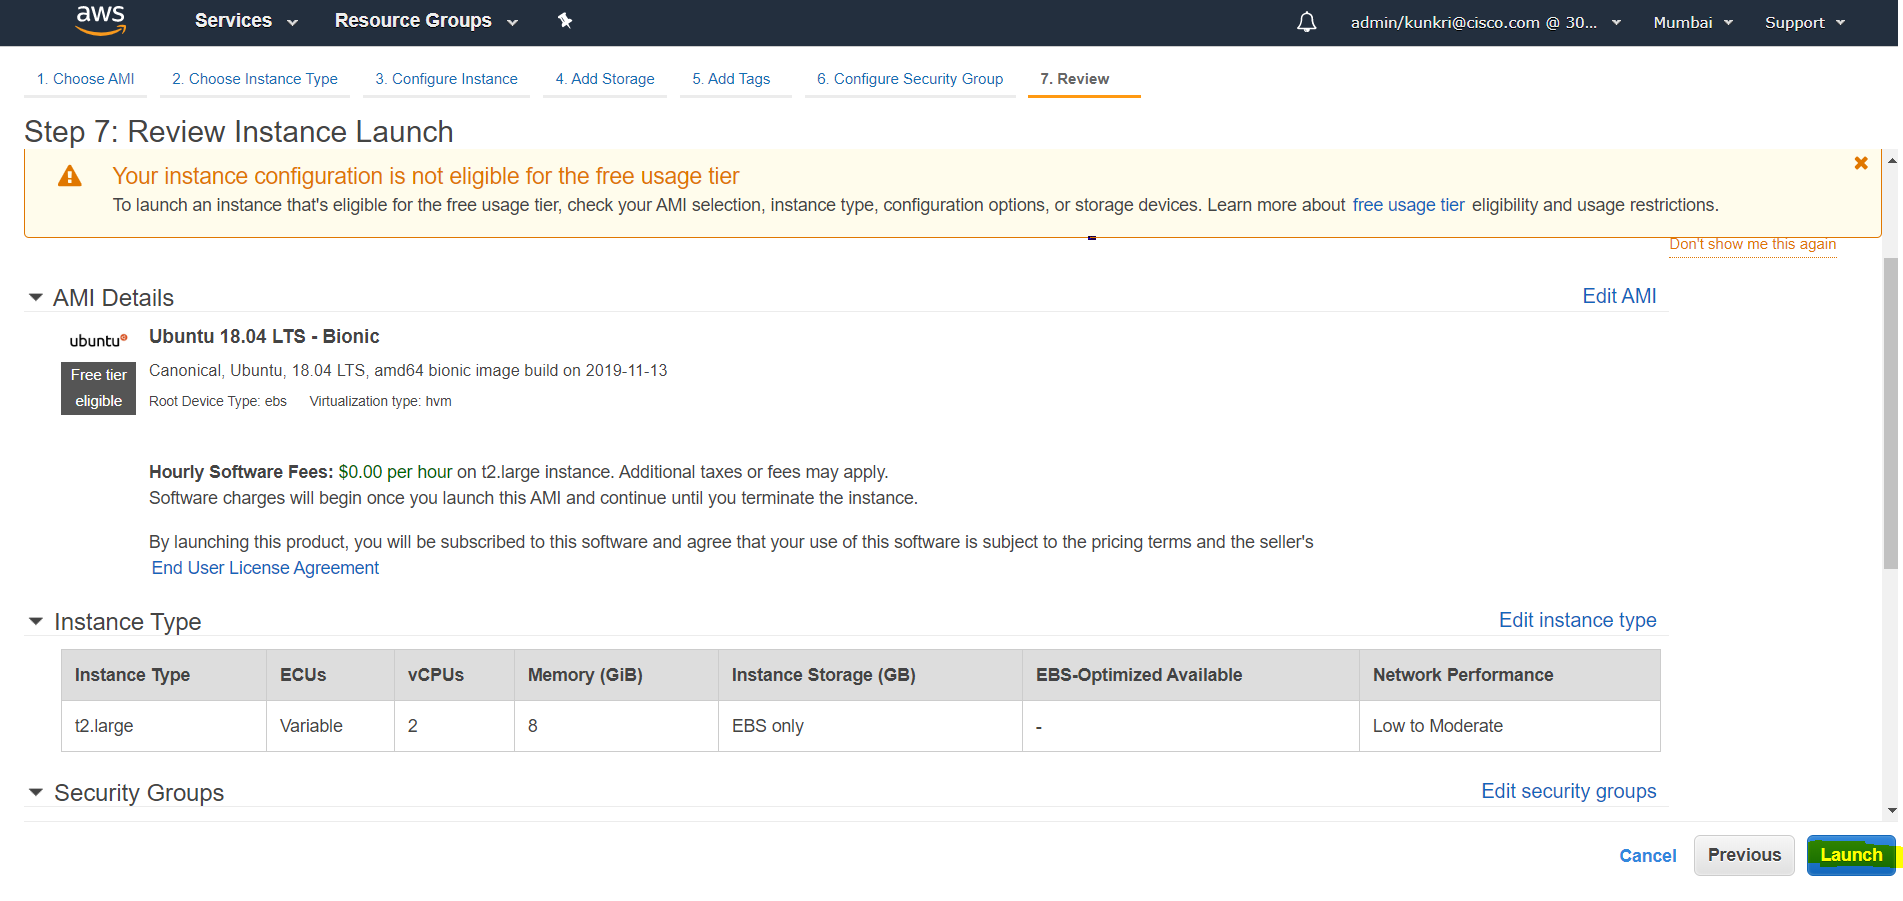
- The first step of launching instance is to choose an appropriate AMI(Amazon Machine Image). In this case, we would choose “Ubuntu 18.04 LTS - Bionic”. First click on “AWS Marketplace” in left side menu and search for “Ubuntu 18.04”. Choose the AMI as displayed in the screenshot below.
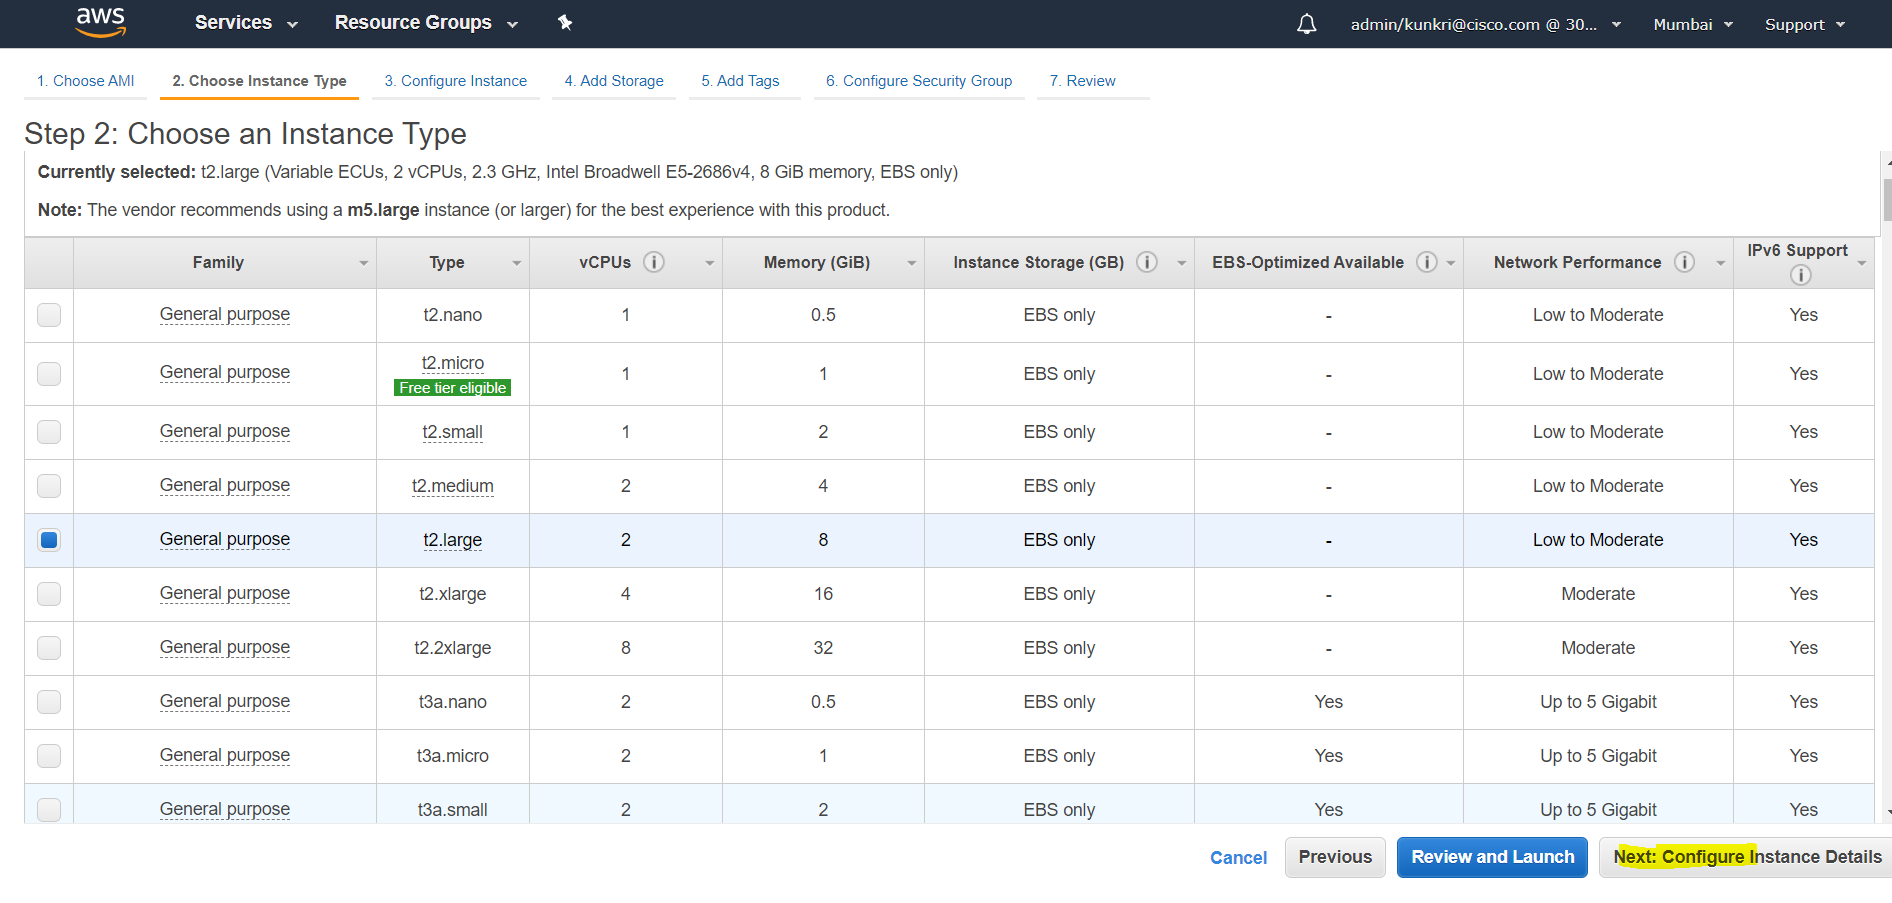
- Next step i.e. step-2 is to choose an Instance Type. Instance Type should be decided after referring to Benchmarking section. For this document, we are selecting “t2.large” type.
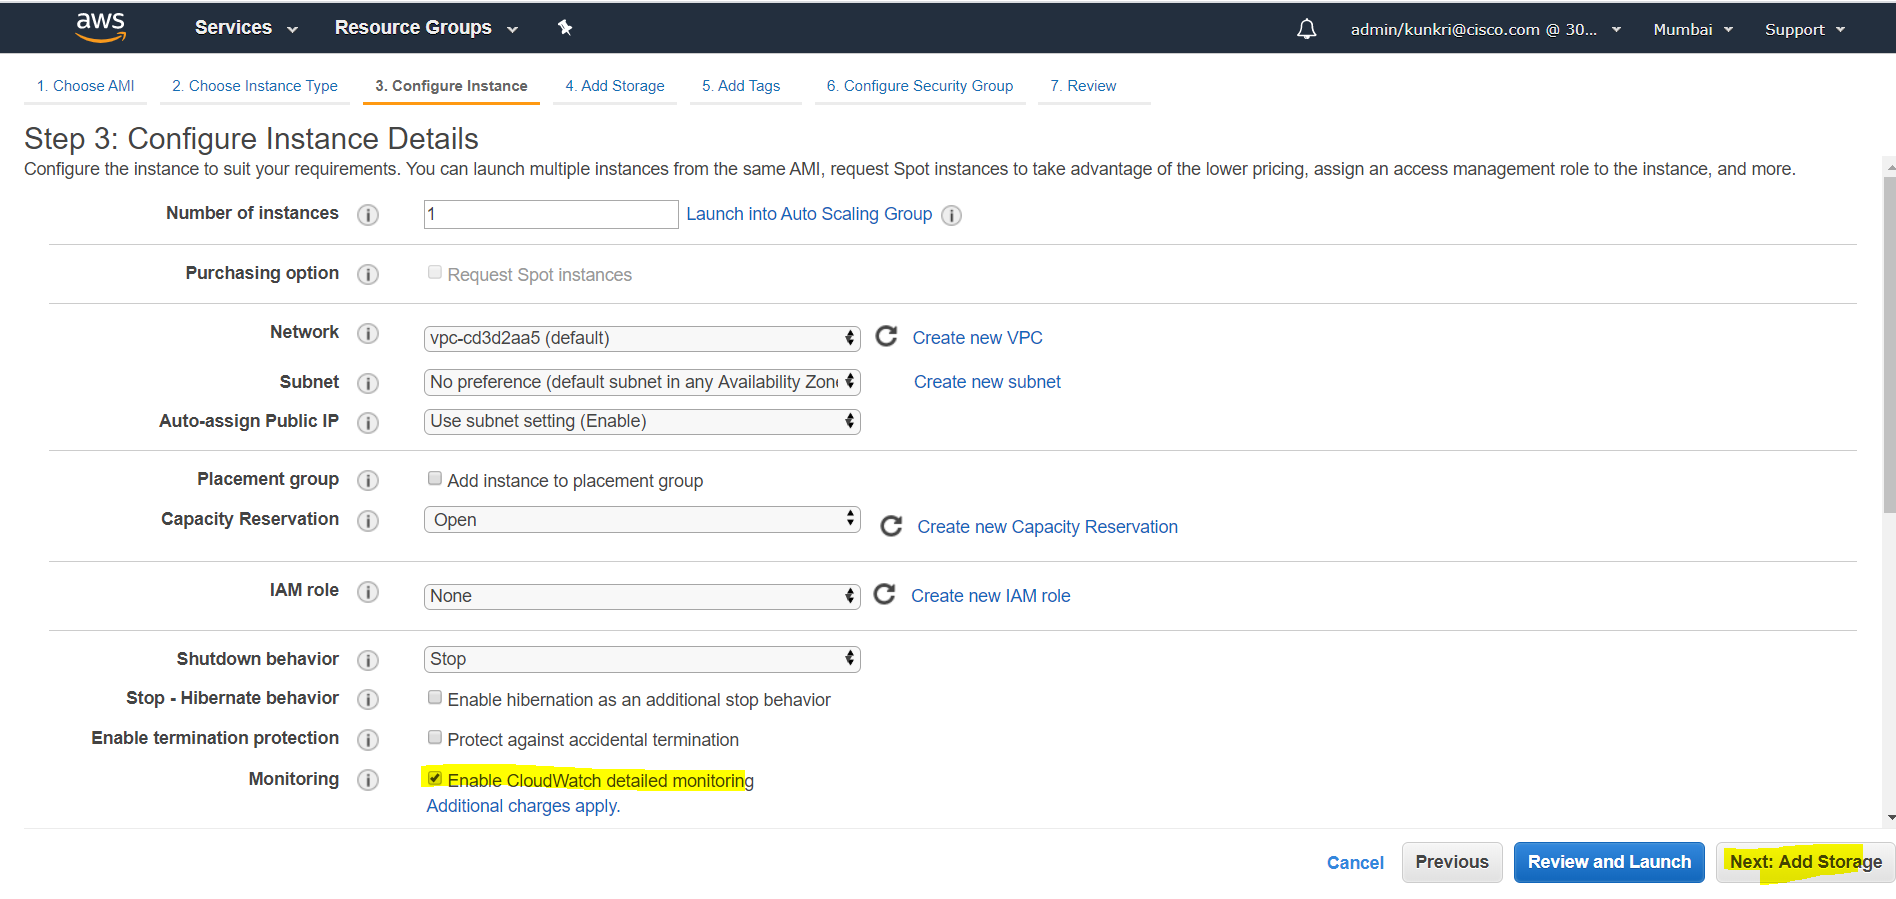
- At step-3, we have to configure the instance details. We can go ahead with default settings here. Enable “Monitoring” -> “Enable CloudWatch detailed monitoring” as per below screenshot.
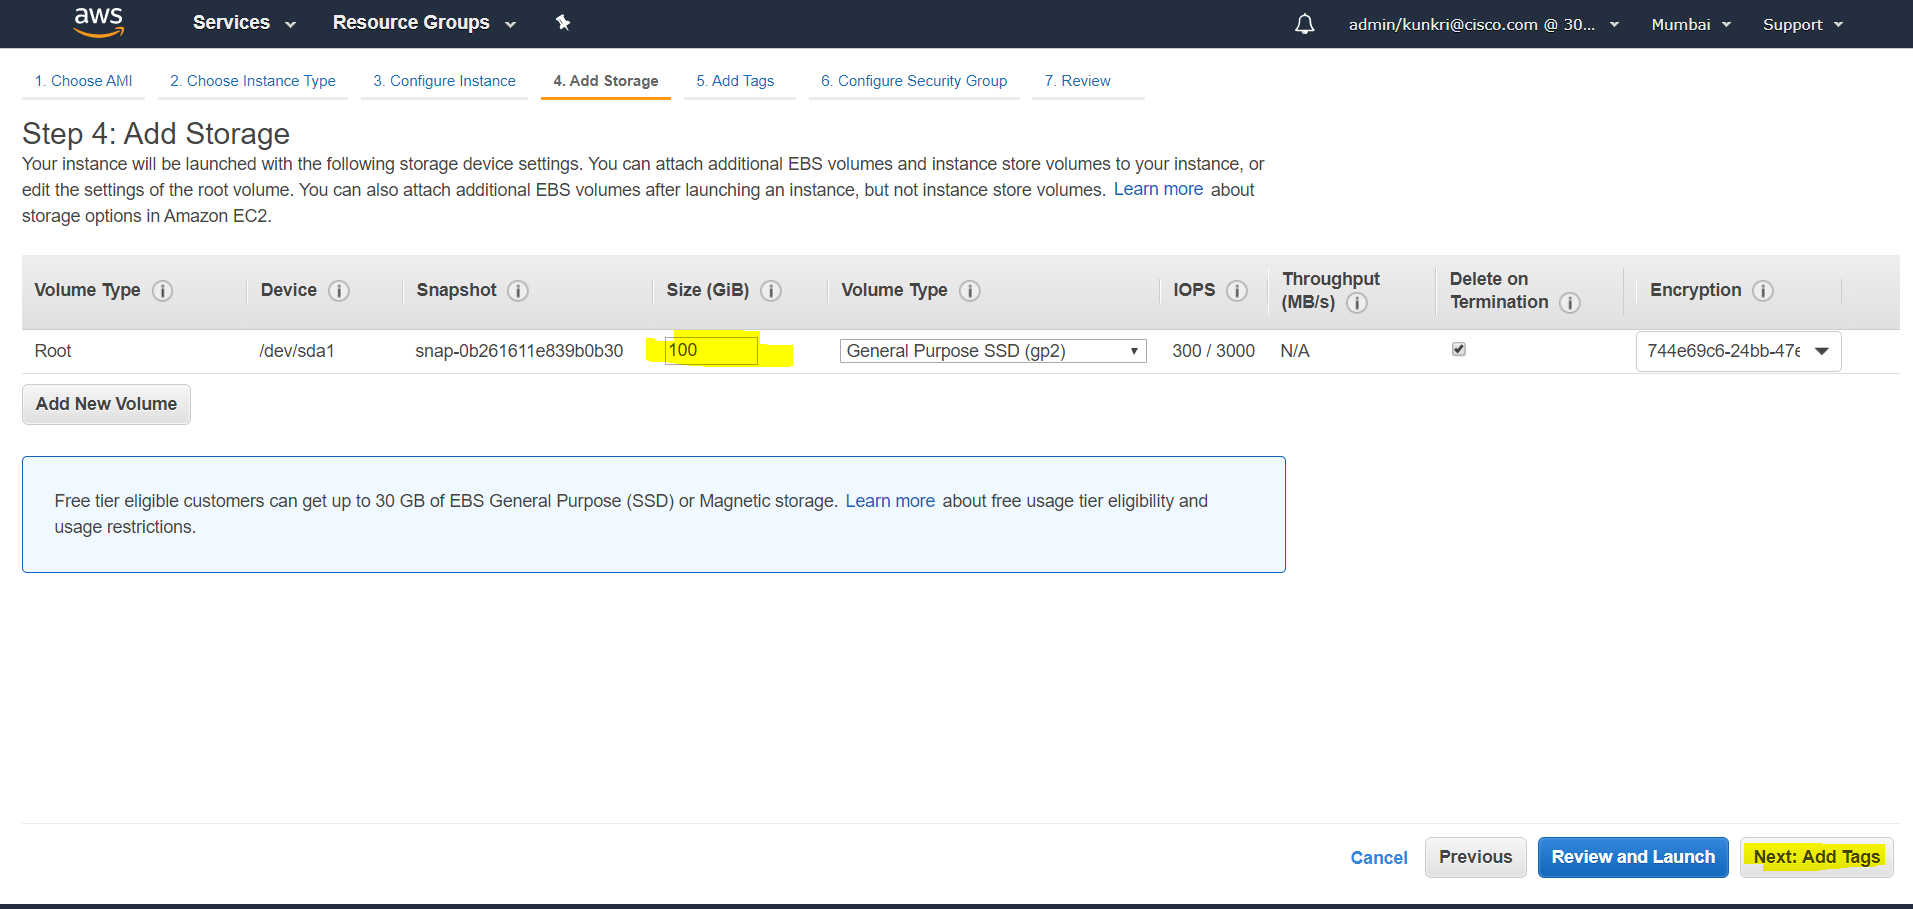
- Next at step-4, we will add storage of around 100 GB. This again should be decided based on the use case.
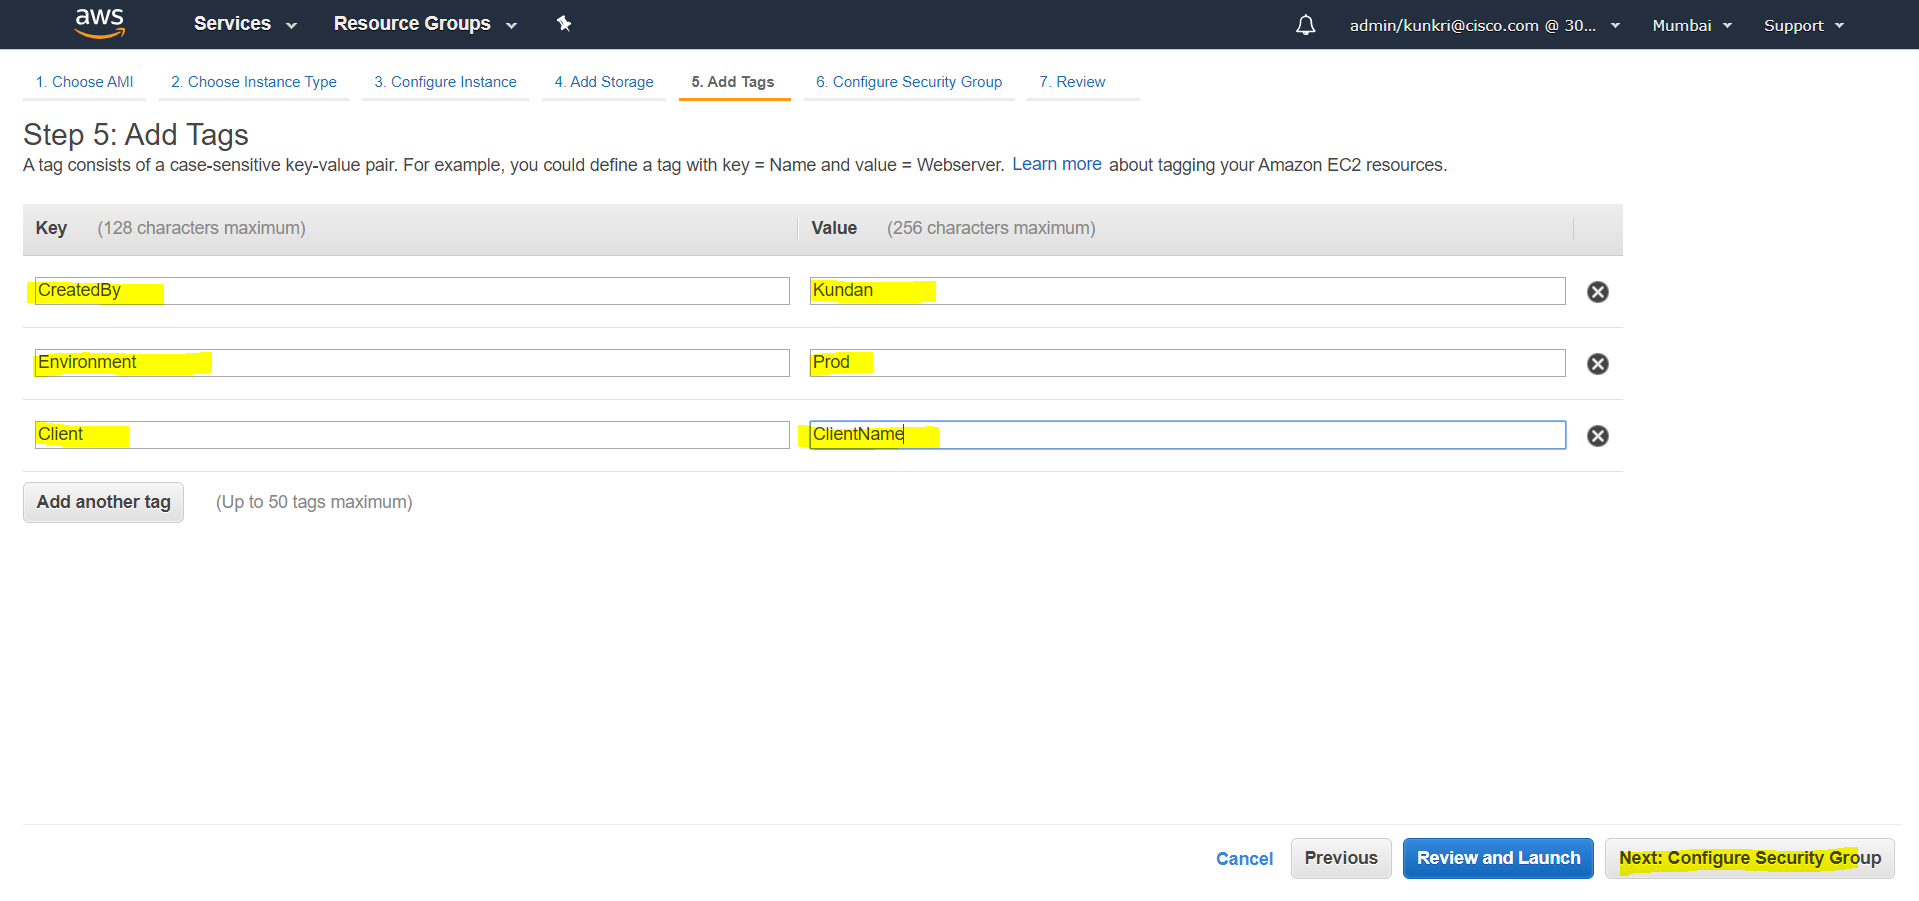
- At “Add Tags” step which is optional however should be adhered as per the organization policy. In this example, we will add few “Key-Value” pairs as per the screenshot, which will help in easier billing and tracking.
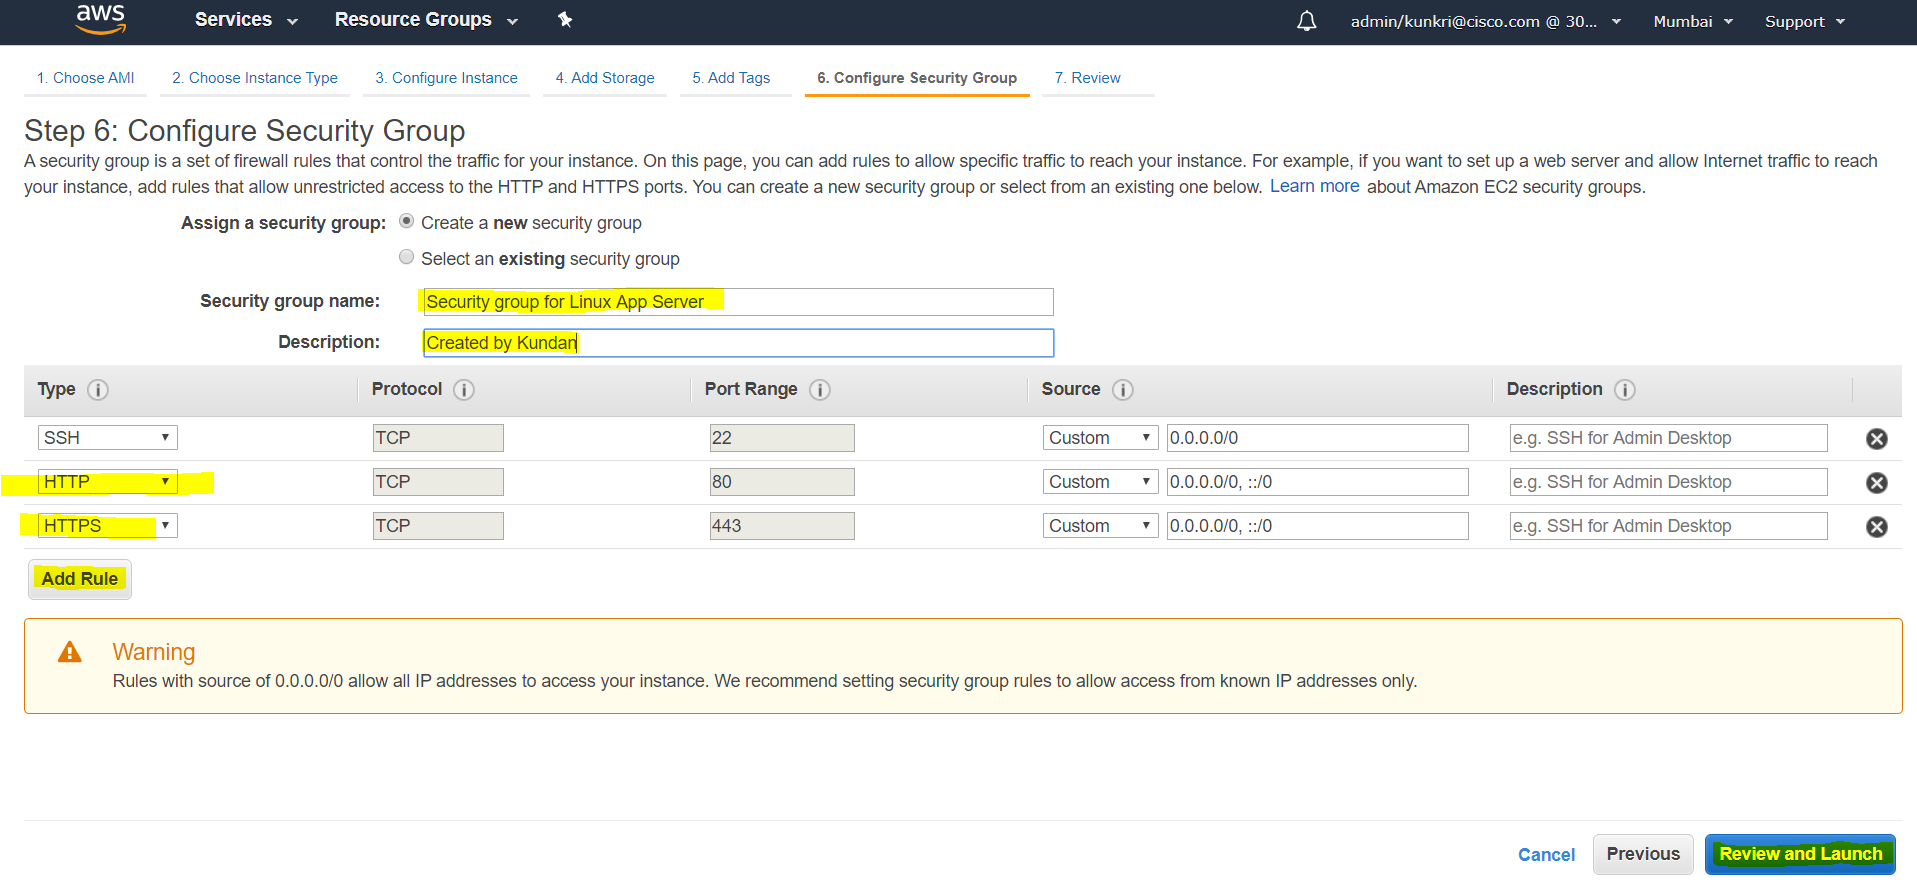
- Next step is to configure the firewall to control the incoming traffic. For this example, we are opening port 22 to allow ssh, port 80 to test nginx during deployment and port 443 for all web API communication. Admin should revisit this section once the entire deploy is complete to make sure no unused ports are open. Provide a unique security group name here for your reference.
- Now we are at step-7 which is final step to review all the configurations done so far. You can have a look before clicking on “Launch” button.
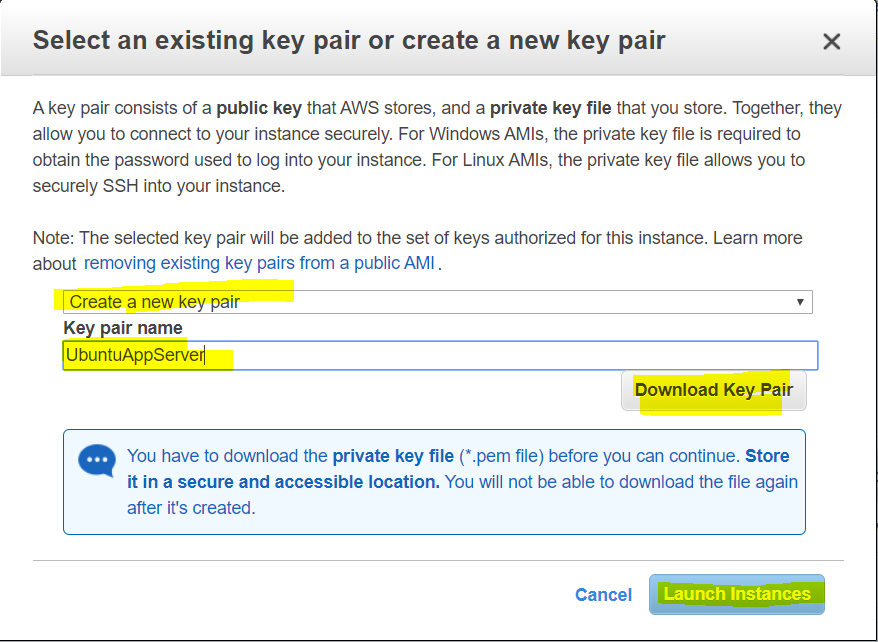
- Before the instance is launched, it will ask for configure a key pair to which will be used to login to server. In this case, we are creating a new key pair as this is first server launch. However, existing key-pair can also be used here. provide a “Key pair name” as per your choice. Make sure to “Download Key Pair” and keep it handy since this will be used to login to server during deployment.
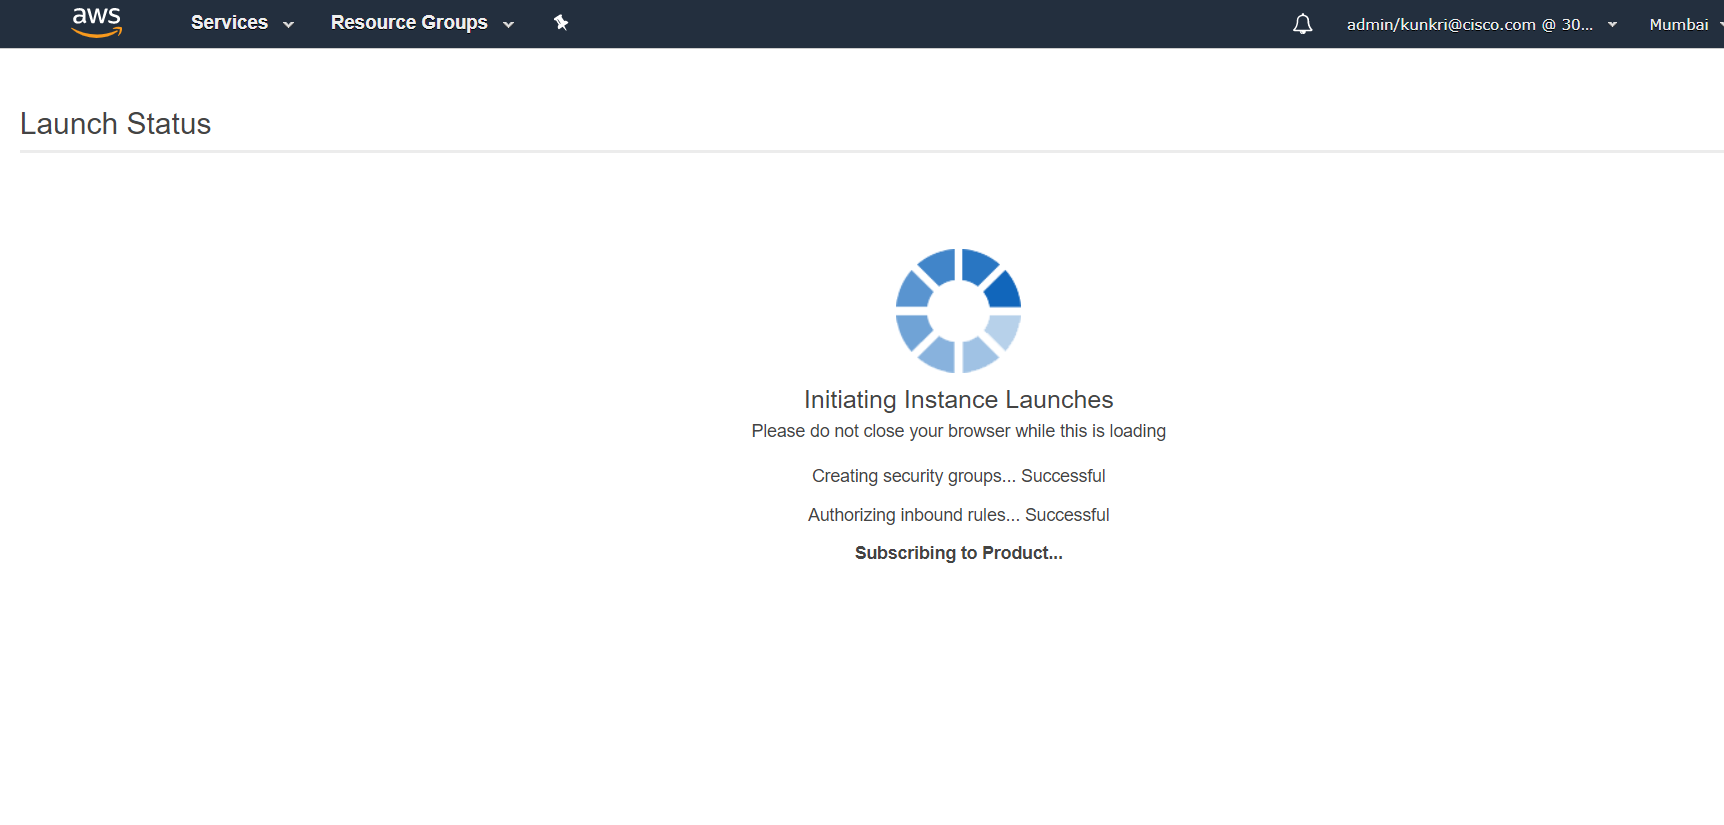
- Now, you should able to see the below screenshot status. It might take a minute while the instance is getting launched.
- Ubuntu Server is successfully launched. You can verify this in “Instance” section. Its recommended to assign a “Name” to which helps admin to uniquely identify the server. Note down the IPv4 Public IP, which will be used while login to this server.
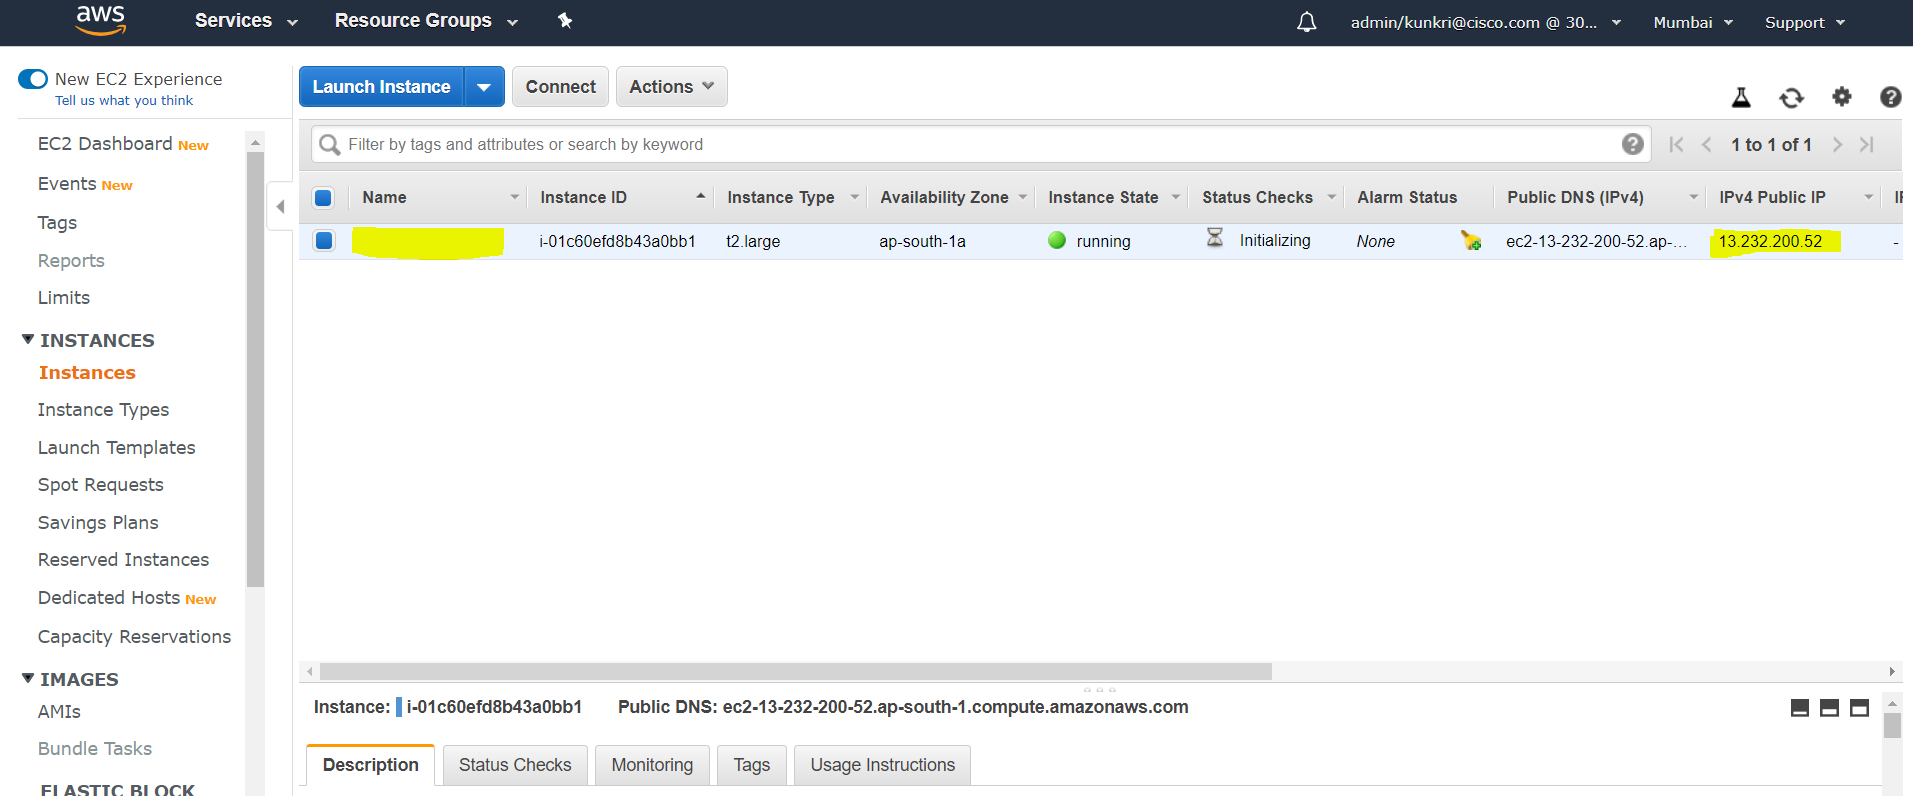
After completion of this, you should have
- Ubuntu VM server in the AWS portal
- SSH key(Key Pair downloaded in Step 12 above) to access above server using Putty/MobaxTerm.
6.2.2 Dispatcher
- Resources to be provisioned:
- AWS IAM User (x1)
- AWS SQS (x2)
- AWS IAM Roles (x2)
- AWS Lambda (x2)
6.2.2.1 Steps to create an IAM User:
- Login into your
AWS Management Consoleas the root/admin user and search for IAM - Click on Users from the next screen
- Click on Add user from the next screen
- Next choose a suitable unique name (ex.
subuser). Select Programmatic access option only under Access-Type. Finally hit Next: Permissions. - Next choose PowerUserAccess as the desired Permission for this
IAM User. Then proceed to Next: Tags, which is an optional step, where you can choose to provide key-value pair tags for this user. From there move to Next:Review. - After reviewing the details click Create user
- Note down the Access key ID and Secret access key of this newly created IAM User as this will be used elsewhere.
6.2.2.2 Steps to create a SQS:
- Continue in the same login session of
AWS Management Console. Choose the desired Region in which you want to provision of all your resources. - Search for SQS from the AWS Management Console
- From the next screen hit Create New Queue
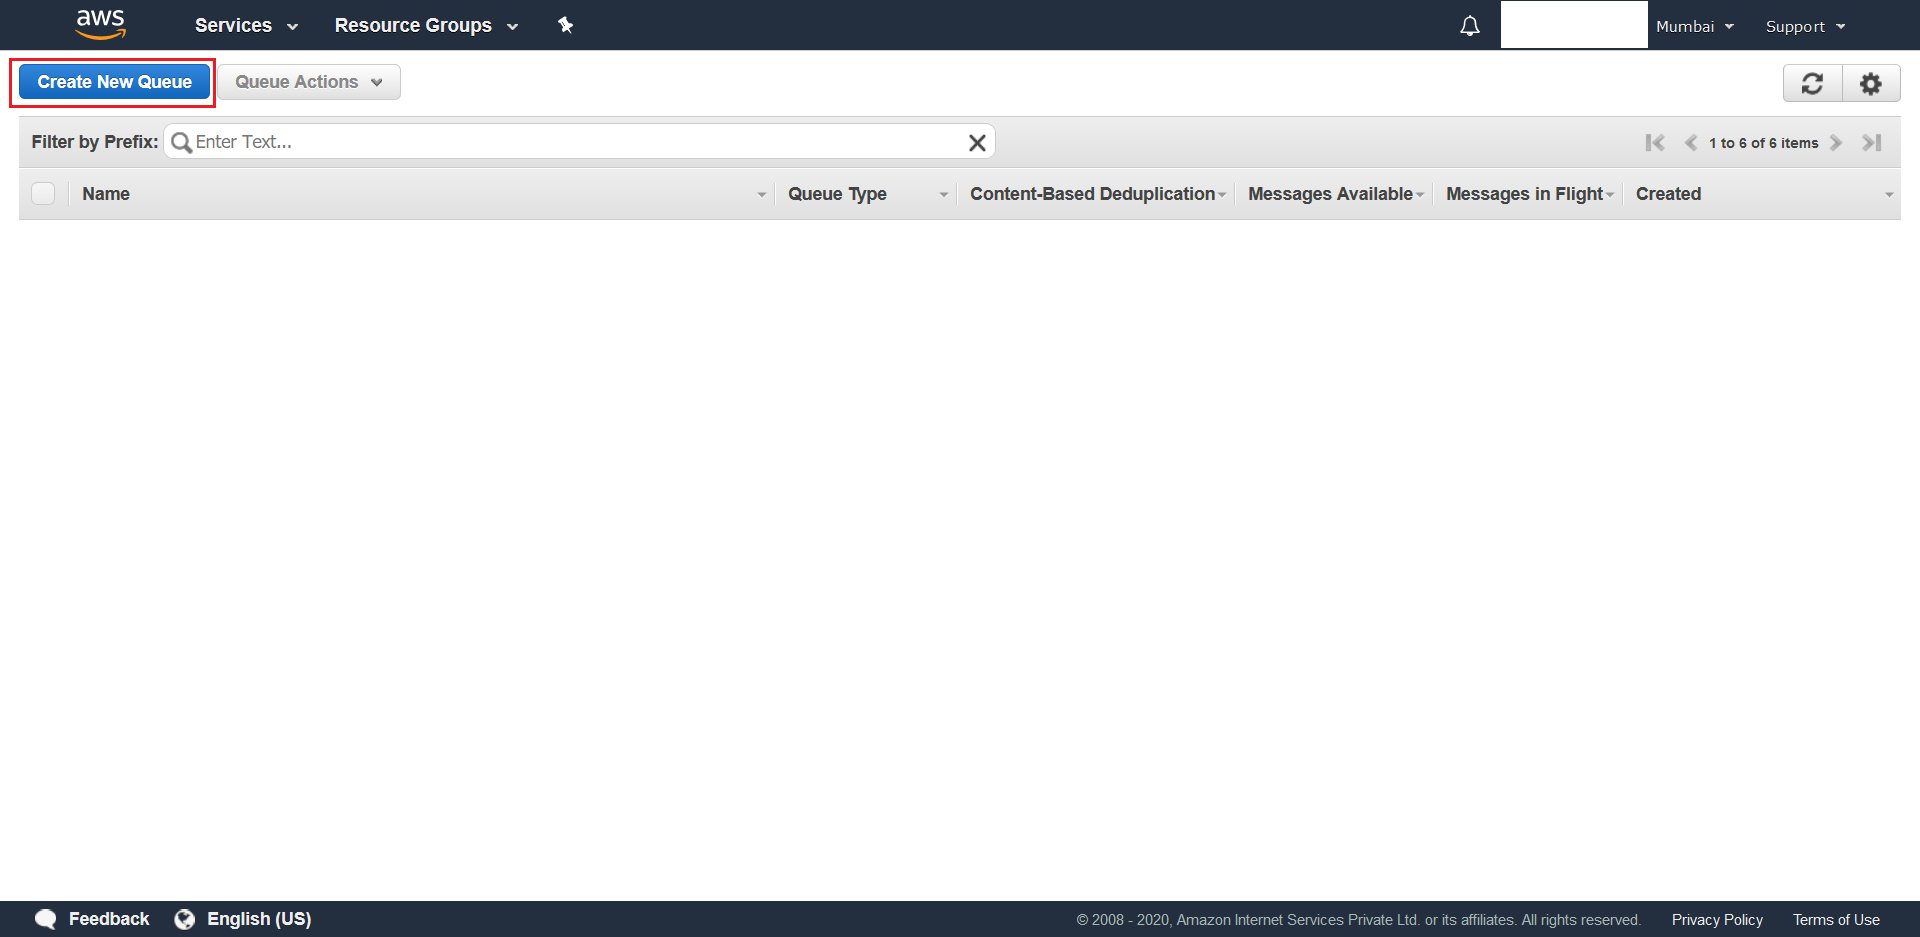
- Give a name for your Queue (ex.
invitations), make sure Standard Queue has been selected and finally hit Quick-Create Queue that is located at the bottom of the page. This is your primary queue.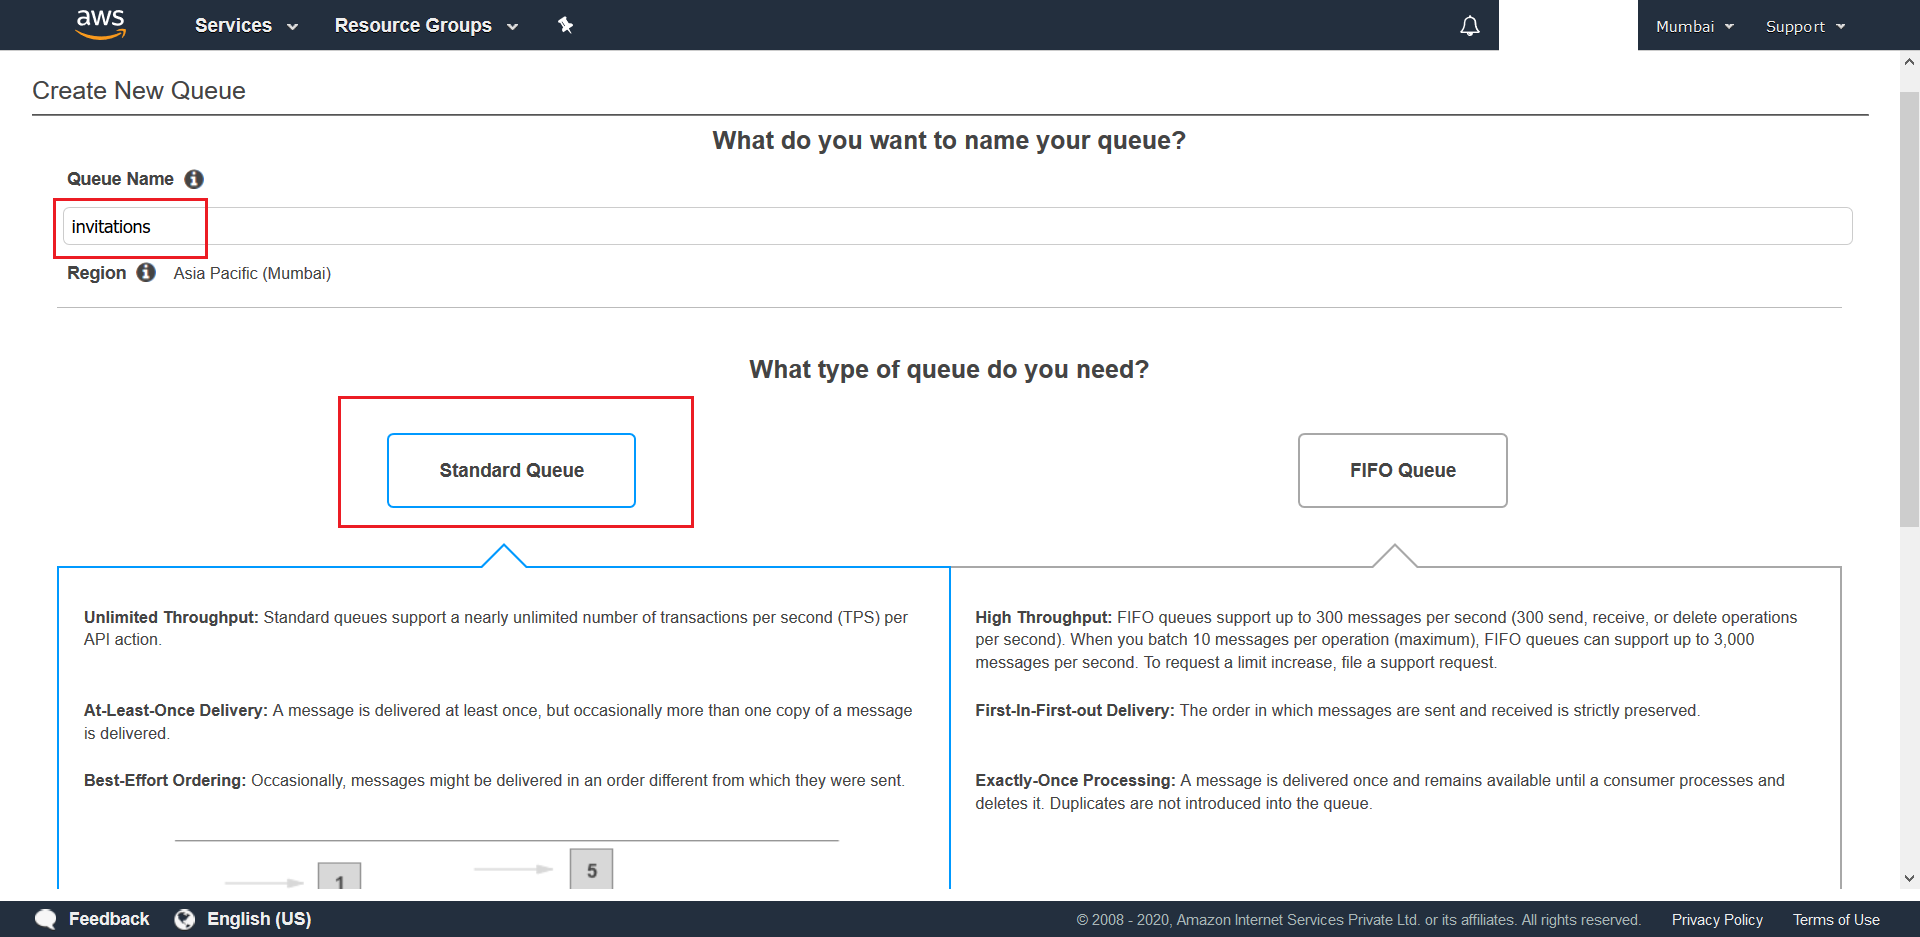
- Wait for the Standard Queue to be created with the default values. Once done create another Standard Queue (ex:
invitations-dlq) by following the above steps. This second queue will act as thedead-letter-queuefor theprimaryqueue.
6.2.2.3 Steps to create an IAM Role:
- Search for IAM from the AWS Management Console

- Click on Roles from the next screen
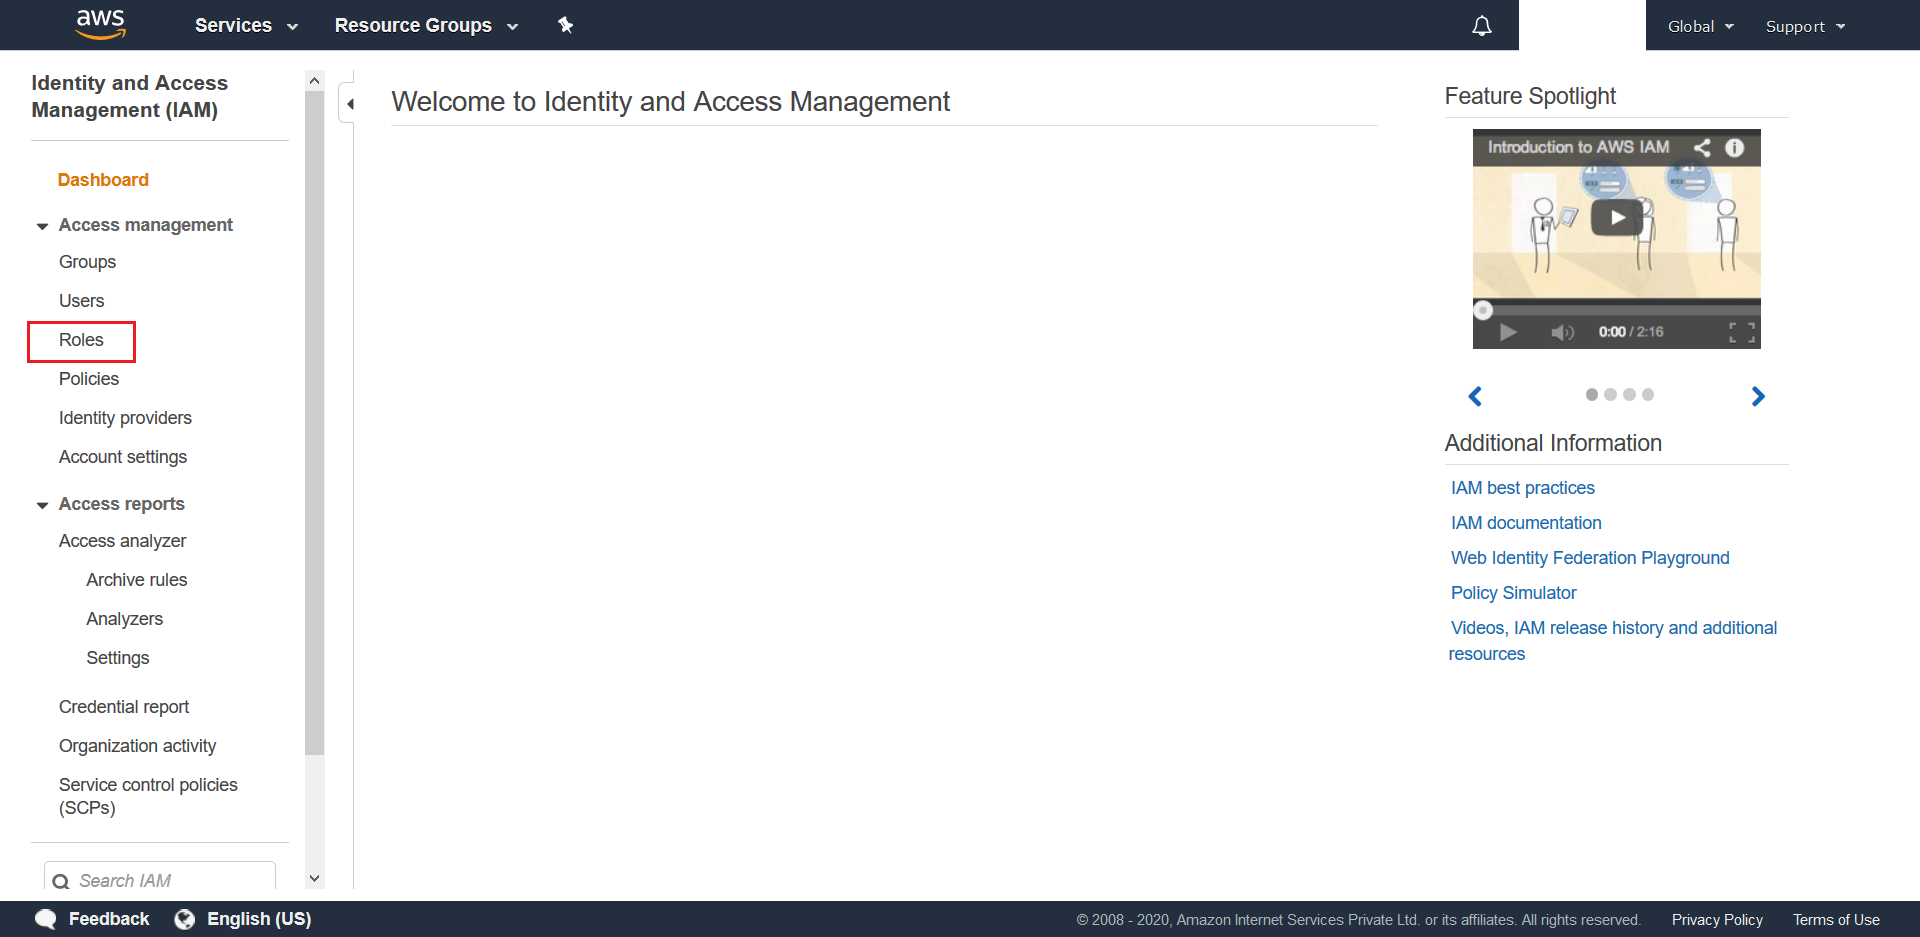
- Click on Create New Role from the next screen
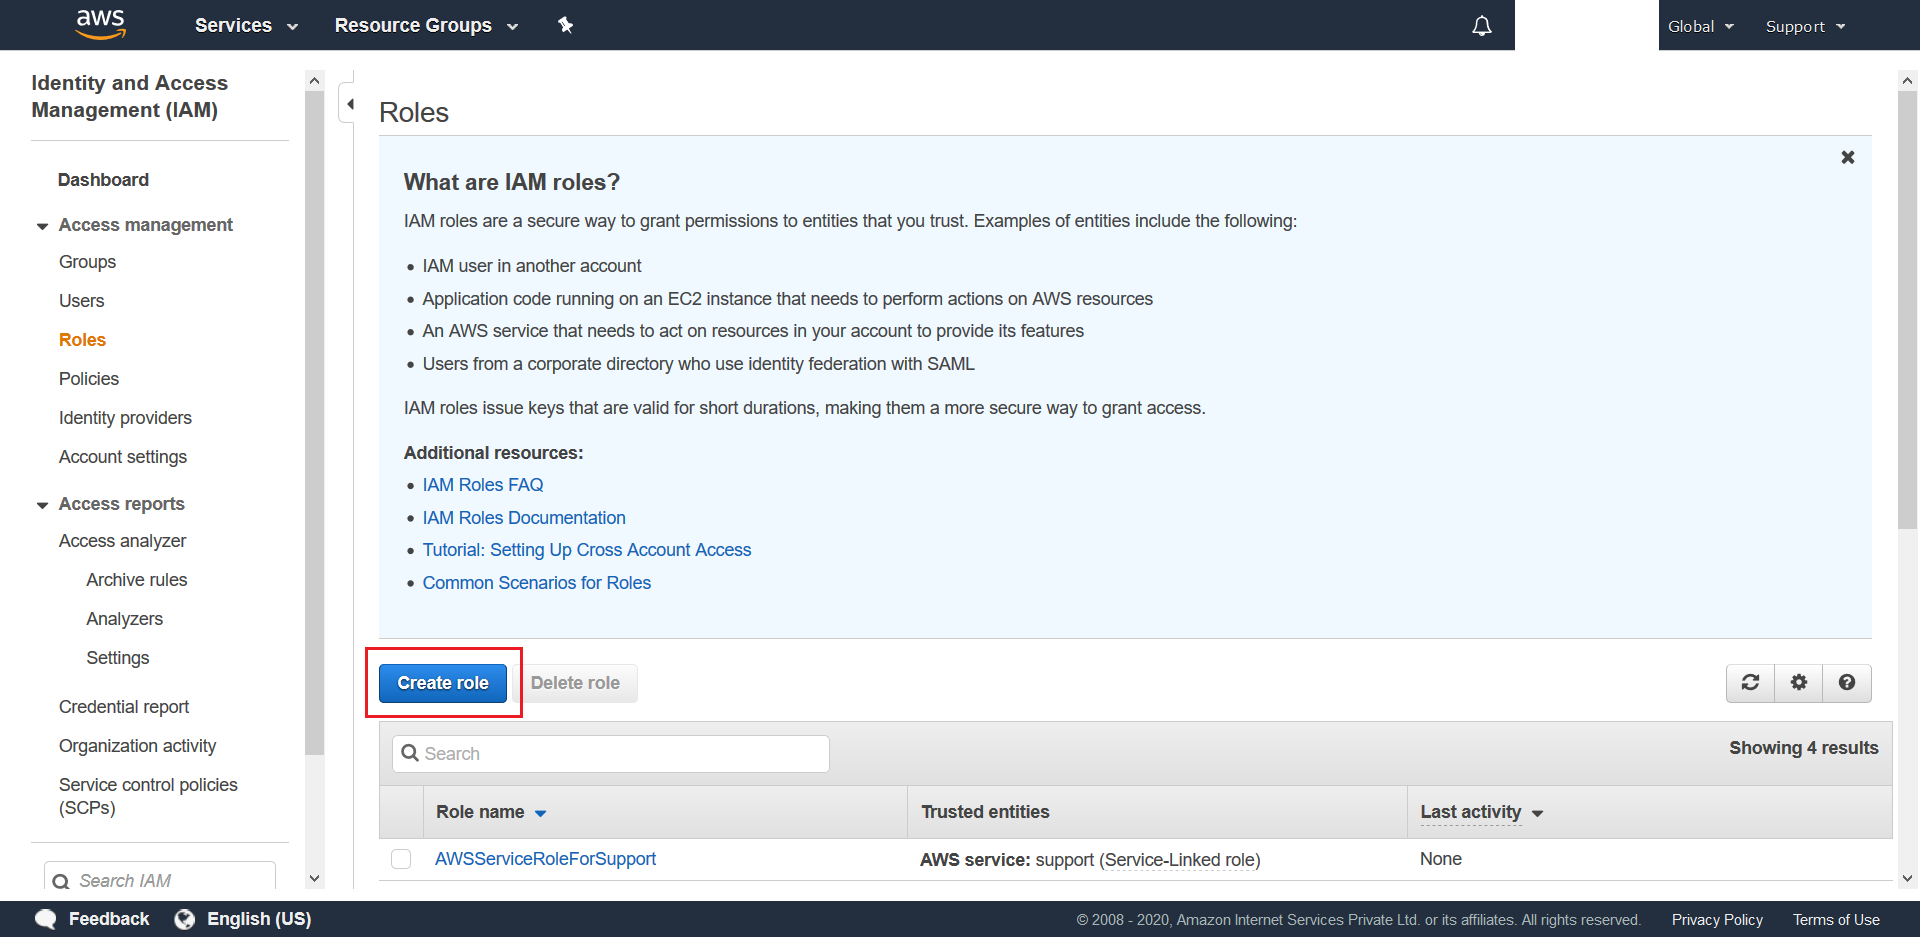
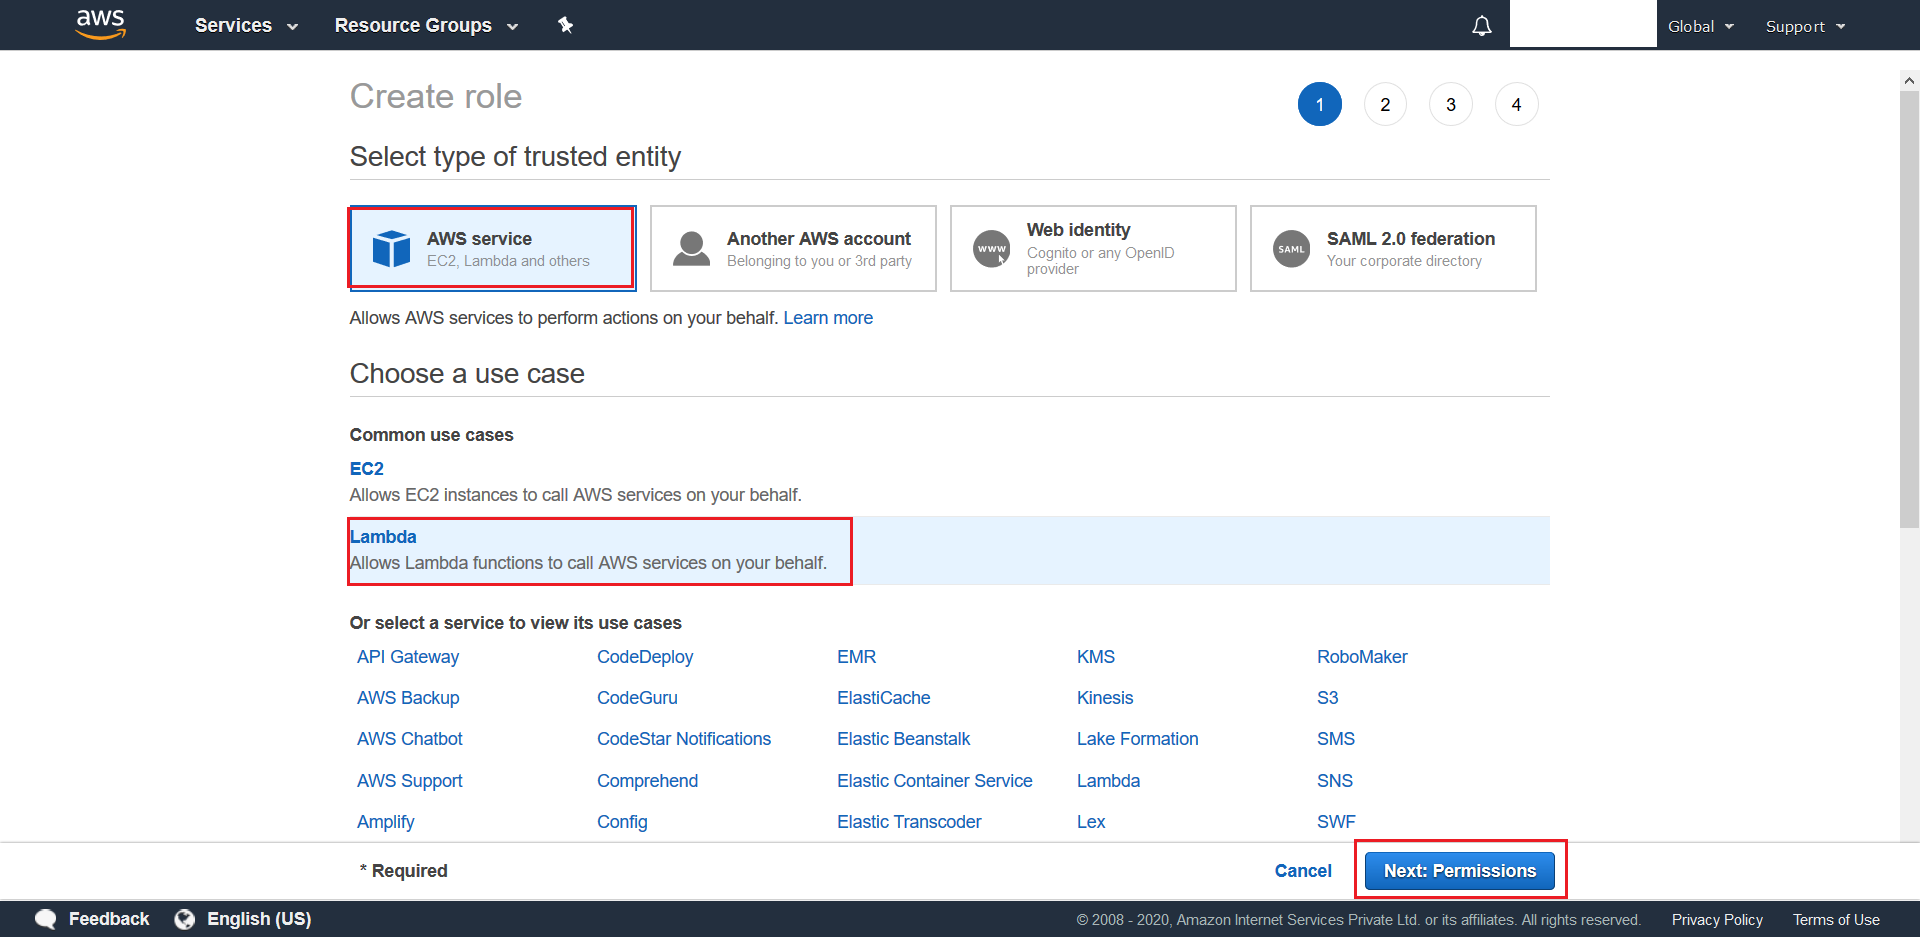
- Select AWS Service as type of trusted entitiy, choose Lambda as your use case, and then finally click on Next: Permissions.
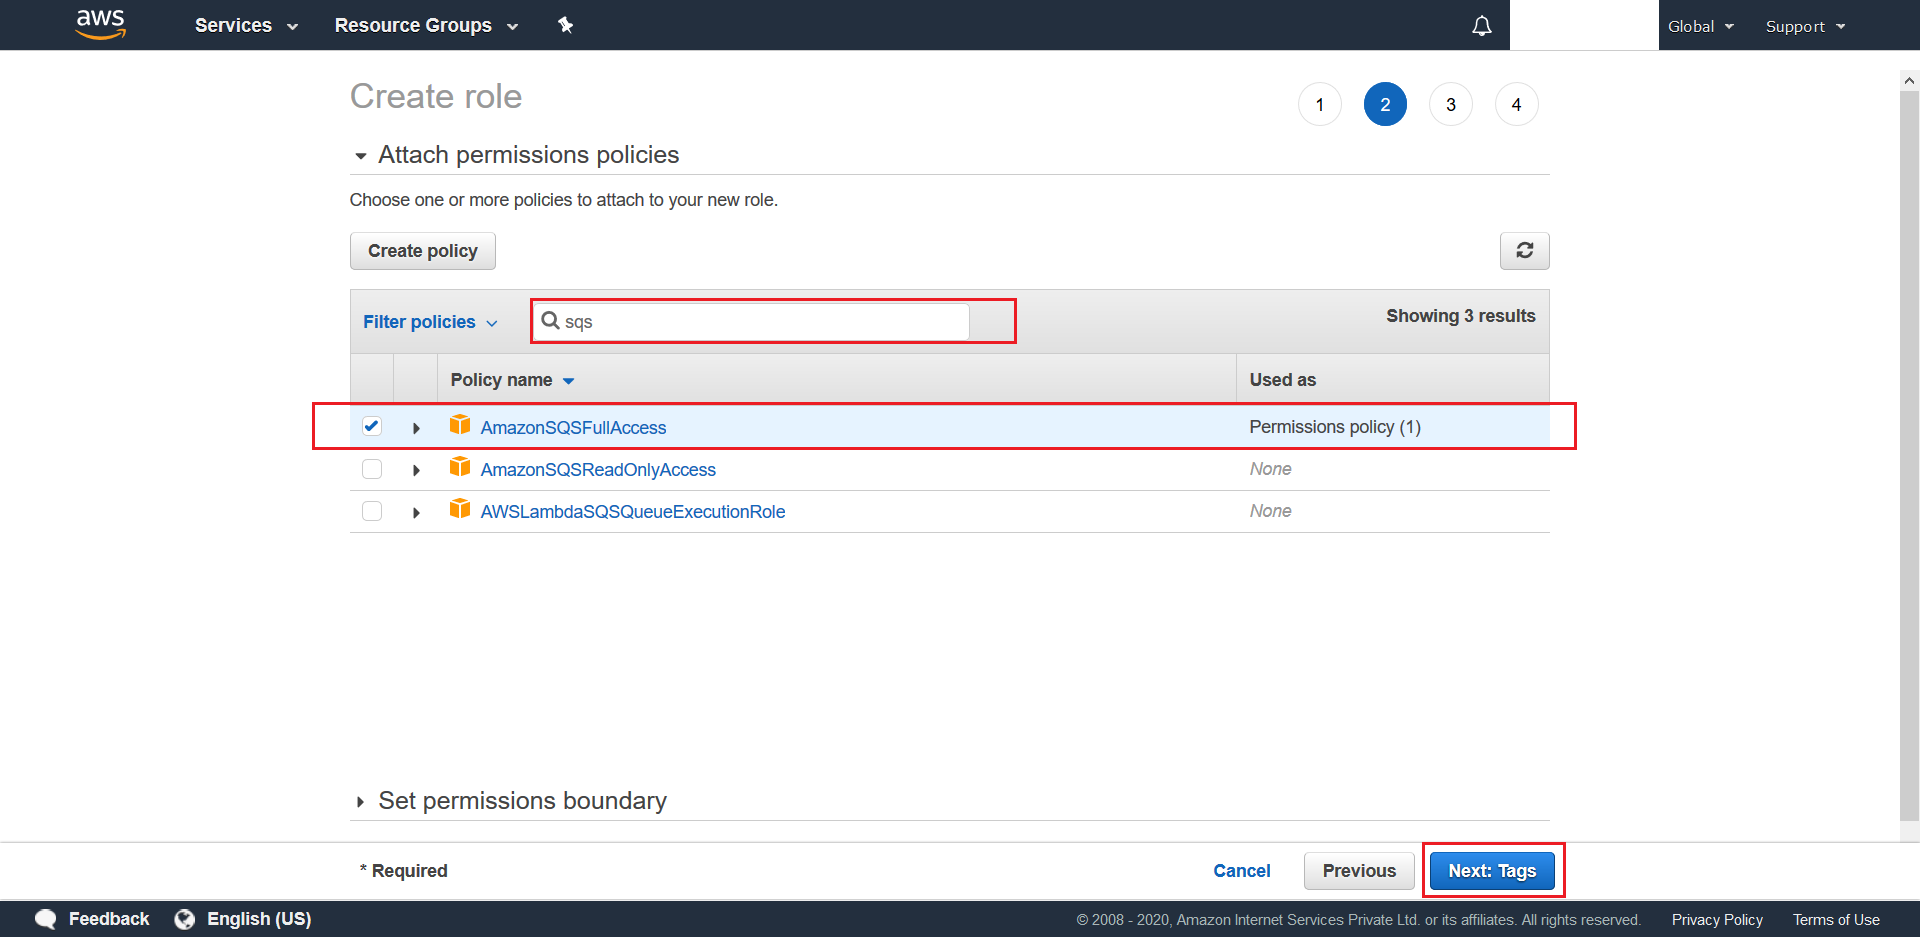
- Search for SQS on the next screen, choose AmazonSQSFullAccess and AWSLambdaBasicExecutionRole as the desired policies, and then finally click on Next: Tags
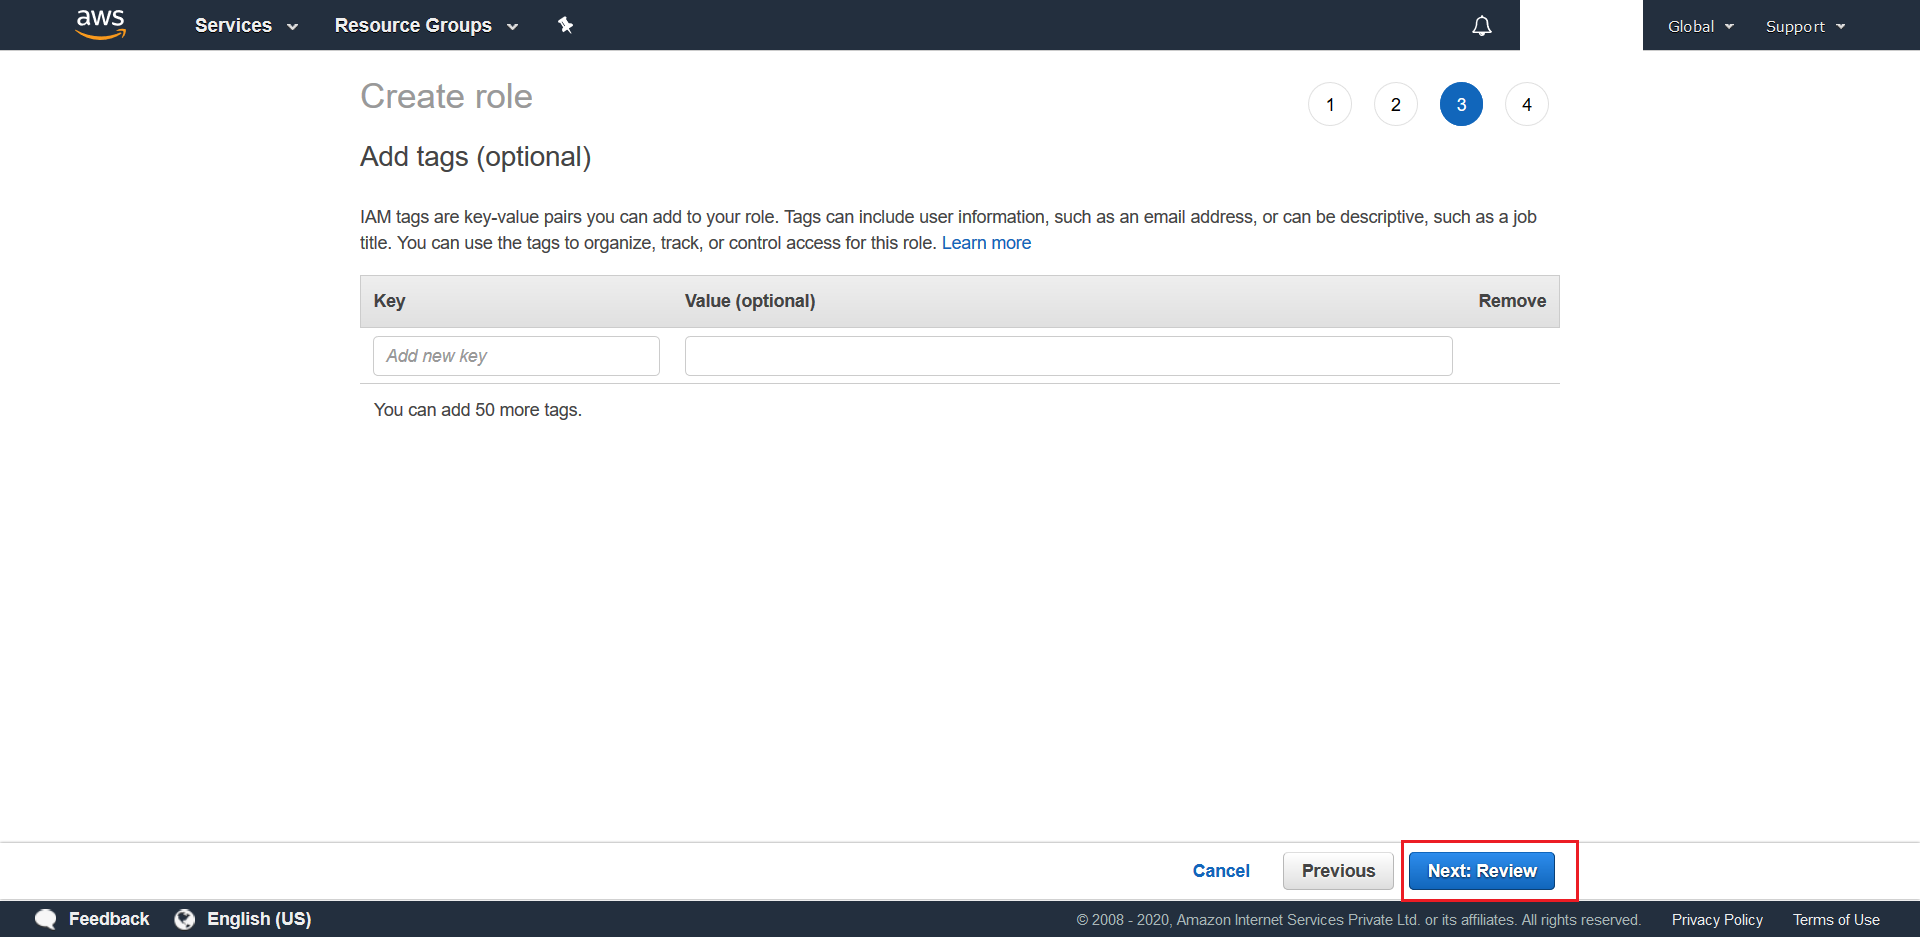
- You can choose to add Tags to this policy (optional). Once done click on Next: Review
- Give a suitable Role name (ex.
QueueTriggerRole). Once done, click on Create Role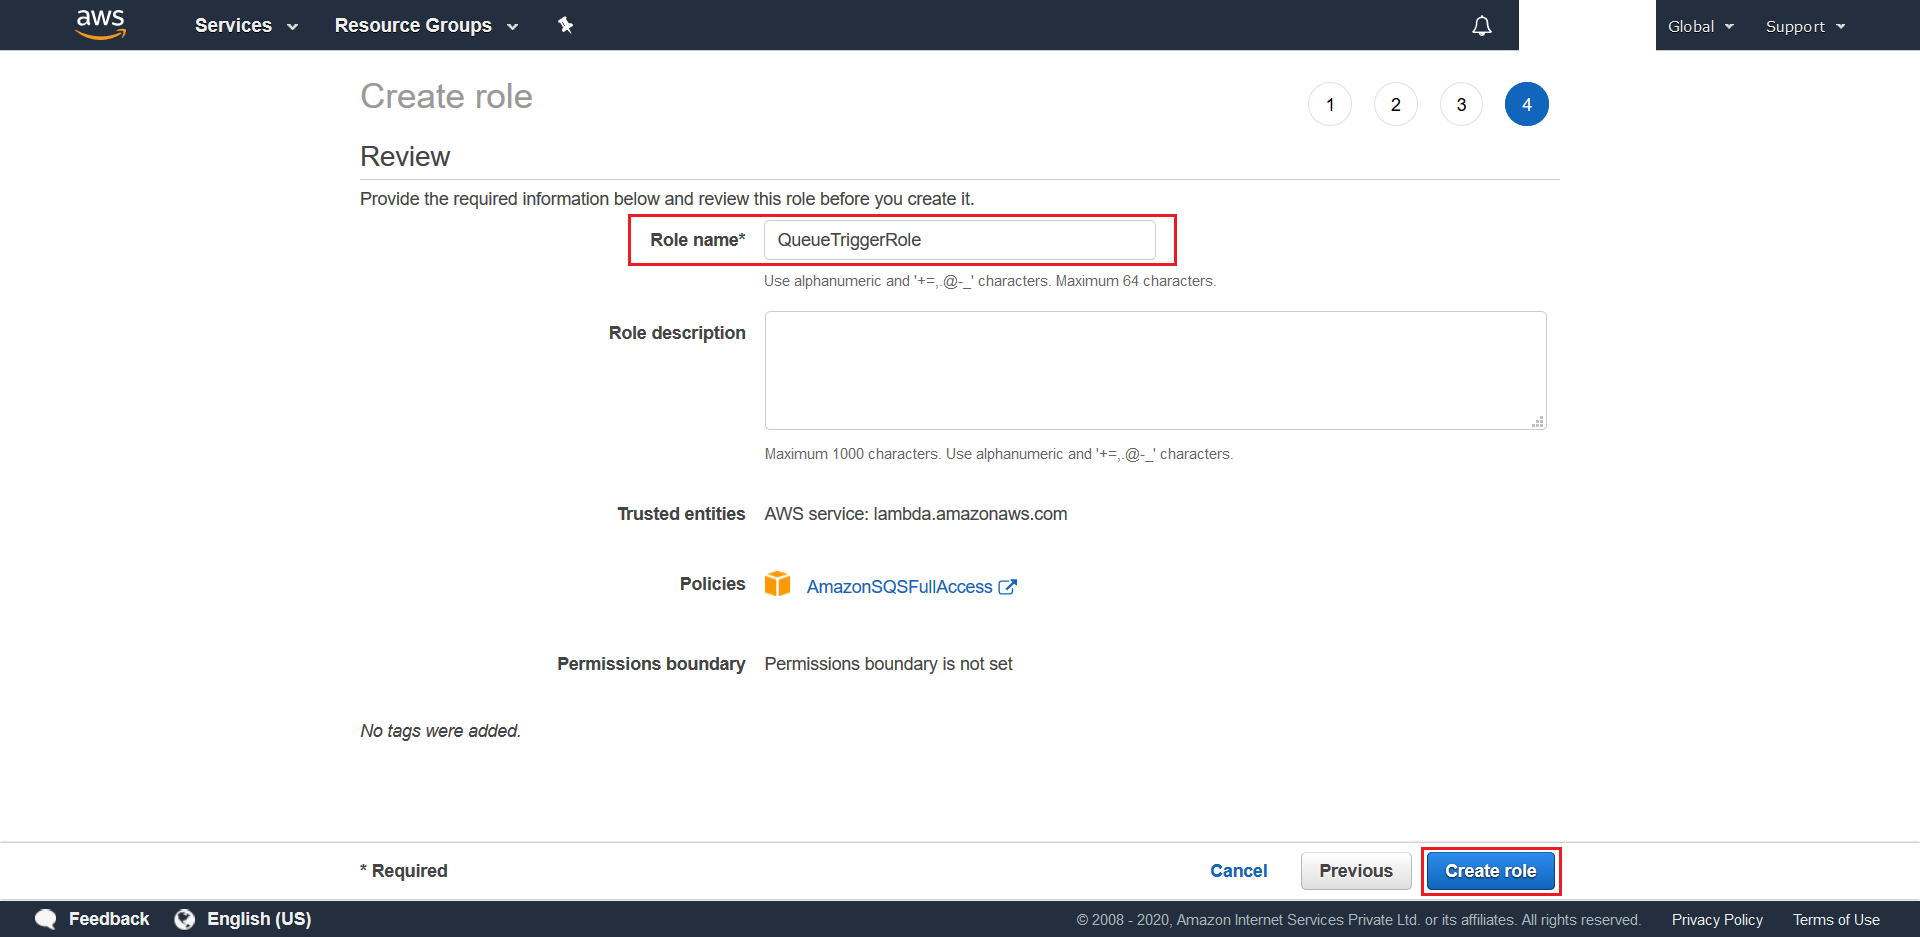
- Wait for the IAM Role to be created. Once done create another
IAM Rolecalled TimeTriggerRole by following the above steps, but choose AWSLambdaBasicExecutionRole as the desired policy in Step 5.
6.2.2.4 Steps to create a AWS Lambda:
- Search for Lambda from the AWS Management Console
- Select Create Function from the next screen

- Choose Author from Scratch under function options, give a suitable name to your AWS Lambda (ex.
Queue-Trigger), choose Runtime as .Net Core 3.1, and select Use an Existing Role=QueueTriggerRole for the execution role section. Finally hit the Create Function button.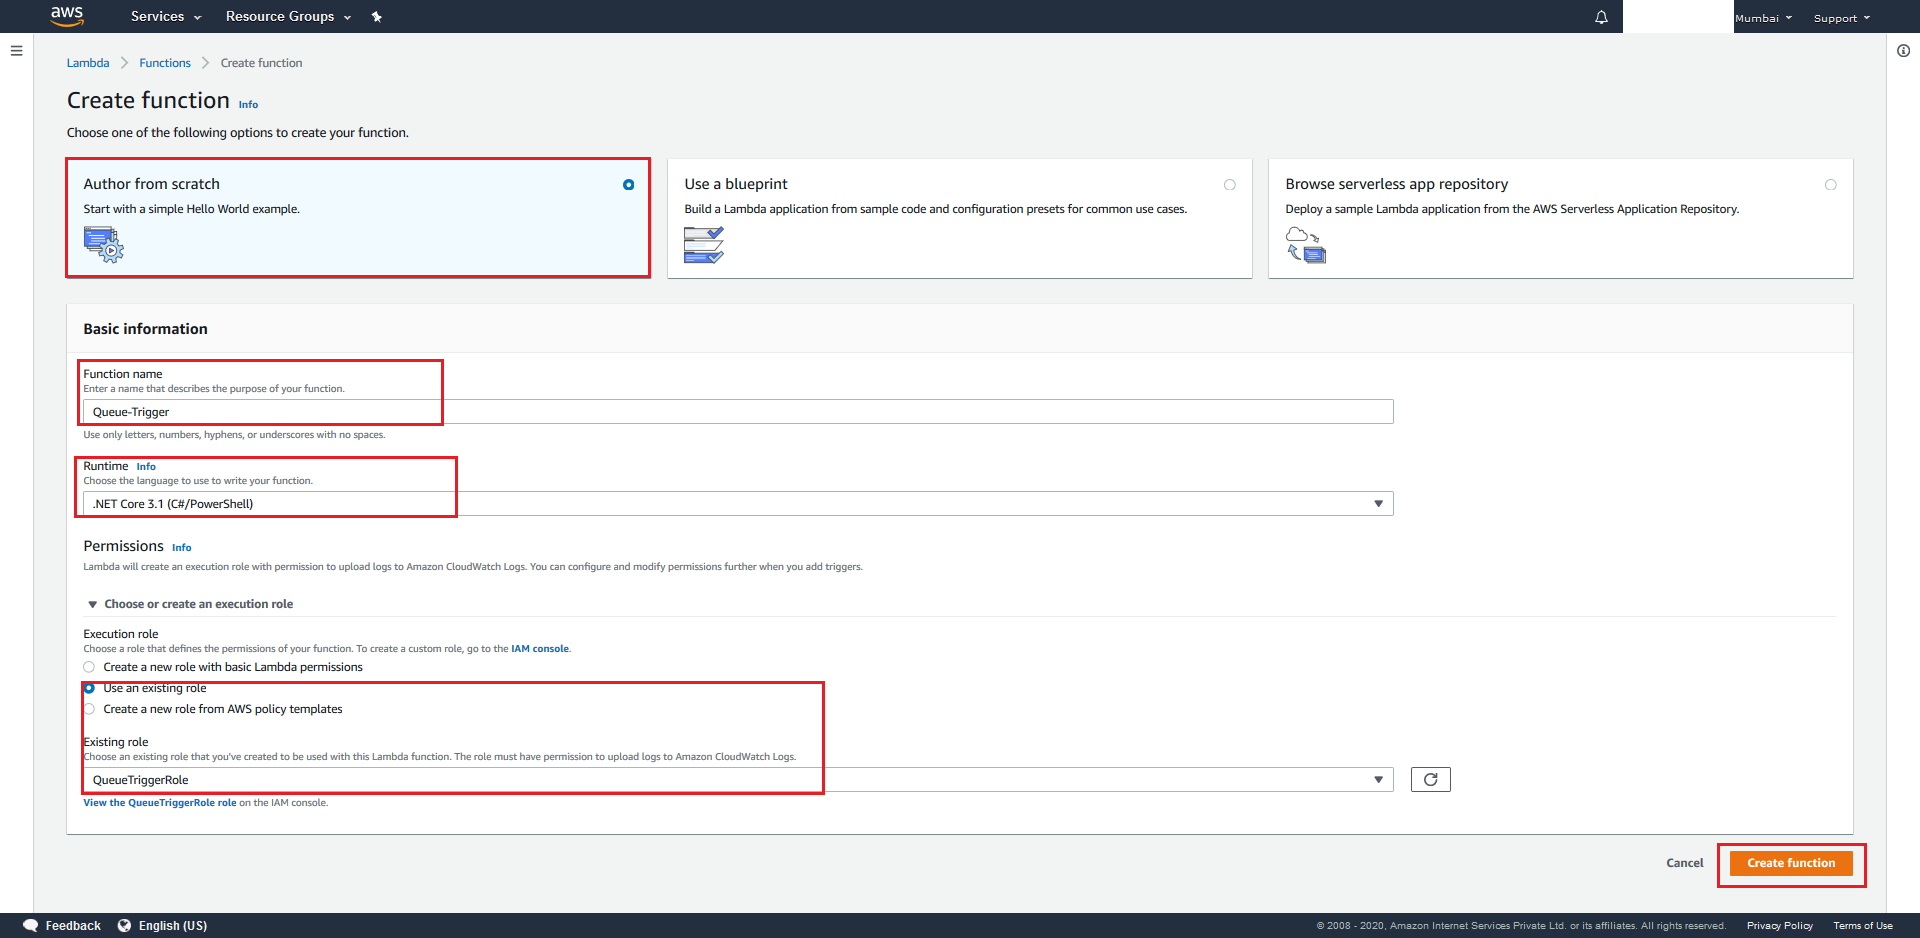
- Wait for the AWS Lambda to be created. Once done create another AWS Lambda called Time-Trigger by following the above steps, but choose Existing Role=TimeTriggerRole as the desired execution role in Step 3.
6.2.3 Mongo Database
The recommended approach for Mongo DB hosting is to leverage the MongoDB Atlas service. MongoDB Atlas is a fully-managed cloud database which handles all the complexity of deploying, managing, and healing your deployments on the cloud service provider of your choice (AWS, Azure, and GCP).
https://docs.atlas.mongodb.com/getting-started/
MongoDB Atlas supports three Cloud Providers.
-
Azure
-
AWS
-
GCP
In this case, it can be hosted along with AWS.
After this step, you should have a MongoDB connection string which will be used during deployment.
An alternate approach (though MongoDB Atlas is recommended) to provision Mongo DB server is to install and run the MongoDB locally in a Linux server. More details about provisioning Mongo DB in Linux server can be referred in Annexure A.
6.2.4 Initiator
(Mandatory step for stand-alone CWXM clients. Optional step for CCE/CCX/WCC clients)
- Resources to be provisioned:
- AWS S3 Bucket (x1)
- AWS IAM Roles (x1)
- AWS Lambda (x1)
6.2.4.1 Steps to create a S3 Bucket:
- Login into your
AWS Management Consoleas the IAM User that was created in this step. Choose the Region in which you previously provisoned the resources for the Dispatcher Component. - Search for S3 from the AWS Management Console
- Click + Create Bucket.
- Give a unique name for your S3 Bucket and choose the same region as you did in step 1. Once done hit Next.
- On the next screen simply hit Next as we want to create a bucket with default settings.
(ie. No versioning. No Server Access Logging (optional). No Object level Logging(optional). No Encryption).
- On the next screen simply also hit Next as we want to create a bucket with default settings (ie. Blocked all public access).
- Finally, review the configured settings and click Next once satisfied. Post this wait for the S3 to be provisioned.
.
6.2.4.2 Steps to create an IAM Role:
Create a new AWS IAM Role called InitiatorRole by following these steps, but remember to choose AmazonS3FullAccess and AWSLambdaBasicExecutionRole as its desired policies in Step 5.
6.2.4.3 Steps to create a AWS Lambda:
Create a new AWS Lambda called Initiator by following these steps, but remember to choose Existing Role=InitiatorRole as the desired execution role in Step 3.
7. Benchmarking
7.1 Web API
This benchmarking data is published based on performance testing done based on the following conditions set.
- AWS instances are used here for the set-up
- Both App servers and Mongo DB servers are separate in this set-up
- App servers are installed with Nginx as webserver and ASP.Net core as Web API as per the published deployment guide
- Mongo DB server is provisioned on a separate Windows instance(2016 Server, 2 CPU, 8 GB RAM)
- No additional components or software were running in App servers or Mongo DB server
- Nginx is used as reverse proxy server while kestrel is used to run ASP.Net core Web API
- Dispatch request which is used for hitting the APIs had one dispatchID and 200 records in a single request
- During the performance test, requests are originated from same region where servers are hosted. In this case, its APAC, Mumbai region
| Serial No | Server Type | Server Configurations | Max No of Requests/Min | Max Concurrent Request (Requests/Sec) | Max # of records to be processed in a Min |
|---|---|---|---|---|---|
| 1 | App Server | CPU 2, RAM 4 GB | 30 | 10 | 18000 |
| 2 | App Server | CPU 2, RAM 8 GB | 40 | 15 | 18000 |
If any of the above parameters required to be scaled as per the requirements, we recommend running multiple servers behind a Load Balancer of same configurations.
For Notifications component, an additional server is recommended to be provisioned.
| Serial No | Server Type | Server Configurations | Max No of Requests/Min | Max Concurrent Request (Requests/Sec) | Max # of records to be processed in a Min |
|---|---|---|---|---|---|
| 1 | App Server | CPU 2, RAM 4 GB | 30 | 10 | 18000 |
7.2 Dispatcher
This component is responsible for dispatching the invitations to 3rd party Email/SMS Vendors, who ultimately deliver the invitation to the intended recipient’s Mail/Message Inbox. Based on their capabilities, there are two kinds of vendors: Single-Send and Bulk-Send. Single-Send vendors accept only 1 invitation per service request, while Bulk-Send vendors accept more than 1 invitation (usually upwards of 1K invitations) per service request. Hence, the dispatch rates for Single-Send vendors are considerably lesser than the dispatch rates for Bulk-Send vendors.
Reference vendor implementations
-
Custom SMTP with Sendgrid
Channel: Email
Type: Single-Send
Time Taken to accept 1 invitation for delivery ≈ 1.75 seconds (includes time taken in connecting to and disconnecting from the SMTP server) -
MessageBird
Channel: SMS
Type: Single-Send
Time Taken to accept 1 invitation for delivery ≈ 0.5 seconds (includes time taken to receive an HTTP response back from their server) -
SparkPost
Channel: Email
Type: Bulk-Send
Time taken to accept 2000 invitations for delivery (at once) ≈ 5 seconds (includes time taken to receive an HTTP response back from their server). 2000 is the recommended size by the vendor, however their max acceptance limit is 10000.
Below are Azure (Functions) and AWS (Lambdas) dispatch rates benchmarks for out-of-the-box supported vendors:
7.2.1 Azure
Test Conditions:
-
We have used the App Service Plan (all available Azure plan details) for profiling the performance, as it provides us granular control over the number of serverless compute instances running. We have use the S1 (the most basic production-ready plan). However, we recommend that you use the Consumption Plan or the Premium Plan (better than the consumption plan) as in these plans, your serverless compute instances are auto scaled based on the incoming load on the queue. In contrast, in the App Service Plan you need to take control of the scaling mechanism yourself. (Scaling means adding additional identical instances of a serverless compute)
-
We have chosen the max batch-size (32) for the Queue-Trigger Azure Functions. However, in the case of Custom SMTP vendors, we are restricted to keeping only 1 connection active with the SMTP server at any given time.
-
We have configured the Time-Trigger Azure Function to read 10000 invitations from the Database every 5mins and make 5 sequential API calls of 2000 invitations each to Spark Post to send out all 10000 invitations.
Results:
| Vendor | Number of Serverless Compute Runnning | Dispatch Rate (Number of invitations dispatched in 1 sec) | Dispatch Rate (Number of invitations dispatched in 1 min) |
|---|---|---|---|
| Custom SMTP | 1 | 1 | 60 |
| Custom SMTP | 2 | 2 | 120 |
| Message Bird | 1 | 35 | 2100 |
| Message Bird | 2 | 60 | 3600 |
| Spark Post | 1 | 200 | 12000 |
7.2.2 AWS
Test Conditions:
-
We have used Reserved Concurrency (Managing concurrency for a Lambda function) option for profiling the performance, as it provides us granular control over the number of serverless compute instances running. We set the AWS Lambda’s memory to 3008MB for running the benchmarks. However, we recommend that you use the Unreserved Concurrency option (with memory limit set to 1792 MB), as with this option your serverless compute instances are auto scaled based on the incoming load on the queue. In contrast, in the Reserved Concurrency option you need to take control of the scaling mechanism yourself. (Scaling means adding additional identical instances of a serverless compute)
-
We have chosen the max batch-size (10) for the Queue-Trigger AWS Lamdas. However, in the case of Custom SMTP vendors, we are restricted to keeping only 1 connection active with the SMTP server at any given time.
-
We have configured the Time-Trigger AWS Lambda to read 10000 invitations from the Database every 5mins and make 5 sequential API calls of 2000 invitations each to Spark Post to send out all 10000 invitations.
Results:
| Vendor | Number of Serverless Compute Runnning | Dispatch Rate (Number of invitations dispatched in 1 sec) | Dispatch Rate (Number of invitations dispatched in 1 min) |
|---|---|---|---|
| Custom SMTP | 1 | 0.75 | 45 |
| Custom SMTP | 2 | 1.15 | 69 |
| Message Bird | 1 | 0.55 | 33 |
| Message Bird | 2 | 1.10 | 66 |
| Spark Post | 1 | 115 | 6900 |
8. Next Steps
Once all the services are provisioned and hosted, please refer to Invitation Module Deployment Guide guide to download the code, generate binaries and deployment.
Annexure A
MongoDB Installation in Linux Server
We are considering Ubuntu 18.04 server to install and host MongoDB. For a very less volume(<10 CPS), this can be installed in same Ubuntu Server where Web API is hosted. For higher volume, consider installing MongoDB in a separate server(Min 2 CPU, 8 GB RAM).
MongoDB Install
Official documentation of MongoDB provides steps to install MonngoDB community edition on Ubuntu which can be referred here
Configure MongoDB
-
To login to the Linux server, you will require IP, port and SSK key. For more details, refer this section.
-
Create /data/db folder with permission as ubuntu:ubuntu (ubuntu is the username here of the server)
 sudo mkdir -p /data/db
sudo chown ubuntu:ubuntu /data/db-
Restart MongoDB
 sudo systemctl daemon-reload
 sudo systemctl restart mongod
 sudo systemctl status mongod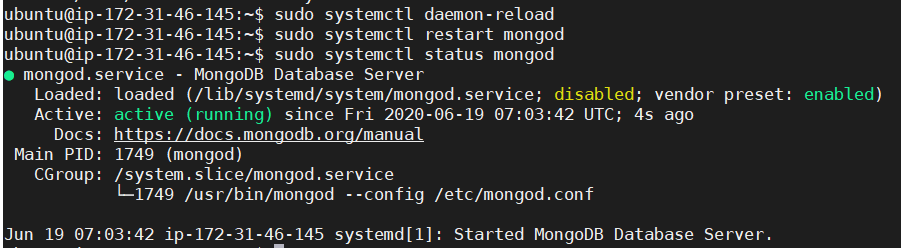
-
Login to MongoDB
-
type “mongo” in a console
-
Once inside MongoDB shell, type “use admin;” to switch to admin database
-
-
Create Admin user
- Create an admin user within MongoDB with username as “admin” and password as “admin@123”. You can choose password as per your choice.
db.createUser({ user: "admin", pwd: "WXMAdmin@333", roles: [{ role: "userAdminAnyDatabase", db: "admin" }, {role: 'dbAdminAnyDatabase', db: 'admin' }, { role: 'readWriteAnyDatabase', db: 'admin' }] })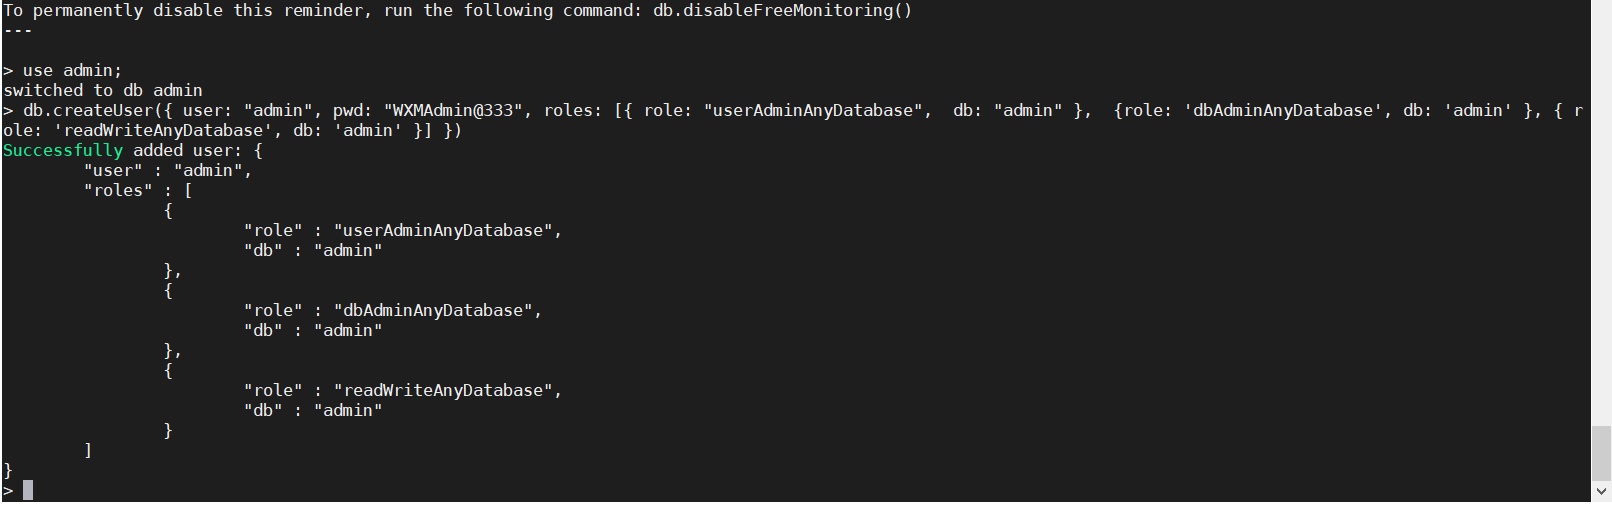
-
Create normal user per Database
-
Since we need only one DB here, we will be using creating single user only. Creating user with
username as “wxmuser”
password as “wxmuser@123”. You can choose username and password as per your choice.
Database as “WXM_ID_XXXXX”. Here XXXX can be any string as per choice. For this example, we are using DB name as “WXM_ID_Invitations”.
db.createUser({ user: "wxmuser", pwd: "wxmuser@123", roles: [{ role: "dbAdmin", db: "WXM_ID_Invitations" }, { role: 'readWrite', db: 'WXM_ID_Invitations' }] }) -
-
Enable Authentication for MongoDB
- We are now going to enable authentication on the MongoDB instance, by modifying the mongod.conf file. First use “exit” command to come out of Mongo shell.
sudo nano /etc/mongod.conf- Add these lines at the bottom of the mongod.conf config file. Since this is a YAML file, use space button instead of tab. With nano, save with CTRL+X and confirm with y.
security: authorization: enabled- Also, change the port from default(27017) to custom(any non standard port). In this case, we will be using 8010 port for MongoDB connection. Also, add the private IP of the server so that other components running outside the server is able to connect. Refer below screenshot for the changes required.
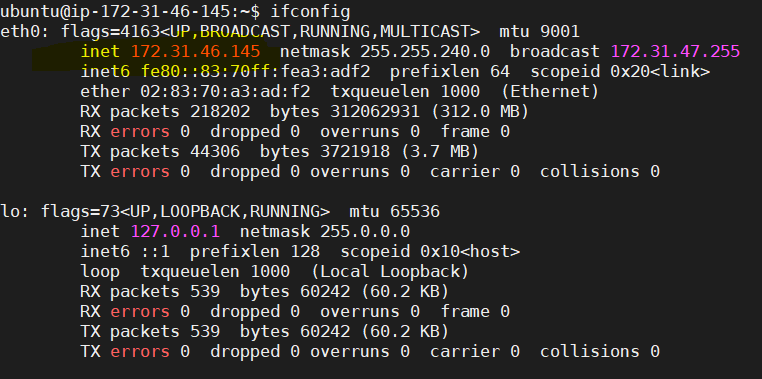
Once private IP is copied, open mongod.conf again and change the port and IP as per below screenshot. Save and exit.
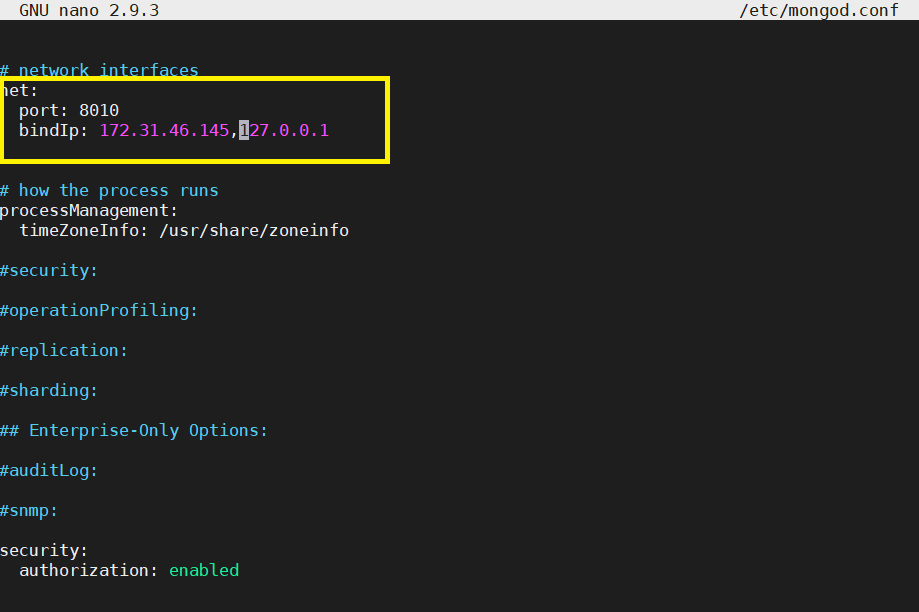
Since we are using 8010 port for MongoDB traffic, make sure to allow this port for incoming traffic in your server firewall. This can be allowed from respective cloud(AWS/Azure) portal.
- Restart the MongoDB service
sudo systemctl restart mongod sudo systemctl status mongod- Verify the authentication and port changes by logging to MongoDB shell
mongo --port 8010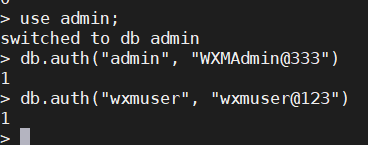
MongoDB connection String
Once the above configuration is successfully completed, the MongoDB connection string will be:
mongodb://username:password@publicIP:port/admin
Example: mongodb://wxmuser:wxmuser%40123@{publicIP}:8010/admin