User Management
Content Outline
Overview
User management describes the ability for Super-admin to manage user access to various modules, tabs, questionnaires, spaces and data, along with permissions, restrictions, escalation metrics etc. in the WXM platform. User management enables admins to control user access and create & delete users in the system.
This section allows for multiple users to access the system concurrently, each with a defined set of permissions. These permissions can be fine-tuned so that certain users can only view the data, while others users can generate and download reports. Multiple user departments and roles can be assigned, each with their own set of permissions, and then assigned to the users which grant them certain privileges within the system. This module describes how to manage users and user roles.
Creating New Users
This section will describe how to add new users to the application. You can create as many user names as you need. Each user can be assigned certain privileges, and can be assigned to a department and role for which they will be enabled the data.
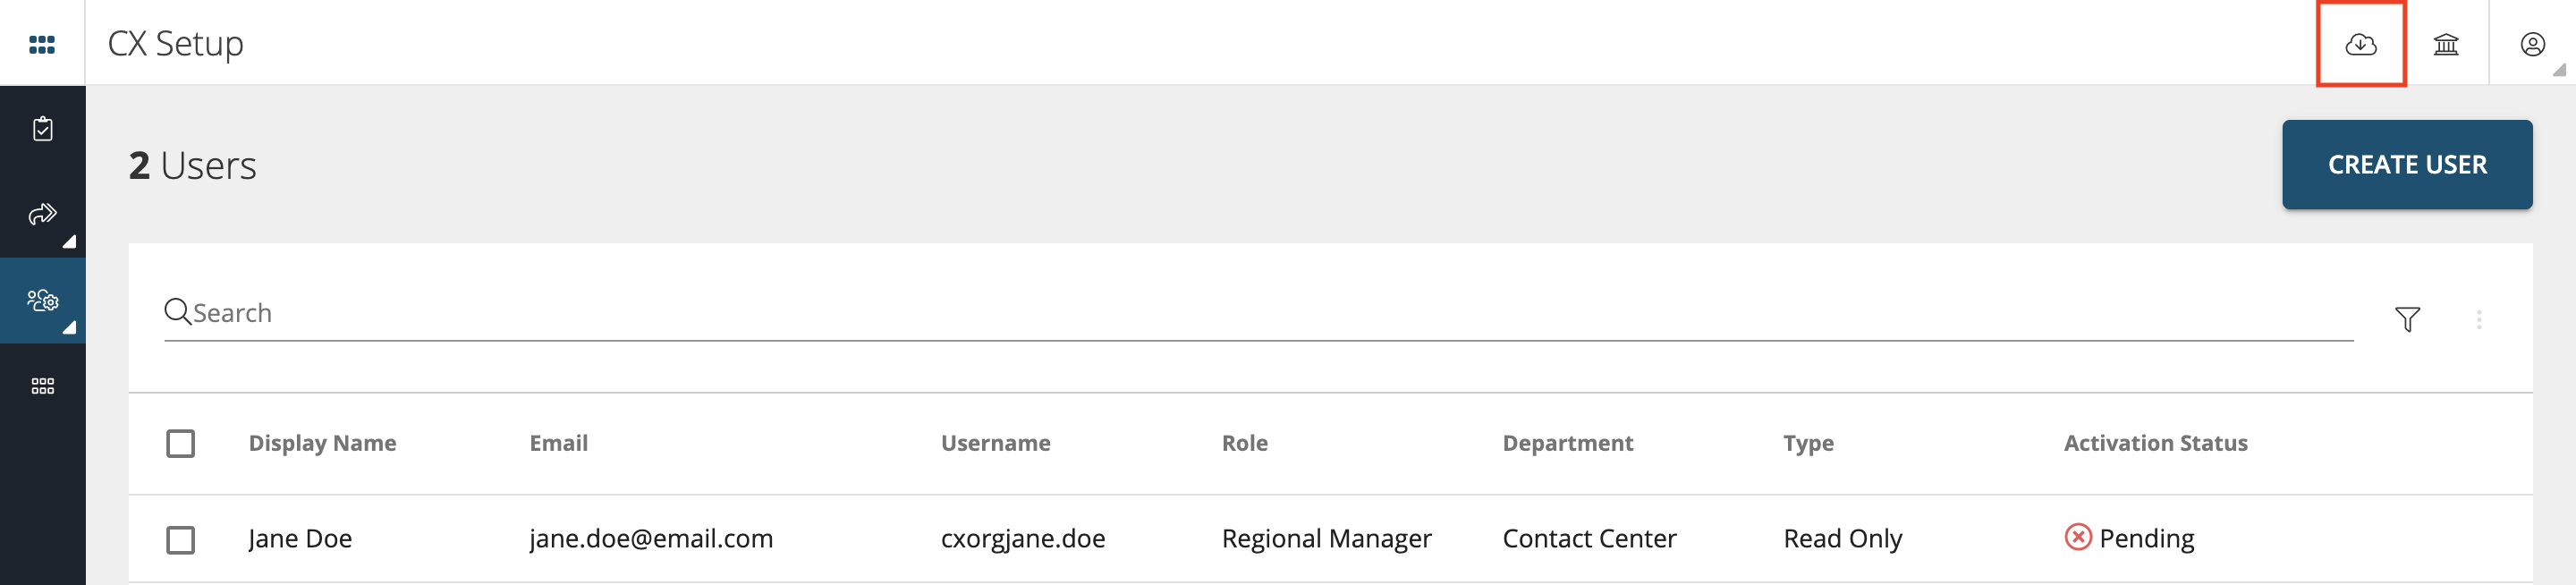
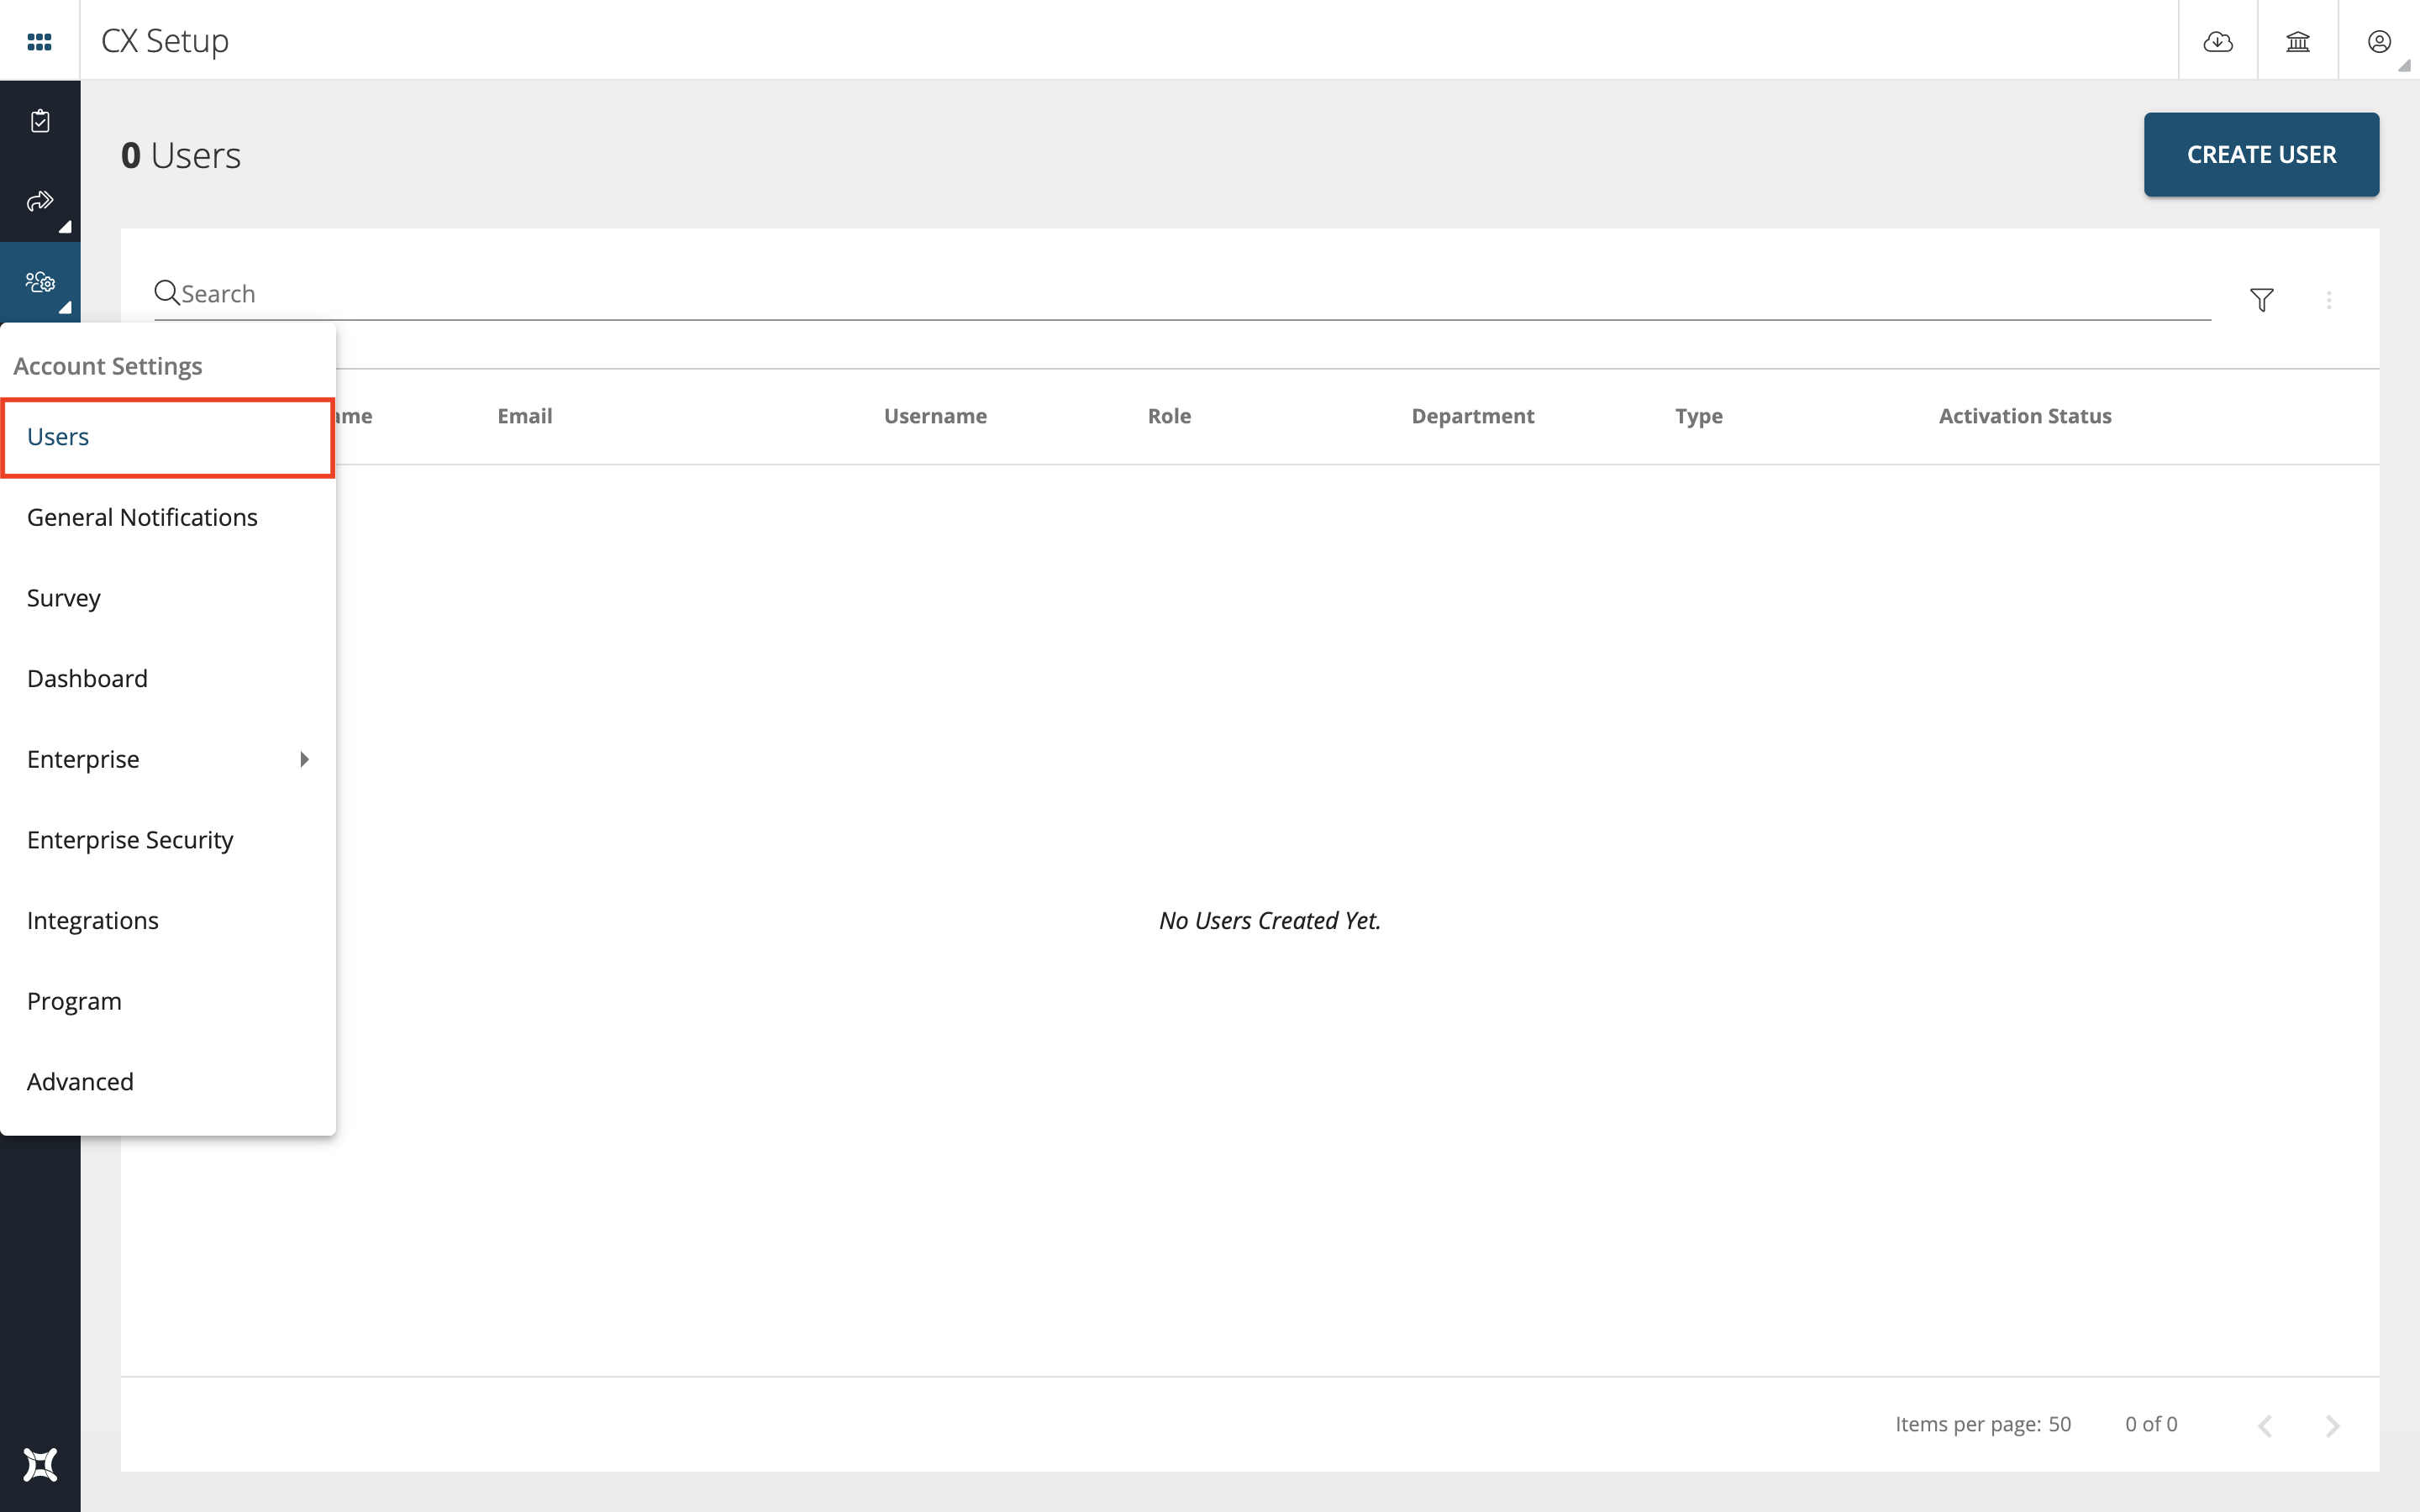
To create user (or users) go to CX Setup > Account Settings > Users and click on ‘Create User’ as shown below.
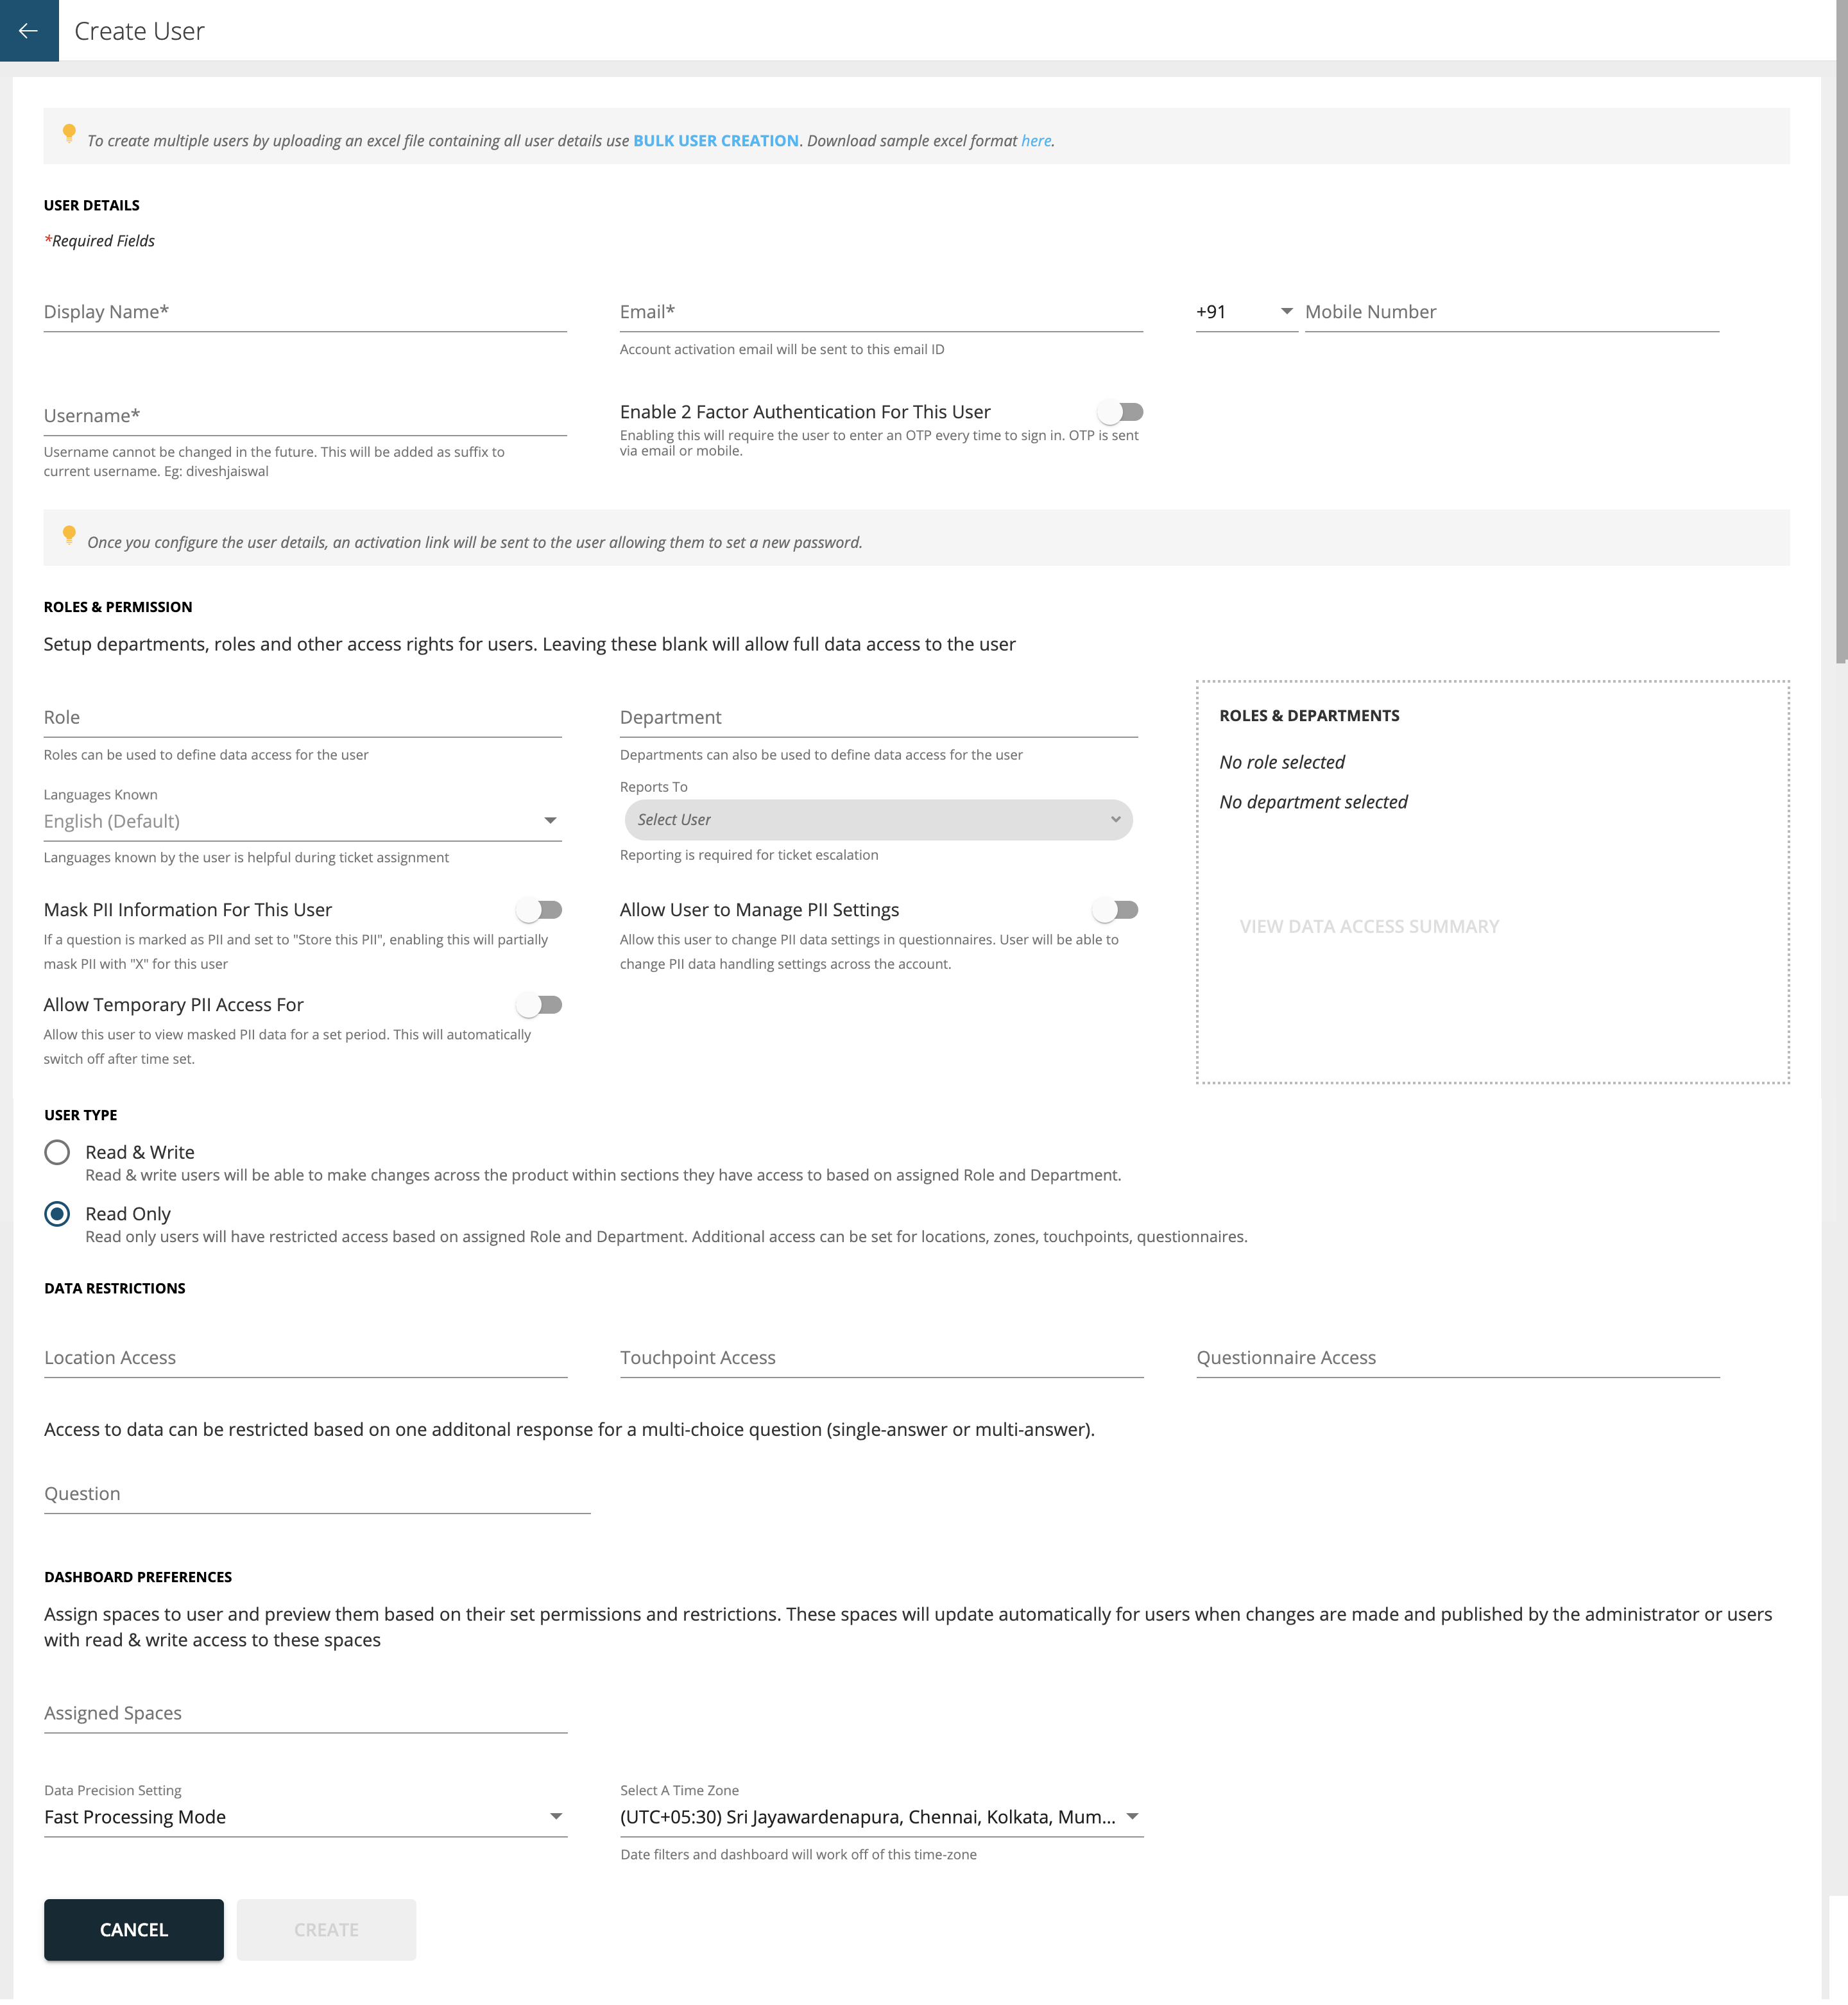
New user creation form is divided into multiple sections.
User Details
In this section Display Name, Email, Mobile number and Username is defined. Email address is mandatory as once you configure the user details, an activation link will be sent to the user allowing them to set a new password.
- Enable 2 factor Authentication (2FA): You can also enable 2FA for the user in this section. Enabling this will require the user to enter an OTP every time to sign in. OTP is sent via email or mobile.
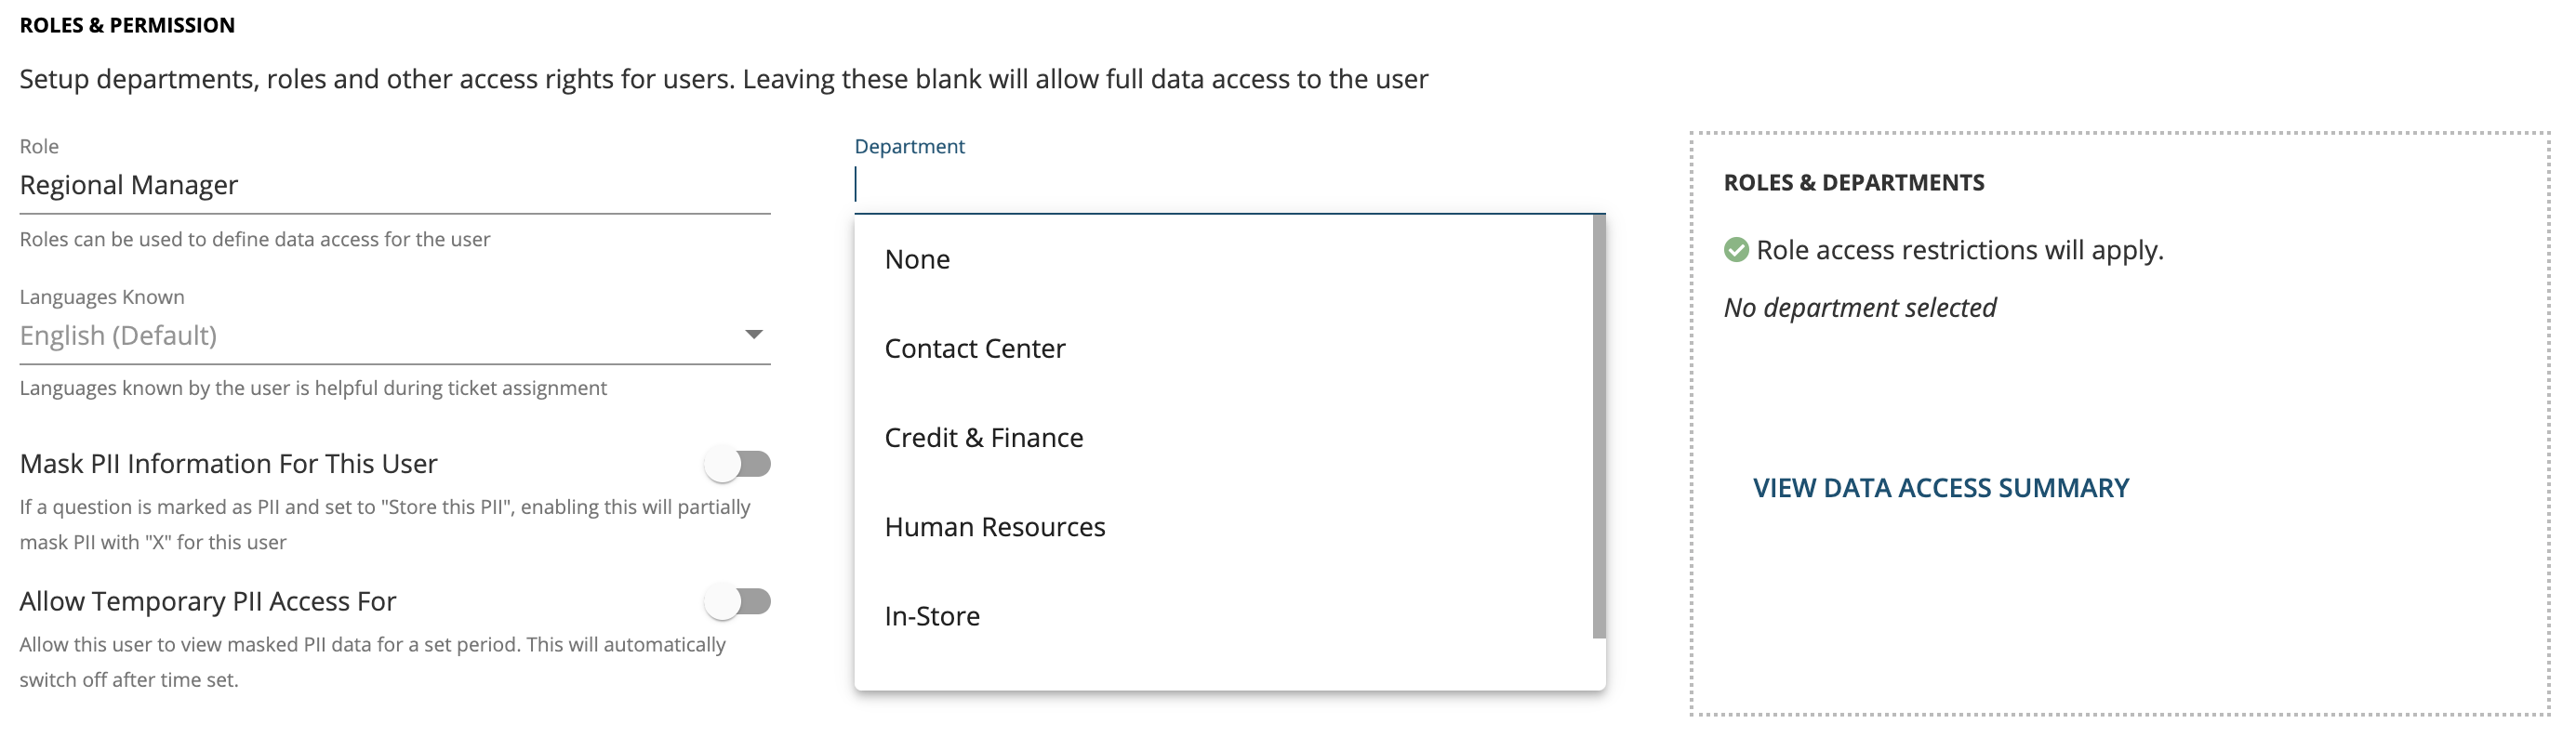
Roles & Permissions
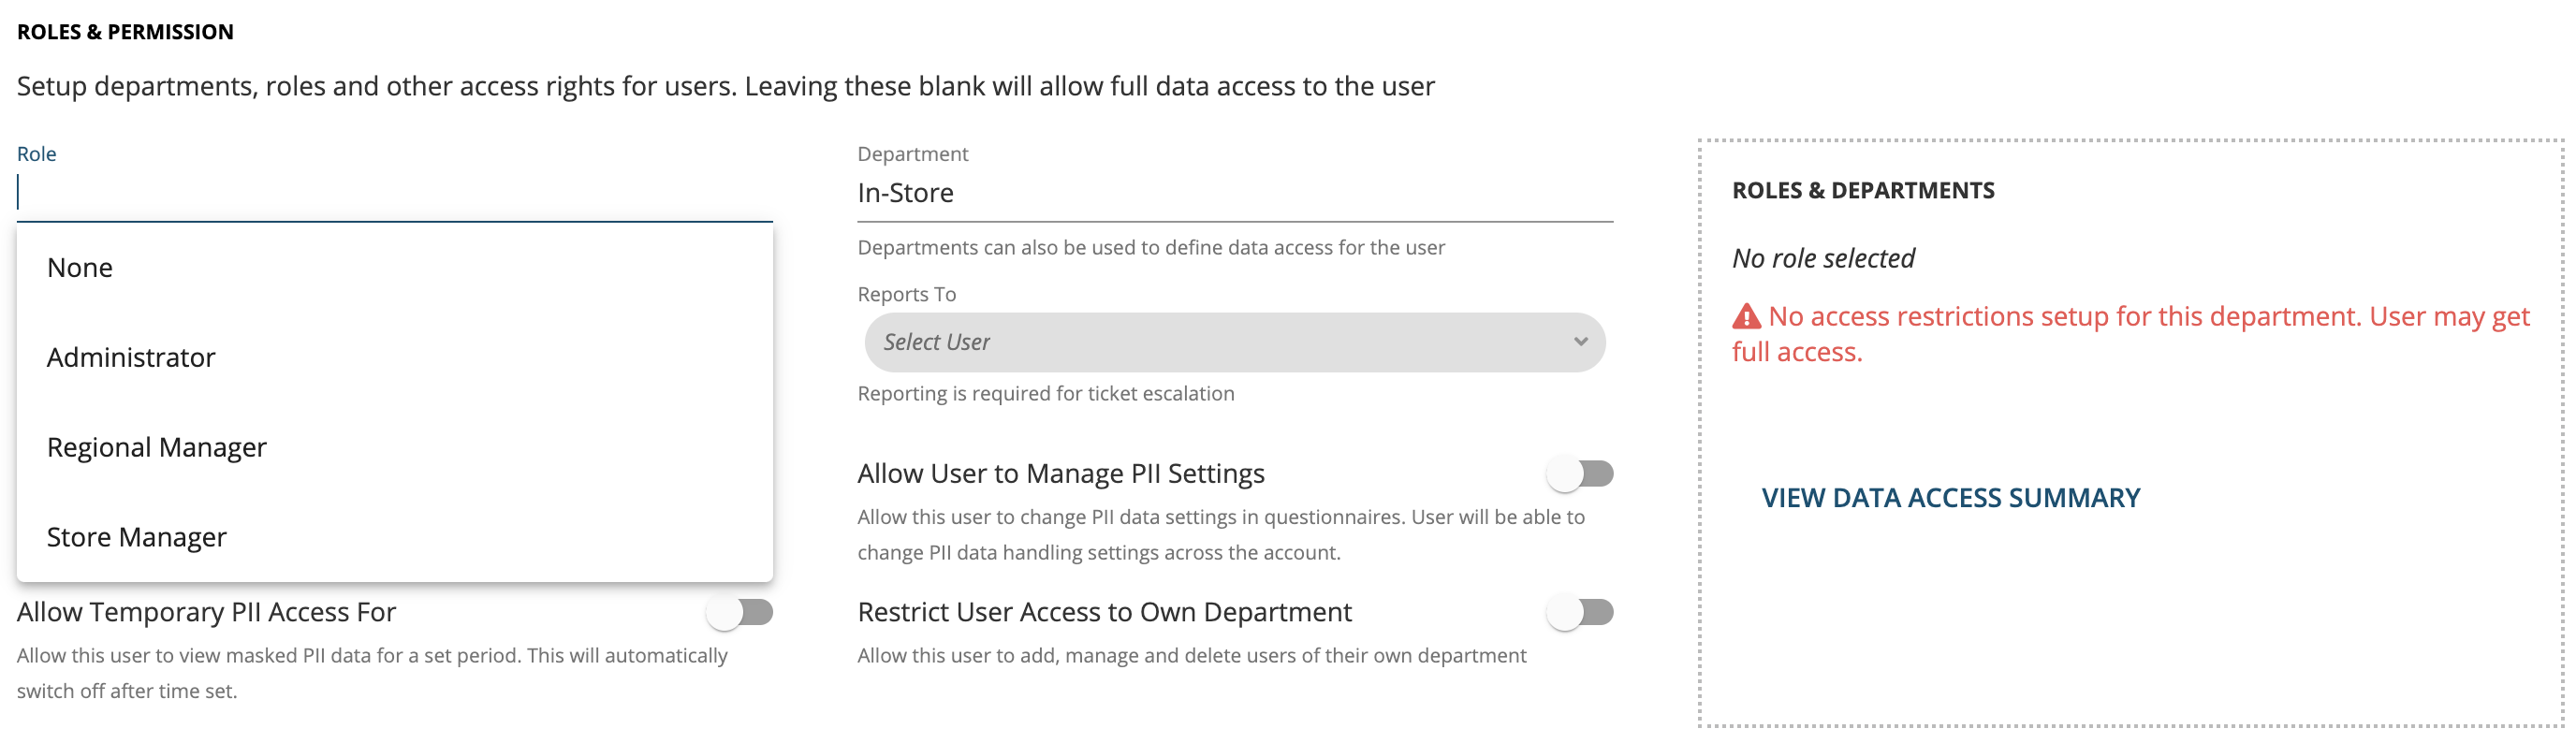
In this section choose the relevant role and department for the user. Based on the departments & roles the access rights are assigned to the user. If department and role is not selected or left blank then it will allow full data access to the user. Other permissions that can be set are:
-
Role: The role a user belongs to. The restrictions if any setup for the role will be applied for this user once a role is selected. Roles will have to be created in Enterprise settings beforehand.
-
Department: The department a user belongs to. The restrictions if any setup for the department will be applied for this user once a department is selected. Departments will have to be created in Enterprise settings beforehand.
If only department is applied, only restrictions for that department are applicable for the user
If both role and department are applied for a user, then role based restrictions are applicable along with the additional restrictions from the department.
Once a Role, or Department, or both are applied for a new user, you can verify their data and product access based on role and department restrictions (if any) by clicking the VIEW DATA ACCESS SUMMARY button in the right panel within the ROLES AND PERMISSIONS section.
-
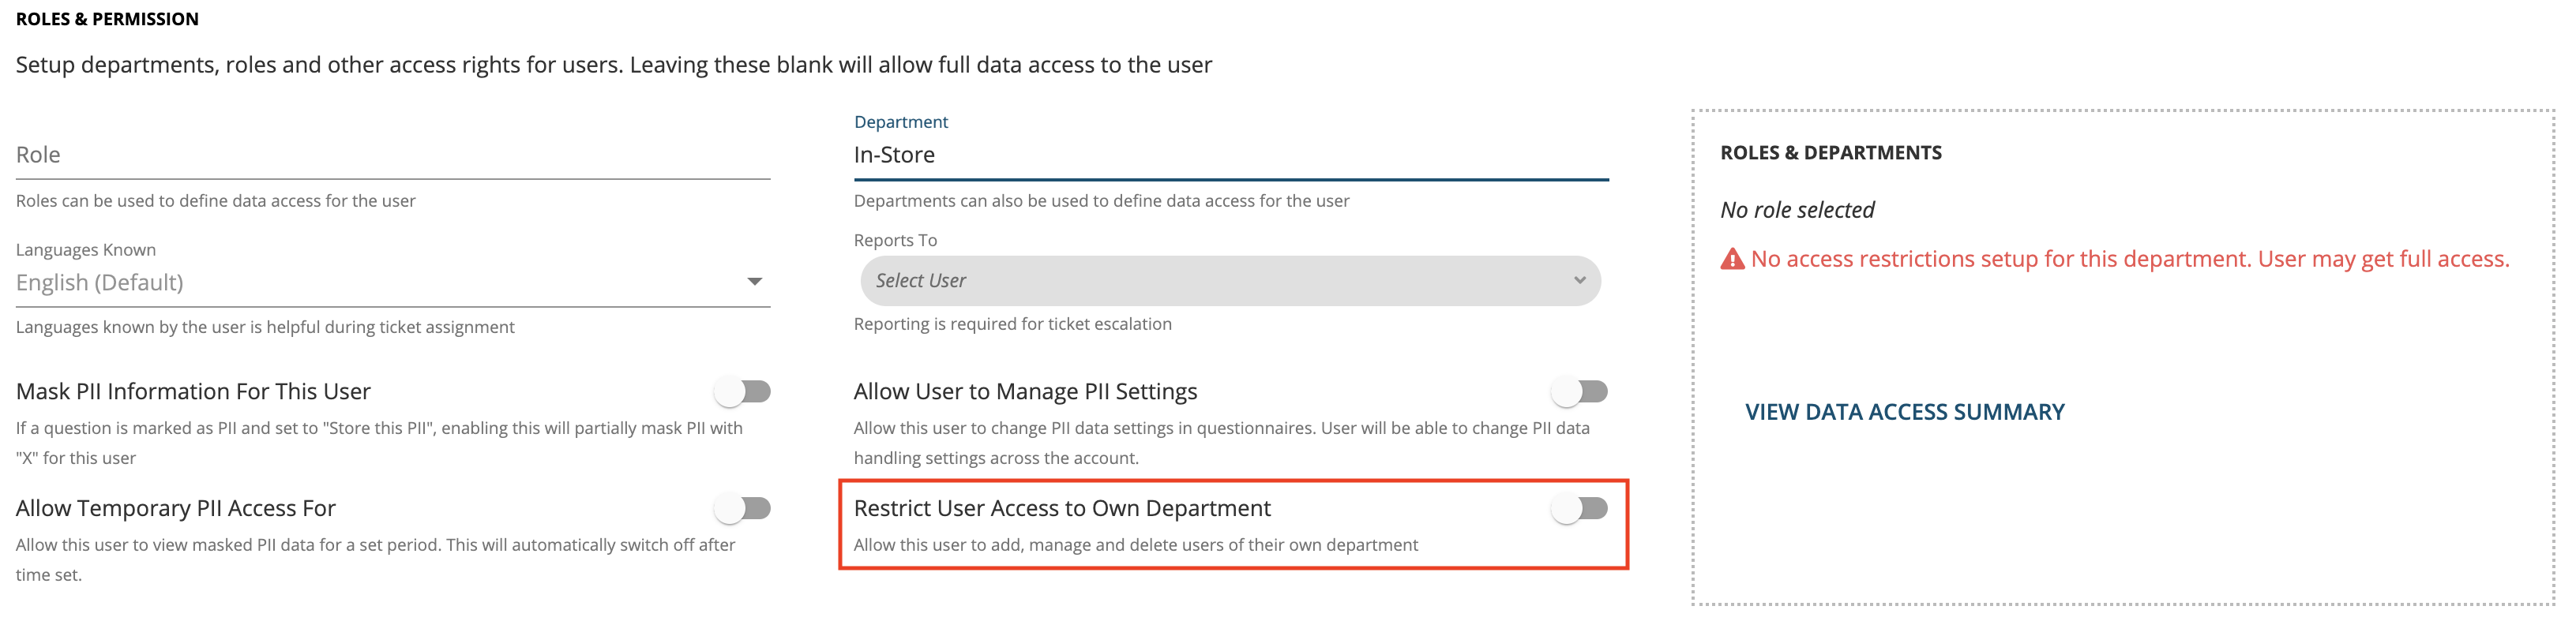
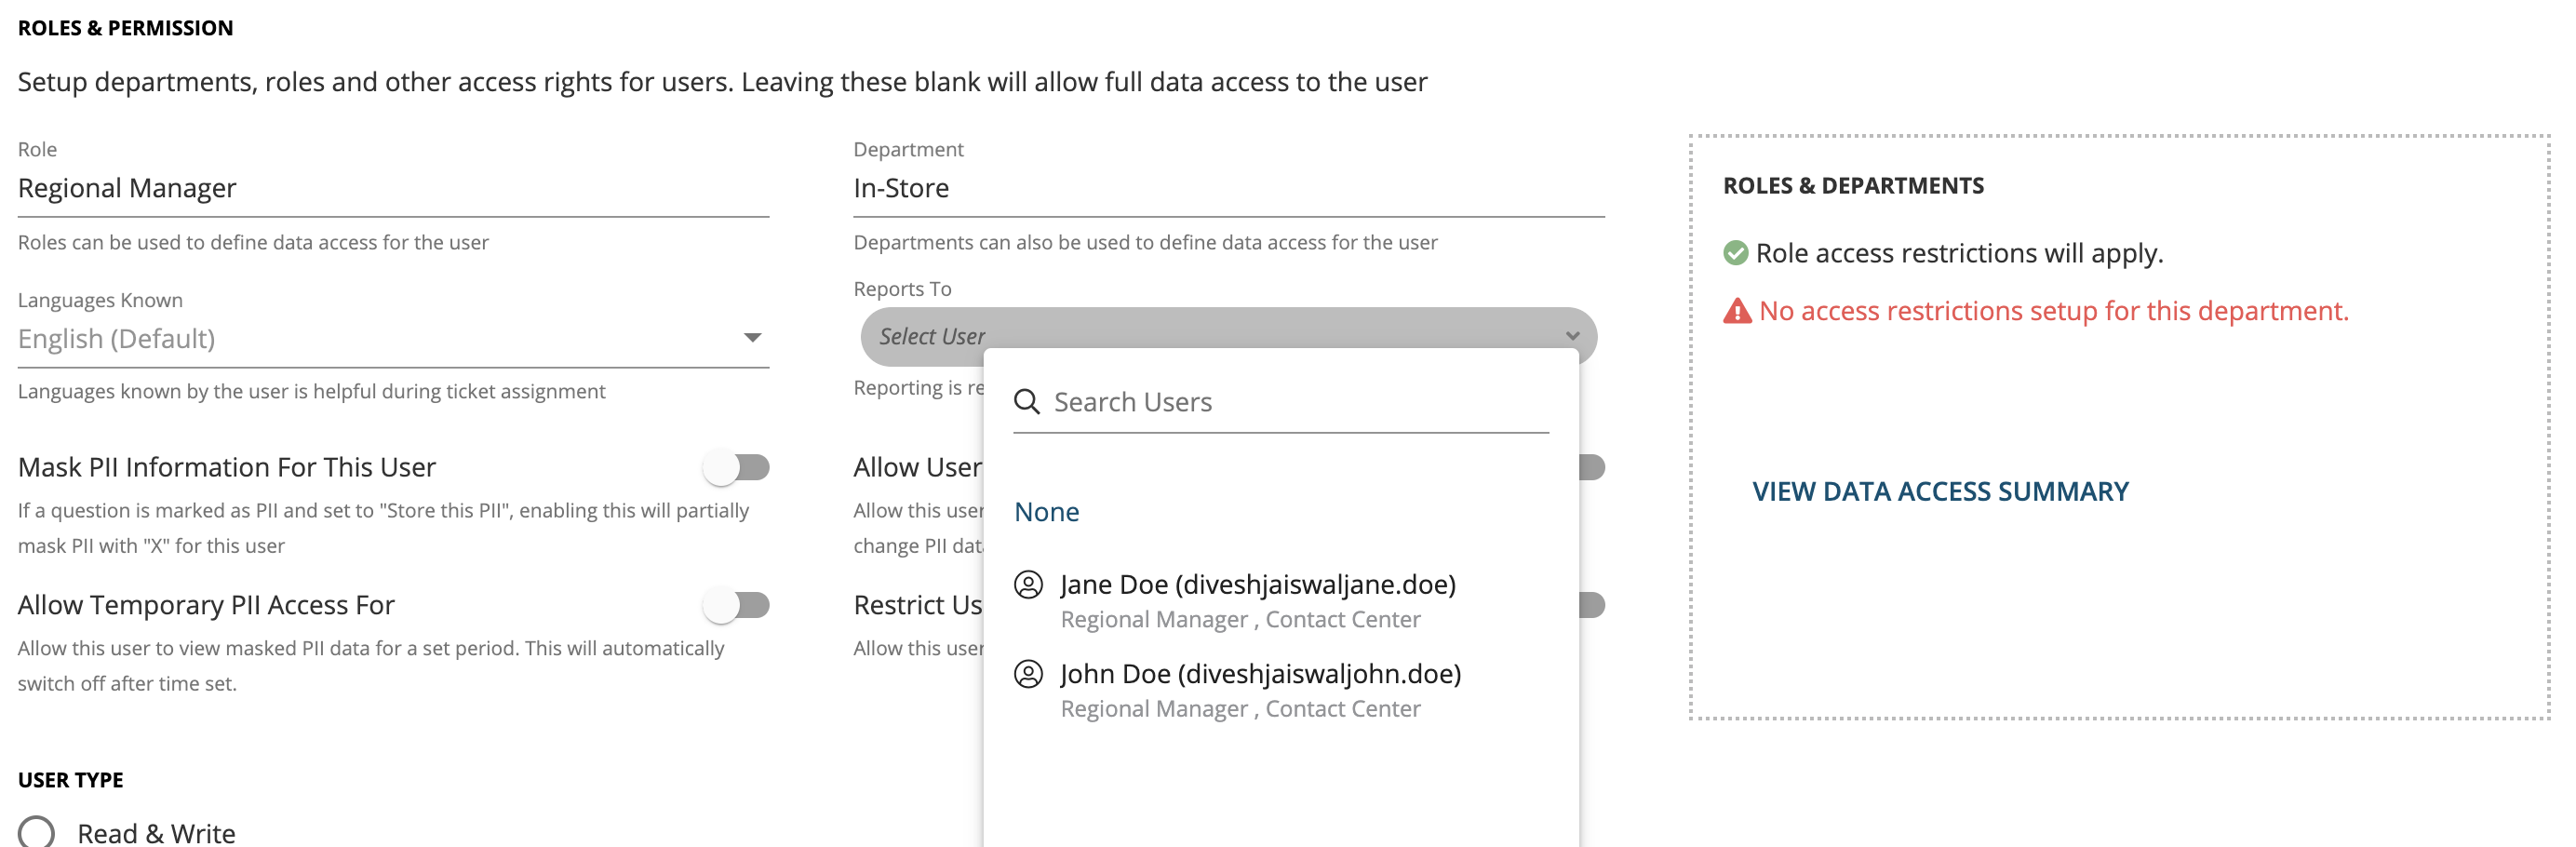
Reports to: Reporting needs to be defined for ticket escalation. This is related to the reporting hierarchy in the system. Multiple levels of reporting can be set up to replicate organizational hierarchy. This allows tickets assigned to this user to be escalated to their reporting manager based on the ticket turn-around time set up for the user’s department.
-
Mask PII information for this user: If a question is marked as PII and set to “Store this PII” in the questionnaire builder (question settings), then enabling this will partially mask PII with “X” for this user. This will ensure that the user is not able to access sensitive PII data of the respondents.
-
Allow Temporary PII access for: Users for whom PII data access has been restricted, can be granted temporary, time based access to this data. In scenarios where a user is required to access PII data for troubleshooting any issue, this temporary access can come in handy. Once switched on, the user will be able to view PII data in their account and for the set duration after which, the setting will be switched off automatically and PII will again be masked for the user.
-
Allow User to Manage PII Settings: When enabled for a user, they will be able to manage PII settings in Questionnaire Builder. This includes ability to mark a question PII, and once marked as PII, set the storage setting as ‘hash using SHA256/SHA384/SHA512’, ‘mask’, or ‘store’. These settings are key to following certain data privacy policies within the organizations and this setting should be enabled only for a few users who are familiar with these polices and settings within Webex Experience Management.
-
Restrict User Access to Own Department: This setting is available only for users who have been assigned a department. When enabled for a user, they will be able to view other users only from their department in the User Management section. Additionally, these users can create new users only for their own department and cannot assign any other department to the new user. All users created by this user will have the same restriction of access to users of own department will be applied by default.
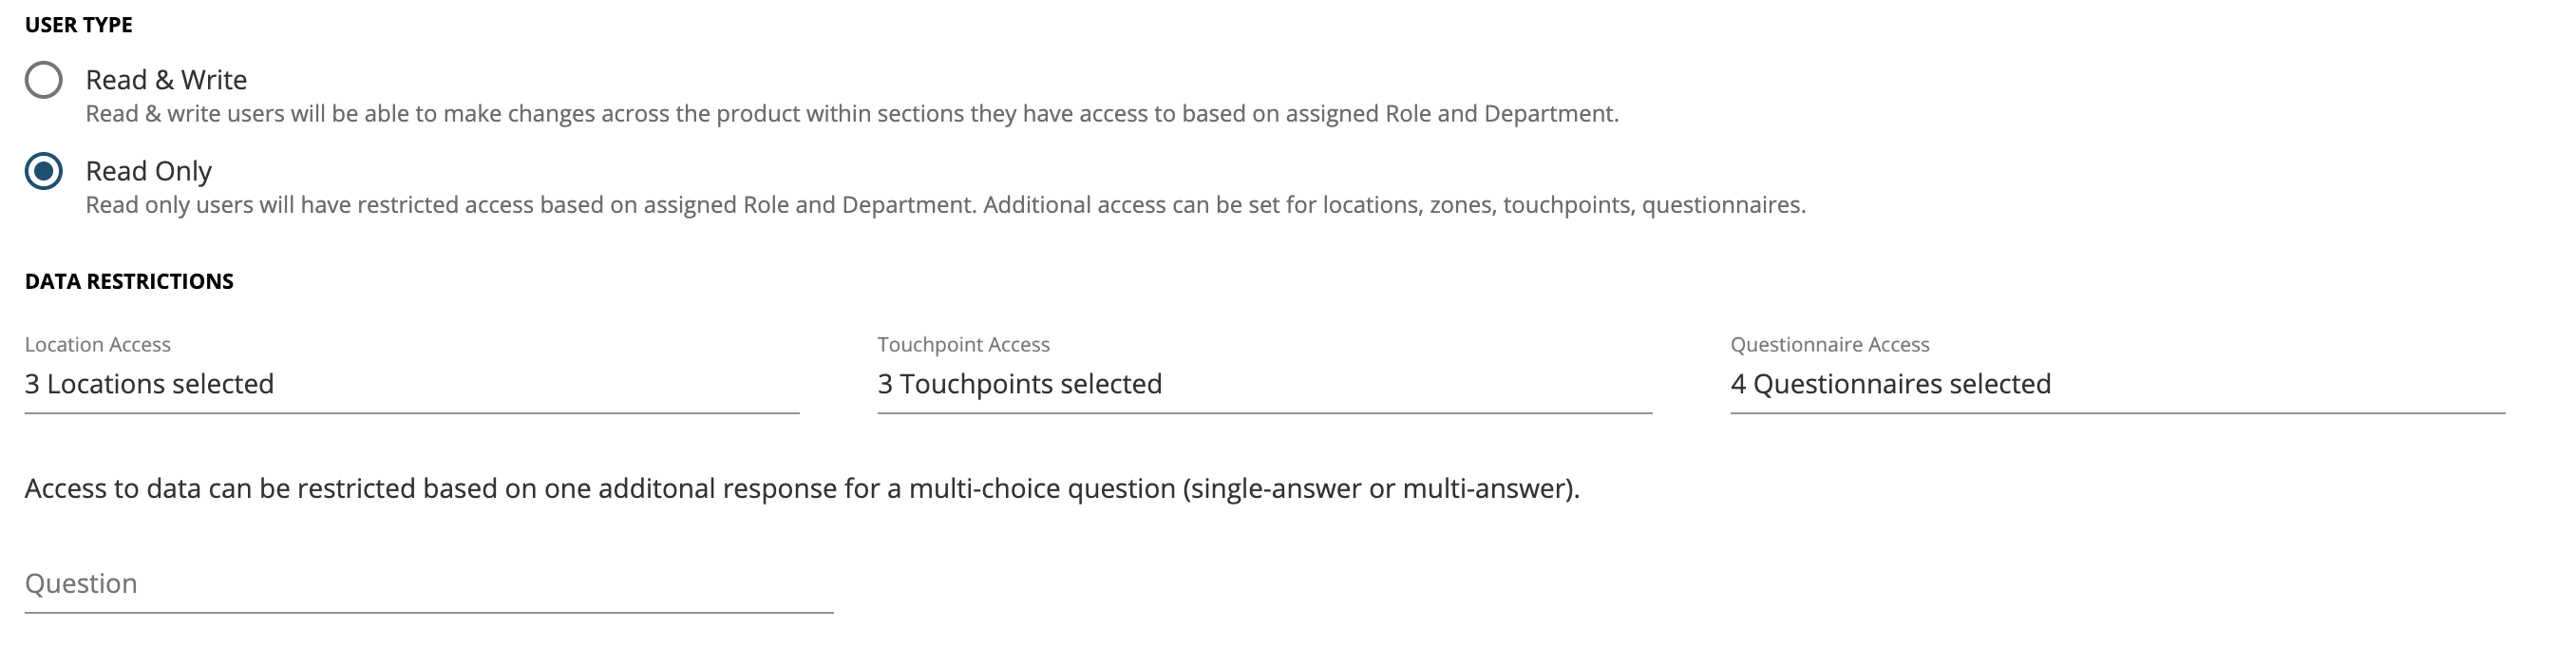
User Type
Here you can choose whether the user should have only read only rights or read/write rights.
-
Read & Write users will be able to make changes across the product within sections they have access to base on assigned Role and Department.
-
Read Only users will have restricted access based on assigned Role and Department. Additional access can be set for locations, zones, touchpoints, questionnaires.
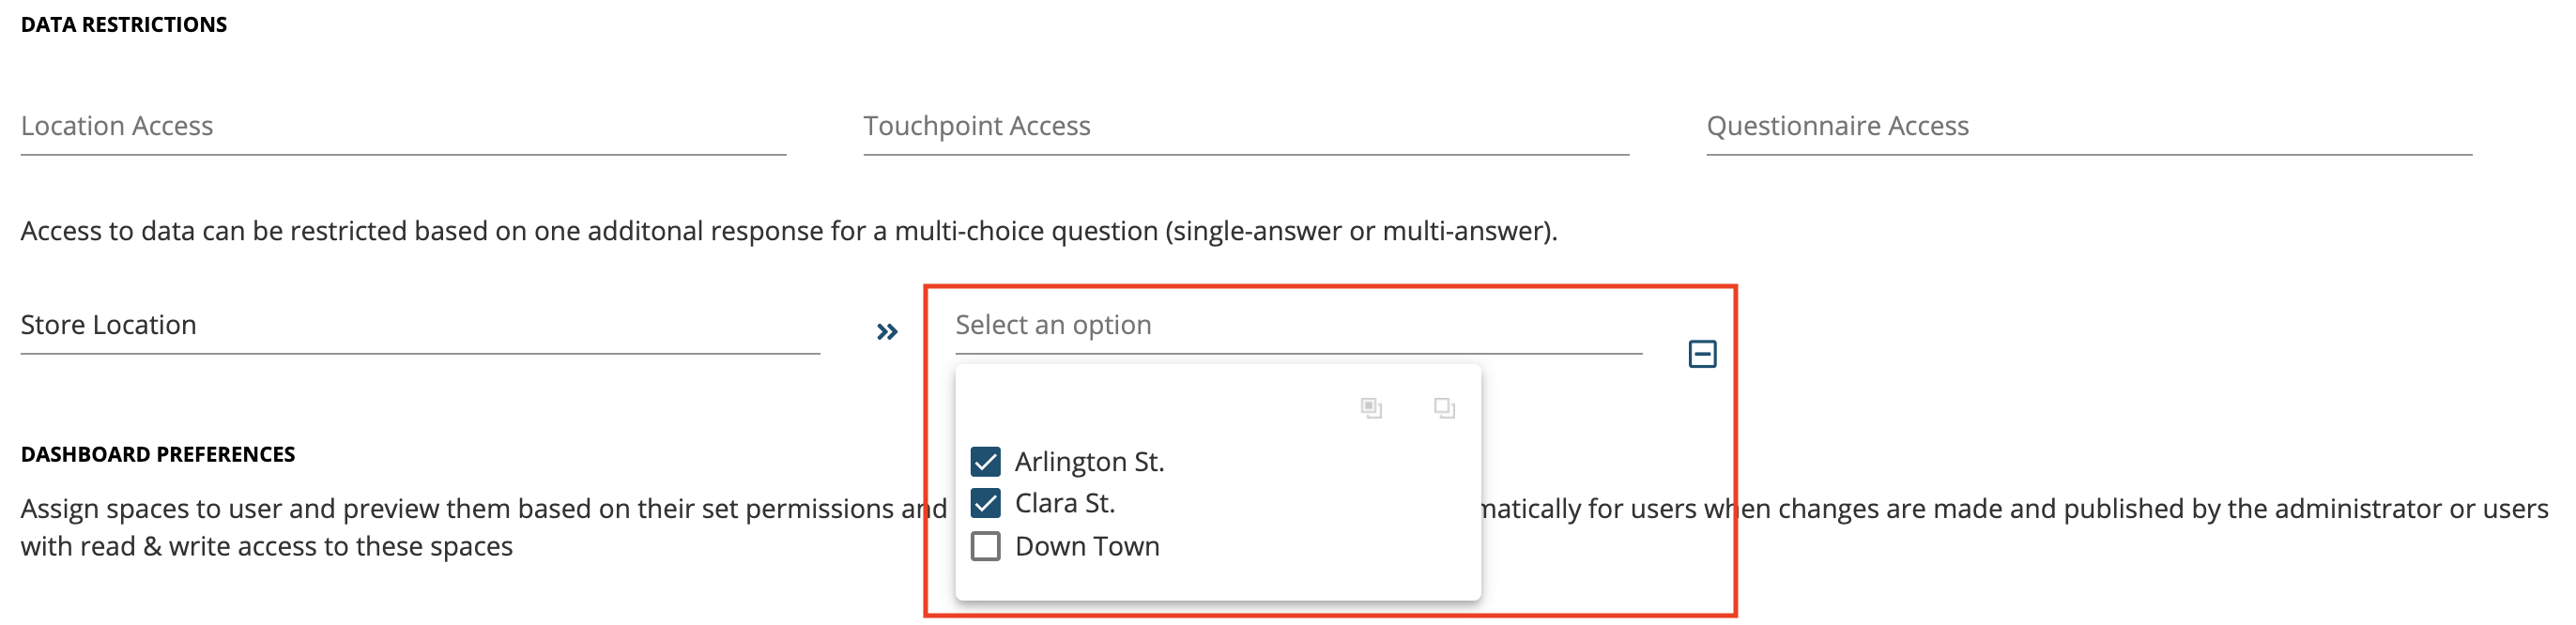
Data Restrictions
Available only for Read Only users, this section allows restricting data access to uses based on locations, touchpoints, zones, or to responses for a fixed set of questionnaires.
Additionally, access to data can be restricted based on one additional response for a multi-choice question for the user (single-answer or multi-answer). This is useful if restrictions have to be added using any other question instead of the default set of locations, touchpoints, or zones.
Dashboard Preference
Here you can assign spaces to user and preview them based on their set permissions and restrictions. These spaces will update automatically for users when changes are made and published by the administrator or users with read & write access to these spaces
-
Select a Time-zone: Date filters, dashboard time metrics and some reports will work off of this time-zone
-
Precision Settings: There are two kinds of settings, Fast Processing Mode and High Precision Mode. These are designed to understand customers as a group at a macro level to derive systemic areas of improvement that impact customer experience. This offers real-time analysis of data against a statistically valid random sample of all responses collected to provide fast processing.
New User Creation Form
User Details Section
Fill in the user details as shown below.
- Display Name
- Mobile Number
- Username (username entered here will be used as a suffix to the primary account name)
- Enable 2 Factor Authentication for this User

Roles & Permissions Section
Select the Role from the drop-down list for this user. Based on the role selected the access rights and permissions will be assigned.
Select the Department from the drop-down list for this user. Based on the department selected the access rights and permissions will be assigned.
If a department is assigned to a user, an additional setting is then available to restrict the user’s access to their own department only. If enabled, the user will then be able to view, create and manage other users only within their department (users to whom the same deparement is assigned) in Webex Experience Management.
Select the Reports To, reporting manager for ticket escalation in Loop Closure Module for the user from the drop-down list.
PII (Personal Identification Information) Setting
You can toggle on Mask PII Information For This User. So, if this is enabled then any question marked as PII in the questionnaire the user will not be able to see. It will only be visible partially. For instance; Customer mobile number is 9999999 then user will see as 99xxxxxx
Similarly, you can enable Allow Temporary PII Access For. This will allow this user to view masked PII data for a set period. This will automatically switch off after time set. You can select the time window from the drop-down as shown below i.e. 1 hour, 4 hours, etc.
For most users, Allow User to Manage PII Settings should be switched OFF. Only for a select set of users, who understand PII related data management rules within the organization should be given this access and the setting should be enabled for them.

User Type
In this section you can choose whether the user should have only read only rights or read/write rights. The Read & Write users will be able to make changes across the product within sections they have access to base on assigned Role and Department.

The Read Only users will have restricted access based on assigned Role and Department. Additional access can be set for locations, zones, touchpoints, questionnaires. For the Read Only users the additional section of Data Restrictions will be enabled. Here you can define further restrictions on questionnaires and data access for the user based on one additional response for a multi-choice question for the user (single-answer or multi-answer).
-
Define questionnaire access by selecting the questionnaires from the list as shown below.
-
Set data access restrictions on a single or multi select question type options for the user. For e.g.: The user should only see data from two locations out of four, that is China & India.
Dashboard Preference: In this section assign spaces to user from the drop-down list and preview them based on their set permissions and restrictions. Select a Time-zone and Precision Settings as well for the user.

Once all the details are filled in press ‘Create’ button as shown to create a new user. The moment the user is created an activation link is sent to the user email address.
The concerned user will receive an activation link in their outlook.
Once the user clicks on activation link (Hyperlink) in the email a Reset Password window opens for the user to set the password as shown below. Enter the Password and Press Reset Password button to save.
Once the password is set another email will be triggered to the user outlook. This is the system Welcome Email.
Bulk User Creation
To create users in bulk, click on ‘Create User’ button from main user management screen.
To create multiple users by uploading an excel file containing all user details use BULK USER CREATION. Download sample excel format as shown below.

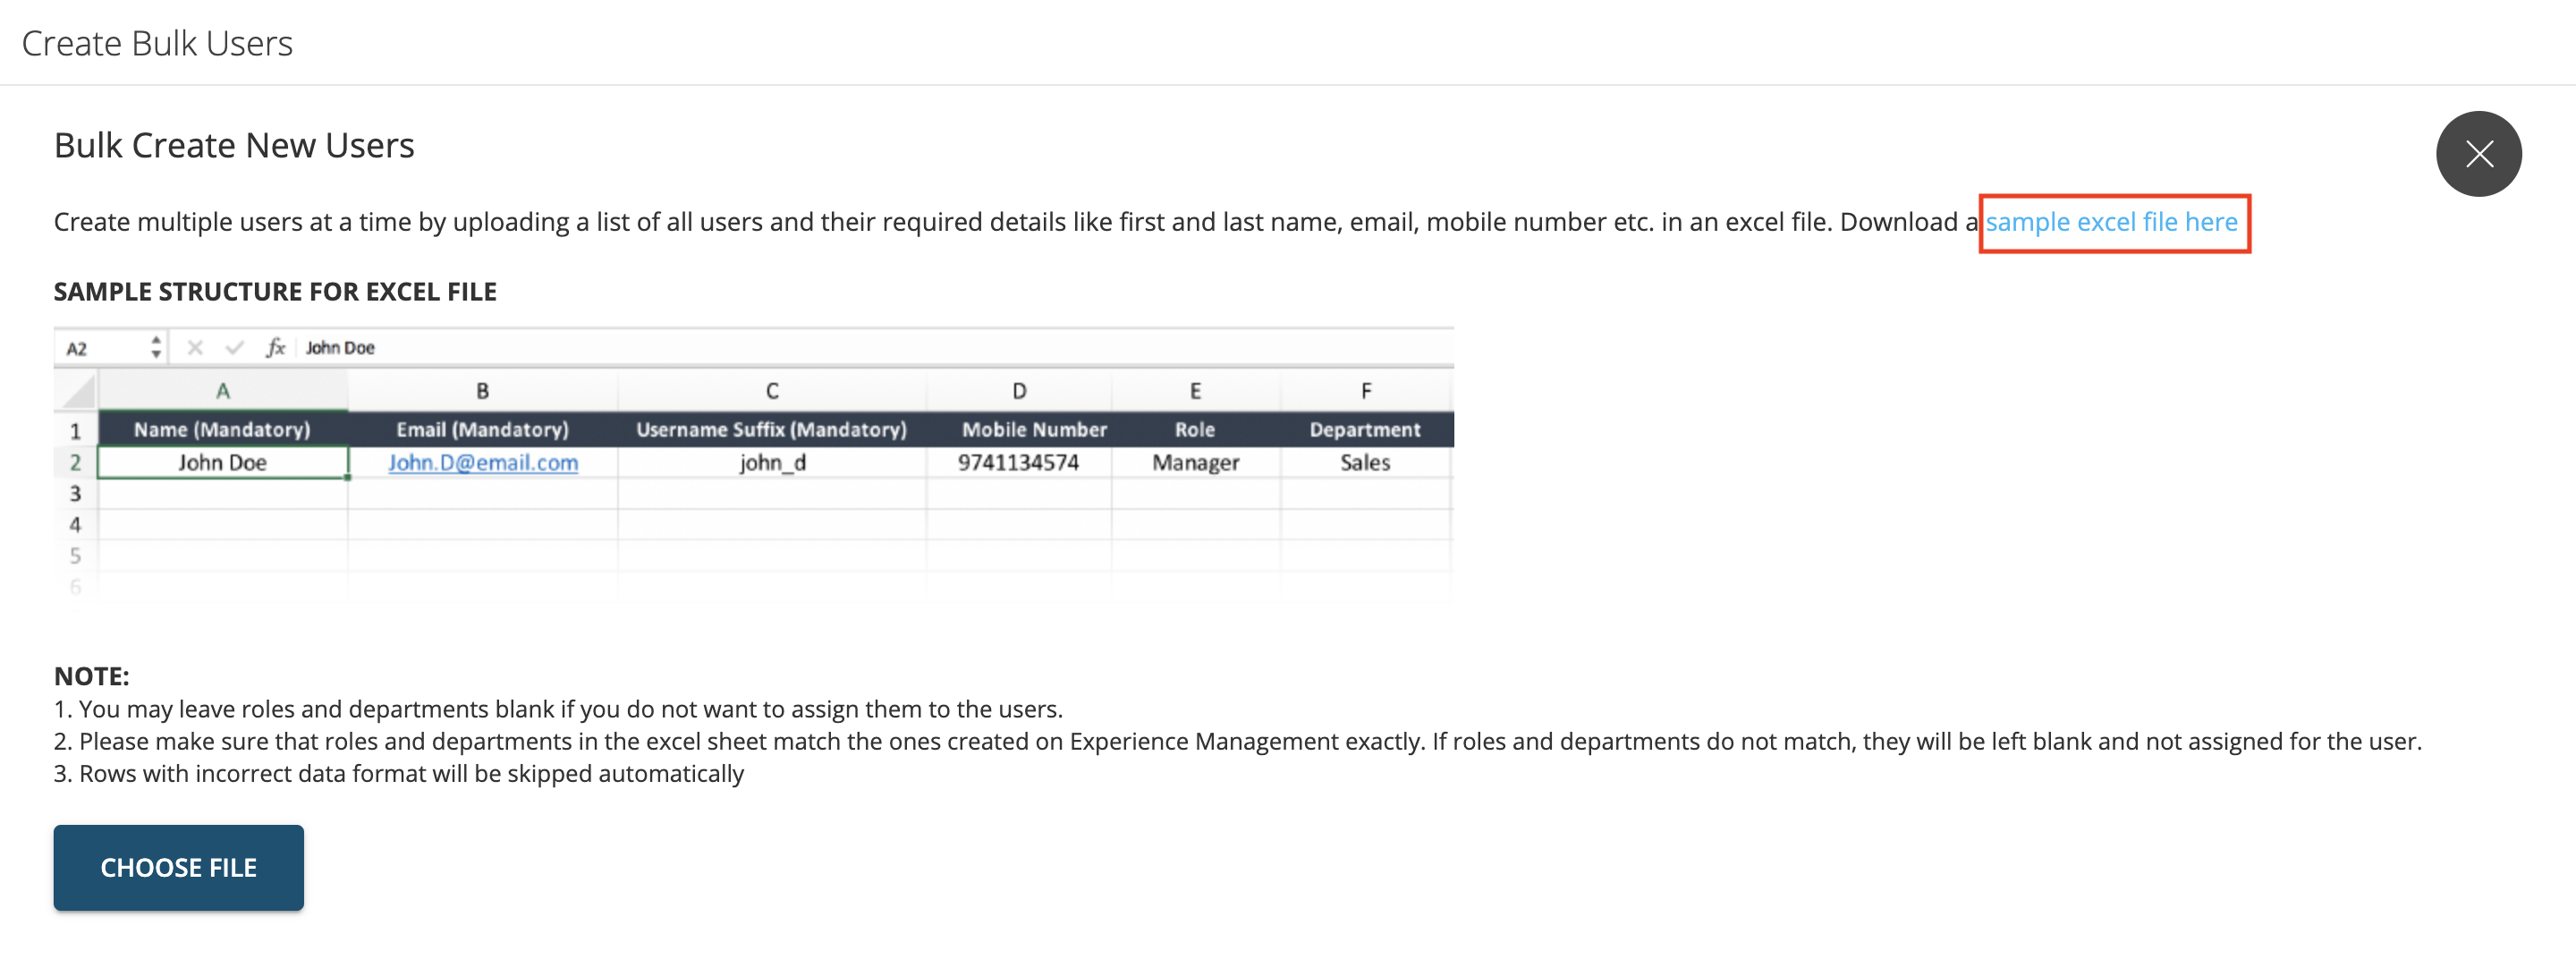
Sample Excel Format
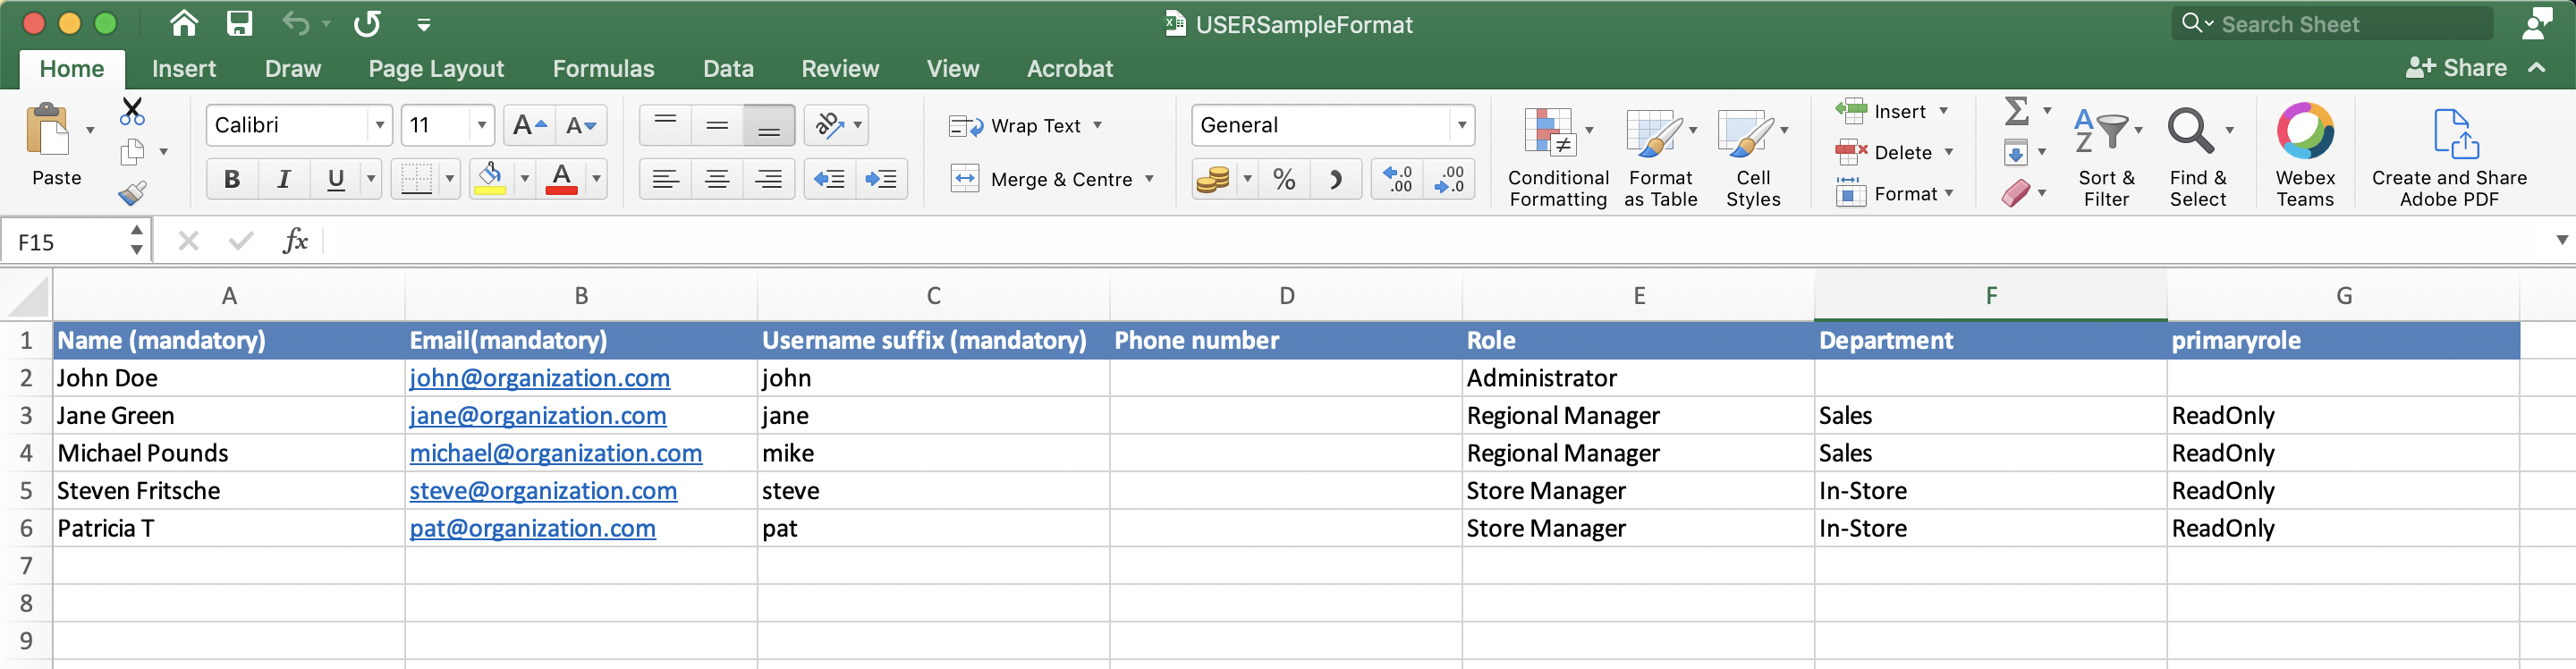
Prepare the excel like below which you want to upload with all necessary details.
- Click ‘Choose File’ and upload the excel file with user data
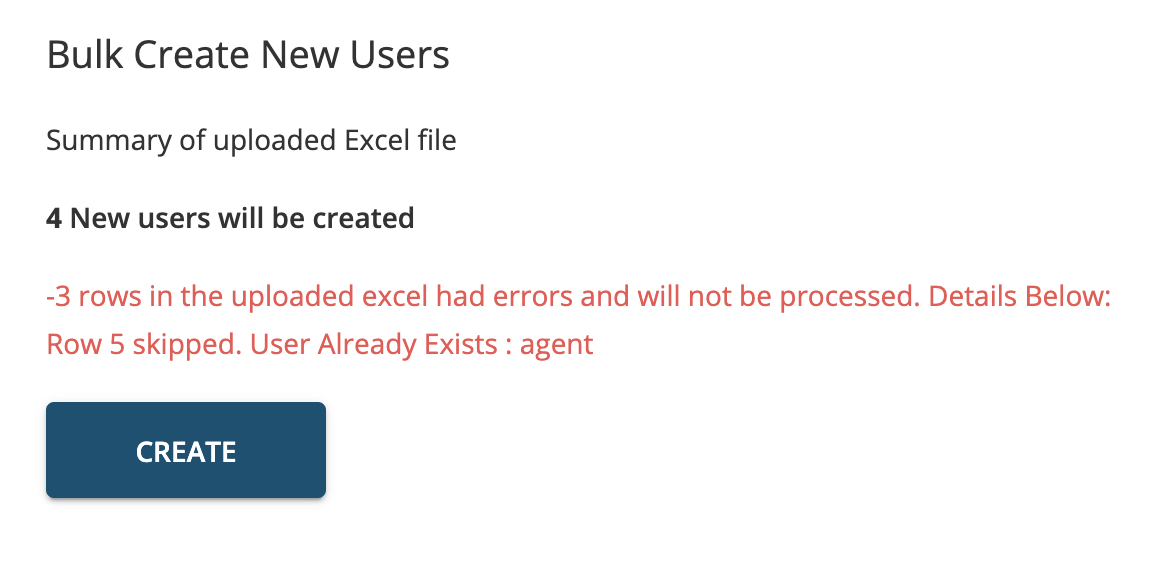
- After validating the uploaded file, a summary is displayed with the count of new users that will be created. Press ‘Create’ to proceed and create new users.
- In case of any error in the uploaded file, including duplicate usernames, these rows will be automatically skipped and the other users will be created. A summary of the same will be displayed on the confirmation screen as shown below.
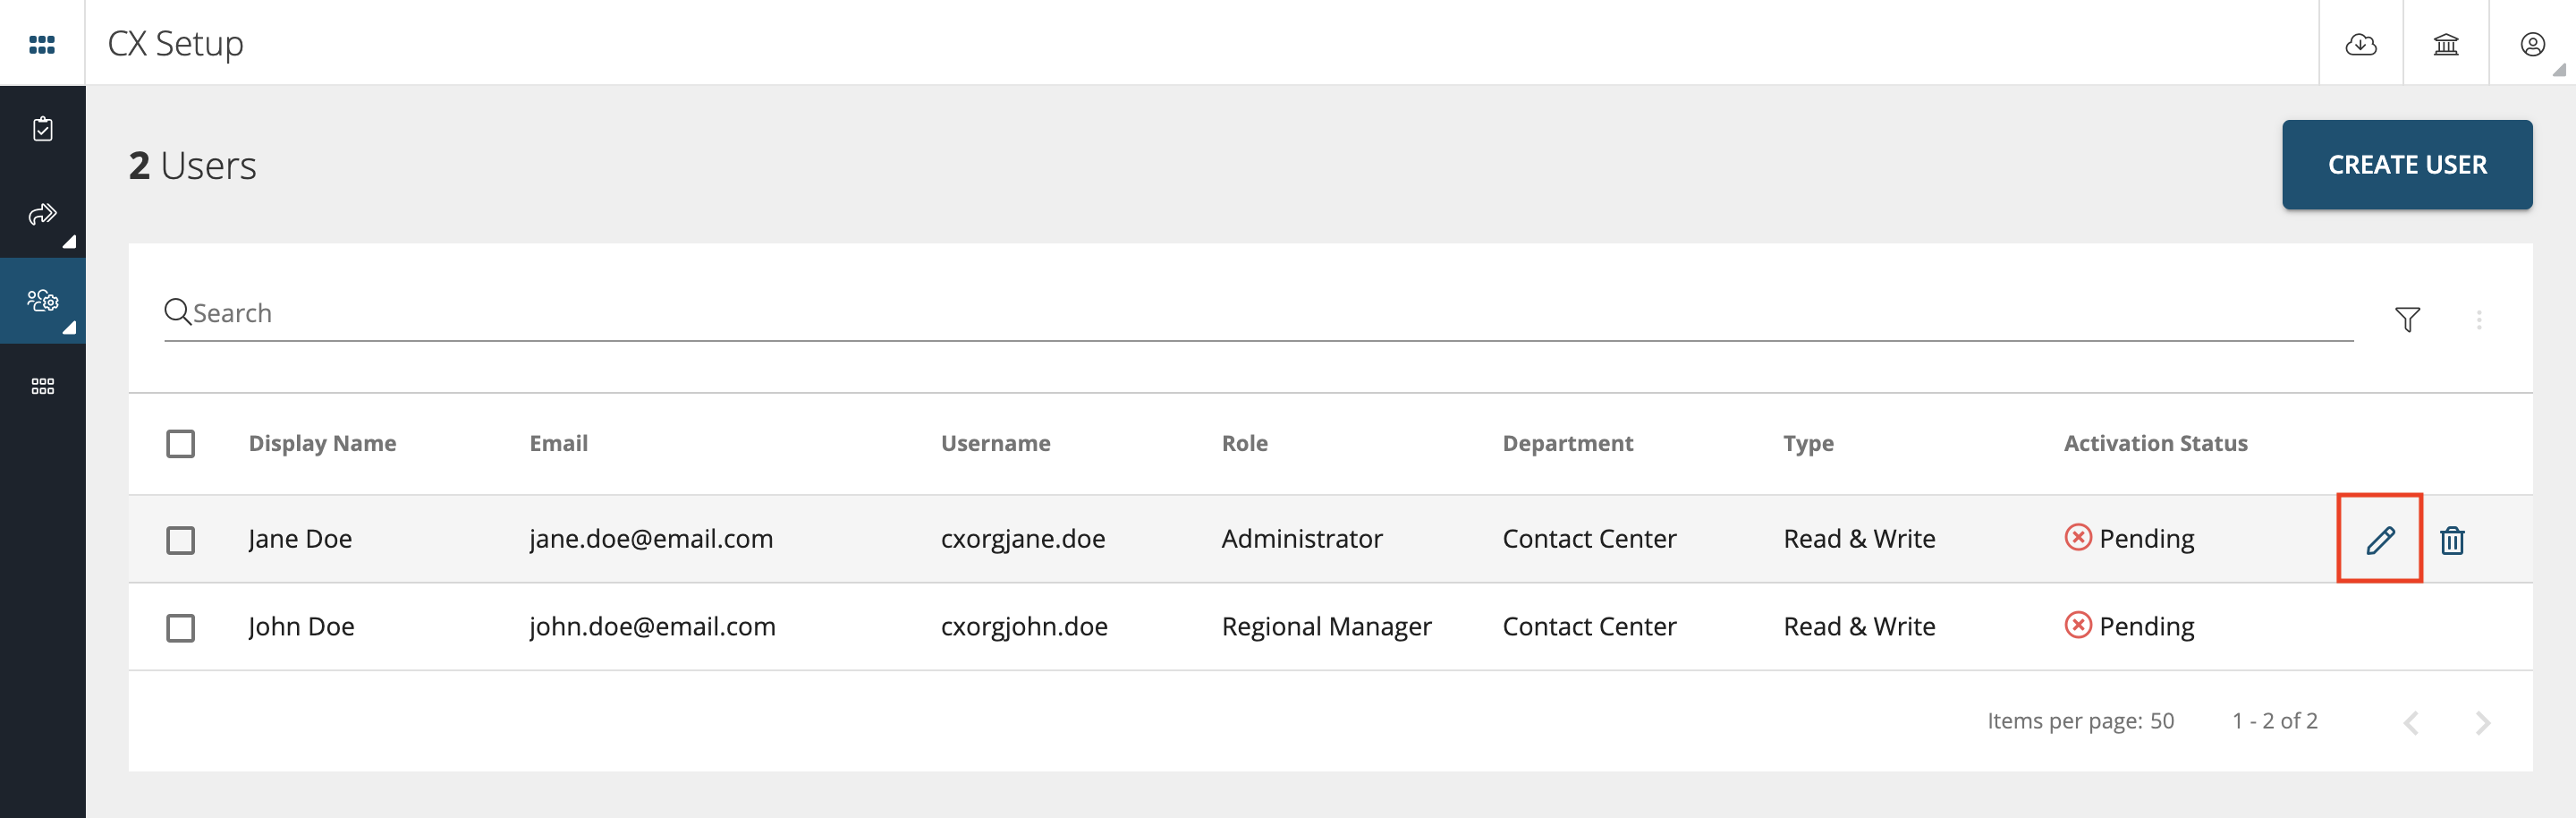
Edit Existing User
To edit an existing user, click on the edit icon as shown below.

Once you done editing the user details, click the ‘Update’ button to save the changes.
Delete An User
Users can be deleted from the table view by clicking the trashcan icon that appears on hover for each row.
Additionally all the spaces created by the user that is being deleted will be automatically assigned to the account admin to ensure they continue to be visible to other users this space is shared with.
User Management
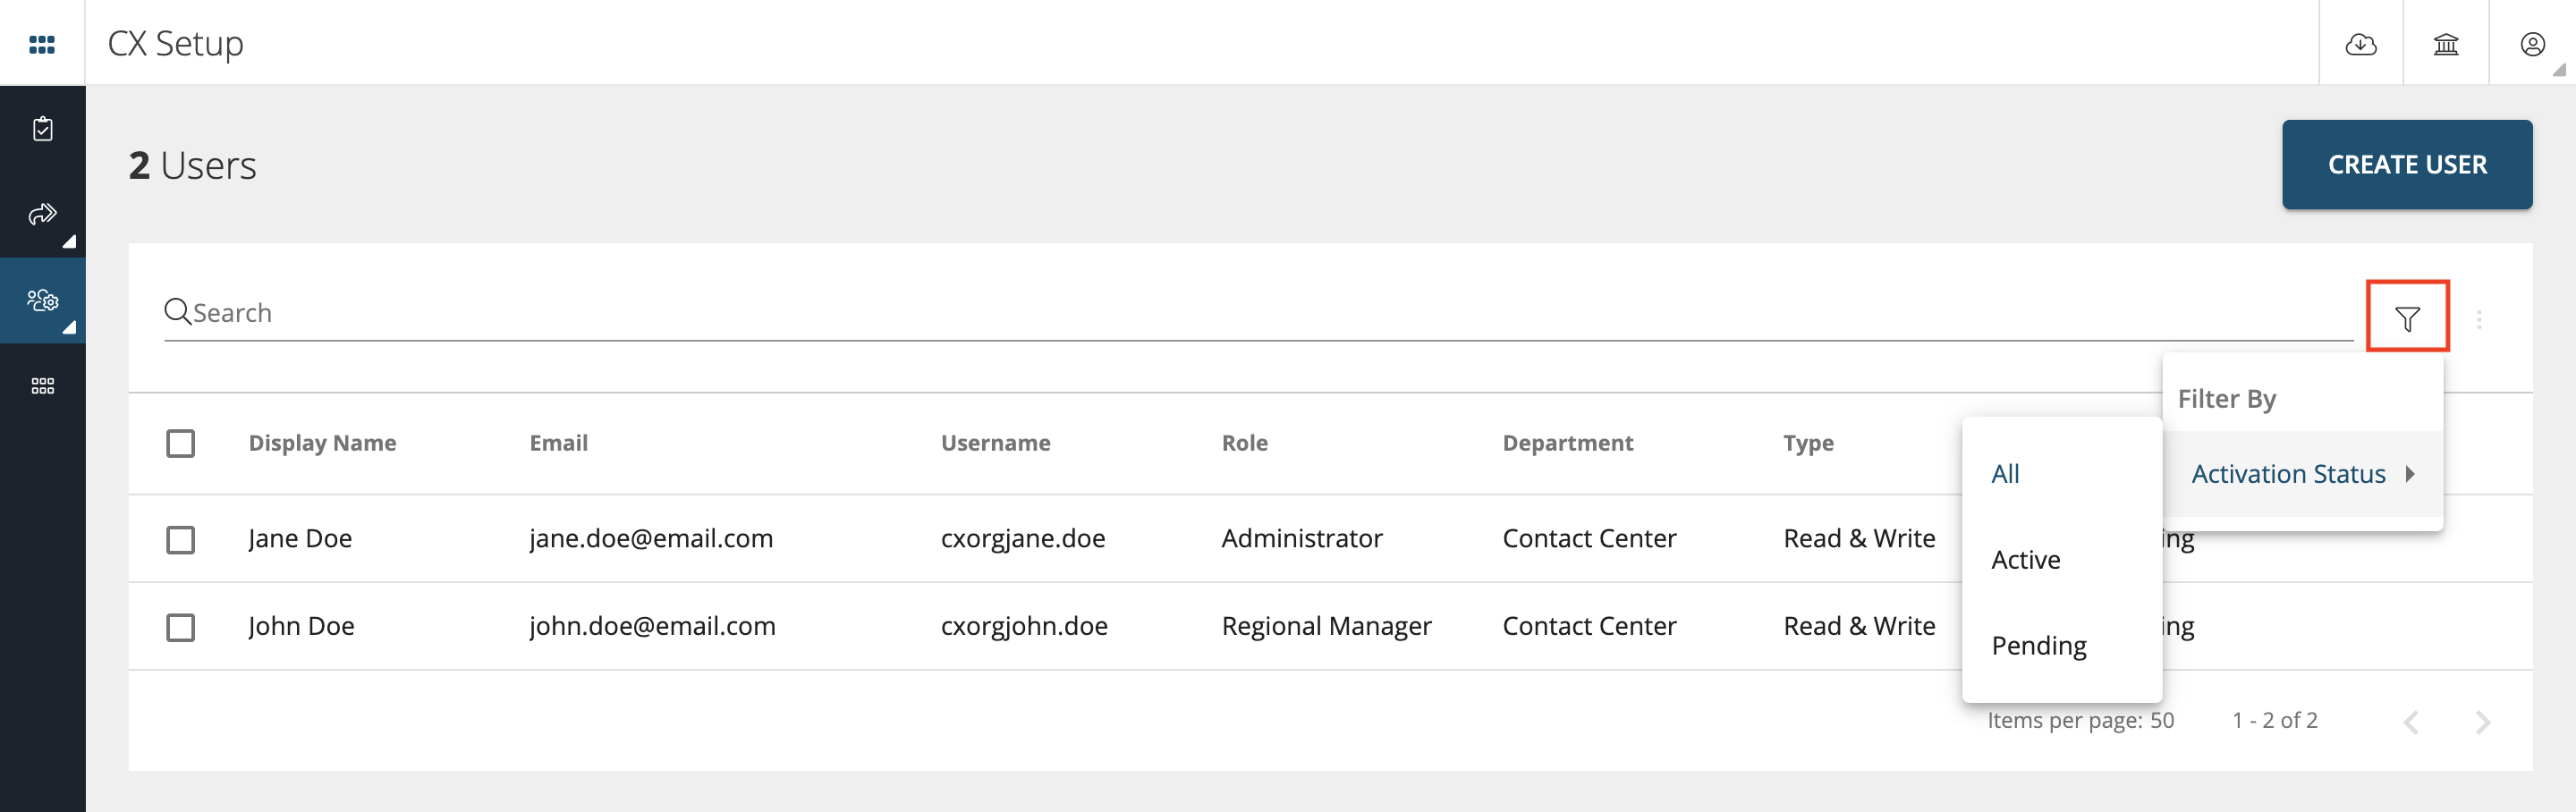
The landing screen for users will list all existing users in a table. You can search a user in the list by their Display Name, Email, or Username.
Filters
You can apply filters to sort users based on their ‘Activation Status’ i.e. only Active Users or only Pending Users (Inactive, pending for activation) or ALL (combination of Active and Pending status users.
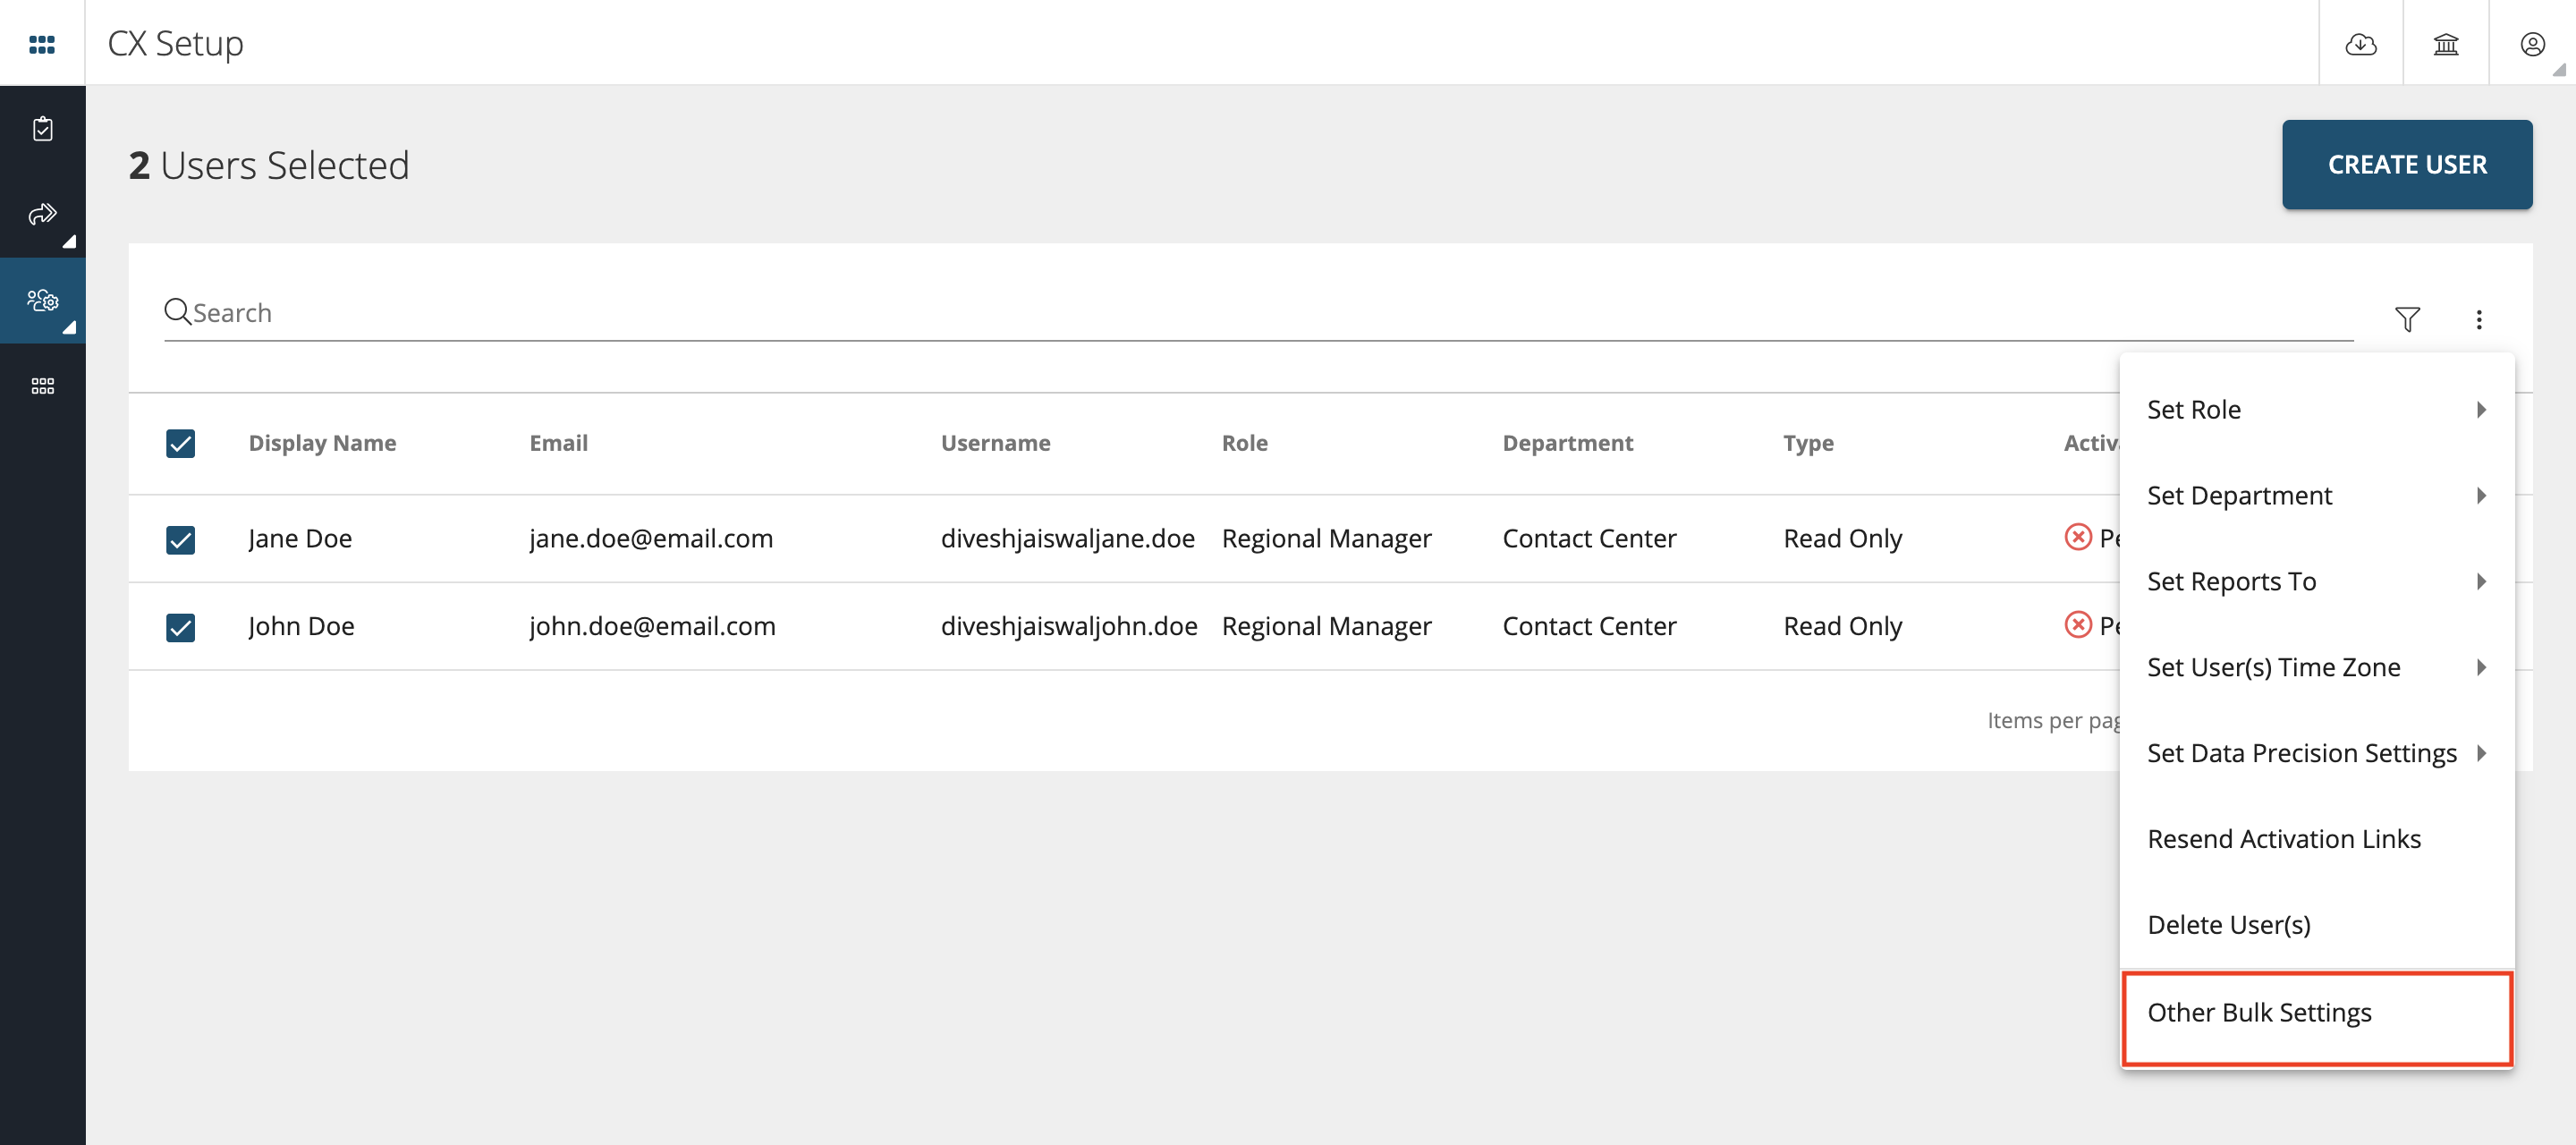
Bulk Actions
To edit multiple users in bulk, select at least more than one user from the table by checking the checkbox on the left. Bulk actions are available in the top right menu indicated by three dots next to the filter icon as shown below.

You can perform the following actions from the bulk actions menu:
- Set Role: You can select multiple users and change the role.
- Set Department: You can select multiple users and change the department.
- Set Reports To: You can select multiple users and change the reporting structure needed for ticket escalation.
- Set User(s) Time Zone: You can select multiple users and change the user time zone. All date filters are based on this setting.
- Set Data Precision Settings: You can select multiple users and change the data precision settings to Fast Processing Mode or High Precision Mode.
- Resend Activation Links: You can resend the account activation links again to their registered email IDs of users who have not activated their accounts yet.
- Delete User(s): You can select multiple users to delete from the system as shown below.
Additionally all the spaces created by the user that is being deleted will be automatically assigned to the account admin to ensure they continue to be visible to other users this space is shared with.
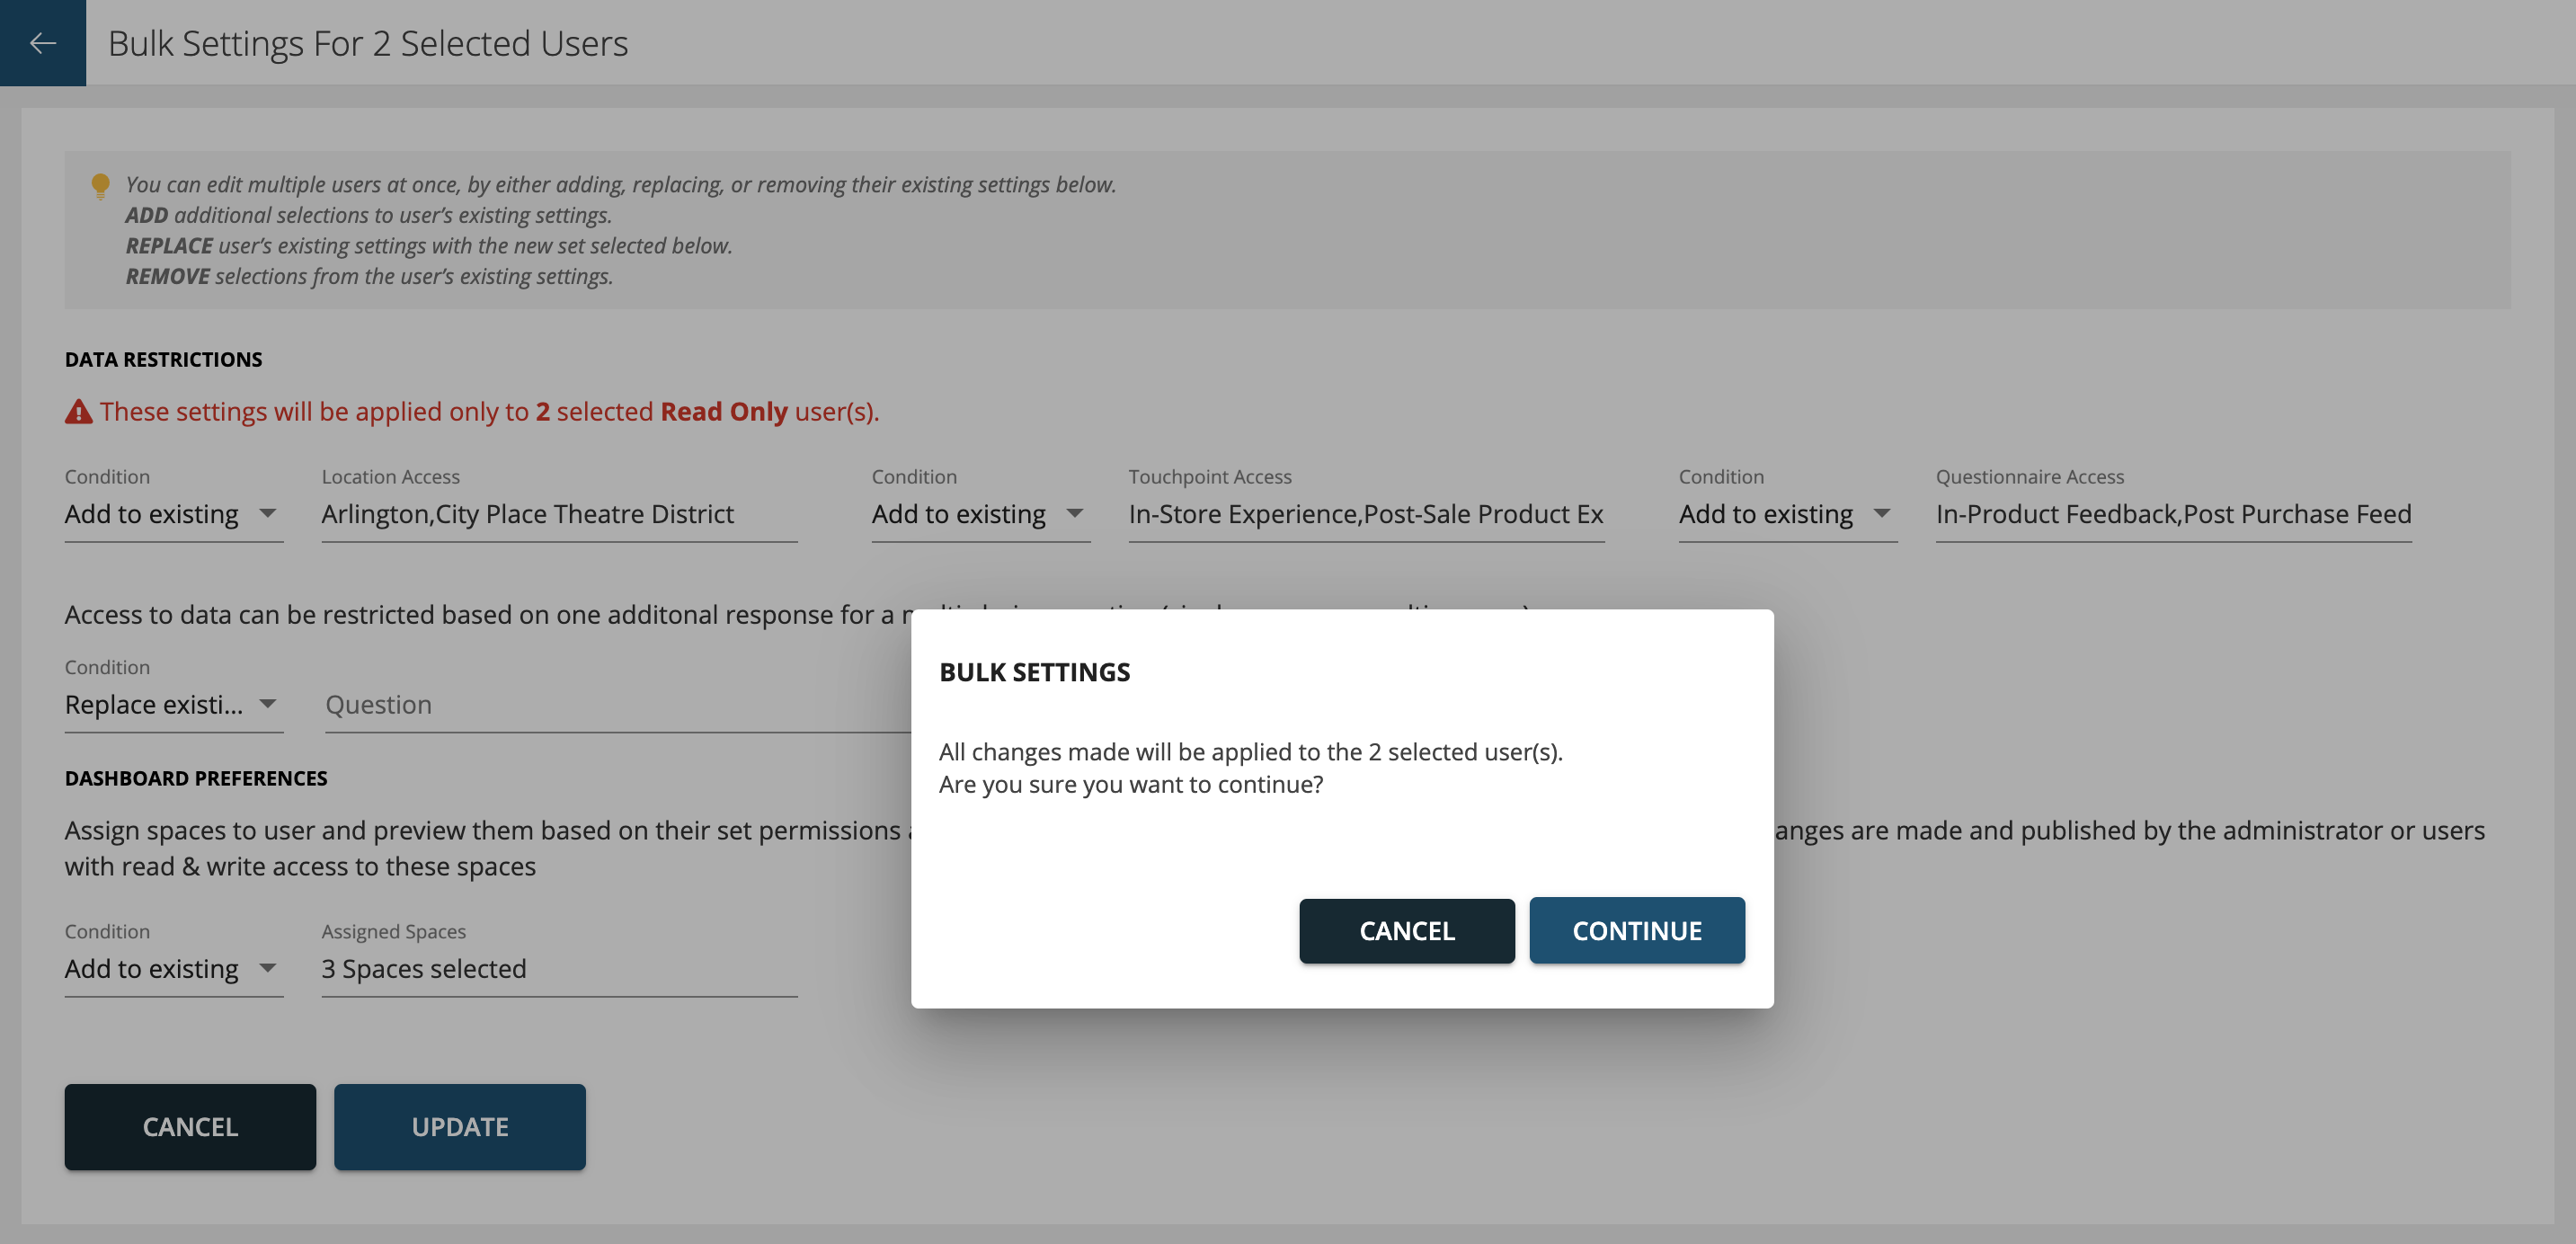
Other Bulk Settings
You can edit settings for multiple users at once, by either adding, replacing, or removing their existing settings below.
- ADD Adds the selection to user’s existing settings.
- REPLACE Replaces the existing user’s settings with the new set selected.
- REMOVE Removes the existing user’s settings.
The above settings can be applied for Data Restrictions for Questionnaires & Questions. Access to data can be restricted based on one additional response for a multi-choice question (single-answer or multi-answer).
The settings with respect to Dashboard Preferences if for Spaces. You can assign spaces to user and preview them based on their set permissions and restrictions. These spaces will update automatically for users when changes are made and published by the administrator or users with read & write access to these spaces
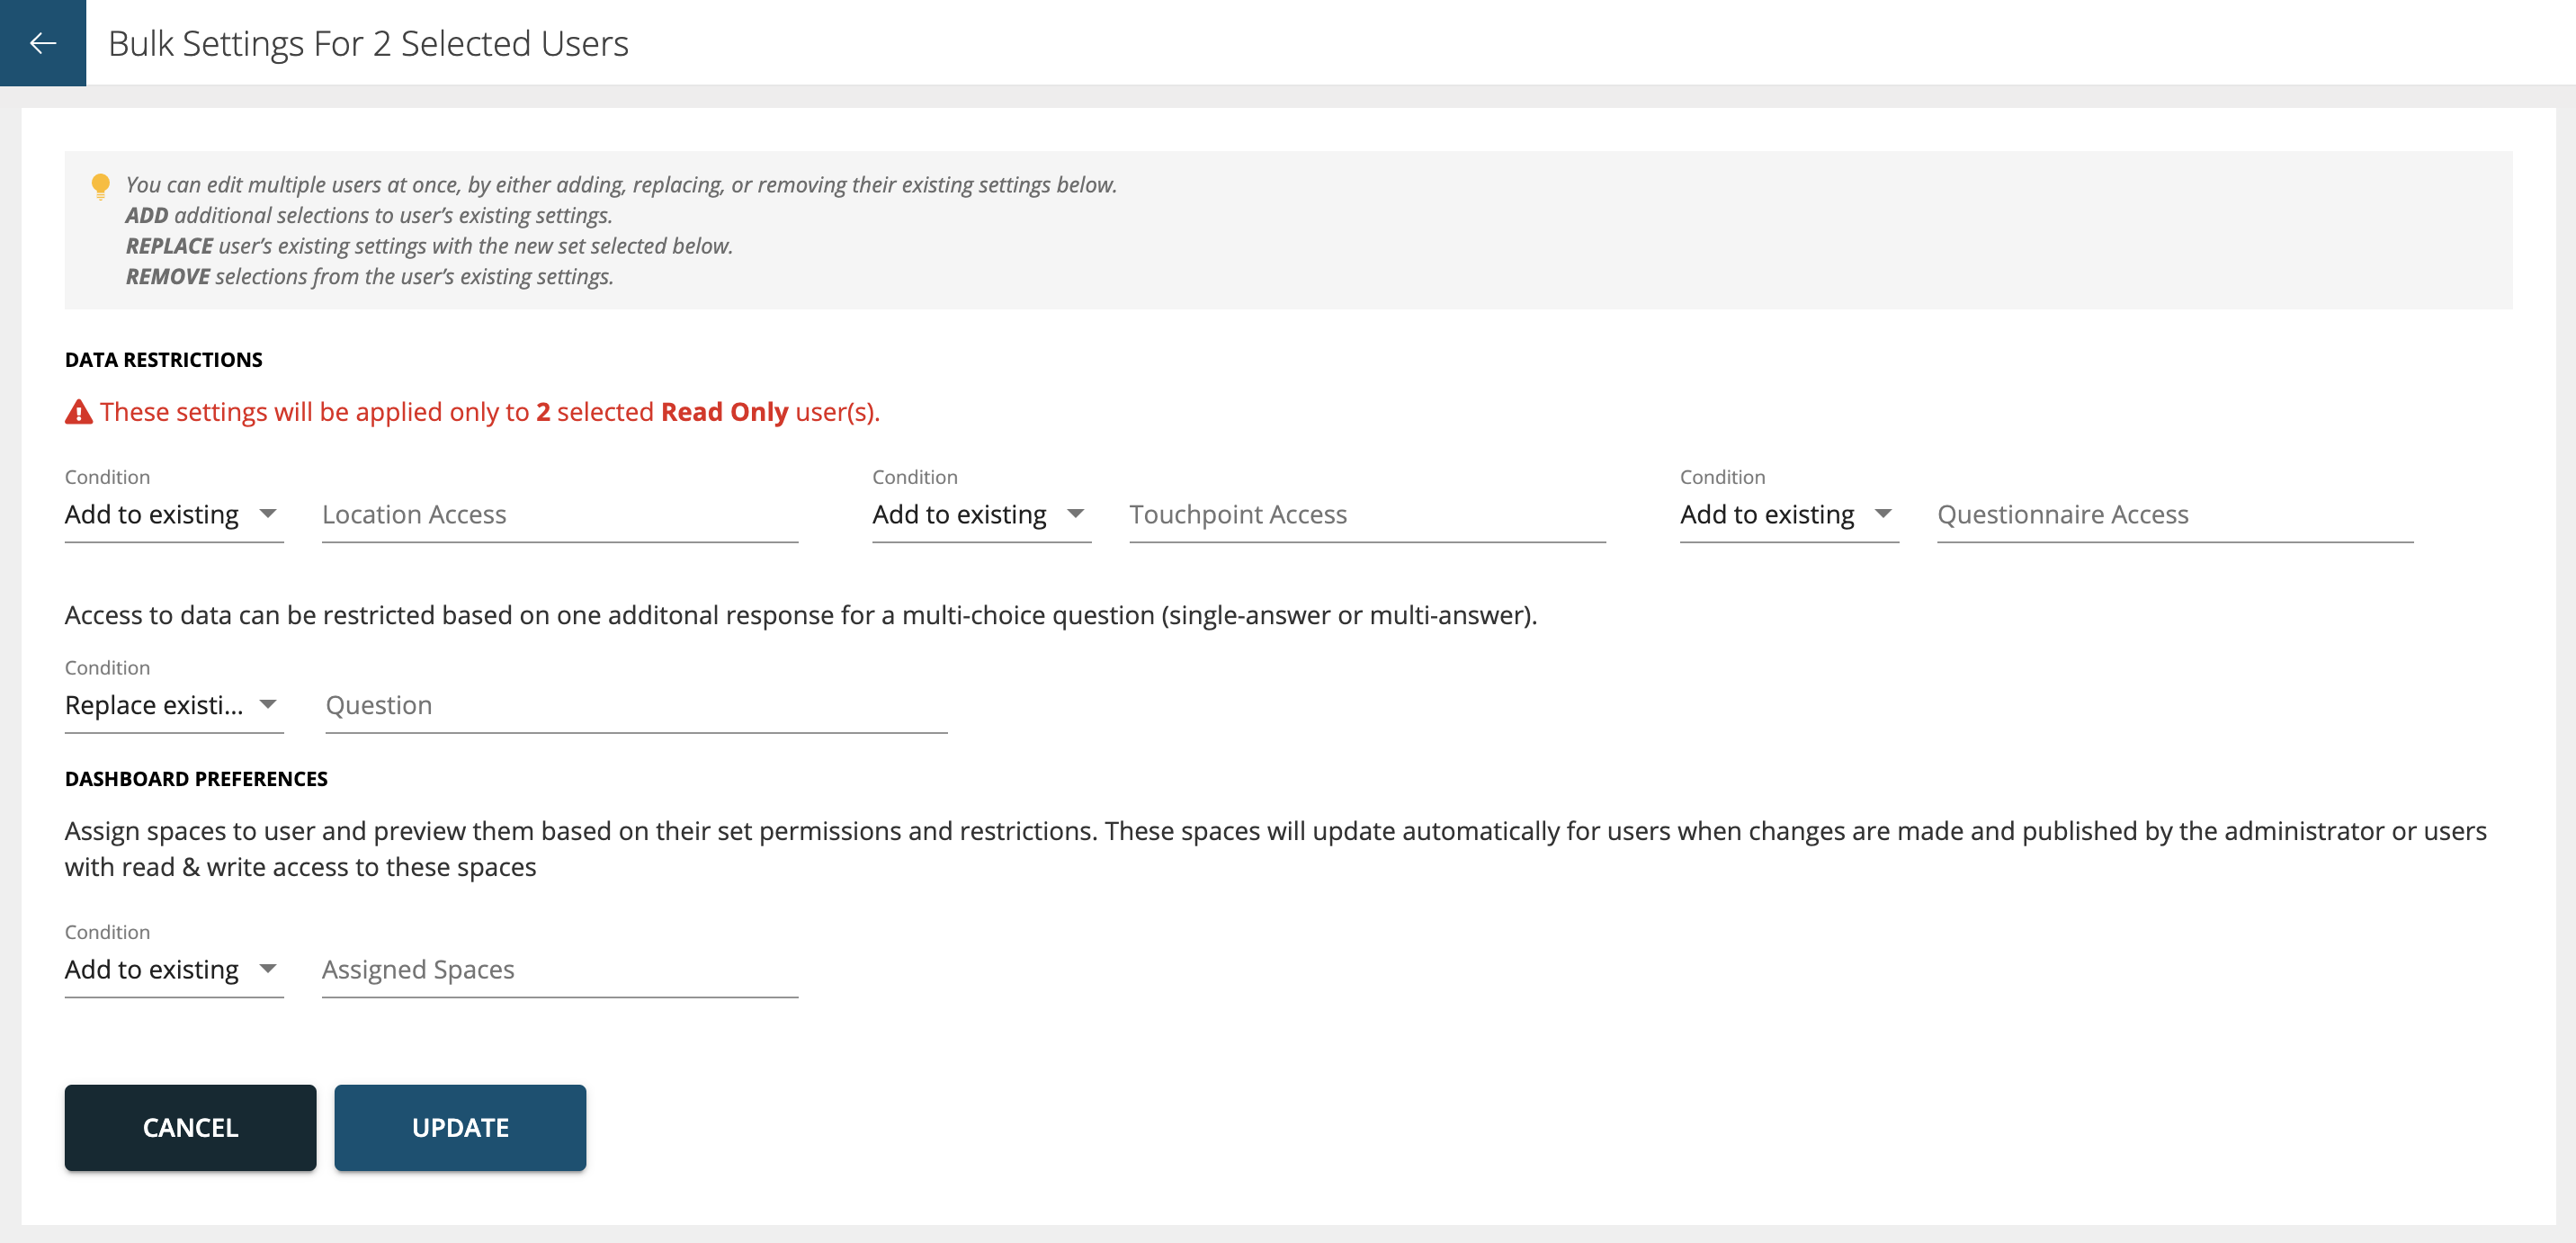
-
Questionnaires: You can edit questionnaire settings for multiple users at once, by either adding, replacing, or removing the questionnaires from the drop-down list.
-
Questions: You can edit questions settings for multiple users at once, by either adding, replacing, or removing the questions from the drop-down list.
-
Spaces: You can edit dashboard space settings for multiple users at once, by either adding, replacing, or removing the spaces from the drop-down list.
Once all the settings are done press UPDATE button as shown above. Then press Continue.
Once all the settings are updated successfully the system will prompt the below message.
User Management Report
You can download the User Management Report with complete user(s) details in an excel by clicking on the cloud icon on the top as shown below from the main user management screen.